
Divi 5 represents a rewrite of the Divi page builder by Elegant Themes. It abandons the short code-based rendering model that powered Divi 4, replacing it with a modern JSON-based architecture.
Divi 5 stores structured JSON data, while Divi 4 stores page layouts as WordPress shortcode strings embedded in post content.
For designers and agencies who have built their workflows around Divi 4, the transition path is straightforward for most simple sites, and Divi 5 supports a one-click upgrade for existing Divi 4 sites, and legacy modules continue to render correctly after migration. However, staging + backups are highly recommended.
What the Theme Builder Actually Does (and What It Doesn’t)
WordPress handles site structure in two different ways depending on your theme. With a classic (PHP-based) theme, the header and footer live in the theme’s template files, the blog post layout is set by a template you can’t change without code, and WooCommerce renders product pages through its own output. With a block theme, WordPress Full Site Editing lets you edit headers, footers, templates, and global styles visually in the Site Editor, no code required.
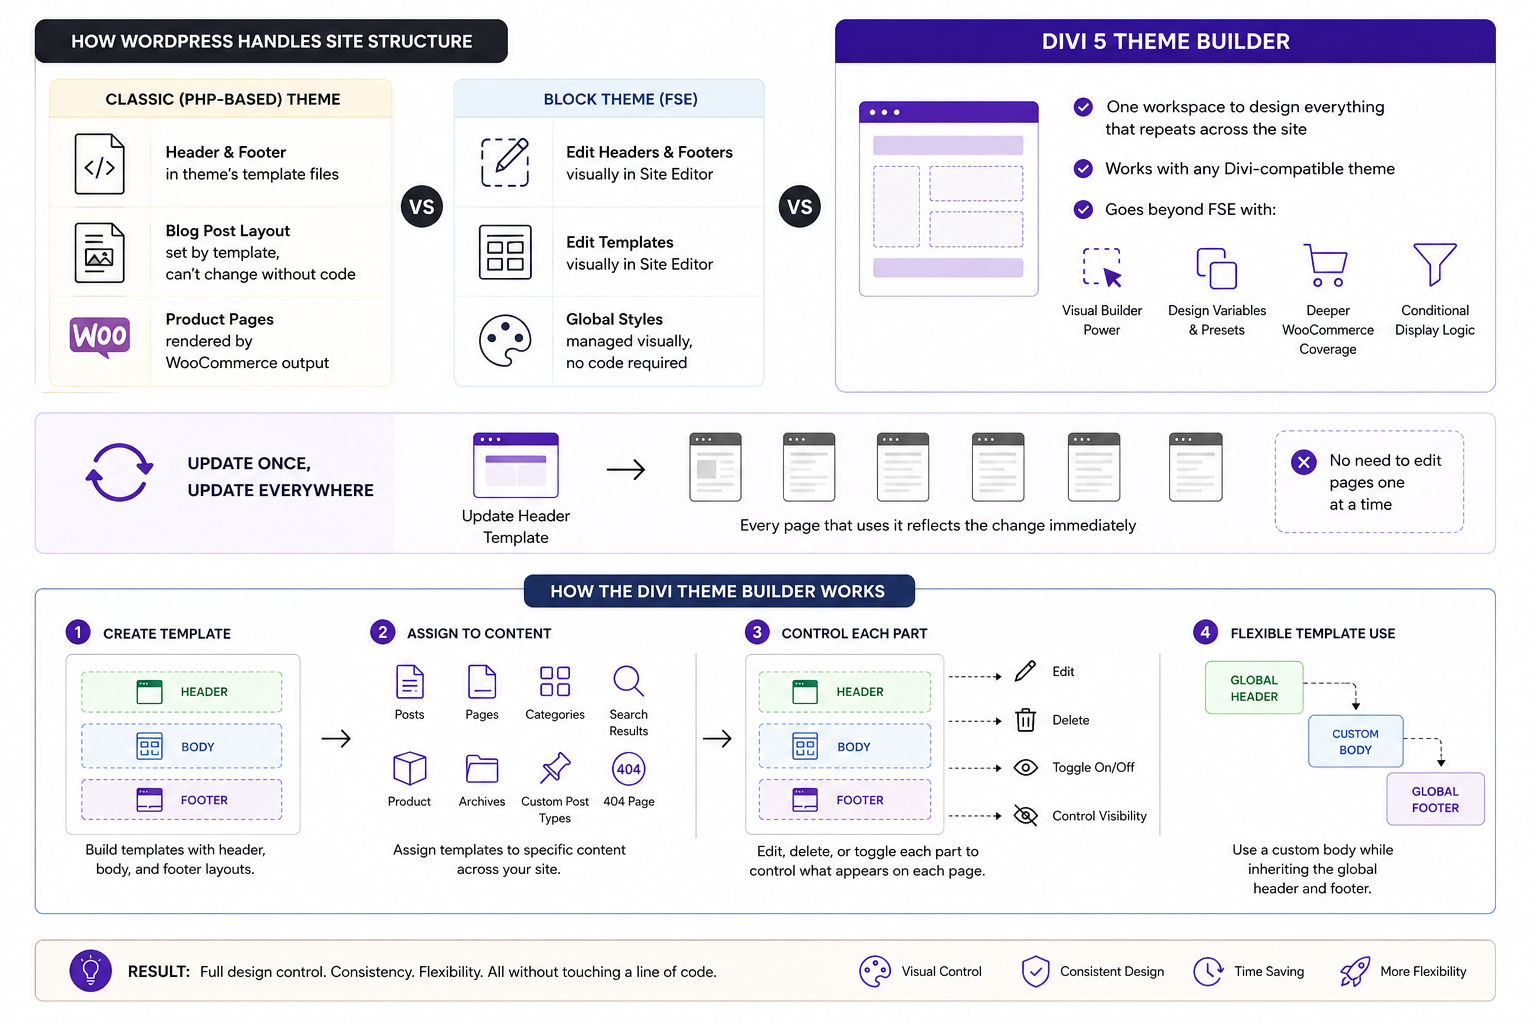
The Divi 5 Theme Builder gives you one workspace to design everything that repeats across the site: headers, footers, blog post layouts, archive pages, WooCommerce product pages, custom post type templates, search results pages, and 404 error pages. Where it goes beyond native Full Site Editing is the visual builder itself, the design variables and presets system that keeps styling consistent, deeper WooCommerce module coverage, and conditional display logic. It also works with any Divi-compatible theme rather than requiring a specific block theme.
When you update the header template, every page that uses it reflects the change immediately, without editing pages one at a time.
The Theme Builder is an interface in Divi that lets you create templates with header, body, and footer layouts, then assign them to specific content: posts, pages, product categories, and search results. Each part can be edited, deleted, or toggled for visibility to control what appears on the pages the template is assigned to.
A template can also use a custom body while inheriting the global header and footer.
What the Divi 5 Theme Builder Doesn’t Do
The Divi 5 Theme Builder only controls the structural shell that wraps your content; the content itself still lives on the individual pages, posts, and products.
Even so, text, image insertion, and section customisation within individual pages remain your responsibility. It doesn’t control every element of your site’s appearance in isolation, e.g., typography, color schemes, and spacing; you can manage them through Divi’s design variables and theme customizer.
The theme builder references those values. You still get to decide how it should look.
The Template Hierarchy
1. The Base Features the Default Website Template
Any page that is not explicitly claimed by a more specific template will be rendered using the default template. The global header and footer are also found here. It is the foundation of all other templates.
2. The Custom Templates
These are specific to different content types or locations. When templates overlap, Divi uses a priority system so more specific templates override more general ones. Pages will use the template assigned to them, whether that is a content type template, a category template, or an individual page template.
What’s New in Divi 5 vs Divi 4
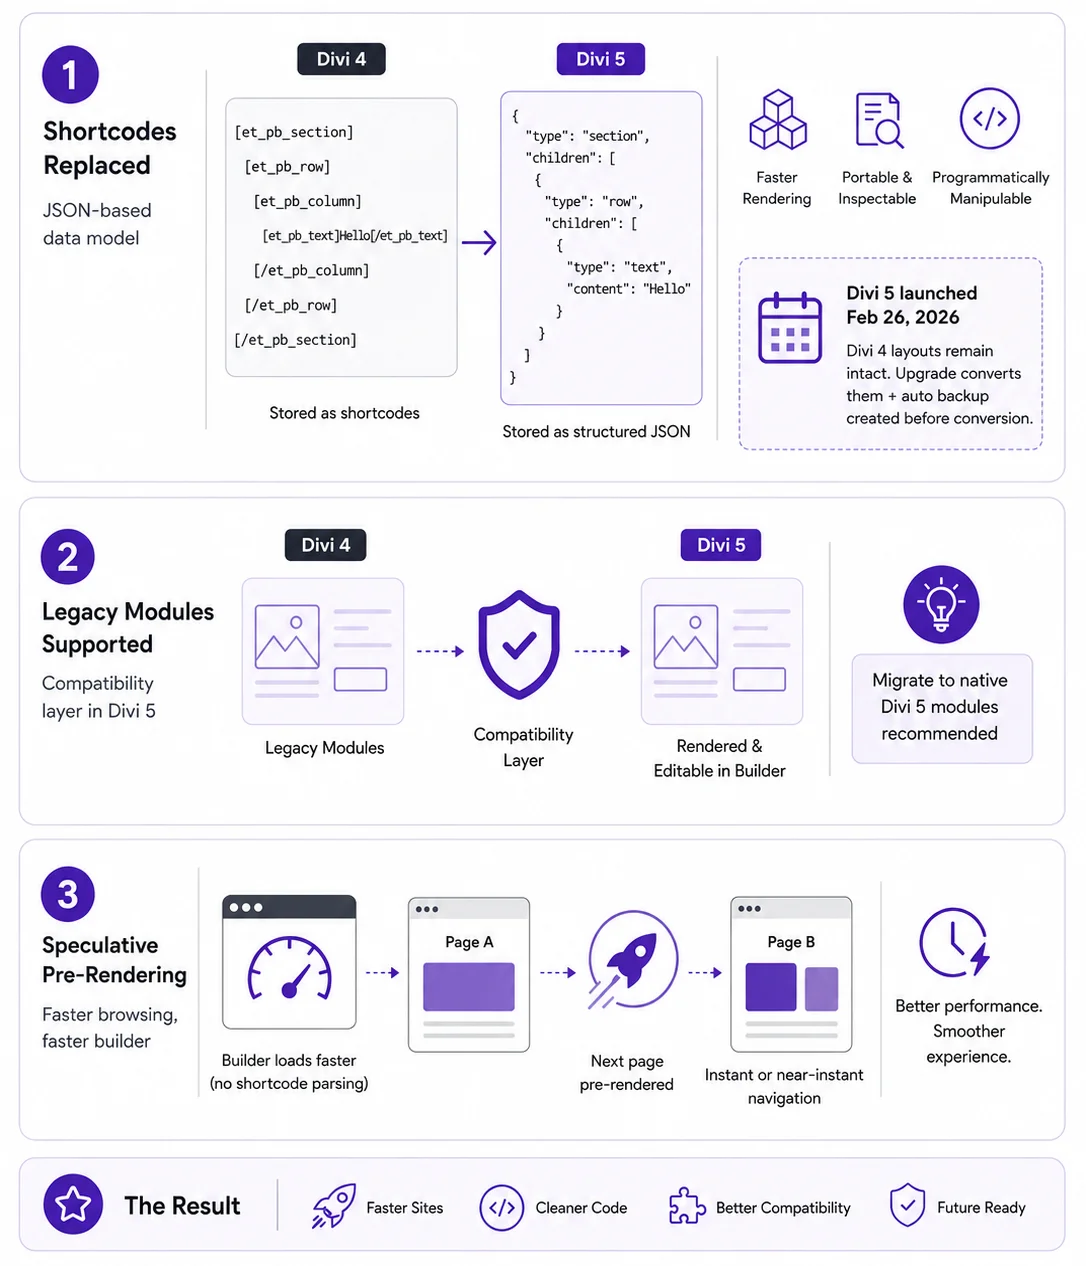
i. Replacement of WordPress Shortcodes With a JSON-Based Data Model
Divi 5 stores the equivalent layout as structured JSON objects with type properties, which the renderer reads directly, eliminating shortcode parsing at runtime, making the layout portable, inspectable, and programmatically manipulable.
Divi 5 launched on Feb 26, 2026; however, the Divi 4 layouts remain intact, and the upgrade process converts them to a new format. A backup is created automatically before conversion, so rolling back is possible.
ii. Legacy Modules From Divi 4 Are Supported in Divi 5 Through a Compatibility Layer
They are rendered on the front end and can be edited in the builder.
However, migrating legacy modules to their Divi 5 native equivalents is highly recommended.
iii. Divi 5 Also Introduces Speculative Pre-Rendering
A technique that begins loading the next likely page before the user navigates to it. The builder itself also loads faster because it no longer needs to parse shortcodes to reconstruct the visual layout.
Navigating the New Builder Interface
a. Replacement of the Modal Dialog System With a Persistent Right Sidebar
Previously in Divi 4, clicking an element opened a dialog box that overlaid the canvas, hiding the element you were editing.
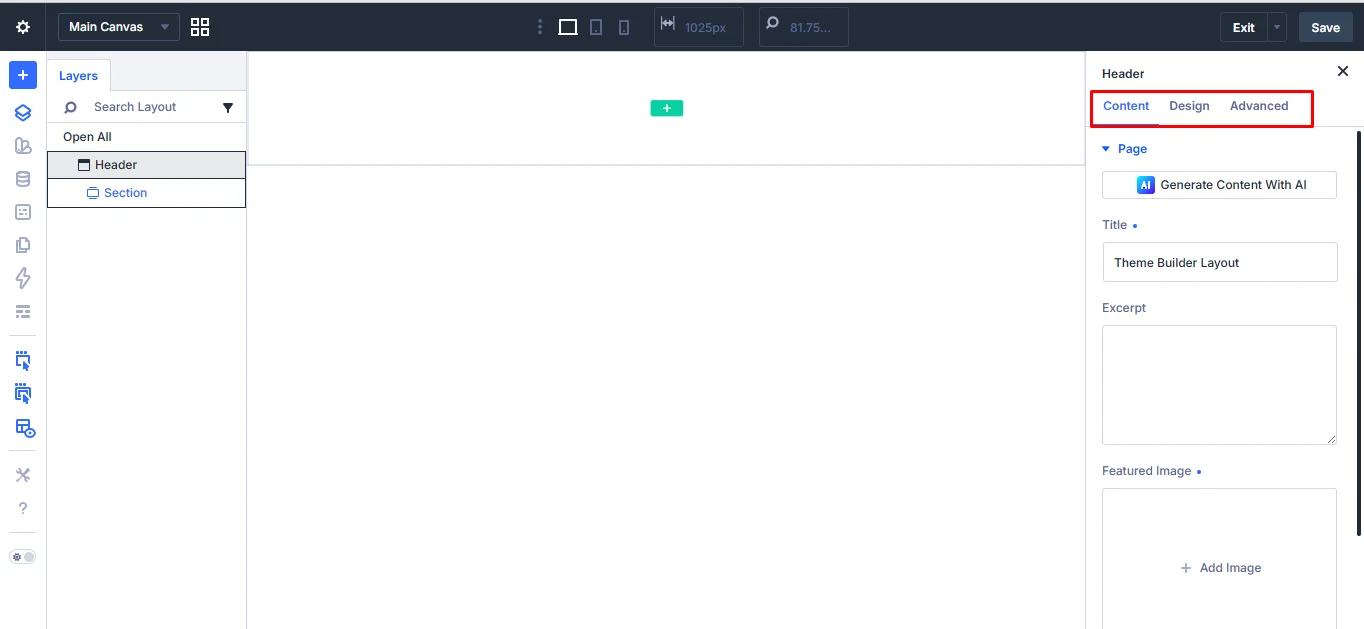
As for Divi 5, the sidebar keeps the content, design, and advanced settings permanently visible in a fixed panel on the right. The element remains fully visible.
b. Layer View, Wireframe, and Breadcrumbs
With the layer view on the left sidebar, you get to see the entire page structure as a hierarchical tree. The hierarchical tree shows every component in the layout.
With the wireframe view, it strips all visual styling from the canvas and presents your layout as labeled boxes, making it easier to understand the structural hierarchy without the distraction of colors, fonts, and images. Additional sections can be added from within the wireframe view.
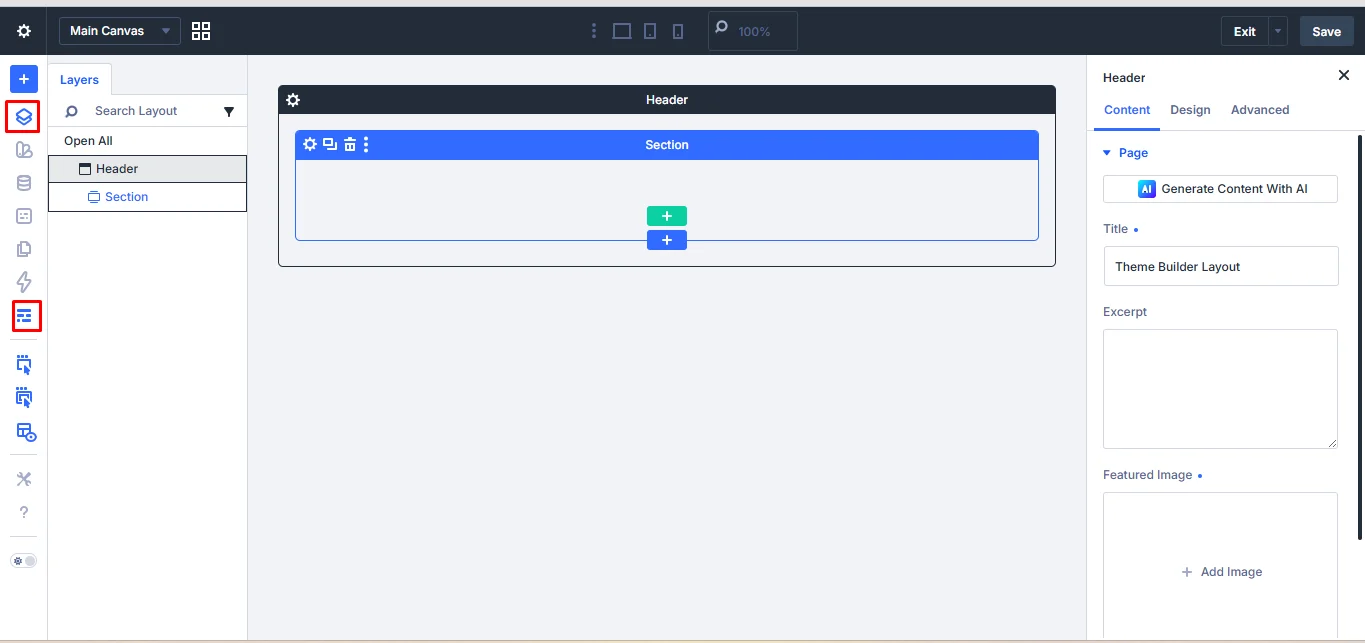
The breadcrumbs appear at the top of the sidebar panel and show your current position in the nesting hierarchy.
c. Builder Bar Tools
The theme builder bar runs along the top of the visual builder and provides quick access to key tools. By clicking the design variable icon, create, edit, and organize from the Variable Manager.
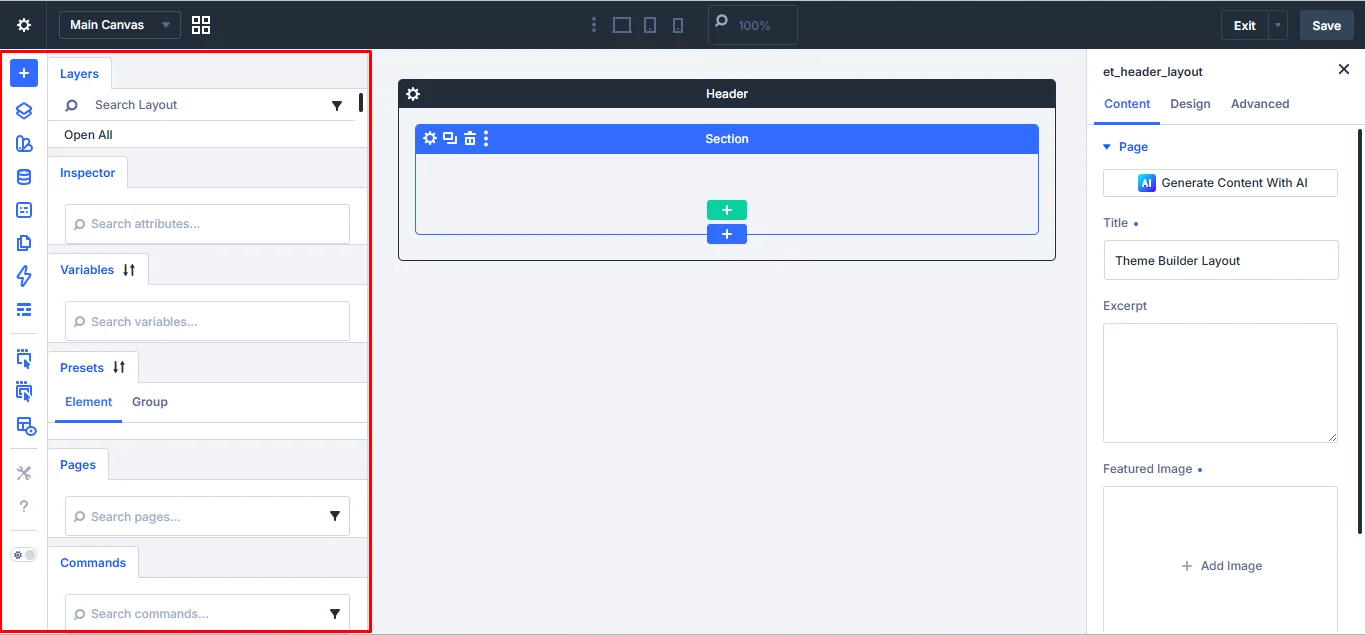
d. Right Side Bar Settings Panel
The right sidebar panel features different options such as content, design, and advanced.
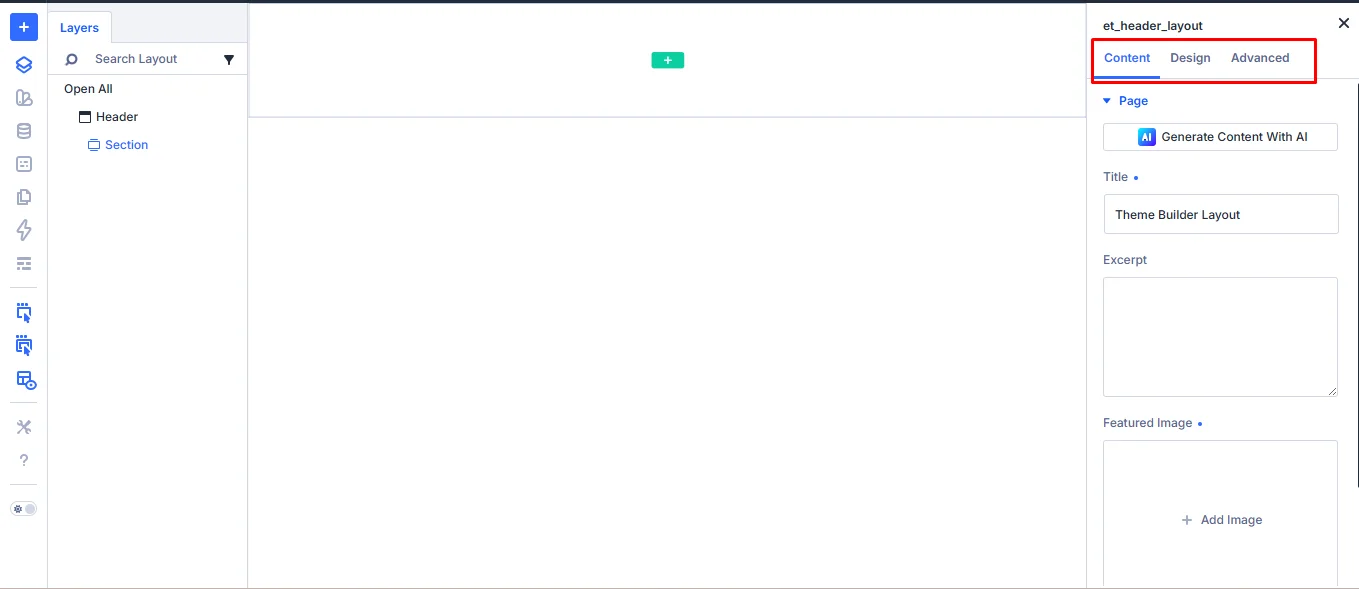
- Content: It allows you to add the title, excerpt, featured image, and background color.
- Design: You can modify the spacing, typography, colors, and borders.
- Advanced: You can modify the custom CSS, positioning, visibility, and HTML attributes.
However, the available options are determined by the block or content you currently have on display.
Why the Design System Comes Before the Templates
It is very tempting to jump straight to building the header and footer templates when starting a new Divi project. However, building templates before establishing your design systems is a workflow antipattern that creates significant rework later.
For instance, each design decision you hard-code directly into a template, e.g., font size, hex color, and spacing value, becomes a future liability since, in the future, when an adjustment is needed, you will need to make the same change repeatedly on the different templates.
Design variables are Divi 5’s solution to this problem. They are named reusable values that modules, presets, and templates can reference. For instance, define your brand color as a design variable and reference it across your header, footer, button presets, and section backgrounds; changing the color in one place updates every instance across the entire site simultaneously.
Follow the Format
Design variables, option group presets, element presets, then templates.
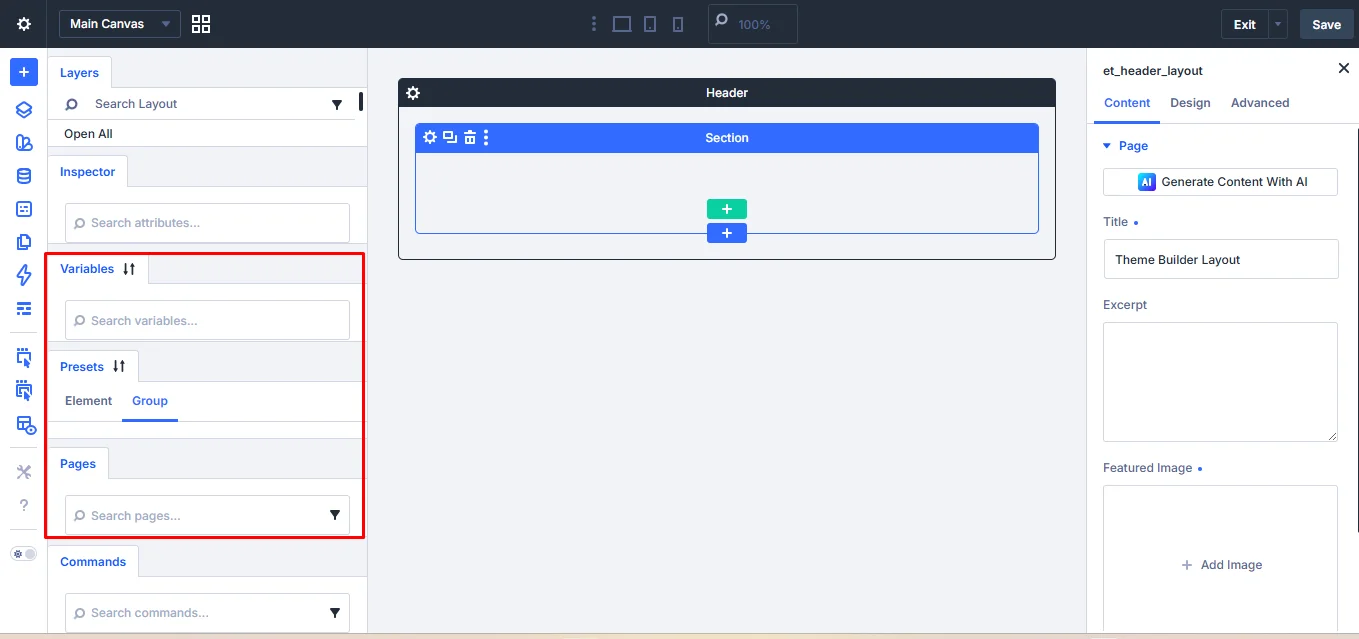
a. Setting Up the Design Variables
There are 6 variable types: Colors, fonts, numbers, links, images, and text strings.
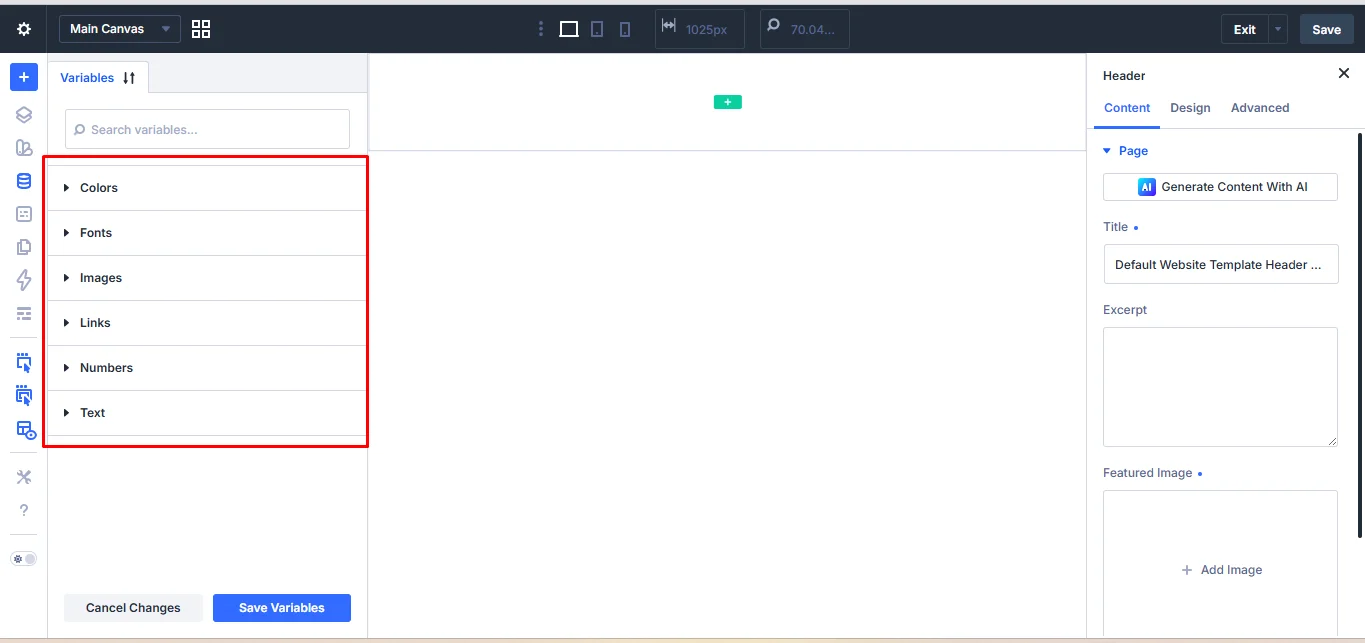
In addition, there is the variable generator built into the design variable manager that allows the creation of complete variable sets. For instance, it accepts a base brand color and spacing scale. Using the variable generator at the start of each project ensures you have a complete, coherent design before you touch any single module settings.
b. Building Option Group and Element Presets
Presets can be understood as saved collections of settings that can be applied to modules of the same type. For instance, option group presets save the settings of a specific section of a module, e.g., just the border or shadow settings for a button.
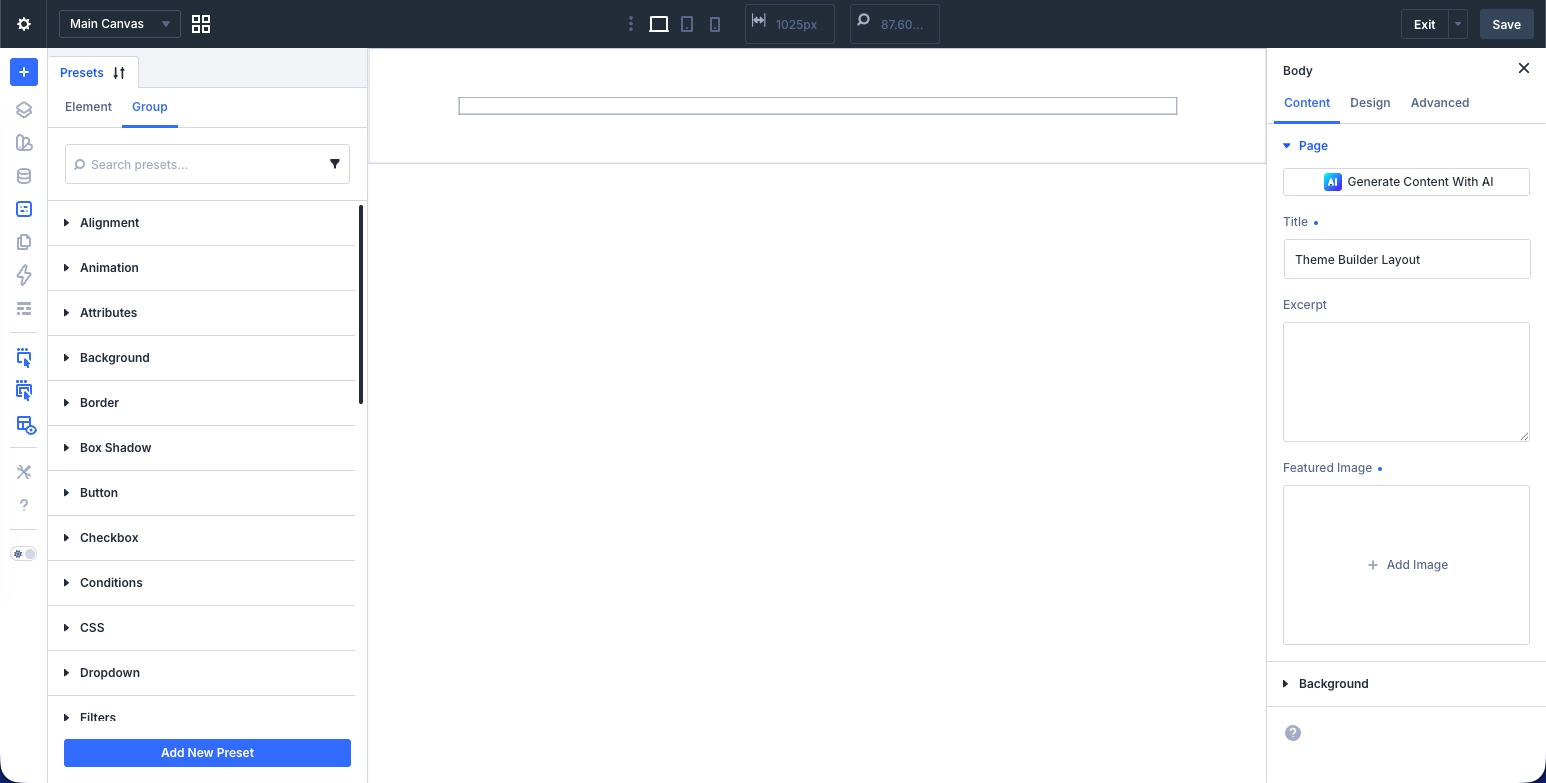
However, the element presets are different since it saves a complete module configuration. Presets are just style packages that apply to modules of a particular type.
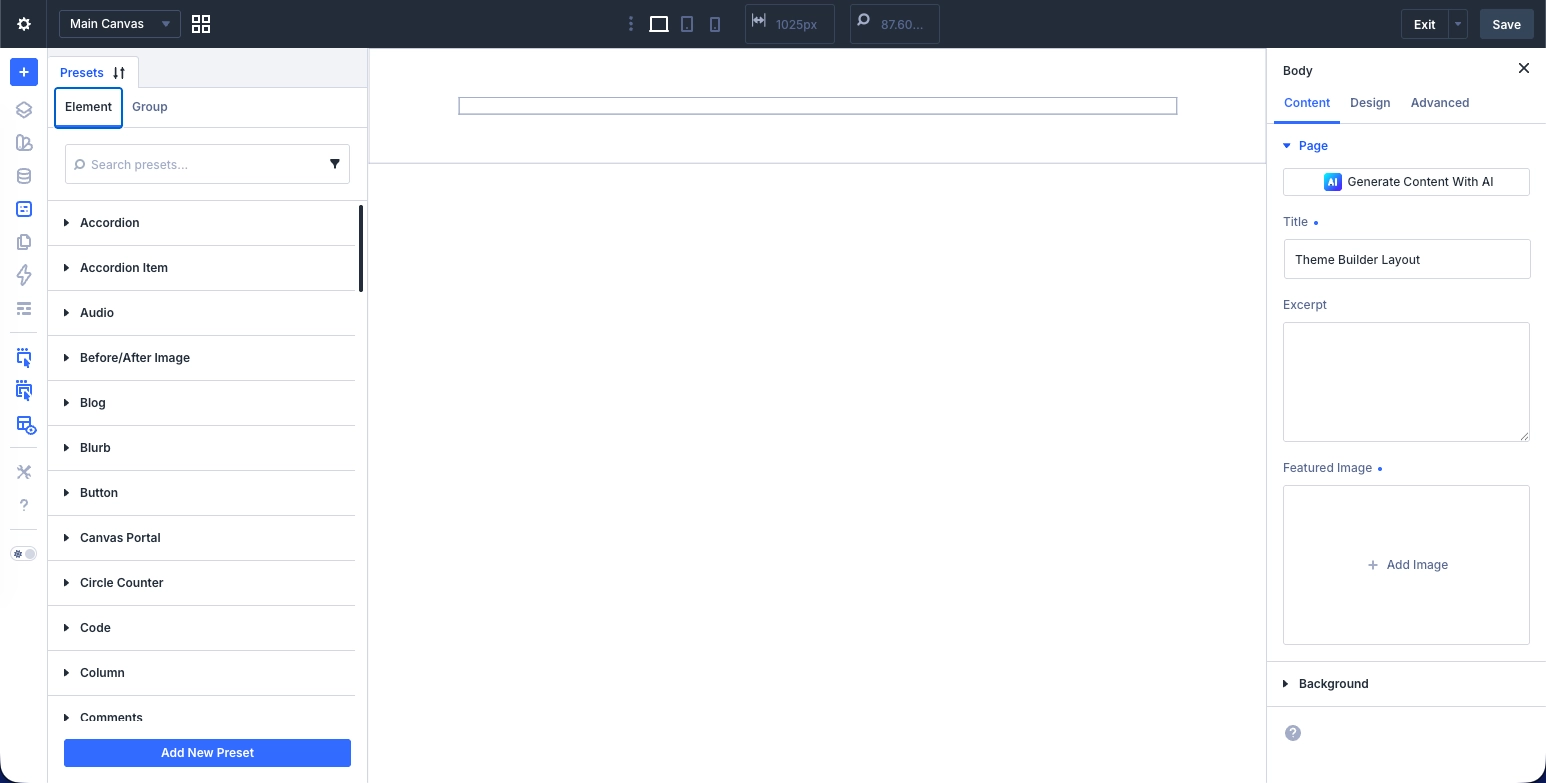
Divi 5 allows multiple option group presets to be applied to the same module simultaneously, stacking their settings; therefore, it becomes easier to even create a heading typography preset that you can use that handles the font family, size, and weight, so whenever you want to use that setting, you just choose it. The same applies to spacing and color presets.
Presets reference design variables directly, so any change made updates every module instance that uses it, without revisiting each template.
Name presets descriptively so you can locate them quickly: use labels like “button-border,” “heading-lg,” or “section-dark-bg.”
Understand the Theme Builder
Access WordPress, click Divi on the main sidebar, then click Theme Builder.
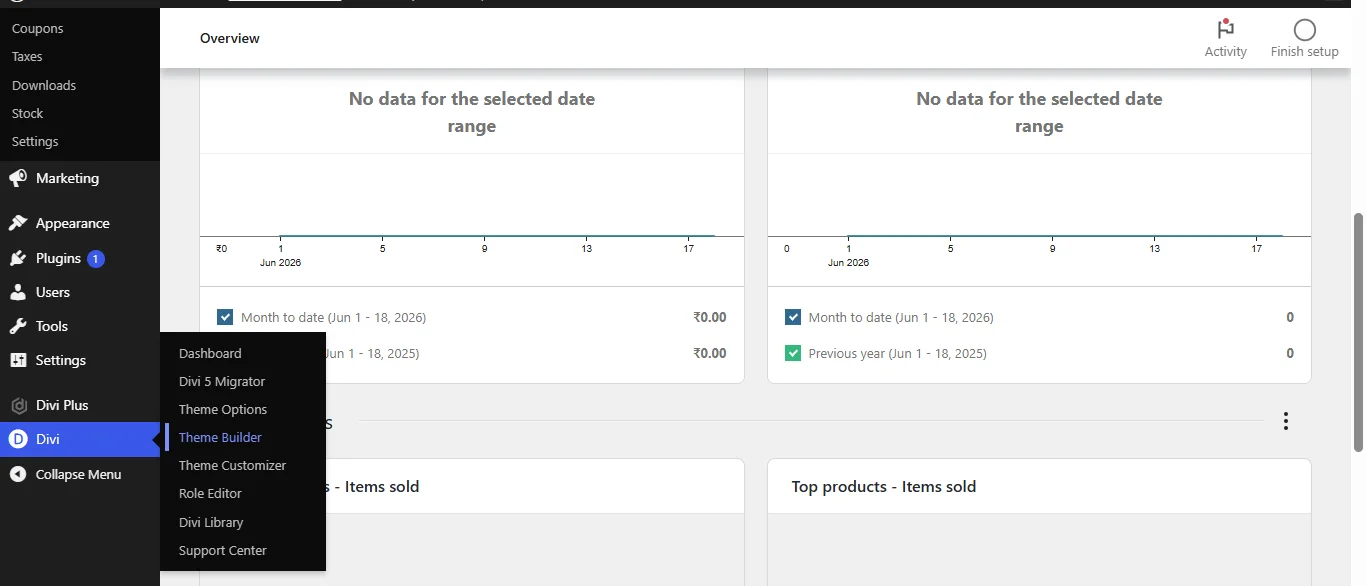
The theme builder is your central command for all global layout templates. It manages layout structures that apply to different categories of content simultaneously. It features three building blocks.
- Header layout: site logo, navigation, top-level call to action
- Body layout: main content area
- Footer layout: links, contact info, copyright notices, secondary navigation
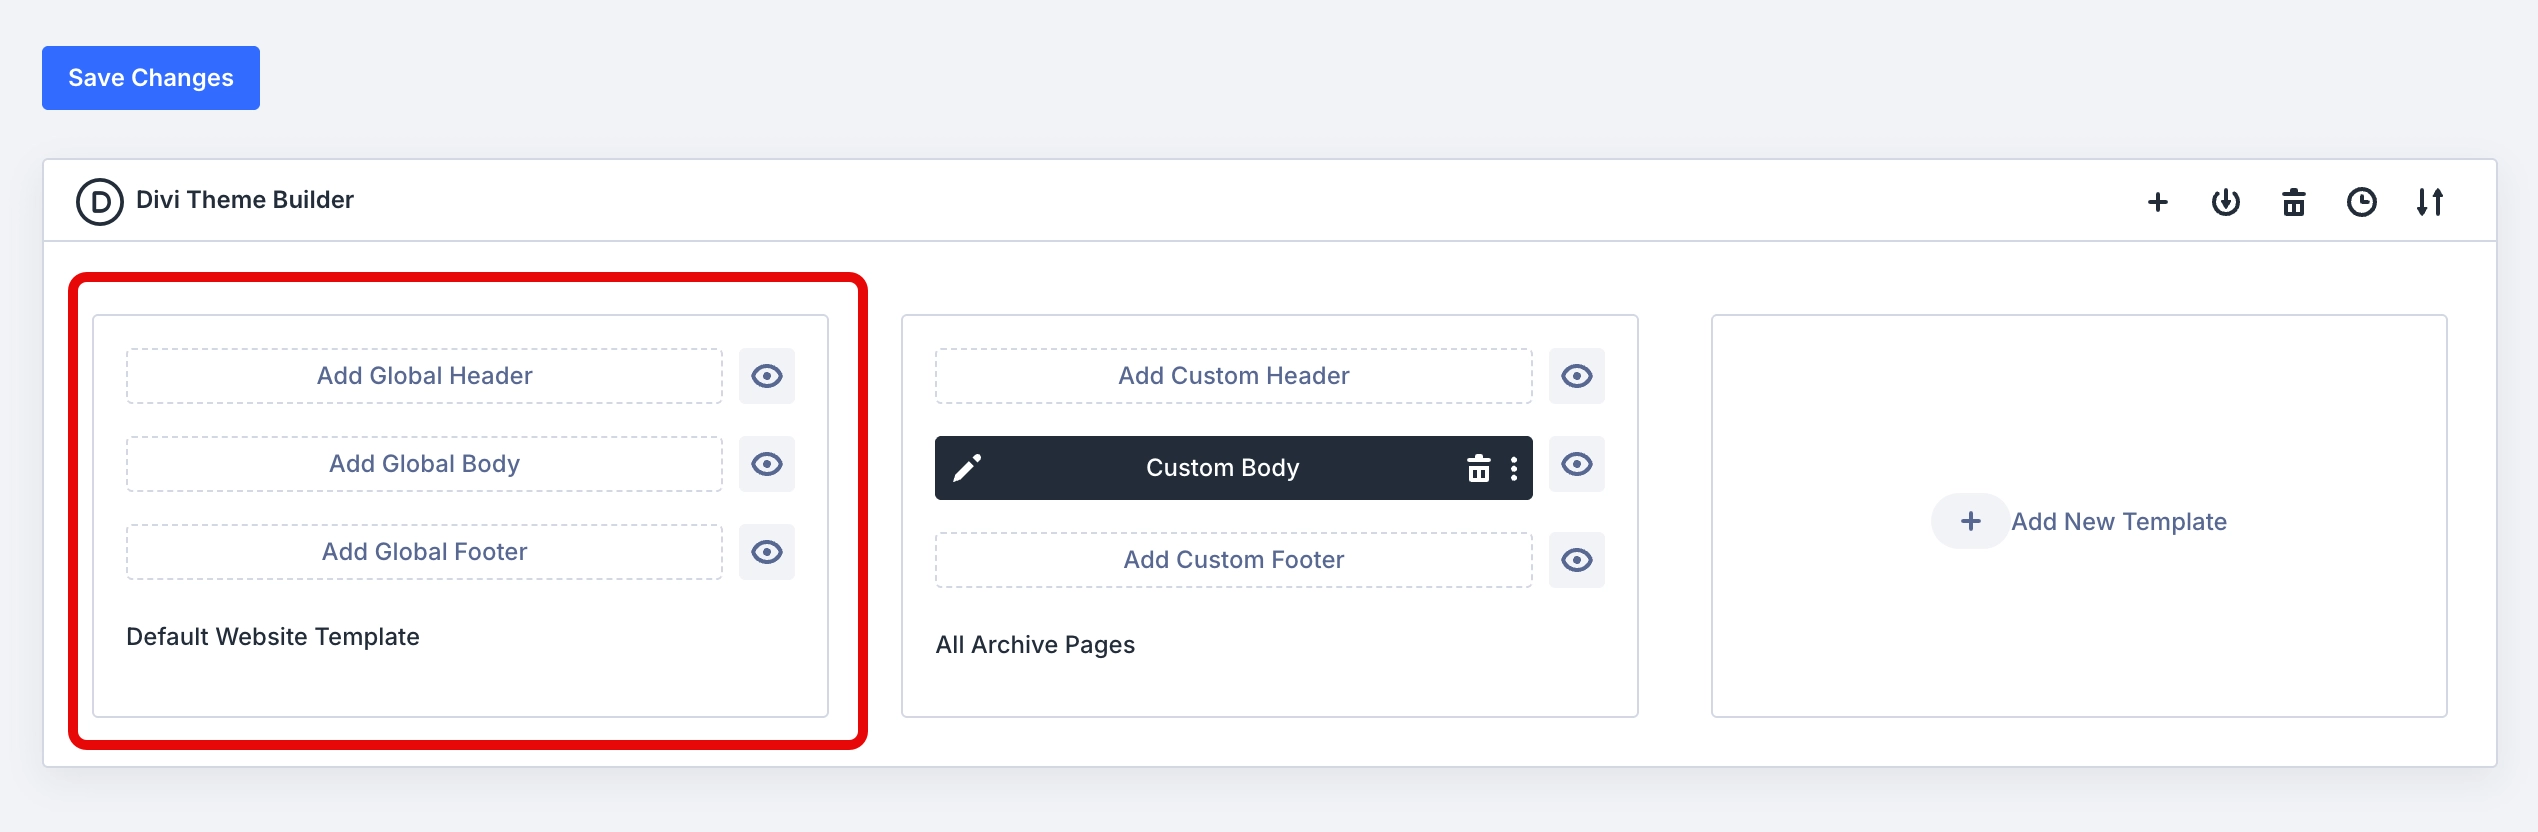
The default website template is the fallback that applies to all pages and posts that don’t match any specific template. Make your default template well-designed, since it applies to every page that no custom template claims. It also defines the global header and footer that appear on most of the site.
Template Assignment and Conditions
Template assignment is the process of connecting a template to specific content. It supports conditions that match individual pages, content types, and taxonomies.
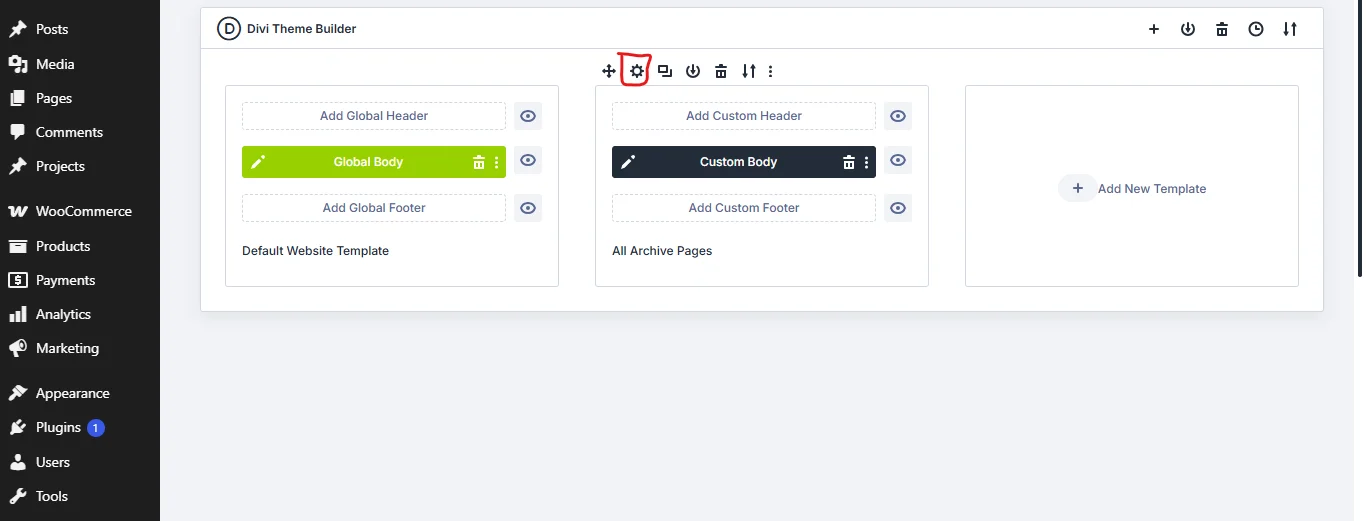
To set assignments, access WordPress > Divi > Theme Builder > hover over the custom template > click the settings option > make the assignments.
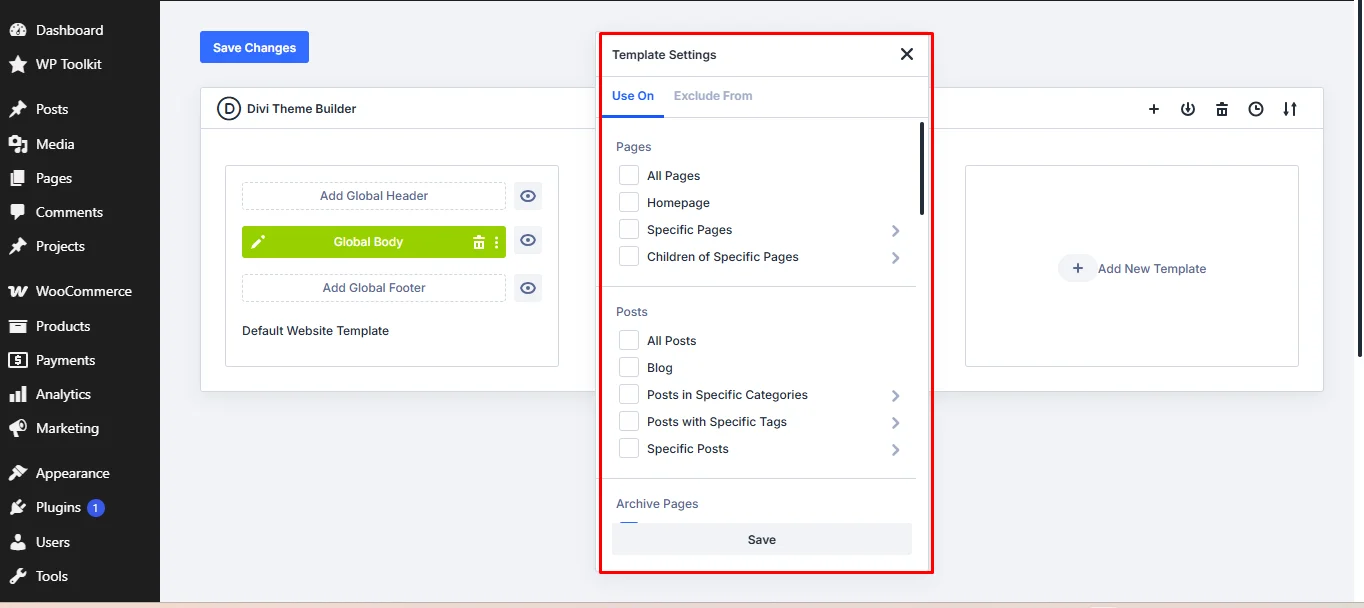
The assignment options include:
- All posts
- Specific pages selected individually by name or ID
- Custom post type archives
- Archive pages; author archives
- Special pages
- WooCommerce pages: shop, cart, checkout, and My Account
- Products: all products and products by tag
- All projects
- Search results
- 404 page
When multiple templates could apply to the same page, e.g., the default template and other special templates, Divi 5 uses a priority system to determine which template wins. Specific assignments take priority over general ones. Let’s say a template assigned to a specific post by ID overrides the template assigned to all posts of that type, which then overrides the default website template. Therefore, if you need the page to be unique, it will be.
When building complex sites, document your template assignment priorities explicitly.
Editable Theme Builder Areas
One of the most significant workflow improvements in Divi 5 is the ability to edit active theme builder areas directly from the front end of any page.
You won’t have to navigate to Divi > Theme Builder, global header/global footer to make changes, but you can do it on the front end and see the changes in real time.
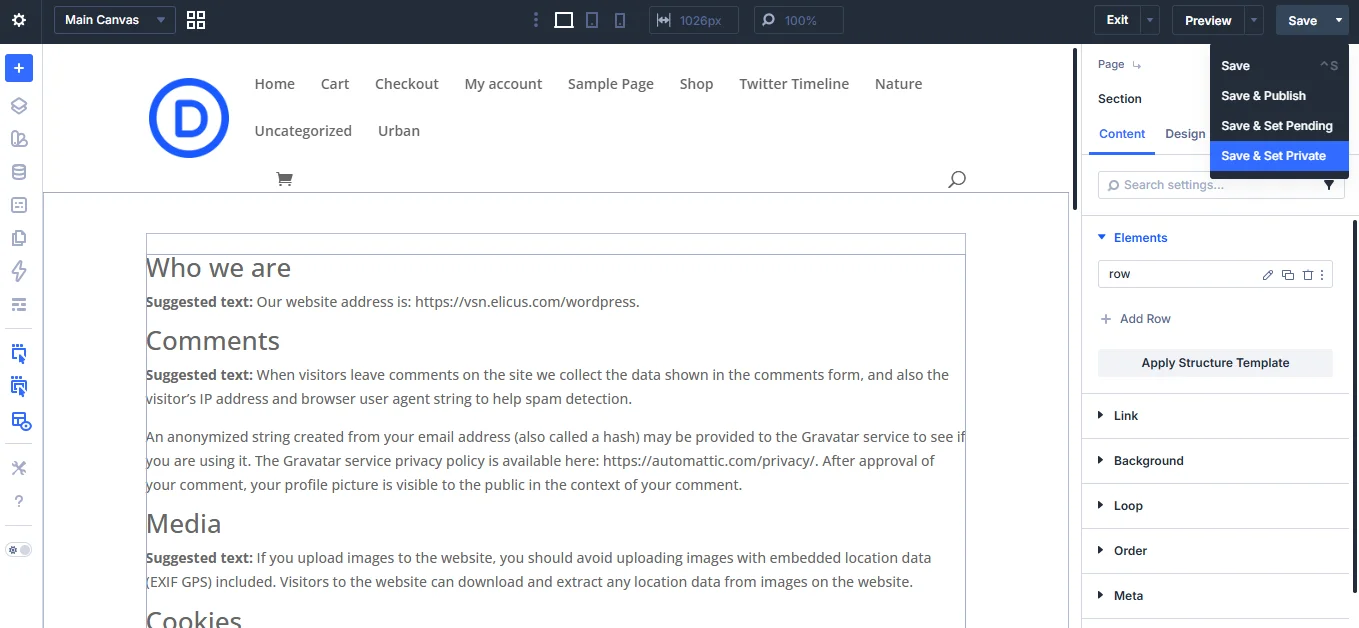
While editing any page in the visual builder, the active header and footer templates are rendered on the canvas. You can click into the header area and edit it directly, then return to the page body and edit within the same editing session. Changes to the global header are saved as changes to the header template, not to the individual page only.
Divi Role Editor
The Divi role editor allows you to restrict access to specific theme builder features based on WordPress user roles. This is important to prevent accidental modification of various template parts and protect others.
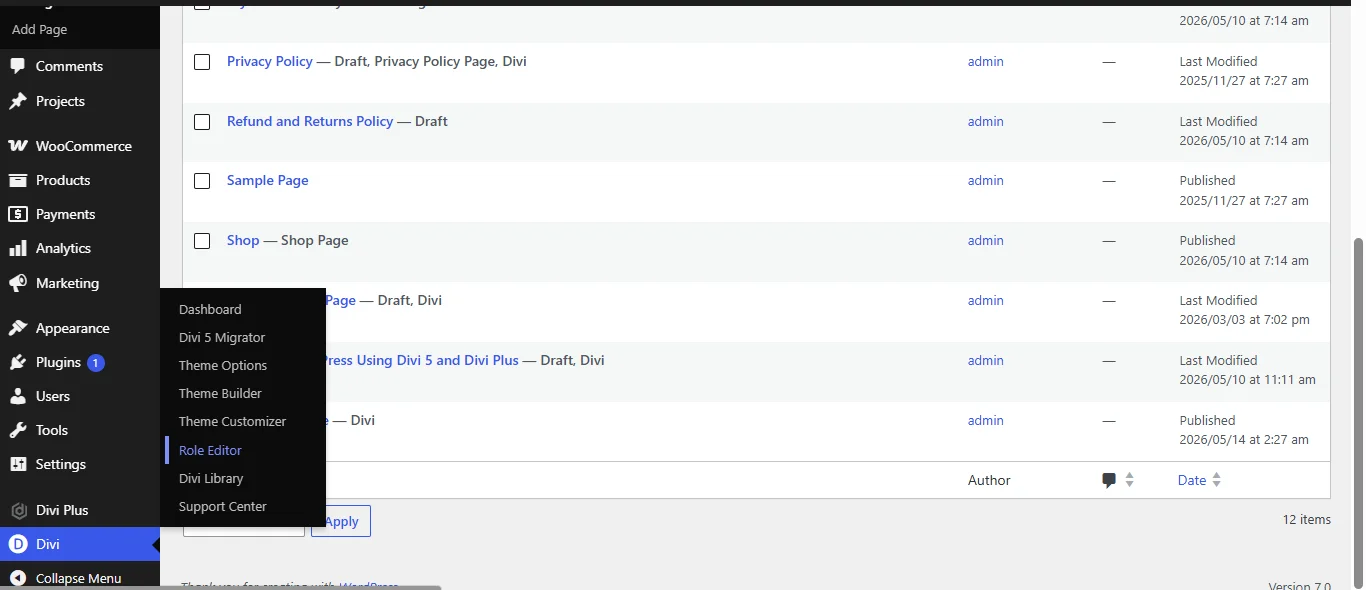
You can assign roles to the administrator, editor, author, contributor, and shop manager. This helps restrict what a certain user can or cannot do.
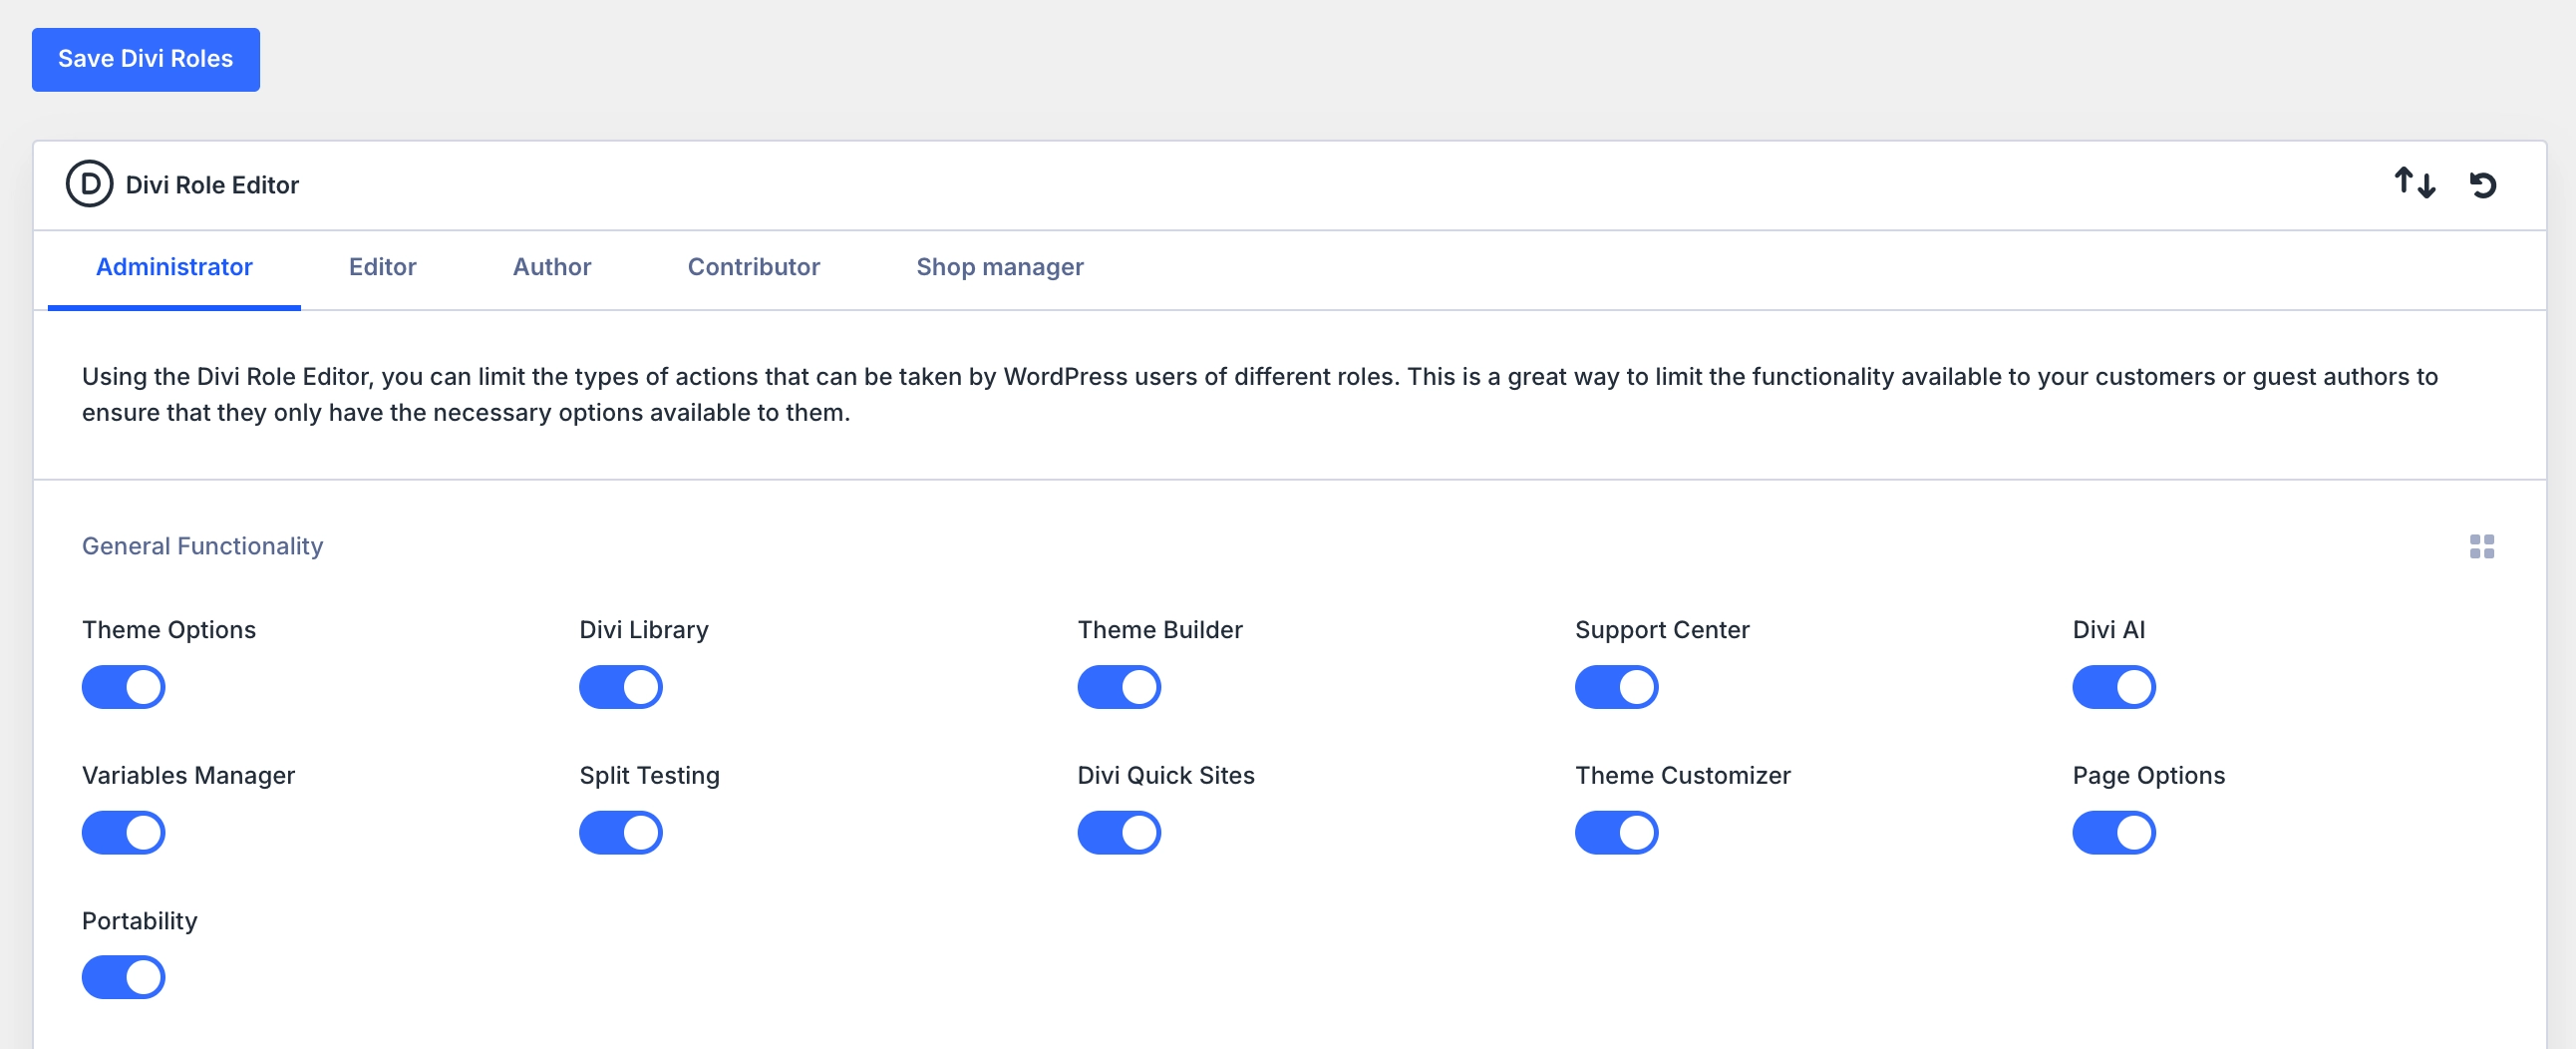
The administrator gets access to changing the general functionalities like theme options, Divi Library, theme builder, support center, Divi AI, variable manager, Divi quick sites, theme customizer, page options, portability, all builder interface options, all library settings, all settings tab, and all module use.
Non-admin roles have access restricted by default.
Editors can typically use the Visual Builder on individual pages and posts but cannot access Theme Builder templates, Design Variables, or Presets.
Authors and contributors are limited to editing their own content and have no access to global layout tools. Shop managers can manage WooCommerce orders and products but are blocked from all builder and theme options unless the role editor explicitly grants access.
Different Template Options
The different template options in the Divi 5 Theme Builder include:
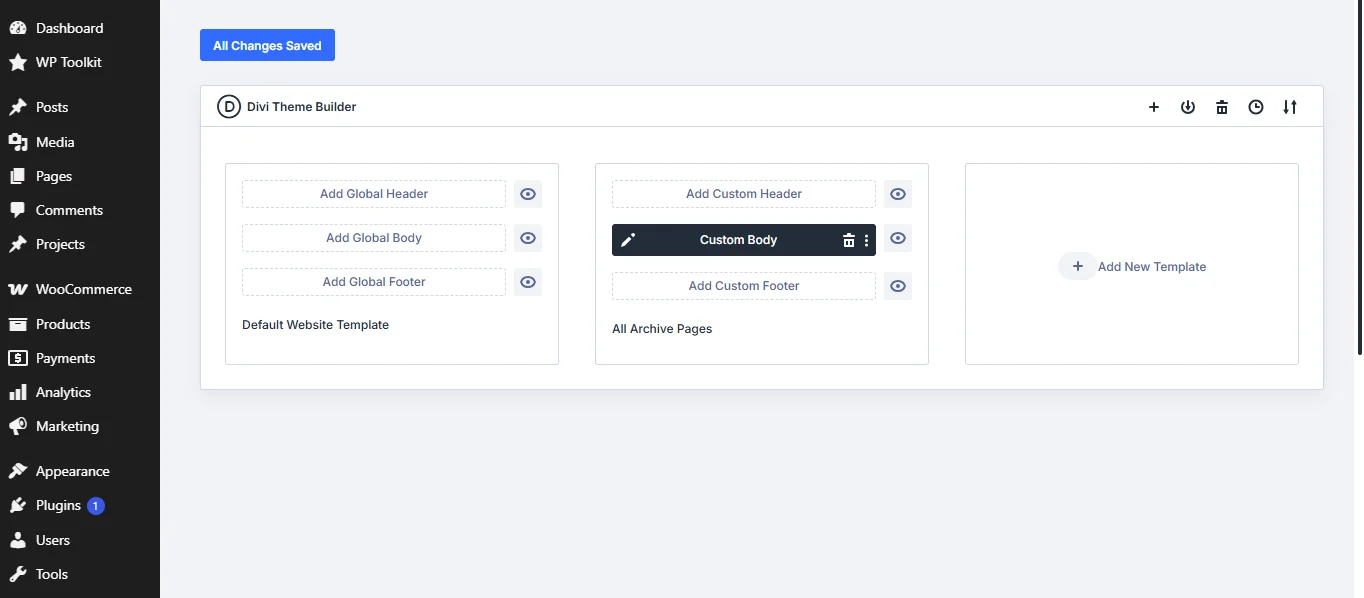
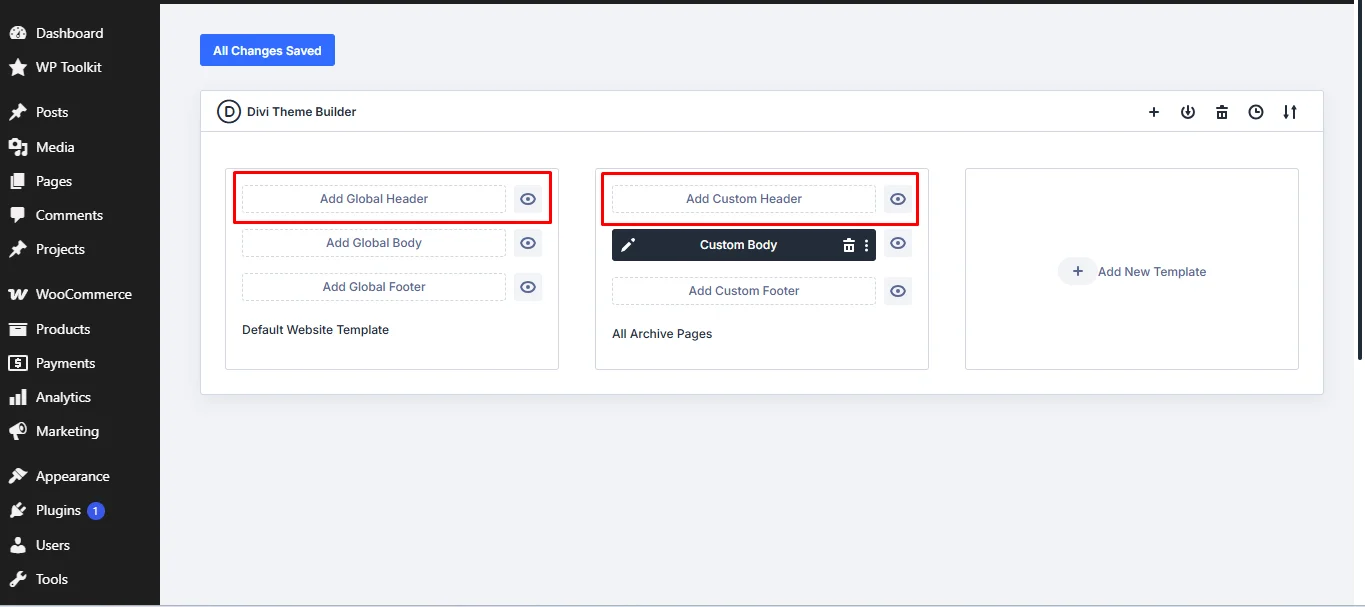
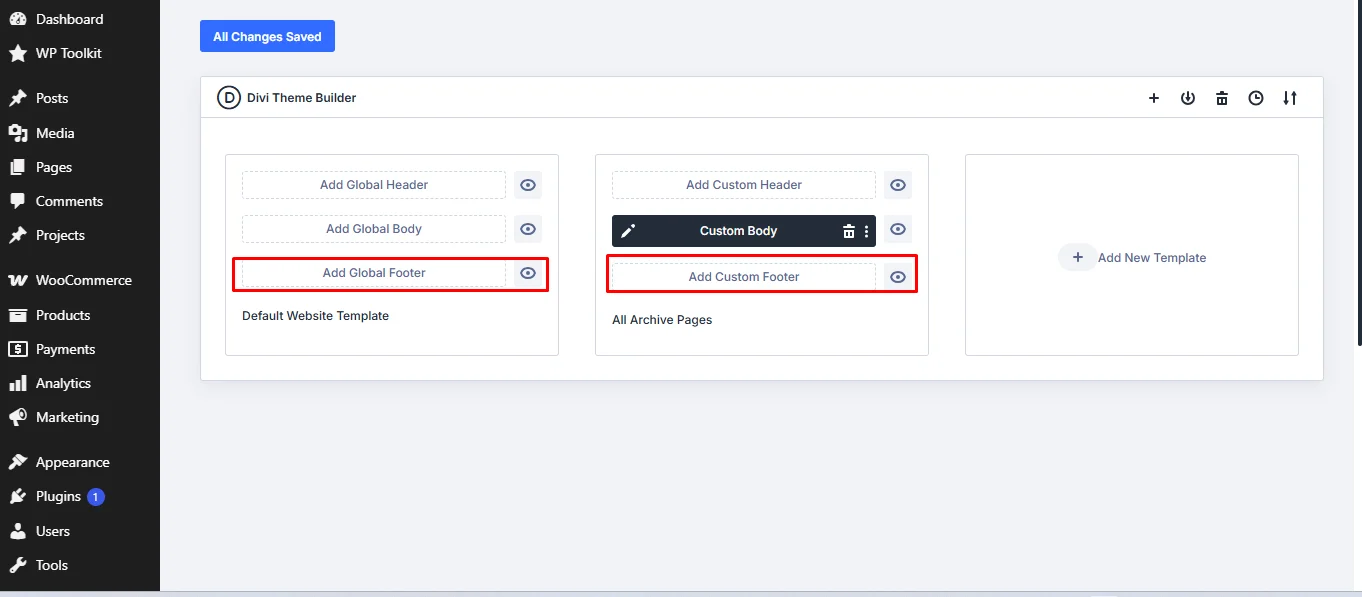
Default Website Template: Where you click Add Global Header, Add Global Body, and Add Global Footer. These layouts apply across the whole site. For this, you can use the existing global layout or load a saved layout from the library.
Custom Templates: Where you click Add Custom Header, Add Custom Body, and Add Custom Footer. When you click any of the three, you get three choices: build a new layout from scratch, use the existing global layout, or load a saved layout from the Divi Library.
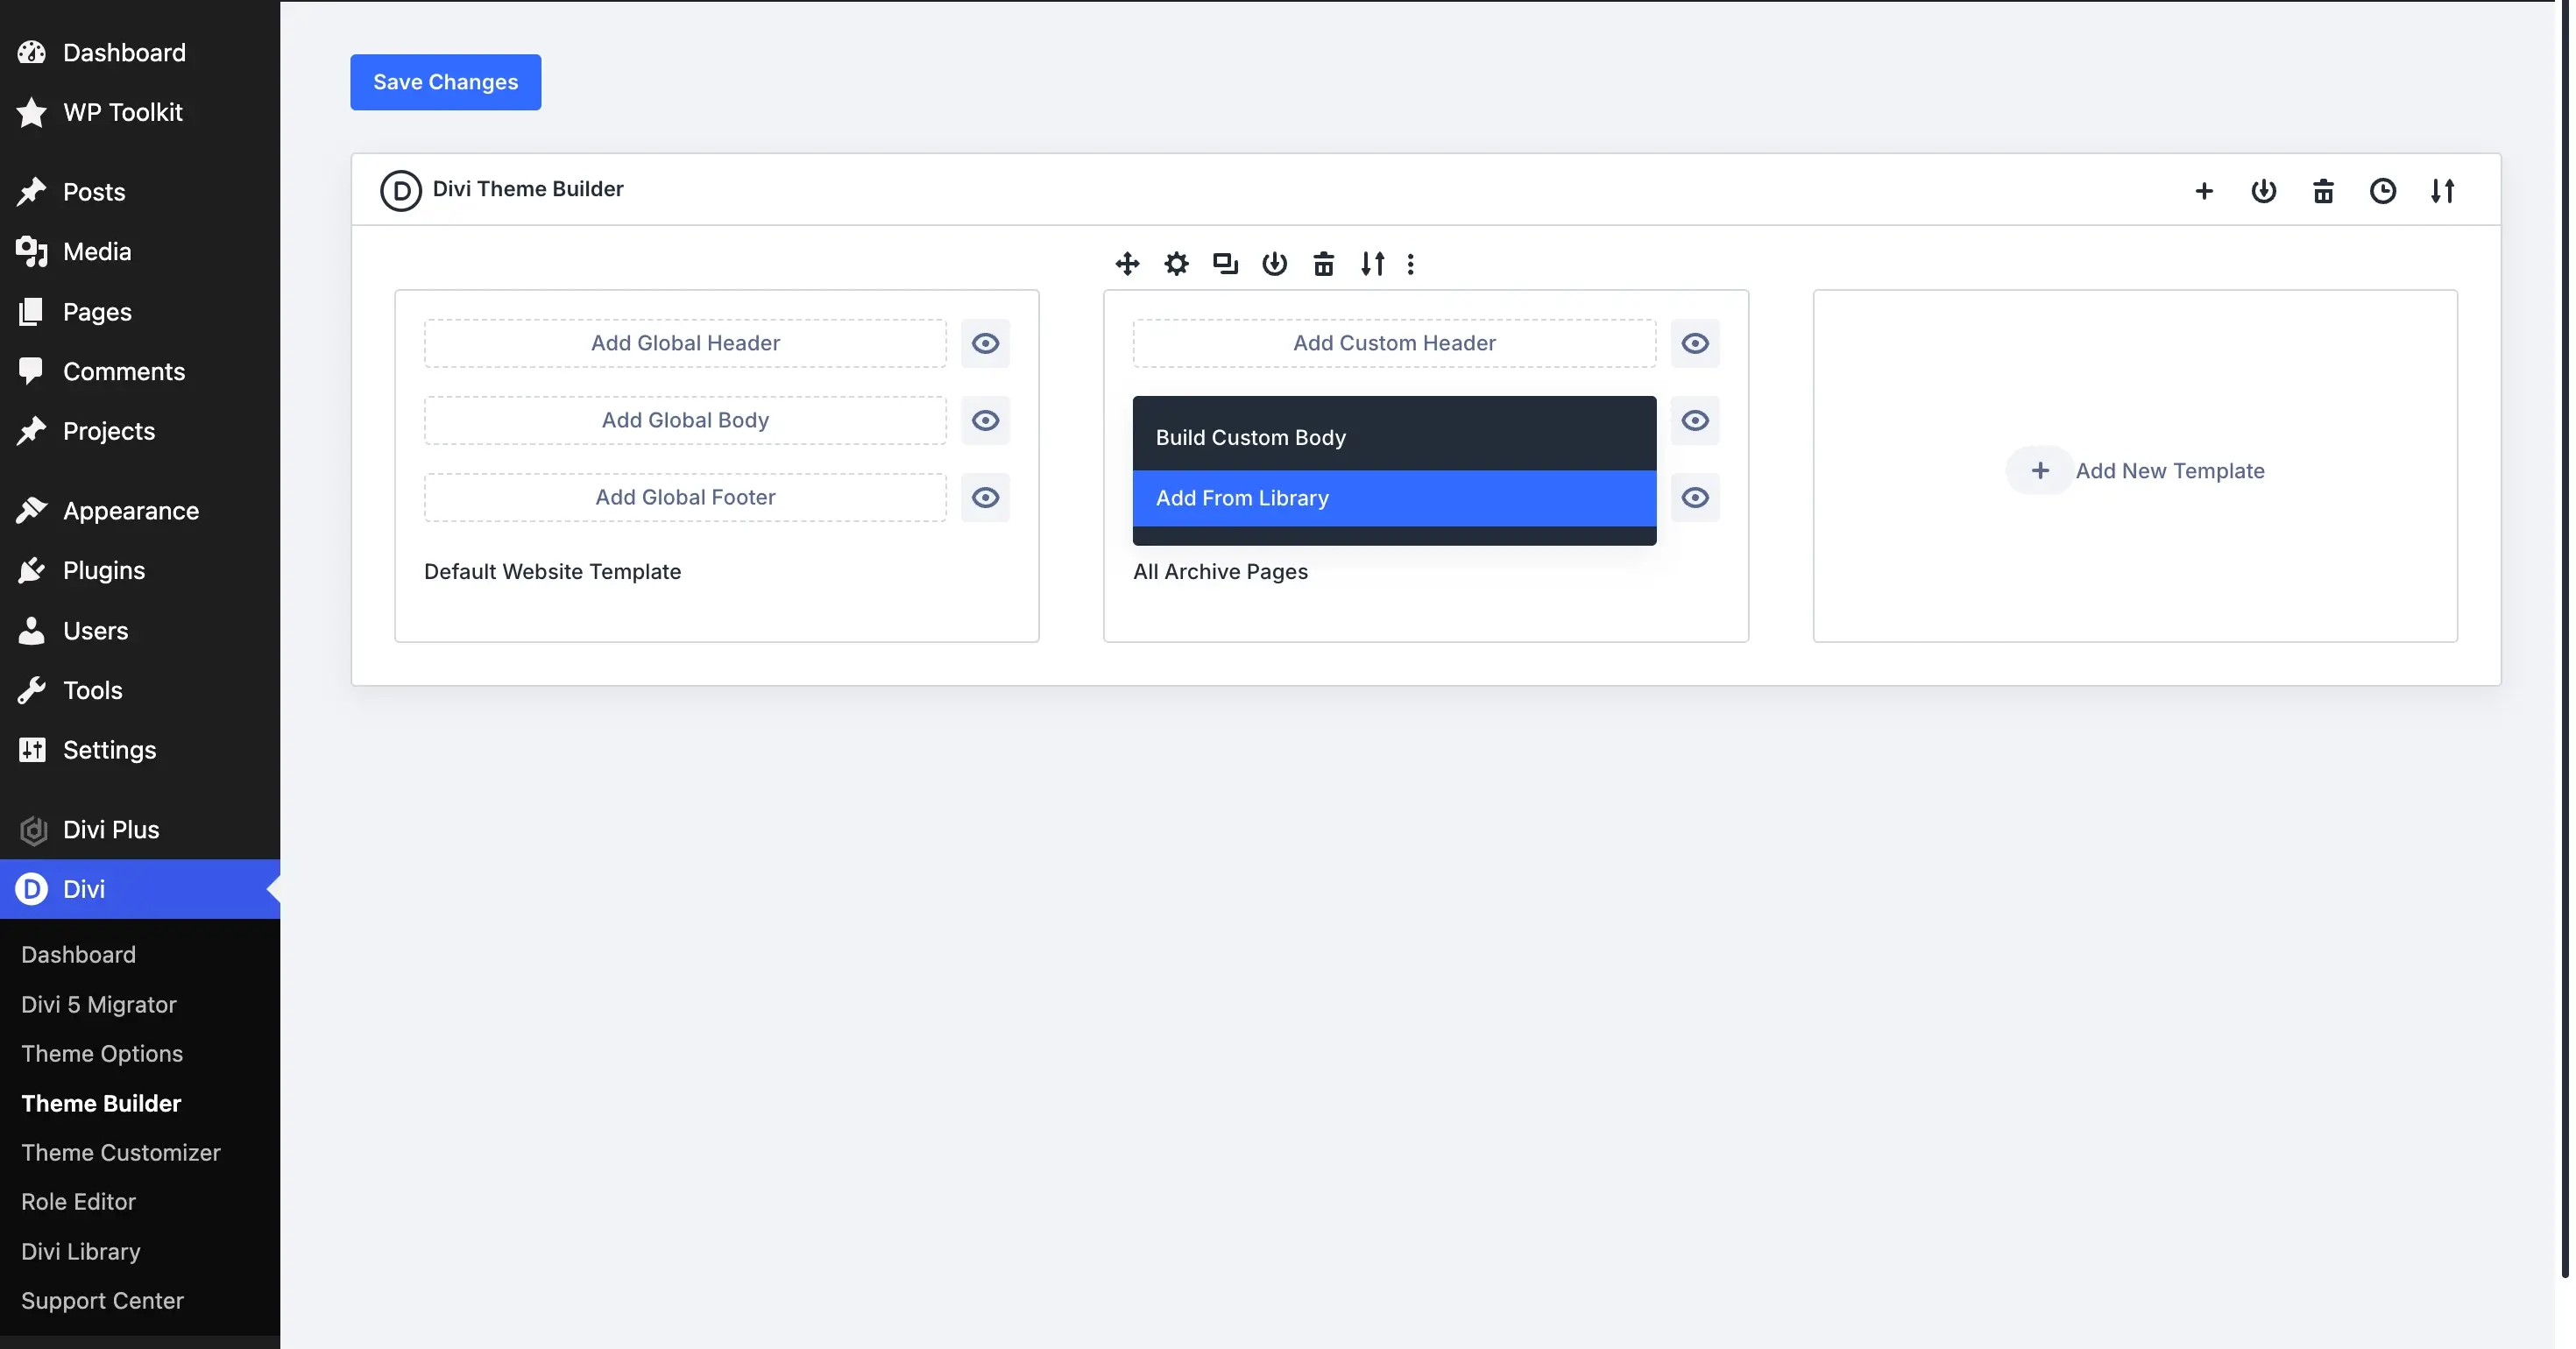
You can also mix and match, for example, using the global header and footer while assigning a custom body to a specific template.
If you want ready-made layouts to load from the library, Divi Layouts Extended gives you 3,500+ pre-built layouts you can browse and import directly from the WordPress dashboard, without downloading files first.
How to Build Headers in Divi 5
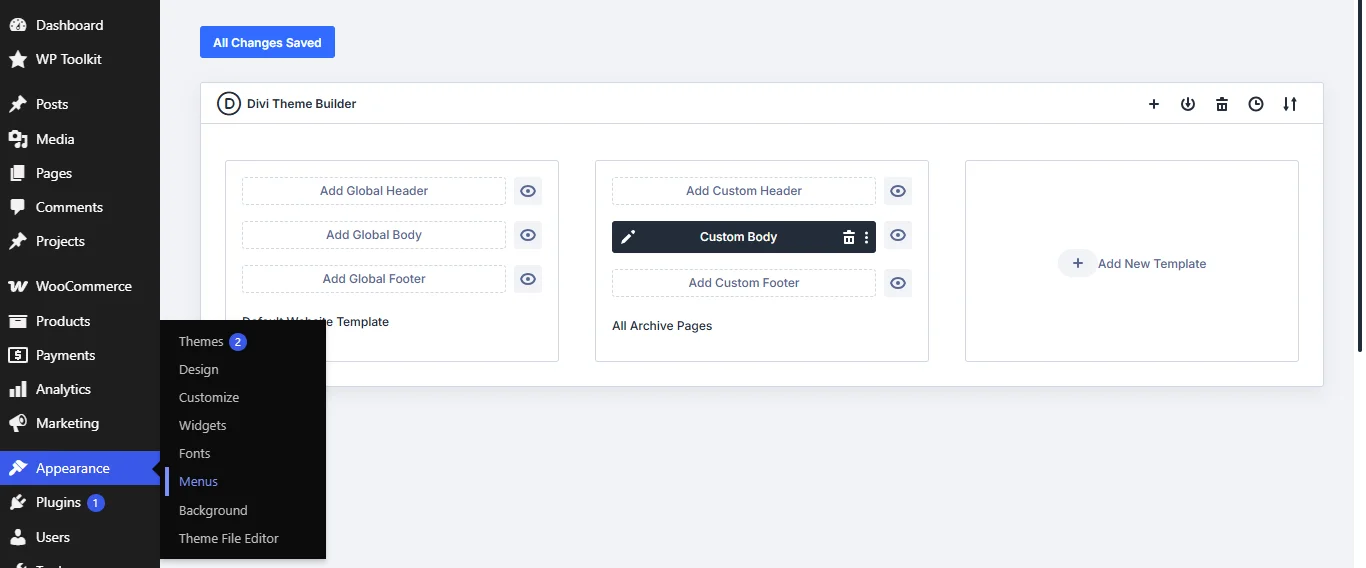
Divi Theme Builder allows you to create headers for your site in the way you prefer. However, for best results, first create a navigation menu through the WordPress dashboard since it is a WordPress feature. The Divi menu module is the element placed in the header that displays and styles the WordPress menu.
Access WordPress, click on Appearance > Menu > Create a new menu, and choose the menu items you would want to appear in the main menu. The header is actually built within the theme builder using modules.
Once you create a menu, proceed to click on Divi > Theme Builder > Choose to add a custom header or global header to be directed to the Theme Builder interface.
Step 1: Plan a Header Structure
Picture how the header should look. Should it be fixed or sticky? Will it be transparent on load? Does the mobile navigation collapse to a hamburger menu?
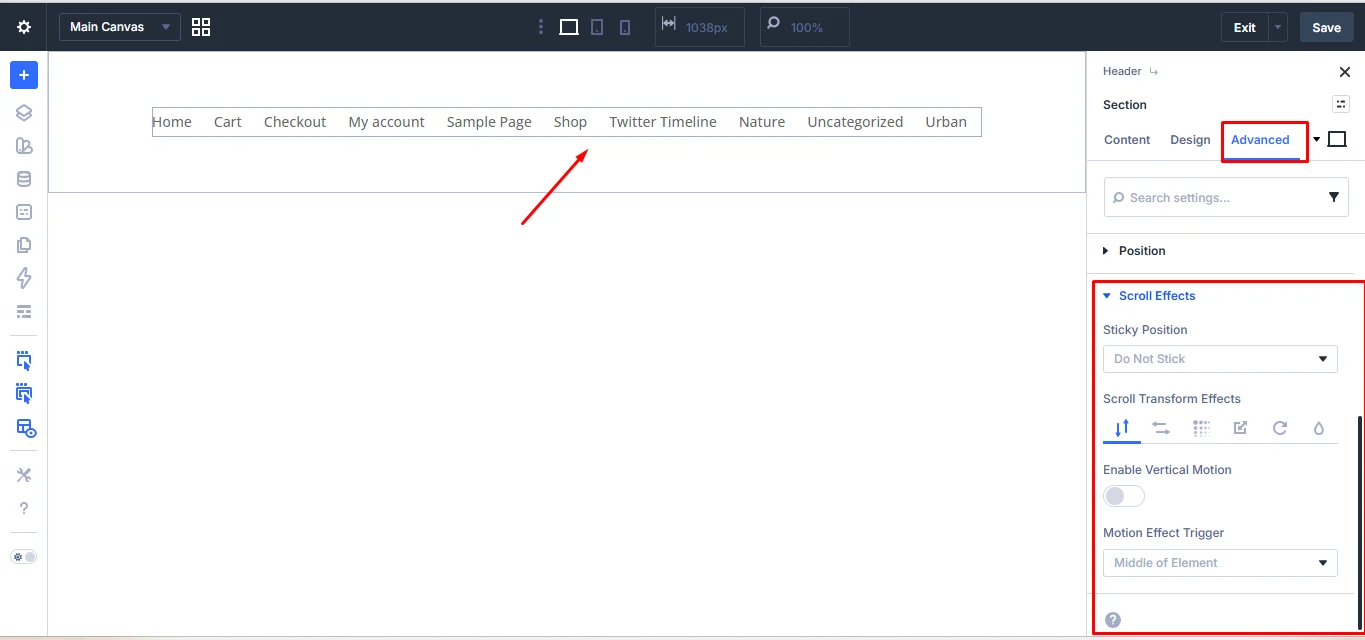
- A fixed header stays at the top of the viewport as the user scrolls. This requires the page body to have a top padding equal to the header height to prevent content from being hidden beneath it.
- Sticky header scrolls with the page until reaching the top of the viewport, then fixes in place. It can be a transparent header that then becomes opaque when it reaches the header point after scrolling.
- Shrinking the header reduces its height after the user scrolls past a defined threshold, typically by scaling down the logo and reducing padding. This requires the use of Divi 5 scroll-triggered style transitions.
Step 2: Mobile-First Header Planning
When creating your design, also have the mobile header in mind. Determine at which breakpoint the desktop navigation collapses to a hamburger menu. Also determine whether the mobile navigation opens as a full-screen overlay, a slide-in drawer from the left or right, or a simple drop-down below the header bar.
Decide whether the mobile logo needs a different size or variant from the desktop version. This will inform the structure of the header template before you place a single module.
Step 3: Building the Header Template
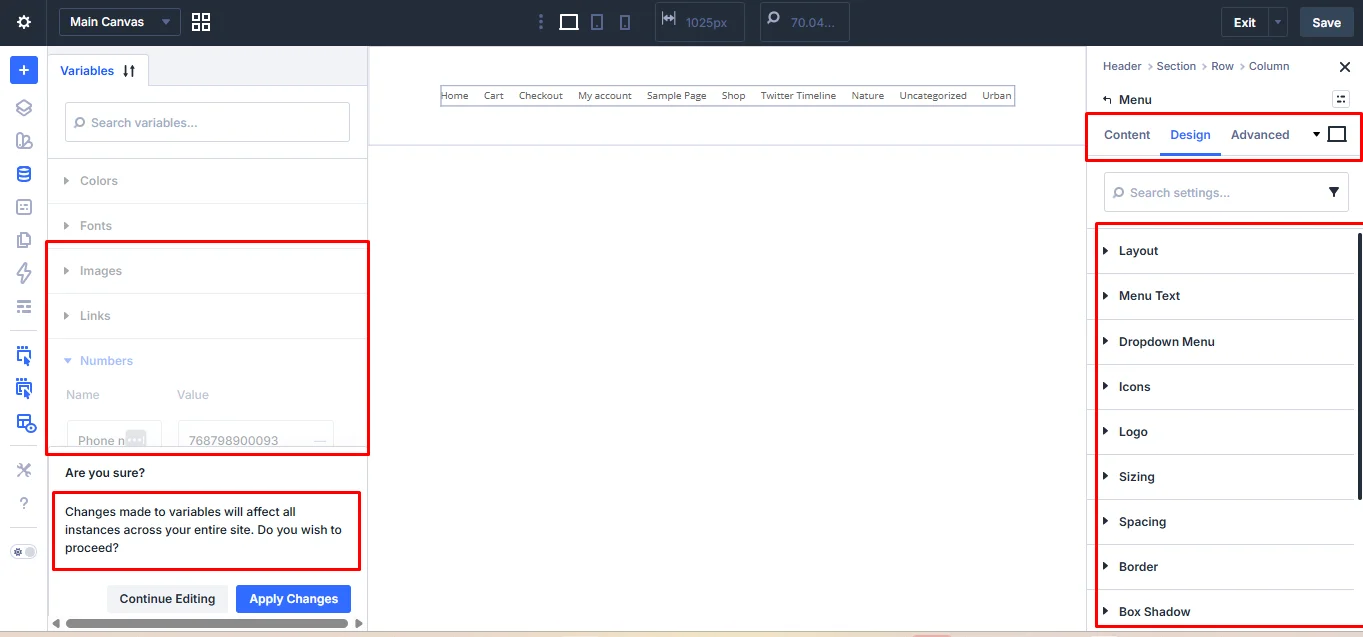
The menu module is the heart of most Divi headers, which pulls from WordPress navigation menus created in Appearance > Menus. In Divi 5, the menu module settings are all accessible in the sidebar panel, with Content, Design, and Advanced tabs.
You can opt to add a global header that will be used on all the website pages by default. Also, you can add a custom header that you can assign to pages you want to look different on your website.
Step 4: Add Header Components
Ensure your header has the menu, a logo, phone number/email address, location, and a call-to-action button. Social media icons can go here, too. Create an image variable for your logo, a text variable for your phone number, a link variable for your logo, and a text variable for your primary CTA label.
A single variable update propagates to every location where they are referenced.
Step 5: Have Conditional Visibility and Other Elements
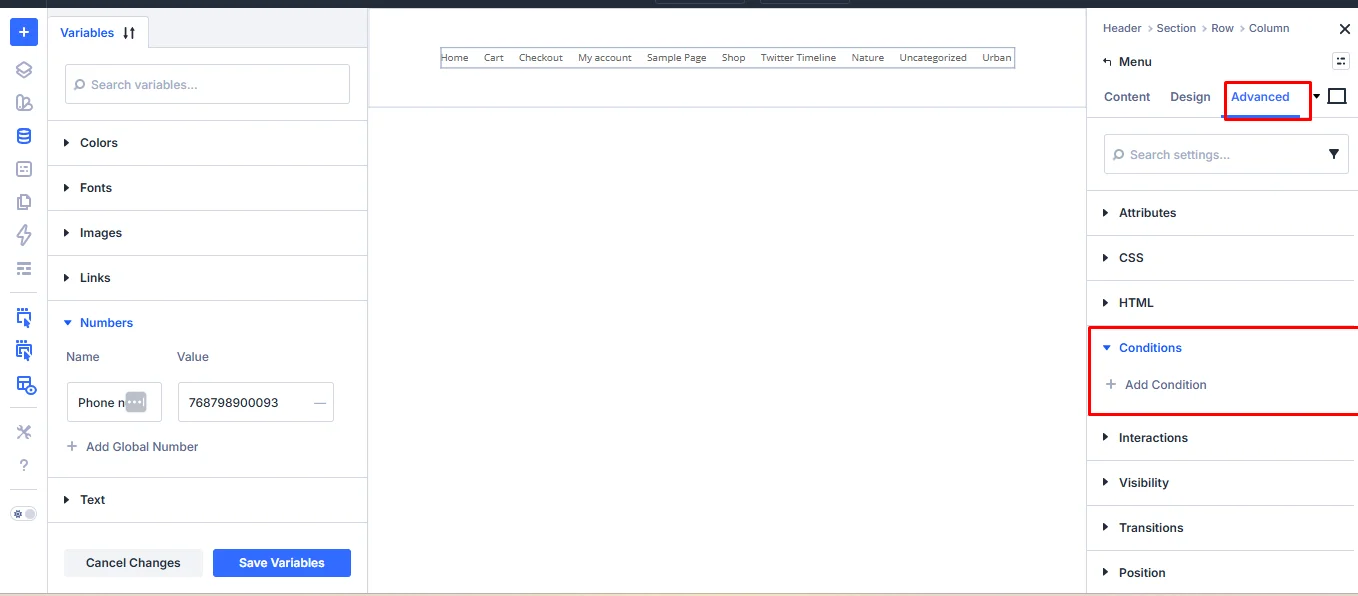
Divi 5 supports conditional visibility for modules and sections based on page type, user login status, and other conditions. For instance, you can show links to users who can log in and have a promotional banner on non-WooCommerce pages, or hide the phone number on mobile breakpoints and have it replaced by a click-to-call icon.
When you have the element you want to hide, click on the Advanced > conditions settings panel for module-level visibility rules.
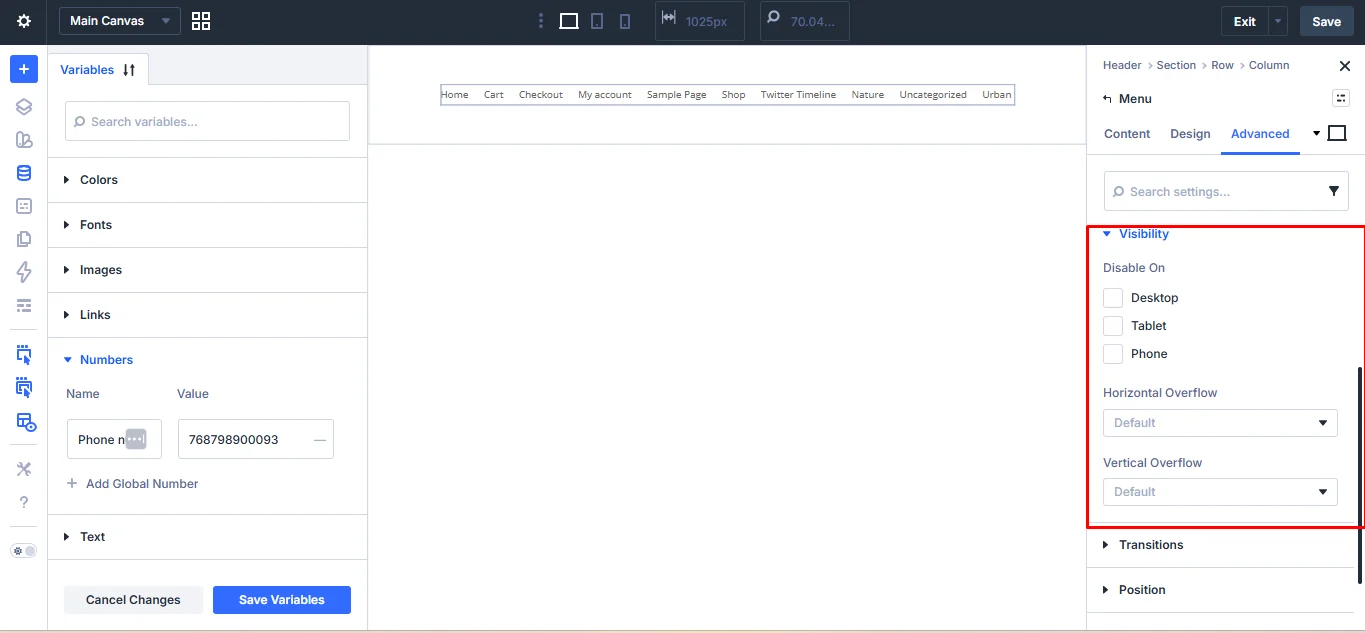
You can also control per-element visibility across desktop, tablet, and phone.
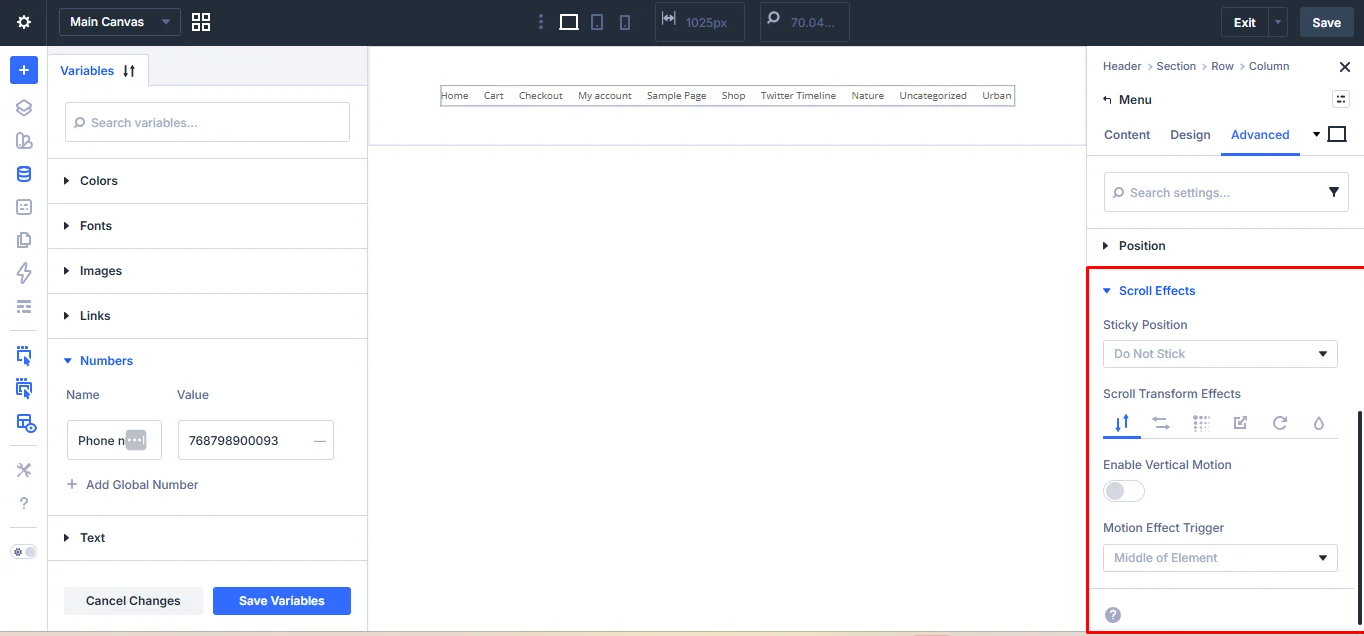
Sticky and scroll-triggered effects let you define a module state that activates when the header fixes to the top of the viewport. Just make the relevant modifications.
How to Build Footers in Divi 5
You can build a footer using the Divi 5 modules in the Theme Builder. However, remember to create a footer menu/quick links through WordPress Dashboard > Appearance > Menu > Create a new menu > Add menu items > Save.
Once the menu is created, go to Divi > Theme Builder > Choose to create a custom footer or global footer to be directed to the theme builder interface. You can either opt to create a global footer that will be used on all the web pages by default or to create a custom footer that will be used on specified pages.
Step 1: Footer Planning
Just like the header, you need to plan how the footer section should look. What information will it contain? You can either opt to have multi-column information or a minimal single-bar footer.
Step 2: Choose the Footer Type
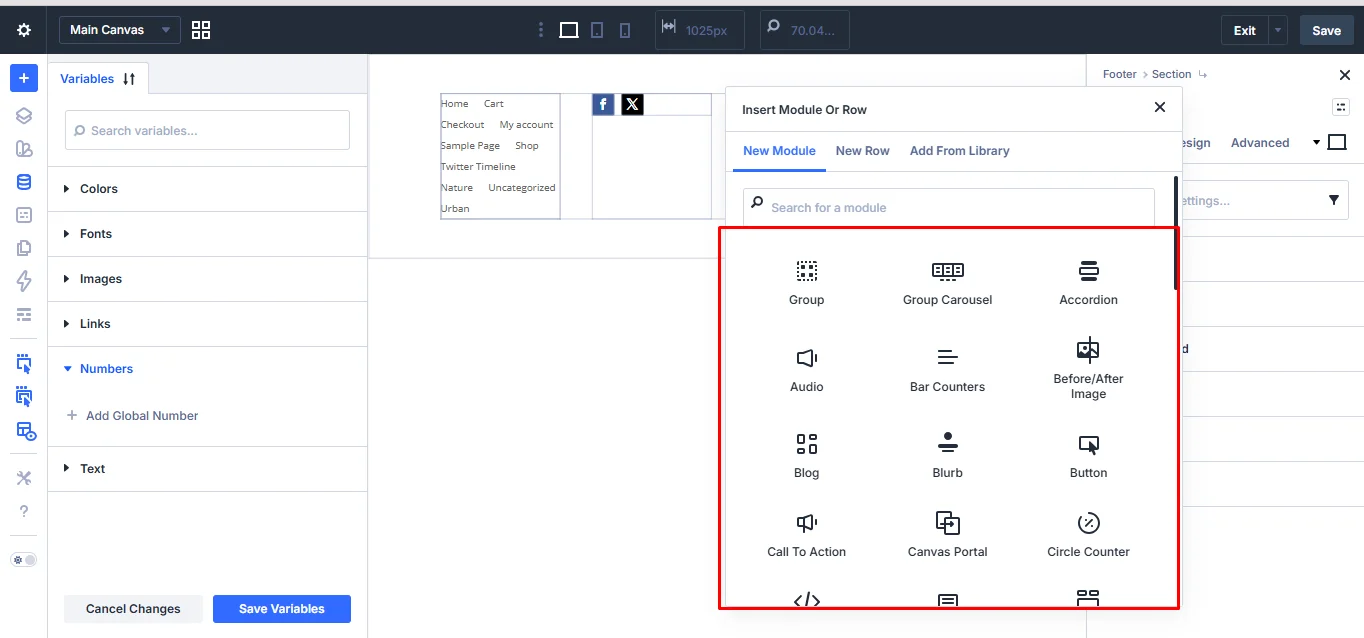
- Multi-column Footer: includes about 4 to 6 columns containing the company logo and description, primary navigation links, secondary navigation links or legal links, contact information, social media icons, and a newsletter sign-up.
- Minimal Footers: just include a single row with a logo, copyright text, and maybe some legal links.
The choice depends on the site type and audience. Service business sites and ecommerce sites benefit highly from informational footers that answer common visitors’ questions: contact details, policies, and location. However, portfolio and landing pages often use minimal footers.
Step 3: How to Build and Style the Footer
The footer needs to have all the key information: business address, phone number, email address, copyright year, and social media URLs are all candidates for text and link variables.
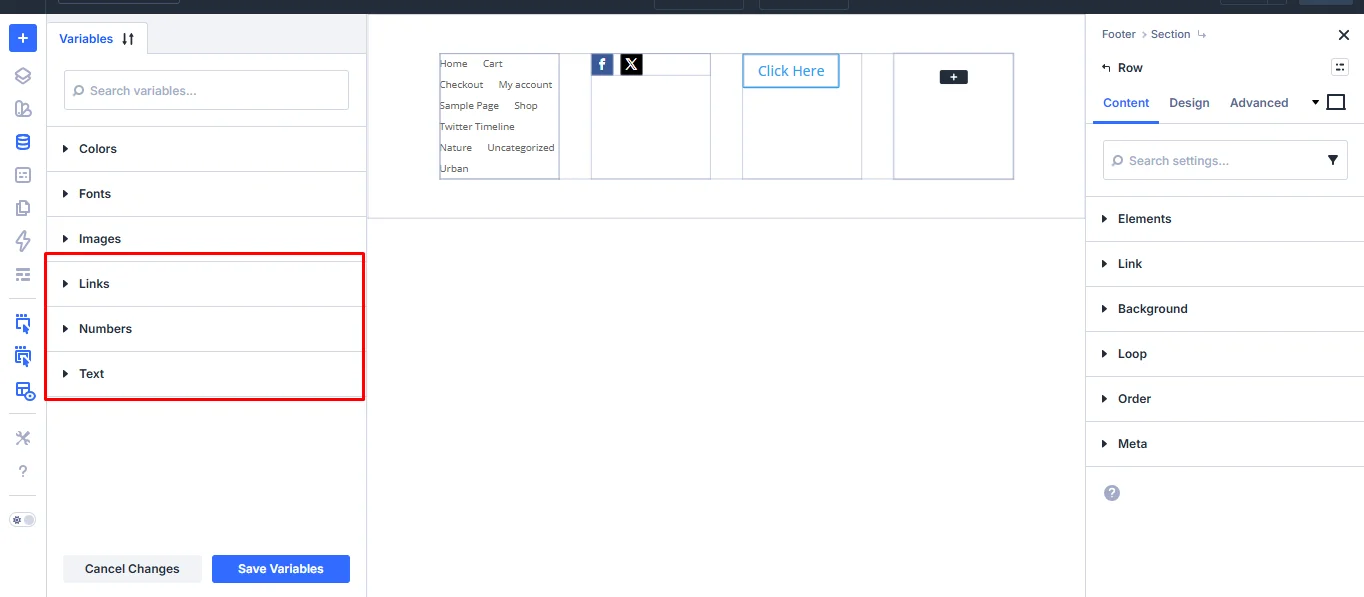
Previously, widgets were used to add the footer content; so editing content meant going into the widget panel. However, with the Divi Theme builder, footers replace this with native Divi modules, giving full visual control over every element of the footer within the builder; no need to use widget areas anymore. Use a Text module for content and a Social Follow module for social media icons.
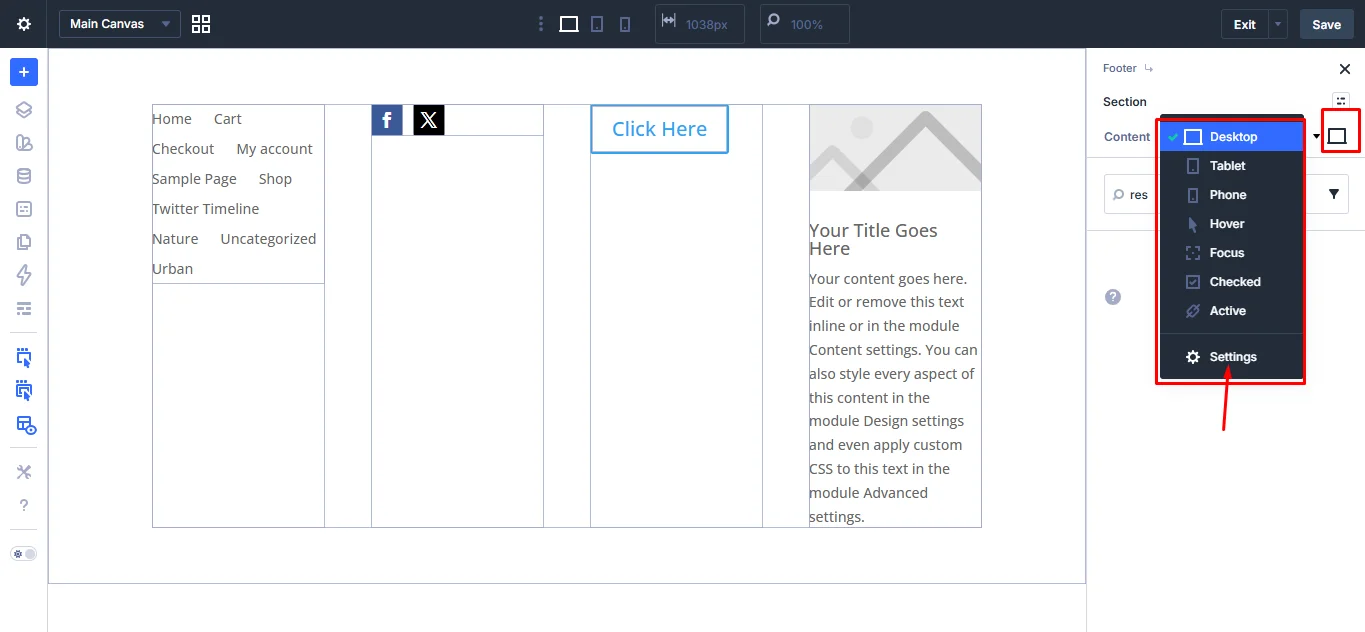
Configure column stacking behavior in the row settings under the responsive panel. Adjust spacing, font sizes, and alignment for each breakpoint. Test in different viewports to confirm column stack and spacing hold at each breakpoint.
Which Are the Different Types of Templates?
The different templates are the ones you can use in the body section. The body section is where the page’s main content renders inside the template shell. You can customize based on different content types such as posts, products, and archives, and you can add either a global header and footer or a custom header or footer.
1. Blogpost and Single Post Templates
You can structure it using a featured image, a post title in a large heading with the author name and publishing info, add content, add a category and that listing for taxonomy, an author box, and bio. In case your project requires more blog layout options, Divi Blog Extras provides 10 layouts with custom post type support and archive page templates for categories, tags, authors, and date archives.
For a step-by-step walkthrough of building a blog in Divi 5 using the Theme Builder, see How to Create a Blog Using Divi 5.
2. Archive, Category, and Author Page Templates
Archive pages present a listing of posts filtered by some criterion, category tag, author, date, or custom taxonomy.
3. Woocommerce Templates
Divi provides a comprehensive suite of WooCommerce-specific modules that replace the default WooCommerce output templates. You can design product pages, shop archives, cart, and checkout pages directly in the visual builder. For additional WooCommerce modules, Divi WooCommerce Extended adds 11 modules, including a mini cart, product carousel, wishlist, and Ajax search, plus a checkout manager and tab manager.
4. Custom Post Type Templates
These include pages for content such as team, case studies, testimonials, events, services, projects, and FAQs.
5. 404 Page
It is key that when a visitor follows a broken link or types an incorrect URL, the default WordPress one is generic; however, making a custom one using Divi 5 builder can be crucial.
Advanced Techniques in Divi 5 Theme Builder
To improve efficiency and scalability, Divi 5 includes features including Design Variables, Presets, Divi AI, and template export/import. This will ensure consistency, improve the workflow, make collaboration more efficient, and improve website performance in general.
The Theme Builder templates are portable. Once you’ve built a layout, you can export it as a JSON file and import it into any other site running the same platform, making this the primary mechanism for moving a design system from one project to another.
Exporting a Template
From the Theme Builder interface, open the template you want to export and select Export. Click the settings icon at the left side menu top.
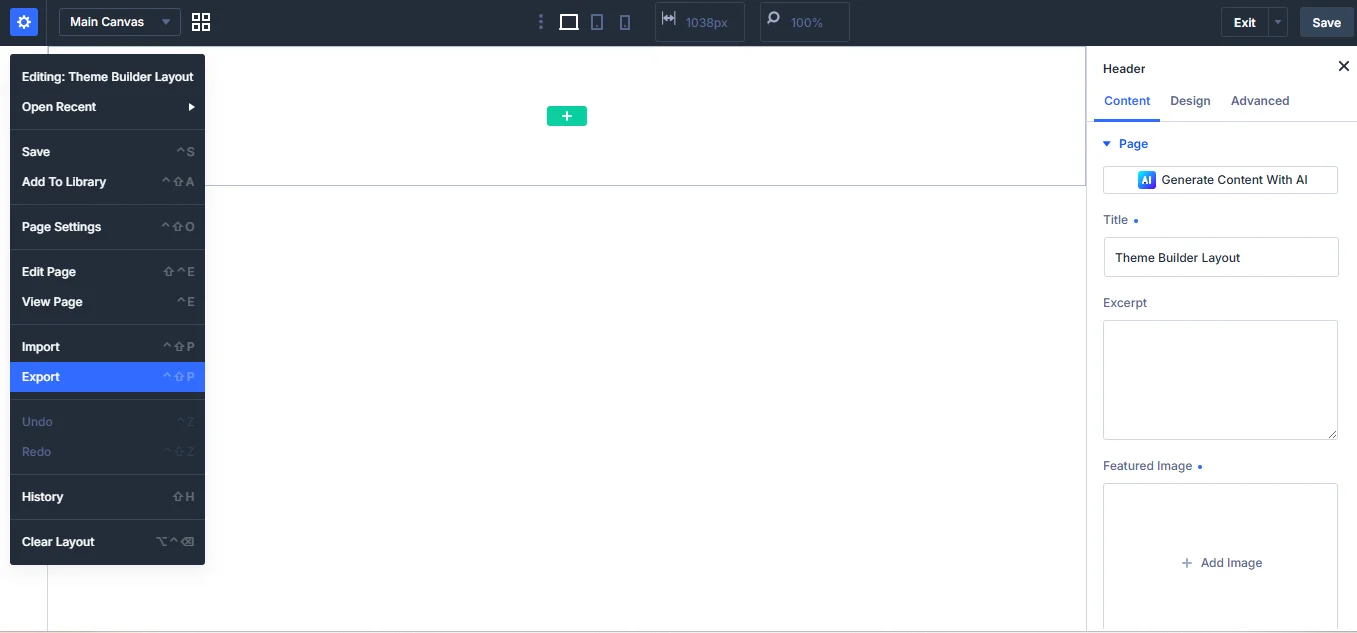
The platform generates a .json file and downloads it to your machine. This file is self-contained: it encodes the full layout structure, block configuration, and all design variables that the template references.
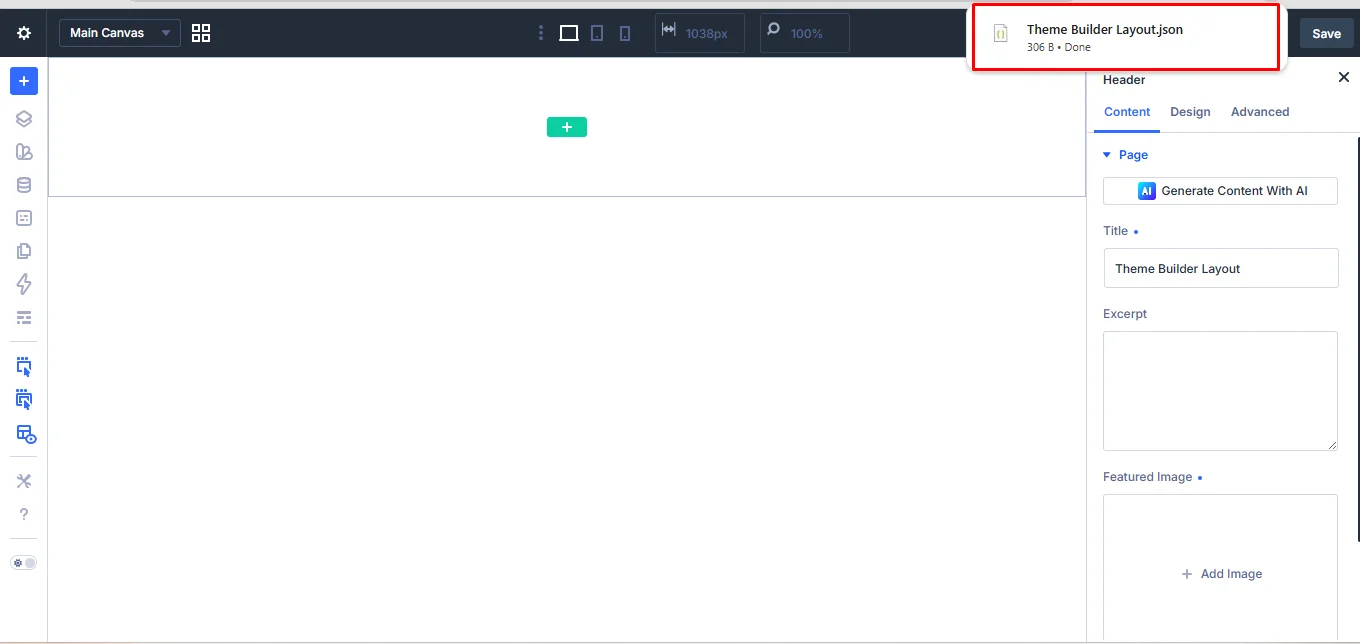
The brand colors, spacing scales, and typography tokens travel inside the JSON.
Importing on Another Site
On the destination site, open Theme Builder and select Import. Upload the JSON file.
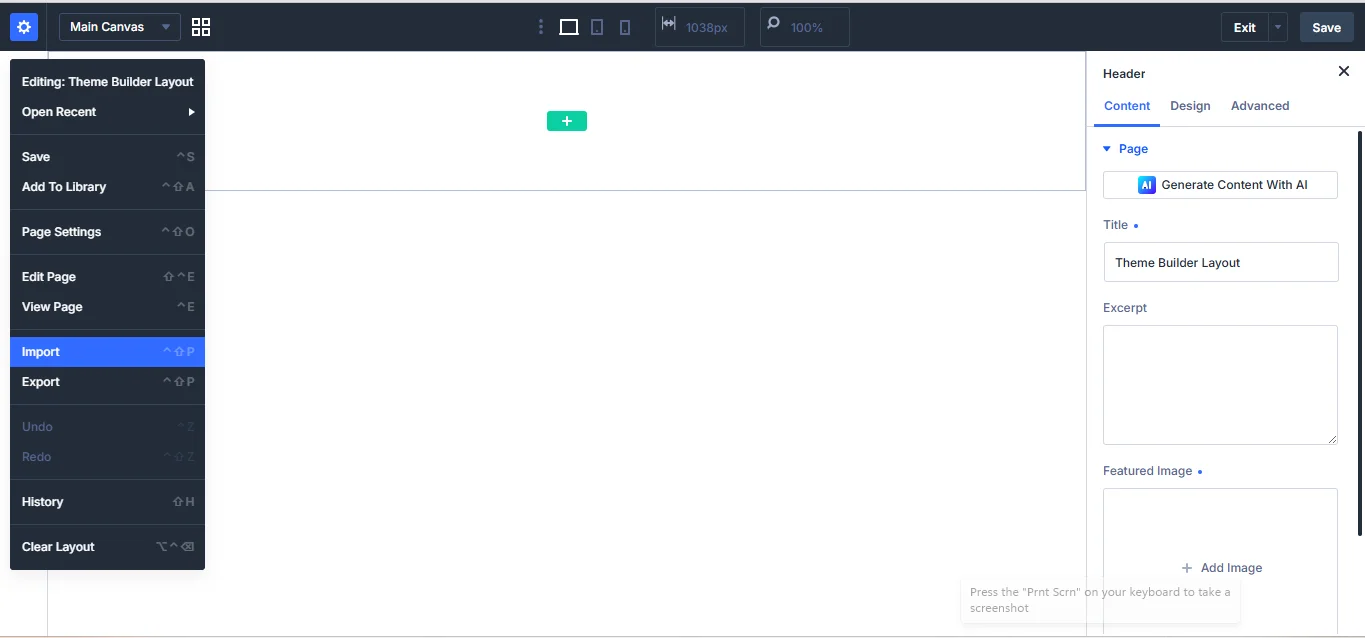
The platform reads the layout and registers any design variables bundled in the file, making them available immediately alongside whatever variables the destination site already has.
If the destination site defines a variable with the same name, the imported value won’t silently overwrite it; review any conflicts before applying the template.
For a broader guide covering all the ways to import layouts into Divi, including directly onto pages, via the Divi Library, and through the Theme Builder, see How to Install Layouts in Divi.
Frequently Asked Questions (FAQs)
The Divi 5 Theme Builder is a visual website-building system that allows you to create and manage global templates such as headers, footers, post layouts, archive pages, and more without coding.
Design variables centralize colours, typography, spacing, and other design settings, so a colour or font change updates every instance site-wide.
Yes. Divi 5 allows you to export templates as JSON files and import them into other websites, making project replication and client handoffs much easier.
Divi AI can generate layouts, write content, create images, and even produce custom code directly within the builder, helping speed up website creation.
To set assignments, access WordPress > Divi > Theme Builder > hover over the custom template > click the settings option > make the assignments.
Simple sites usually convert cleanly, but complex Divi 4 sites should be tested on staging before converting the live site.
Conclusion
By learning how to use the Divi 5 Theme Builder, you are going to be able to build and manage WordPress websites without re-entering the same settings across multiple templates.
With the help of design variables, presets, dynamic field content, global templates, and Divi AI, you will be able to build websites quicker, achieve design consistency, and make website management easier in the long run.


0 Comments