Social media networks are a profoundly significant part of the online world. Daily, millions of posts are uploaded, thousands of comments are written, and the number is the same for new user accounts, likes and shares. With social media buttons, you can add the catalyst on your website that can boost your platform’s reach as well as revenue.
If you’re looking to add social media buttons on your website in Divi, then following this tutorial, you can achieve that effortlessly. In this post, in addition to the steps, we’ll cover why these buttons are crucial; their types, and their benefits. So, you get the best results when you use them.
Therefore, let’s start from the basics so users of all levels can have a clear idea of what we are talking about.
What Are Social Media Buttons?
A social media button is not just like the typical buttons we see on websites. This type of button, unlike typical CTA, won’t redirect users to a particular URL. Instead, it performs an action predefined by the social media platform itself.
It uses JavaScript to establish a connection between your website and the social media network you’re using. For example, if you use a Facebook Button, then it will connect your website to Facebook for the predefined action set by Facebook for that button. Using social media buttons, you can promote your business on various social networks and generate followers for those platforms.
Almost every social media platform offers social buttons that you can embed on your website. And because many social media buttons are available in the market, it’s confusing to decide which one is right for your website.
Well, spotting the difference isn’t difficult if you know your requirements. Of many, the most popular are the following ones:
Why the Need? (Benefits of Using Social Media Buttons)
On average, social media users worldwide spend 151 minutes per day. The high is in the Philippines, where users explore social media networks for an average of 3 hours and 53 minutes per day. And as there are 4.88 billion users, the need to use social media buttons seems apparent.
Also, the websites or eCommerce platforms that use social media platforms make 32% more sales than platforms that don’t. Therefore, choosing not to use these buttons can affect your business or profession because these buttons provide more than one benefit. For social media buttons, the advice is you implement it on your platform.
If you choose not to, then you’ll miss the following benefits:
#1–Boost Reach and Brand Awareness
When people visit your content and find it useful, they share it with their peers. This will increase the reach of your platform to more people and improve brand awareness. And by using social sharing buttons, it can be easy to achieve.
#2–Analyze Which Content Type Works
When users share your content, you’ll get reactions from them.
The more a particular content is circulated, the more it will receive reactions. Hence, the content which will be more effective will get better interactions, and you’ll find out what type of content you need to post next that would bring more appropriate results.
#3–Increase Followers
When users share your content, and others find it useful, they will likely subscribe to your account. And by using social media buttons, you can do that easily. Also, if users want to stay updated regarding your products or services through social media, then if you use one of the social follow buttons, it will allow your visitors to follow your social media account directly from the website.
How to Add Social Media Buttons in Divi (2 Methods)
For using social media buttons, whatever your reason, you have two methods that can help you add them to your Divi website. One will involve multiple steps, which include interaction with social media networks. So, the second will let you add the buttons in fewer and more manageable steps.
If you don’t want to spend more time, skip to the 2nd method to add social media buttons in Divi. Otherwise, continue from the following.
#Method 1 – Without Using a Plugin
In this section, we’ll start with adding Facebook social buttons first.
Adding Facebook Social Buttons
There are multiple social buttons Facebook provides, and it calls them Social Plugins. So, don’t be confused and think we’re using plugins in this section. We’re only going to take help from resources that Facebook offers.
The first one is the Share Button; this is how it looks,

To add this to your website, first, visit the Facebook Social Plugins page for Share Button here: https://developers.facebook.com/docs/plugins/share-button/
Once you visit the page, scroll down to the Share Button Configurator.
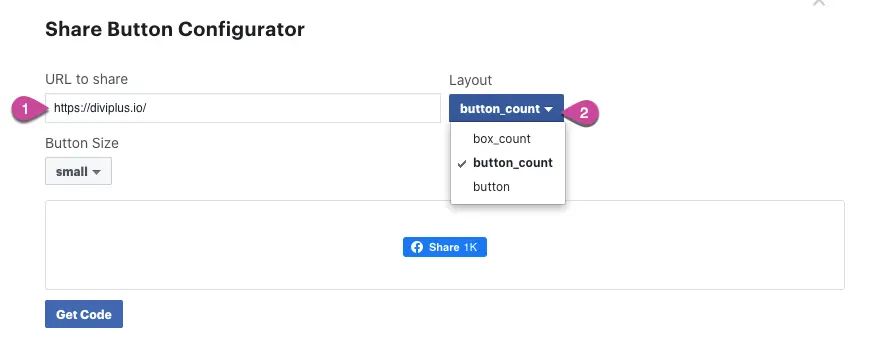
Here, enter the page URL which you want people to share. Then, select the button layout. Currently, Facebook offers three share button layouts.
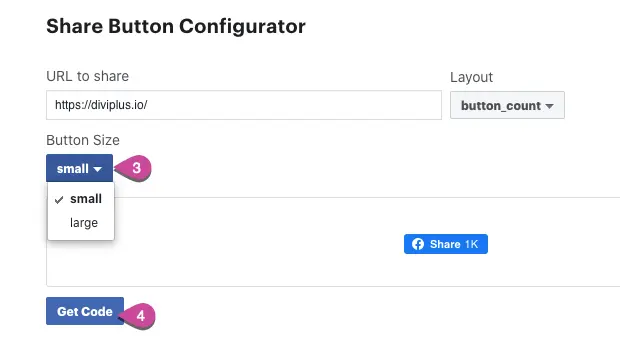
After choosing the layout, select the size of the button and then click Get Code.
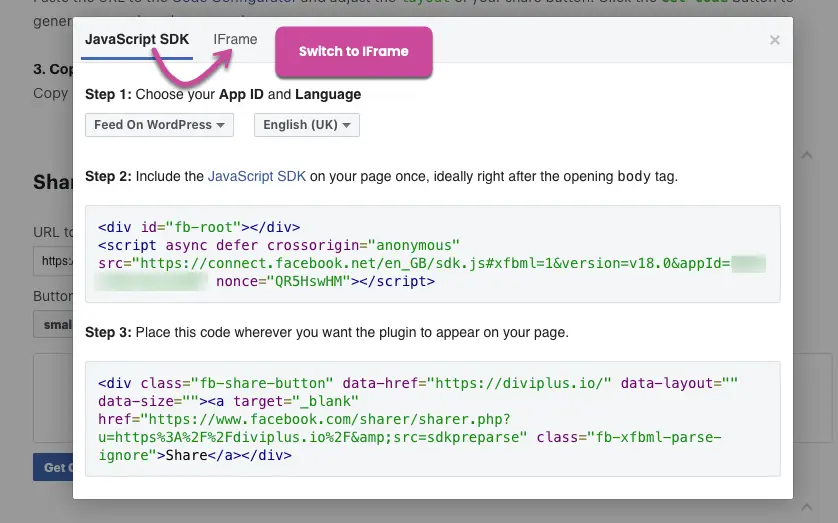
As you click the Get Code button, a popup will appear containing the JavaScript SDK of the button. Here, what you need to do is switch to the iFrame and then copy the code.
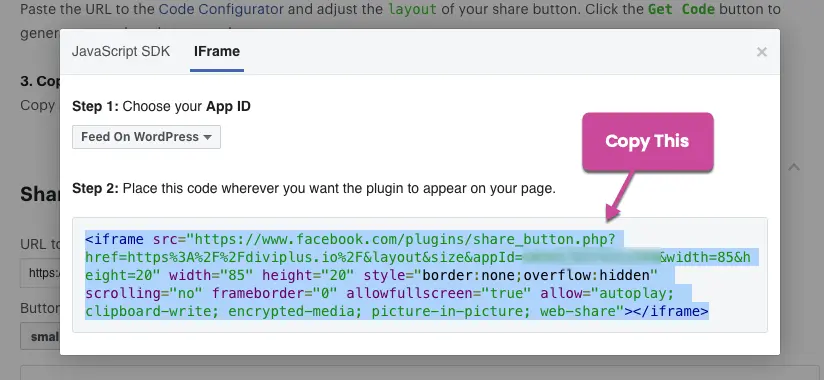
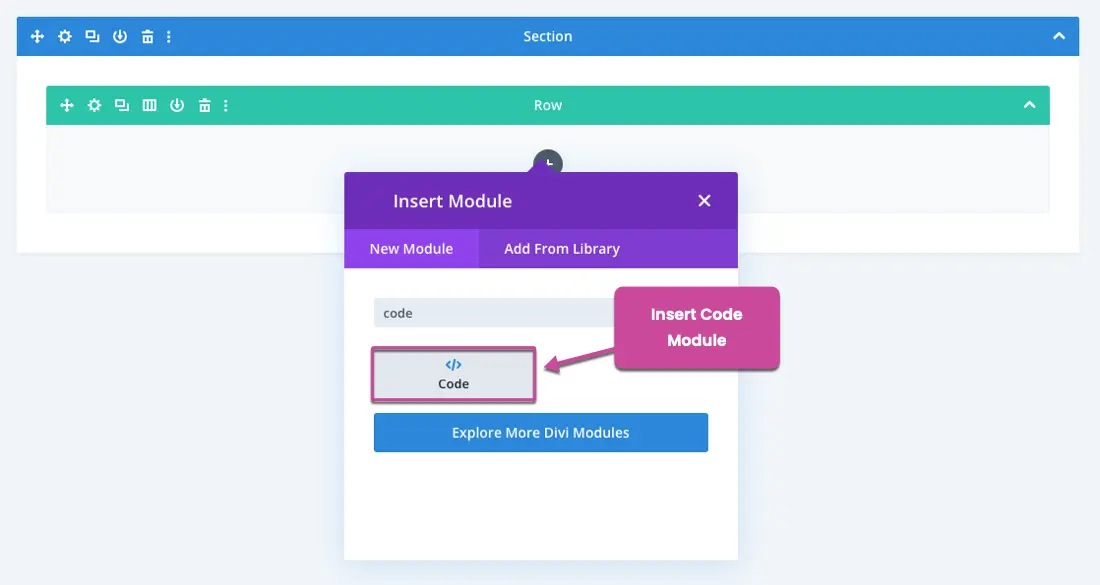
Once the code has been copied, go to the page where you want to add the Share Button. Insert the code module and then paste the code you’ve copied.
Once you paste the code, you’ll get your Facebook Share Button on the website just like the following.
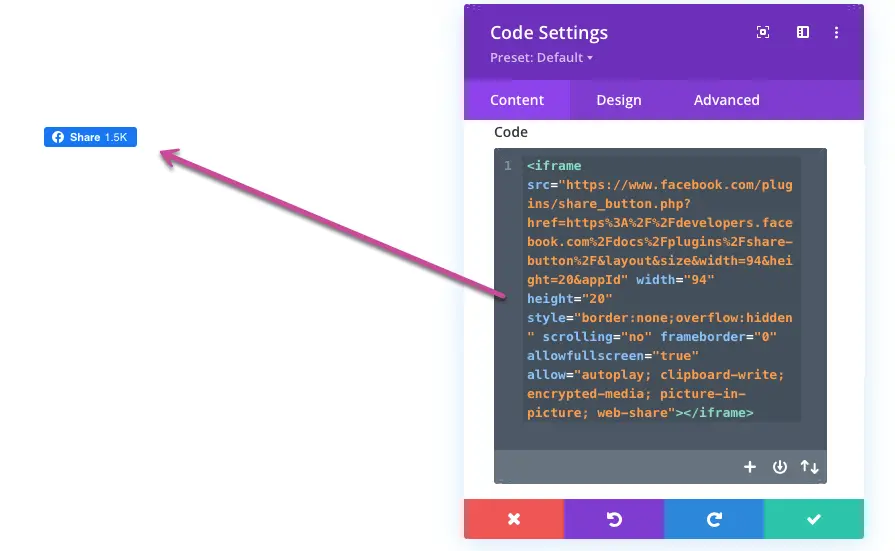
So, this is the step to add the Facebook Share button without using a plugin. Now, let’s add the Facebook Like Button.

To add the Facebook Like button, open this page: https://developers.facebook.com/docs/plugins/like-button/
Then, head over to the Like Button Configurator.
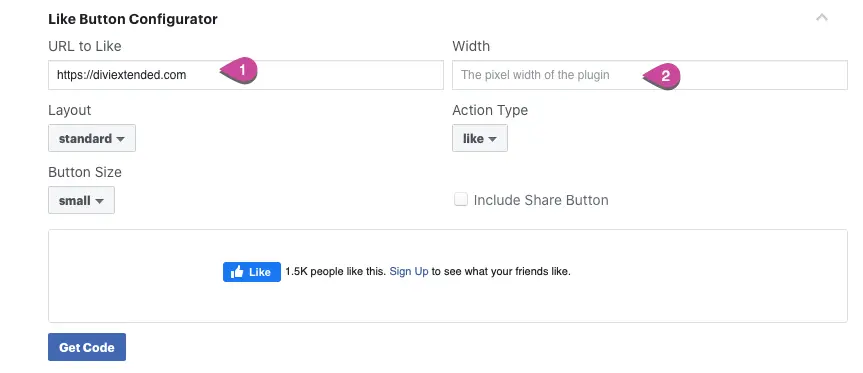
Here, first, add the page URL you want people to like, then set the pixel width for the plugin (this is optional. You don’t necessarily have to do it.)
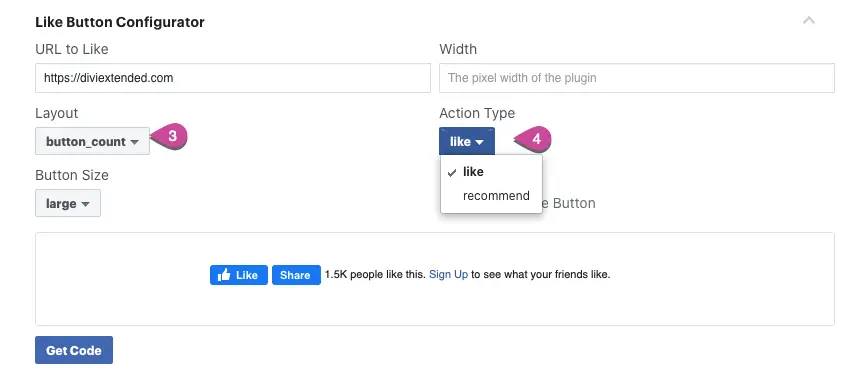
Choose the layout and button type after adding the URL and plugin pixel width. The Facebook Like Button also comes as recommend. Once done with that, choose the size, and if you also want the share button, check the Include Share Button.

Click Get Code. A popup will appear, switch to iFrame and copy the code.
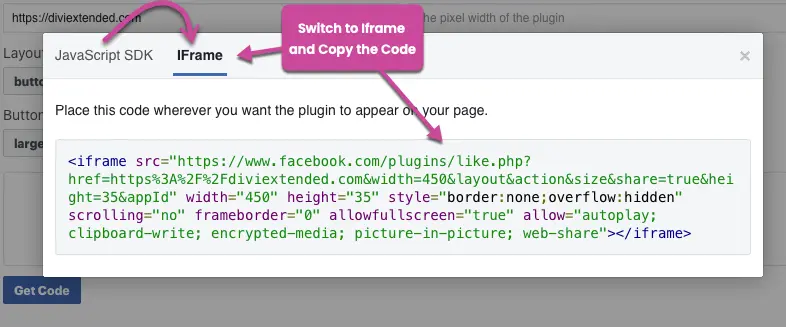
Go to the page where you want to display the like button, insert the code module and paste the code there.
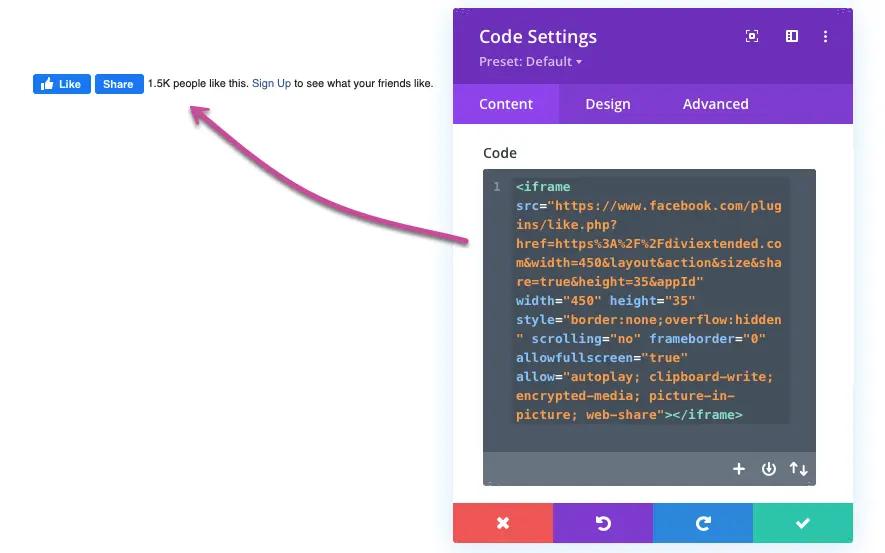
Once added, the button will appear like the above.
Adding Twitter Social Buttons
Adding Twitter Social Buttons on your website without a plugin is not as easy as in the case of Facebook. For Twitter, you need to use some JS, then call it when the button’s HTML needs to load scripts.
Therefore, it’s suggested you go with the 2nd method to save time and avoid the possibility of breaking the website. But if you want to do it, then continue.
Twitter Tweet Button:
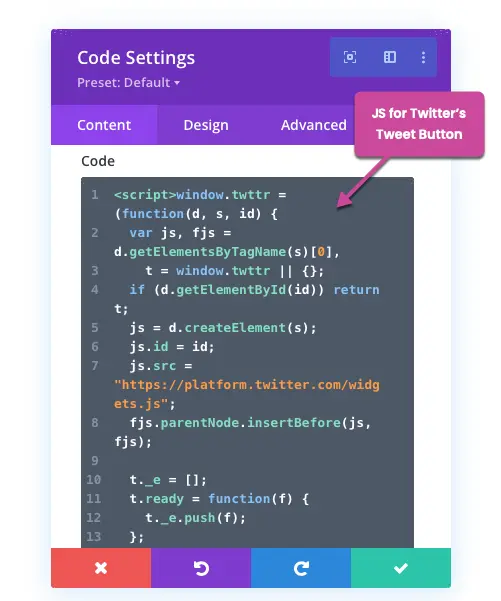
To add the Tweets button, first, copy the following JavaScript provided, then head over to your Divi page where you want to display the Twitter Tweet button.
<script>window.twttr = (function(d, s, id) {
  var js, fjs = d.getElementsByTagName(s)[0],
    t = window.twttr || {};
  if (d.getElementById(id)) return t;
  js = d.createElement(s);
  js.id = id;
  js.src = "https://platform.twitter.com/widgets.js";
  fjs.parentNode.insertBefore(js, fjs);

  t._e = [];
  t.ready = function(f) {
    t._e.push(f);
  };

  return t;
}(document, "script", "twitter-wjs"));</script>
On that page, insert the Code module,

Then, paste the JavaScript you’ve copied.
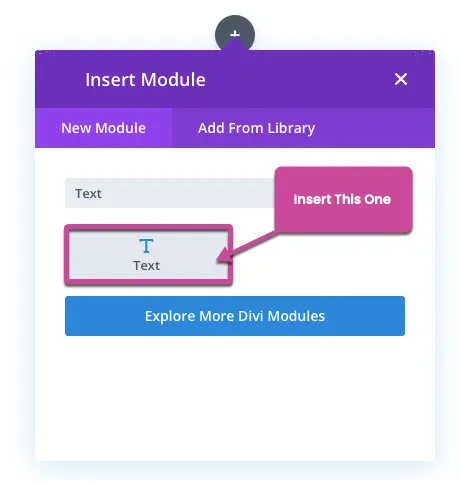
After this, insert the Text module where you want to display the Tweet button.
Now, we need the anchor link to display the button. For that, visit Twitter’s Embedded Buttons page and copy one of the anchor links. Or, you can directly copy the HTML available below.
<a class="twitter-share-button"
  href="https://twitter.com/intent/tweet?text=Hello%20world"
  data-size="large">
Tweet</a>
Once you have copied the link, return to the page where you have inserted the Text module.
Here, add your link and Save Changes. When you preview the page, you find the Tweets button like the following,
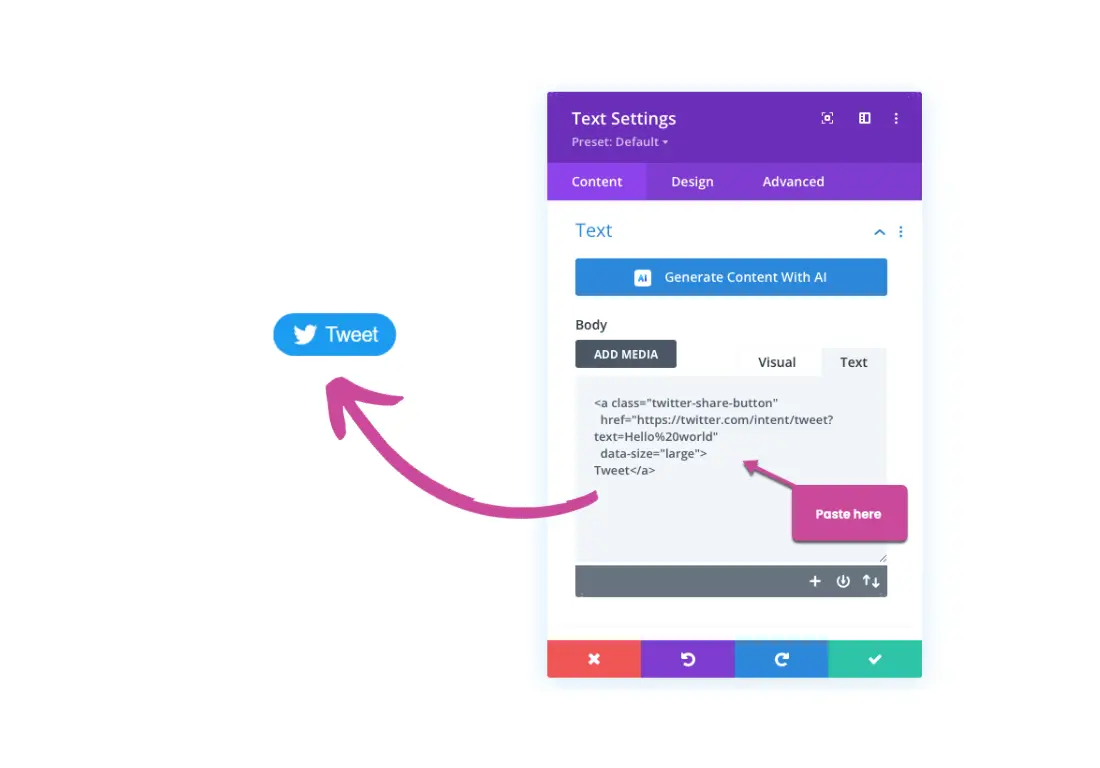
Alternatively, you can create a custom folder on your hosting and add the JavaScript, and then whenever you need to add the Tweet button, you can use the anchor link.
However, these approaches require multiple steps, and in the first one, you have to repeatedly add JavaScript. This will increase the number of scripts on the website and affect the load time.
Therefore, the best way to add a Twitter button is by using a plugin.
Twitter Follow Button:
To add the Twitter Follow Button to your website, follow the steps mentioned in the previous section. However, when you add the anchor link, use the following:
<a class="twitter-follow-button" href="https://twitter.com/TwitterDev"> Follow @TwitterDev</a>Replace the href value with your Twitter account’s one and the text used as well, like the below,
<a class="twitter-follow-button" href="https://twitter.com/DiviExtended"> Follow @DiviExtended</a>Once added, the Follow button will appear like the following.

This is how you add Facebook and Twitter social buttons without using a plugin. Now, head over to the 2nd method, which is easier and recommended.
#Method 2 – Using a Plugin (The Easiest Way)
The plugin we will use for adding social media buttons in Divi is Divi Plus. It’s a premium, multipurpose plugin for Divi that provides extensive modules, extensions, pre-built websites, templates and design sections.

Using this plugin, it becomes easier to implement web page elements that aren’t possible/ hard using Divi’s native module. Also, using the templates and pre-built websites, you can quickly finish any web project. To add the buttons, we will use the Facebook and Twitter modules this plugin includes.
First, get Divi Plus, install and activate it, and then follow the below instructions.
Adding the Facebook Like Button
To add the Facebook Like button to your Divi website using Divi Plus, first, go to Settings → Divi Plus → Integration → Facebook.
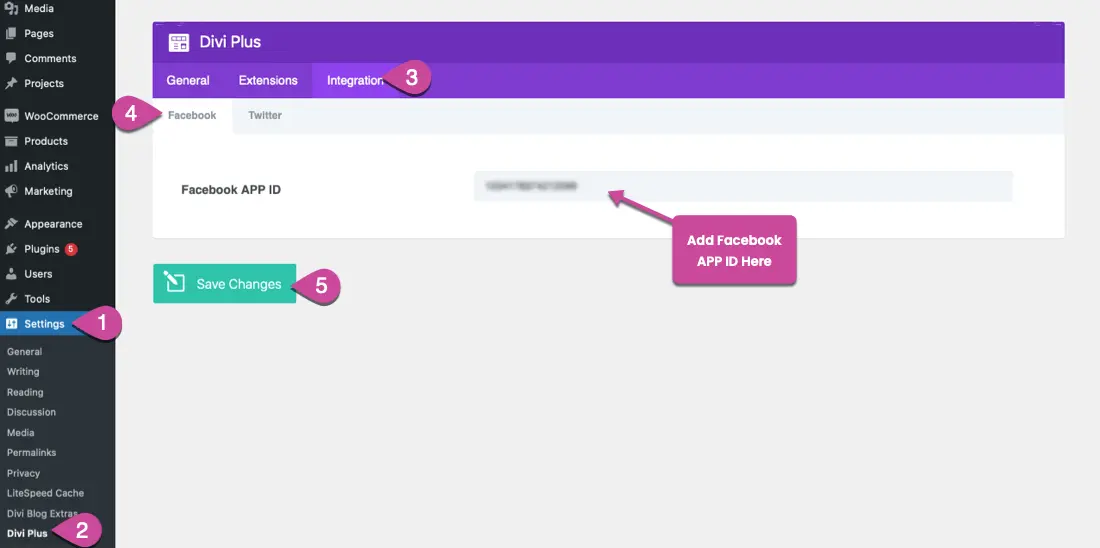
Here, you need to paste the APP ID that Facebook provides to use its Like button on websites. To get the APP ID, visit the Facebook Like Button documentation page and follow the mentioned instructions.
Once you’ve generated the APP ID, head back to Divi Plus’ settings page and add the APP ID there.
After this, go to the general settings of Divi Plus, and there enable the Facebook Like module. Once enabled, click Save Changes.
You can also enable other Facebook modules, so you won’t have to return to the settings page for the next section. We have added the APP ID and enabled our modules. Now, it’s time to add the button.
So, to do that, go to the page where you want to display the Facebook Like button. Launch Divi Builder, and then add the following Facebook module:
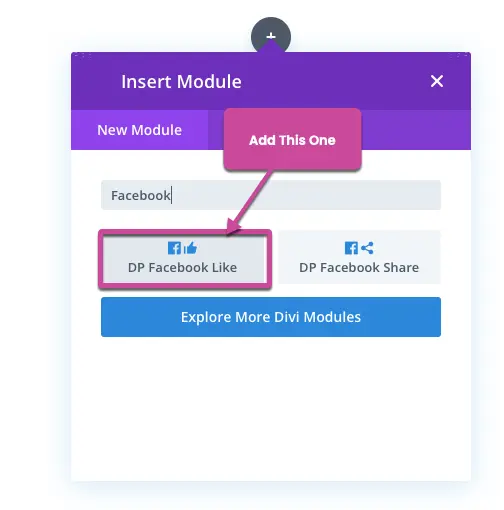
As you insert the module, the Facebook Like button will appear like the following with its customization options.
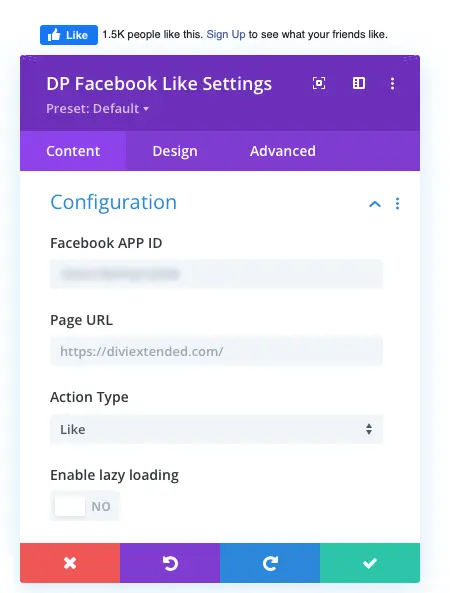
Now, what’s amazing about using a plugin is that whatever customization options Facebook provides to modify the button, you get directly in the builder.
- You can change the URL, Like button type, layout, and size.
- Apply Lazy Loading.
- And even display the Share button with the Like button.
These are all customizations without visiting the official Facebook Social Plugins page. In addition, you get customization options to make the button suitable for your Divi website’s design.
Adding the Facebook Share Button
To display the Facebook Share button on your website, what you need to do is follow the steps mentioned in the previous section. However, in place of adding the Facebook Like module, insert the following Facebook Share module.
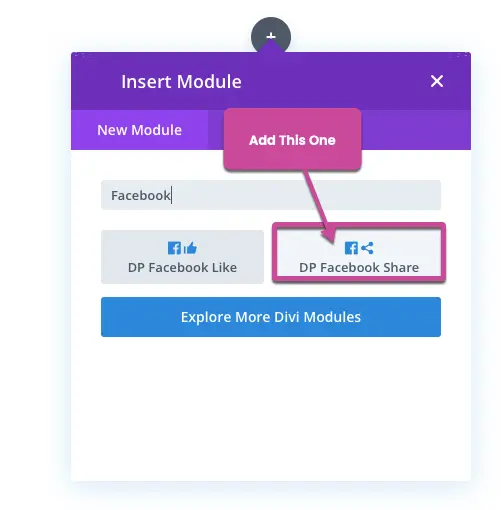
As you add the module, the button will appear like the following with its customization options:
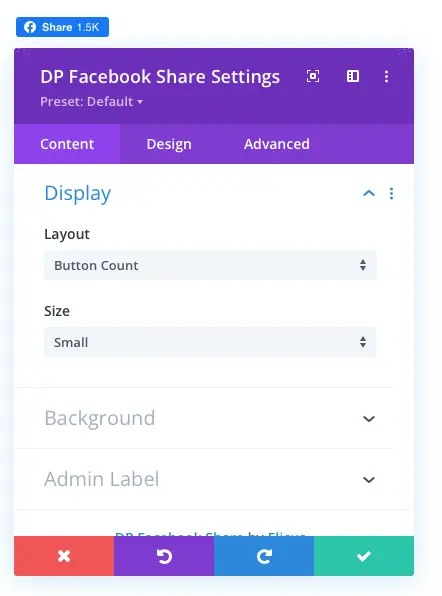
Just like the Like Button, you get all the modification features Facebook provides for the Share button directly in the builder by using the Divi Plus Facebook Share Button module.
Adding the Twitter Share Button
To add the Twitter Share button on your Divi website using Divi Plus, what you need to do is go to Settings → Divi Plus → Integration → Twitter.
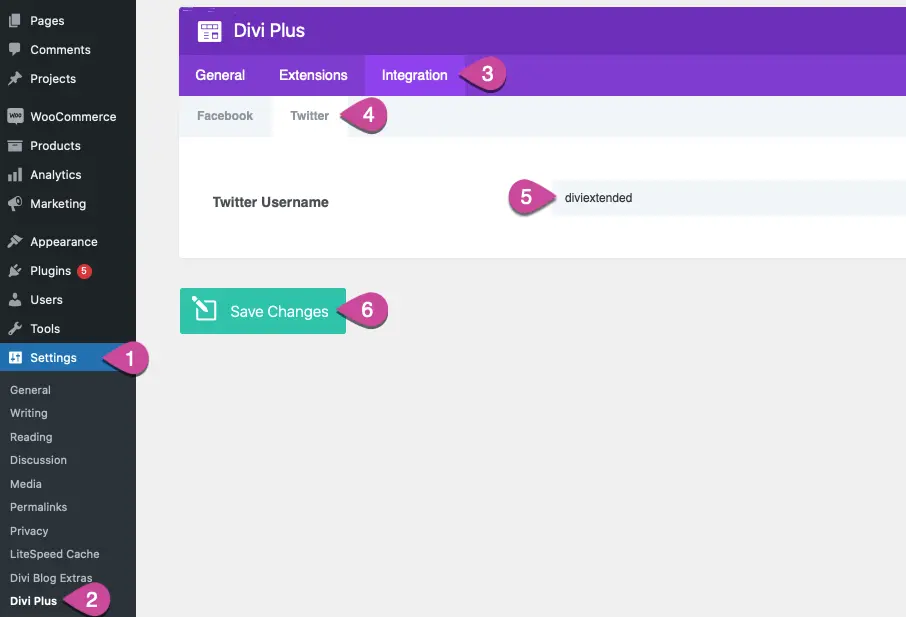
Here, enter the username of your Twitter account and click Save Changes. Then, go to the General option and enable the Twitter Share module. Once done, click Save Changes.
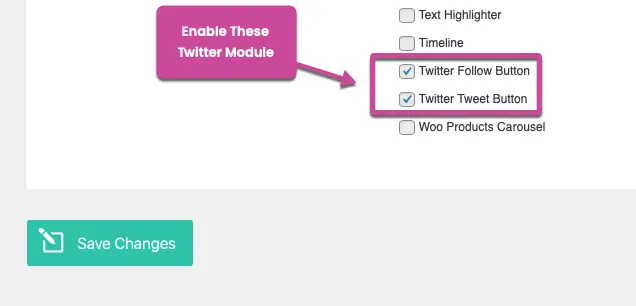
Now, we need to add our module to the page where we want to display the Twitter Share button. Therefore, create a new page or edit the existing one and launch the Divi Builder. Once it’s loaded, add the following module,
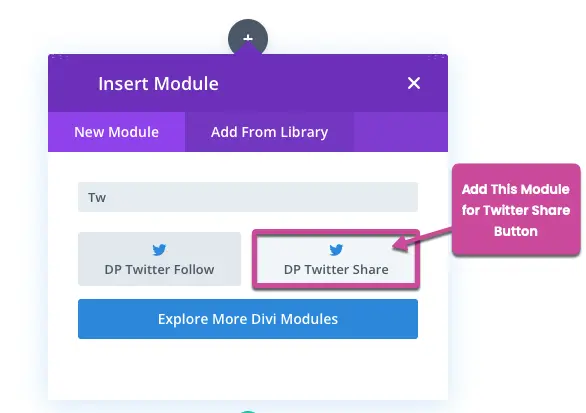
You’ll find the Twitter Share button on the page as soon as you add the module.
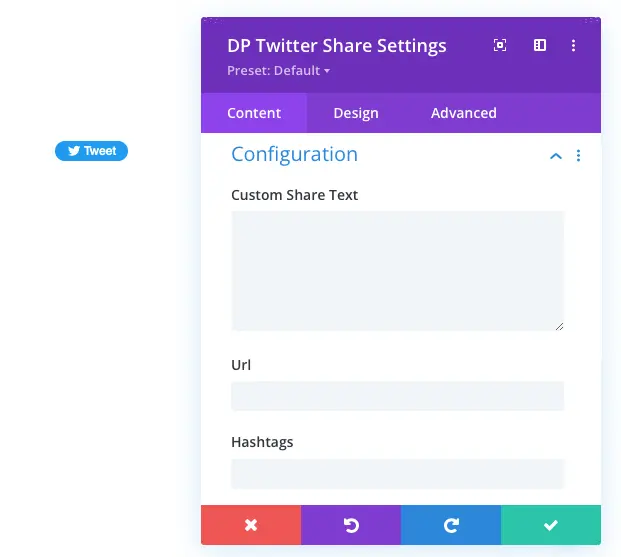
With the Twitter Tweets button, you get a different set of customizations that allow you to,
- Use a custom share text, URL, Hashtags and related accounts.
- Enable the Do Not Track option.
- And change the button size.
Adding the Twitter Follow Button
To add the Twitter Follow button, follow the previous steps mentioned in the above section to add the Twitter username and how to enable the respective module. For this step, you must enable the Twitter Follow button in the Divi Plus settings.
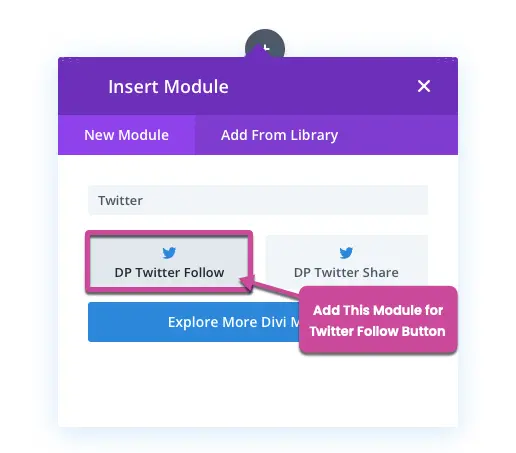
Once you have added the username and enabled the module, open the page where you want to display the Twitter Follow button. On the page, insert the following Twitter Follow module:
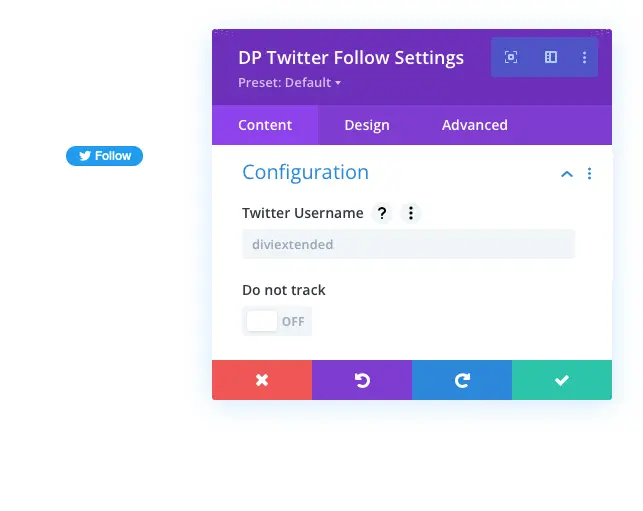
Once the module is added, you can see the Twitter Follow button, using which users can follow your Twitter account directly from your website. The customization options allow you to,
- Display username and followers count.
- Change button size.
- And enable the Do Not Track function.
The Bottom Line
I hope these steps will help you add social media buttons to your website. If you go with the no-plugin method, you won’t get any customization options. Or you have to get involved with the technical part, which is coding. But, if you add them using the Divi Plus module, then you get different benefits, such as,
- A different set of customization options.
- No need to add JavaScript over and over.
- Save time and build fast.
Therefore, it’s recommended you add Facebook and Twitter buttons on your Divi website using the Divi Plus module. Also, Divi Plus is a feature-rich plugin offering multiple modules, hundreds of templates, and even pre-built websites.

Hence, it is a potential investment to craft outstanding Divi websites without spending much time.



0 Comments