

TLDR – Generated With AI
A Divi Timeline is a visual way to display content chronologically or sequentially in WordPress using the Divi Builder. Divi 5 and Divi Plus’ Timeline module make it easy to build without custom CSS. This guide covers 5 types: Photo, Blog, Content, Icon, and Twitter timelines. No coding required for any of the 5 types. Jump straight to your timeline type using the TOC below.
Table of Contents
- What Is a Divi Timeline?
- What Is Divi Plus?
- Benefits of Using a Divi Timeline on Your Website
- Who Should Use a Divi Timeline?
- Timeline vs. Other Divi Layouts — When to Use Which?
- Prerequisites & Setup
- 5 Types of Divi Timelines Using Divi Extended
- Divi Timeline Types — Side-by-Side Comparison
- Common Mistakes to Avoid When Building a Divi Timeline
- FAQs
- Key Takeaways
- Conclusion
What Is a Divi Timeline?
A timeline on a website is a specific design element that presents content, whether images or text, in sequential or chronological order, displayed to visitors one by one as they scroll the webpage. Using it, one can highlight particular past or upcoming events or the journey of an individual or an organization, making them interesting enough to explore. It has certain elements, such as a progress bar, that connect one content to the other, making them appear as a sequence of events that happened at different times, fulfilling the purpose of a timeline.

A timeline can be vertical or horizontal, depending on the requirements of the design project. One can also showcase a date and an icon at the timeline’s start, as well as individual events, making the timeline more informative and better aligned with the content. In Divi, a timeline is created using a timeline module. You can also take help from HTML or custom CSS. However, that would make the timeline strict, with a basic design and fewer possibilities to optimize it further.
Using the new, drag-and-drop of builder of Divi 5, creating a timeline in WordPress is much easier now.
You just need to install the Divi Plus plugin, activate the required timeline modules, insert them into the builder, add your content, apply the customizations, and your Divi timeline is ready to bring events back to life. It adds a storytelling touch and improved interactivity to the event’s content, provides flow, and makes an impact on the explorer’s mind.
Why Use 3rd-Party Divi Timeline Modules?
Divi is a powerful theme for WordPress, and now with Divi 5, you get more design possibilities. However, to make Divi a highly functional WordPress theme, the developer has to limit certain features. You cannot add everything to a single tool, as it will be overwhelming. That’s why, using the native functions of the Divi theme, you cannot create a timeline, but with the help of Divi Plus modules, it’s more than possible.

Divi Plus Timeline modules are lightweight and feature-rich. Offering all the options that make a timeline explorable. You can customize your timelines with depth and flexibility. Thus, designing the kind of Divi timeline you’re looking for your WordPress website. For your assurance, this is what a Divi timeline looks like, created using one of the timeline modules of the Divi Plus plugin.
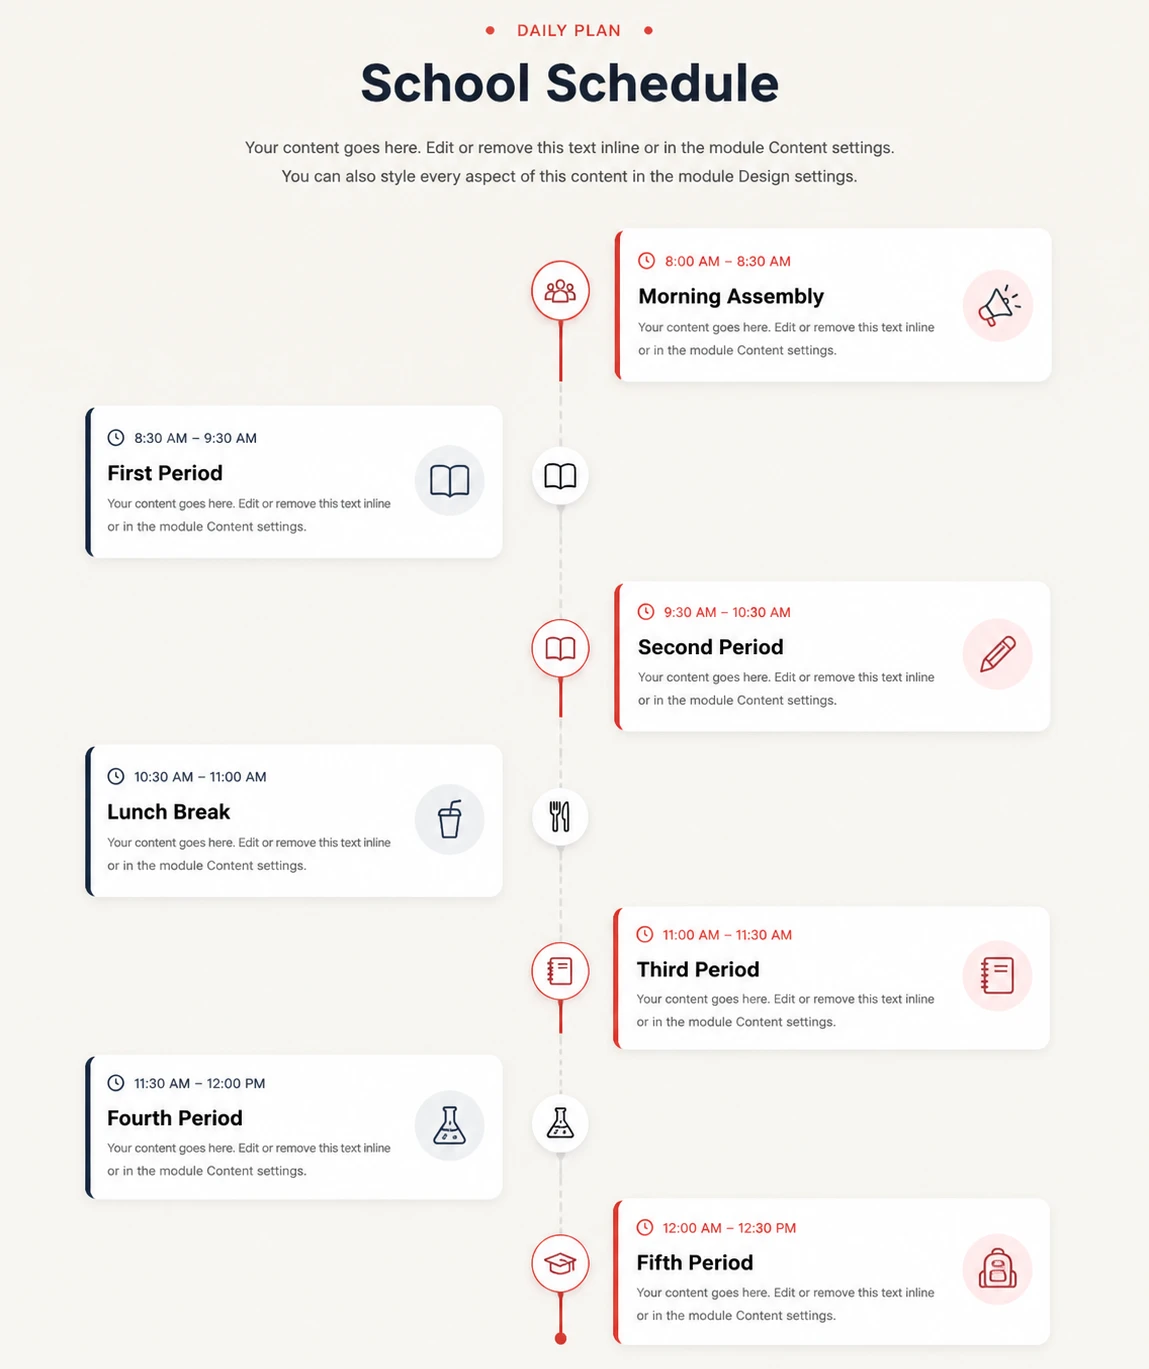
Content Timeline Example 1
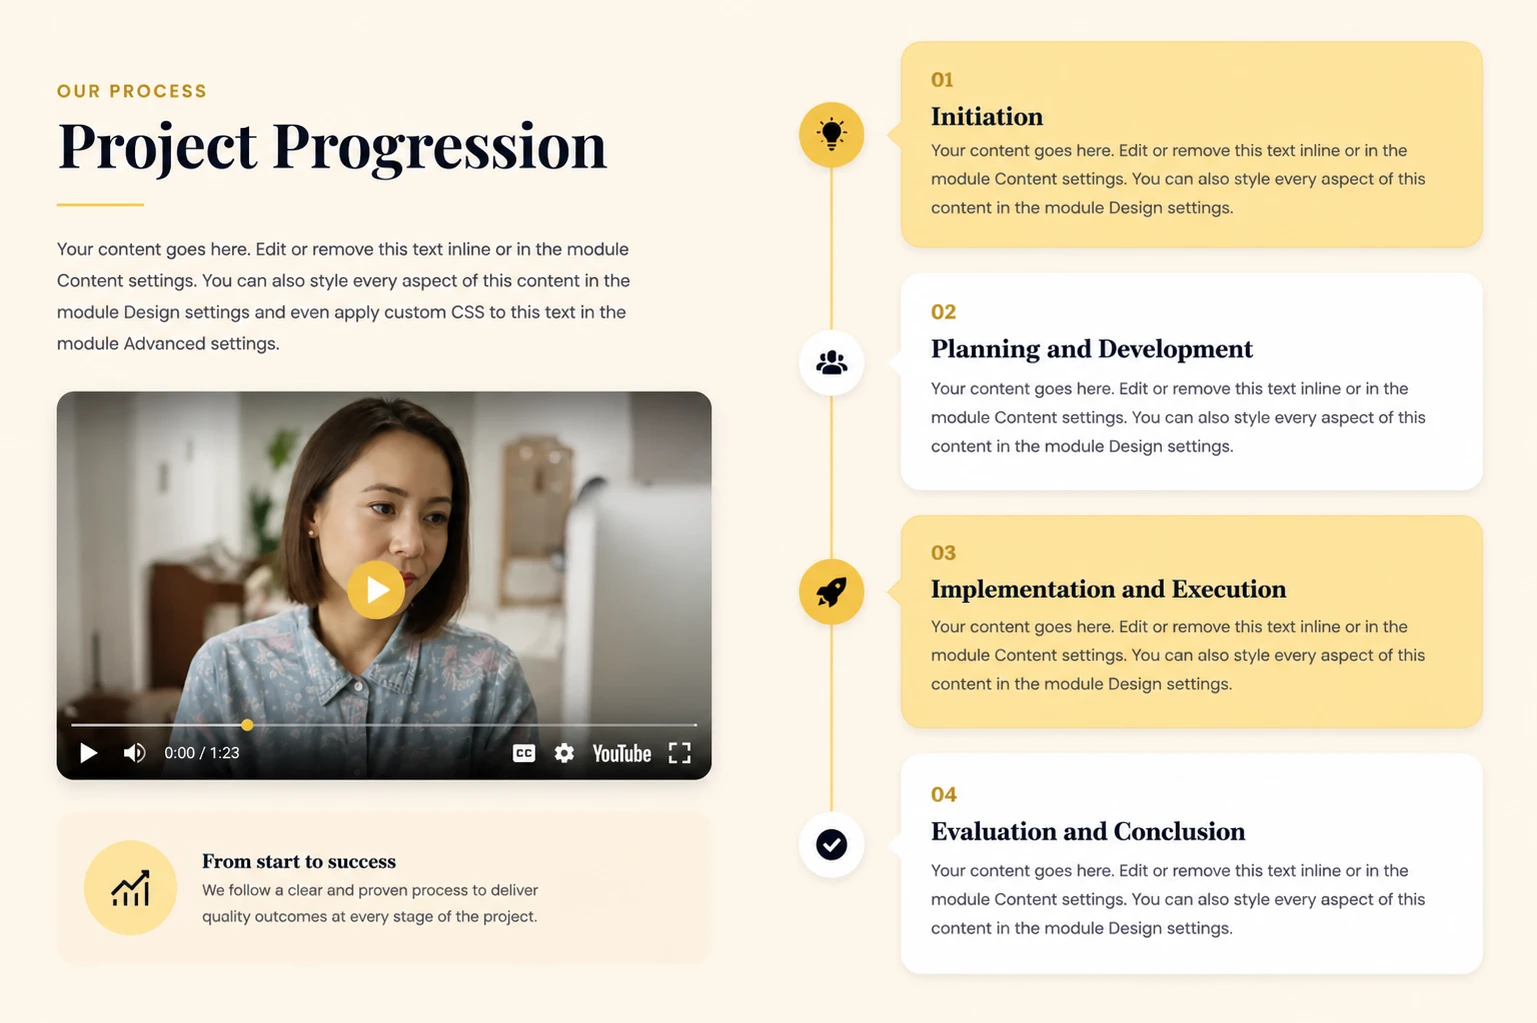
Content Timeline Example 2
What Is Divi Plus?
Divi Plus is a multi-module plugin for Divi. It provides you with more than 100 Divi modules, 150+ prebuilt websites, 900+ sections, 60+ templates, and 5 premium extensions. All of these make building WordPress and Divi websites easy and effective. You don’t have to rely on other plugins; whatever your design requirements are, you can find them in this one. It is a lightweight plugin that offers modules with fewer scripts and cleaner code. So, no compromise with the functionality and performance of the website as well.

The timeline modules you get with Divi Plus are Timeline, Blog, and Twitter (now X)
These timeline modules in Divi Plus enable you to create more types of timelines, such as Photo, Icon, and Content. Each module provides you with extensive customization options so you can use the timeline the way you need it. Furthermore, they are easy to use; hence, you won’t have any confusion or difficulty while creating your WordPress timeline. Divi Plus is a premium plugin with hundreds of free resources, so that you can build any design you want without starting from scratch.
It is available at the Divi Extended store as well as on the Elegant Themes marketplace. Its pricing starts from $79/year for unlimited websites with one year of support and updates.
The plugin is available with a 14-day money-back guarantee, so you can try it risk-free.
Why Use Divi Plus Timeline Modules?
There are multiple Divi Timeline modules available online. Why should one get Divi Plus? If you need a strong reason, then it’s that Divi Timeline modules of the Divi Plus plugin are intuitive, plus they offer many options to customize your timeline the way you need it. Apart from that, Divi Plus is one of the best-selling Divi plugins in the market, and Divi Extended is the #1 Divi developer, which means you can expect a quality product and dedicated support.
Moreover, the plugin includes additional useful modules and resources that make it easier to design WordPress websites of any kind. Another good reason for you to go with Divi Plus timeline modules.
Benefits of Using a Divi Timeline on Your Website
When you add content to your website in a timeline format, the first benefit is that it helps you present information in a visually scannable format. Users or visitors of the website don’t have to force themselves to engage with the content or understand the information.

Another benefit of using a timeline is that it’s ideal for storytelling, processes, and history pages.
You don’t have to do much for the contents that need that type of presentation. You just simply have to use the timeline module, add your content, and the rest will be taken care of. Apart from these, a timeline:
- Increases time-on-page and content engagement.
- Works for both static content and dynamic WordPress data (posts, feeds)
- Fully responsive and mobile-friendly by using the Divi Plus timeline modules.
Who Should Use a Divi Timeline?
Generally, there’s no limit on who can use a timeline on a website. However, if we are talking about essentialism, then it’s a good website element for the following user categories:
- Bloggers: to help them display post archives or content history.
- Businesses: to showcase company milestones or product roadmaps.
- Portfolio sites: to help customers or prospects walk through projects or case studies with improved engagement.
- News and media sites: for covering events chronologically.
- Personal brands: to present career history or an about page timeline.
Now, when reading the above categories, one shouldn’t avoid trying a timeline if they don’t fit into them. Creativity has no limits, so try a timeline, whether you are a blogger or not. Surely, you can create something interesting out of it, for your own domain or industry.
Timeline vs. Other Divi Layouts — When to Use Which?
WordPress offers many possibilities, and so does the Divi theme. In this phenomenon, you’ll find blocks and modules that help you add content in a specific design. However, the way the work isn’t the same as a timeline. So, it’s better if you know the difference between when to use which one. The following will help you quickly spot the difference:
Divi Timeline vs. Accordion
As we discussed above, a timeline shows content in sequential order and adds a storytelling touch; however, an Accordion doesn’t work that way. It displays content in a toggle and showcases it to the user when they expand the toggle, just like the following:

You can use an accordion when you don’t want to have everything visible to the website visitor. They can only access it when they interact with it.
Divi Timeline vs. Slider
By using a slider on a website, one can showcase rotating content. Users can either explore the content by sliding the slider/carousel or have it slide automatically. It features sliding effects, arrows, and pagination to improve the content presentation and make it easy to interact with. In case of a timeline, one scrolls the page to view the content, not slides the timeline.

One should use a slider when interactive content is needed. Everything you add is standalone and has no connection. Whereas a timeline’s purpose is to create a connection, create a flow among whatever is added/showed inside it.
Prerequisites & Setup
To create a Divi Timeline in WordPress, you need to meet the following requirements:
- Divi theme or Divi Builder is installed and active. (Divi 5 recommended)
- Divi Plus plugin installed and activated.
- Timeline modules activated.
Here’s how you activate the Divi Plus Timeline modules:
- On your WordPress Dashboard, go to Divi Plus.
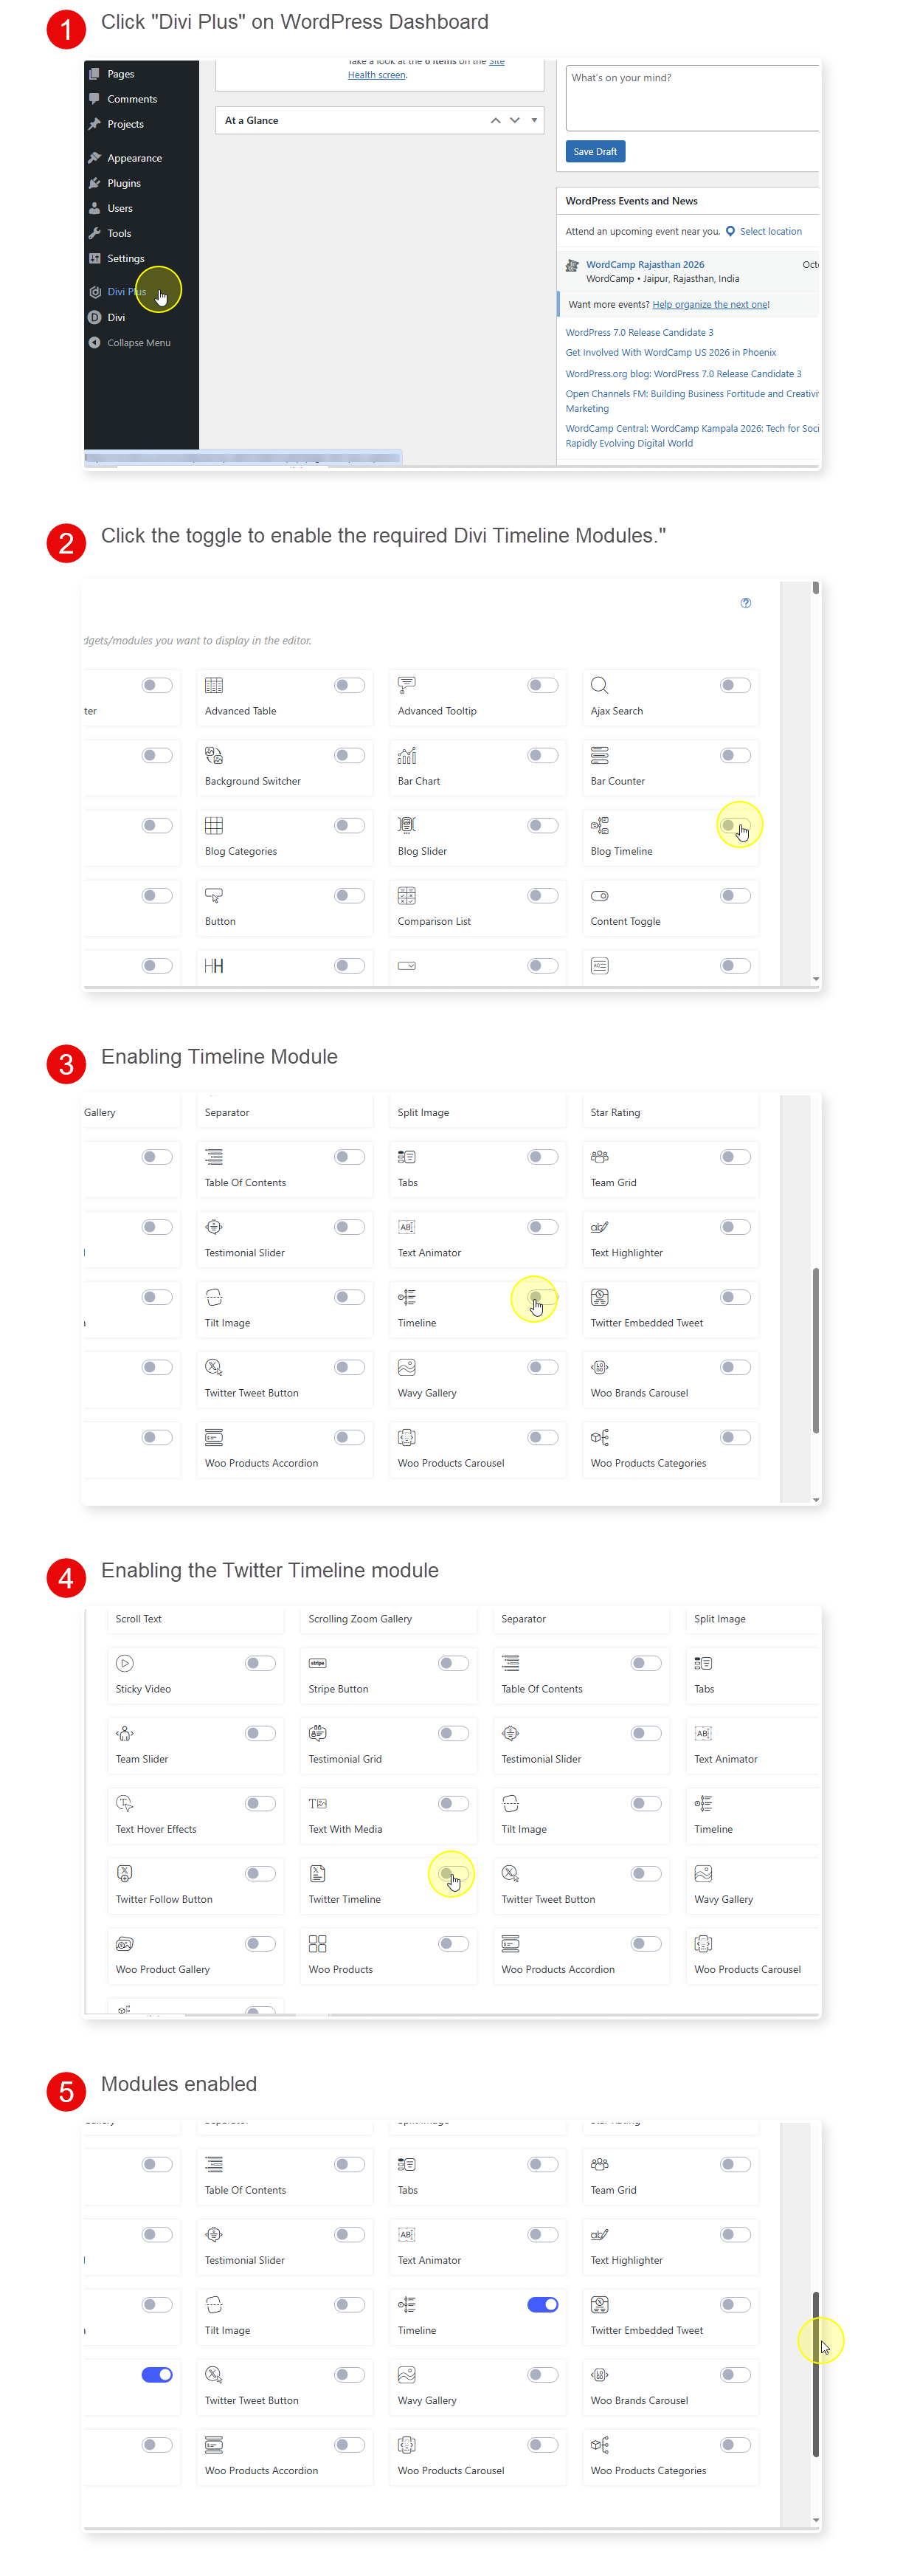
- Then, enable the Divi timeline modules one by one.
Since we have activated our modules, it’s time we create the dedicated timelines. Follow the sections below to learn how to do it.
5 Types of Divi Timelines Using Divi Plus
By following the steps mentioned in this section, you’ll be able to create the timelines below in WordPress:
Let’s start with Photo Timeline, shall we?
Type 1 – Photo Timeline

Best for: Portfolios, travel blogs, event recaps, visual storytelling
Overview: A photo timeline shows photographs of an event or journey in an organized, sequential order to improve engagement and connection.
What You’ll Need
- Divi Plus Timeline module
- Optimized images (recommended dimensions)
Steps to Create a Photo Timeline
The first step in creating a WordPress photo timeline using the Divi 5 builder and Divi Plus module is to create a new page or edit an existing one, where you need to show the timeline.
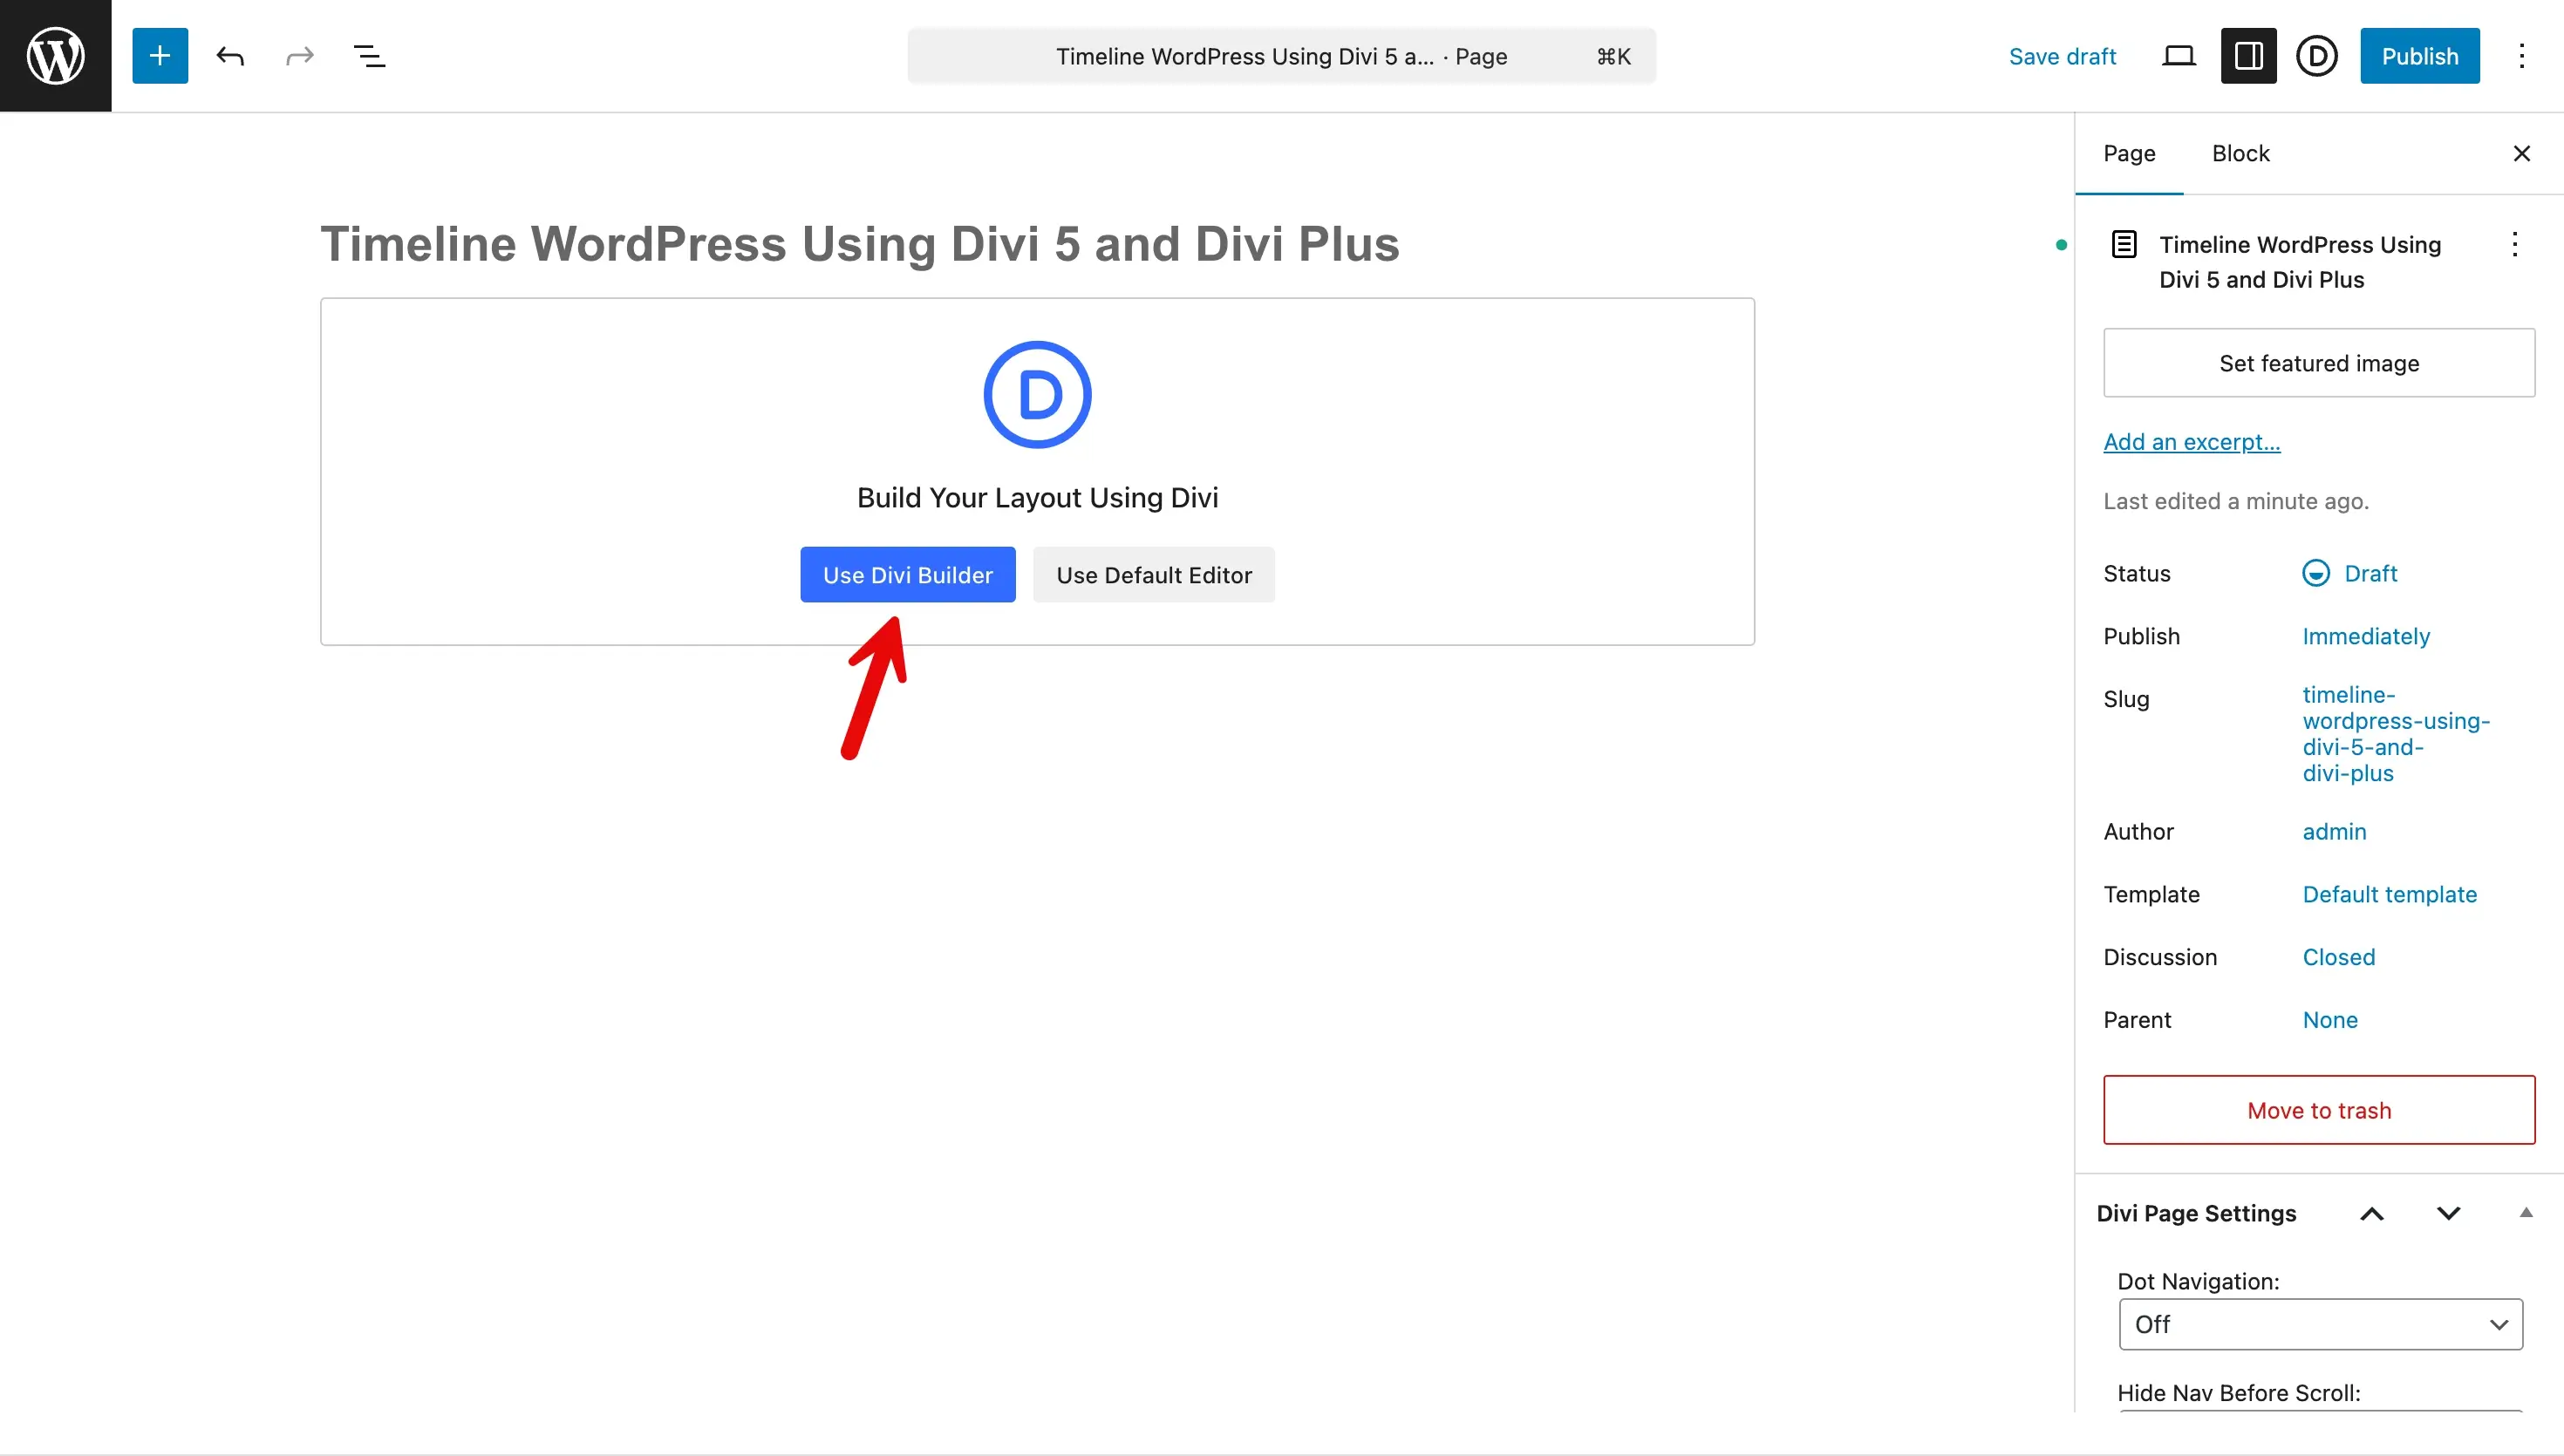
Enter the page name, then click the blue button “Use Divi Builder.” This will open the Divi 5 builder with all the options to create your photo timeline.
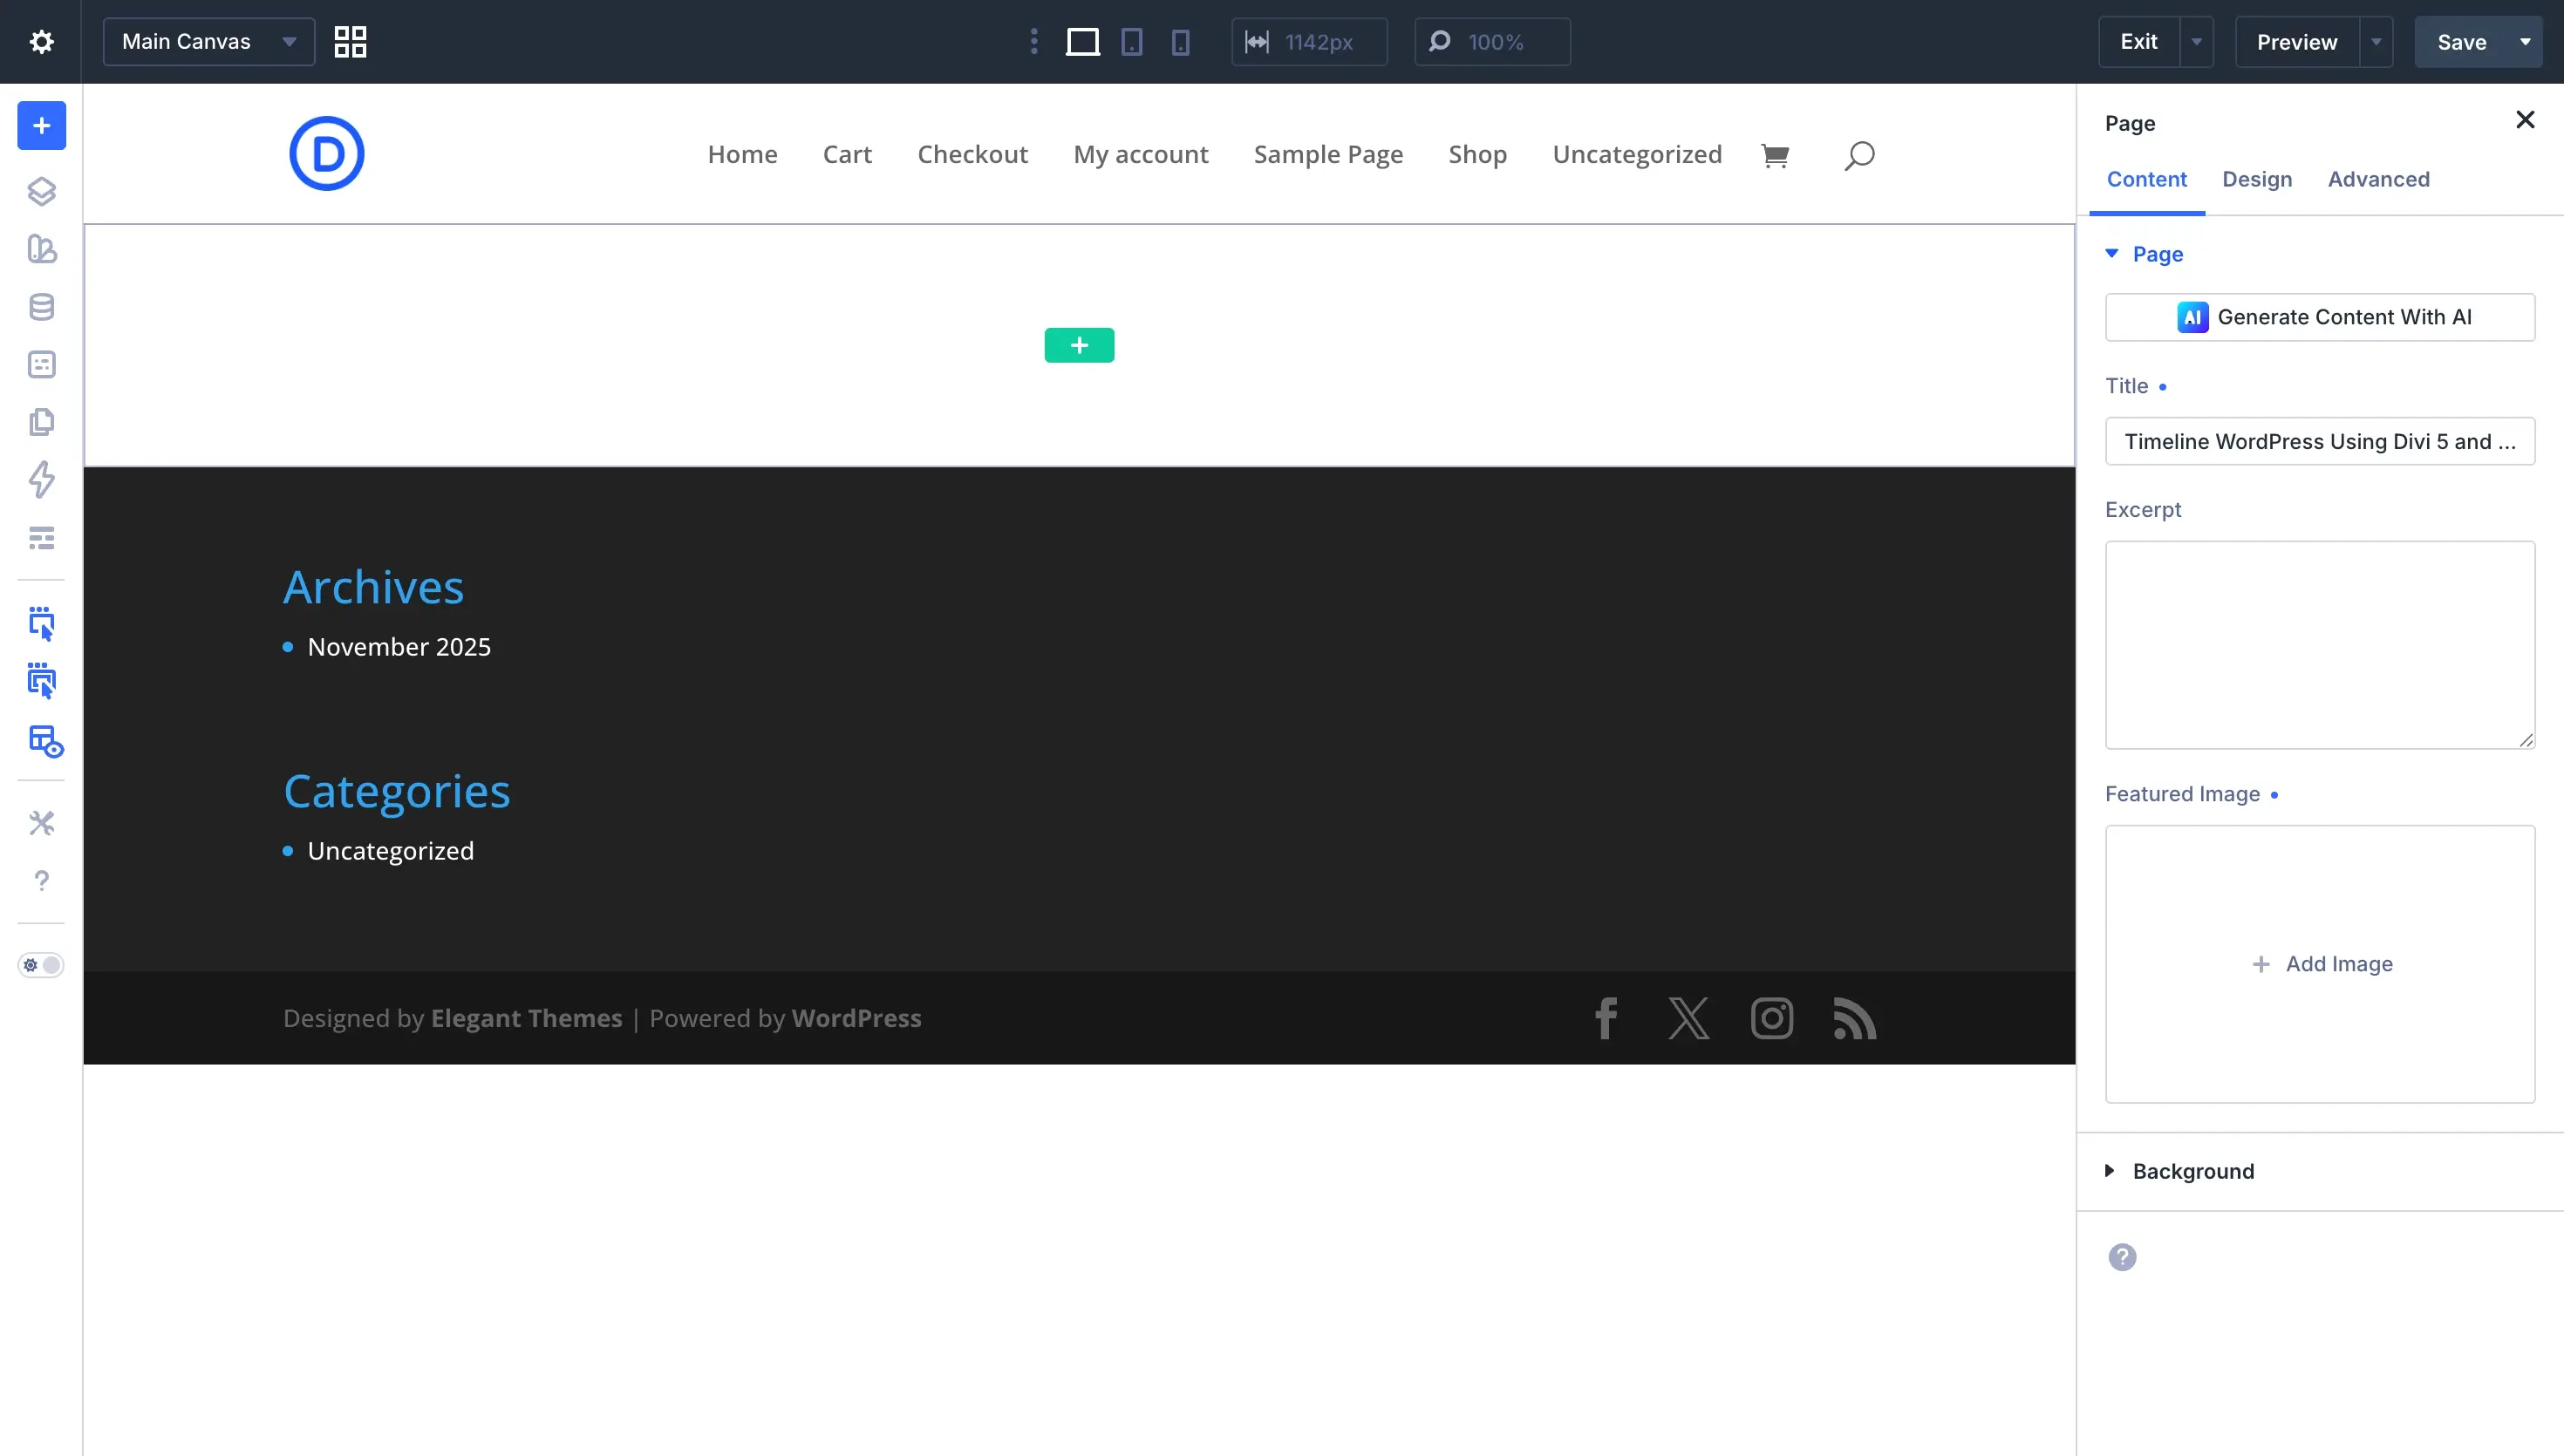
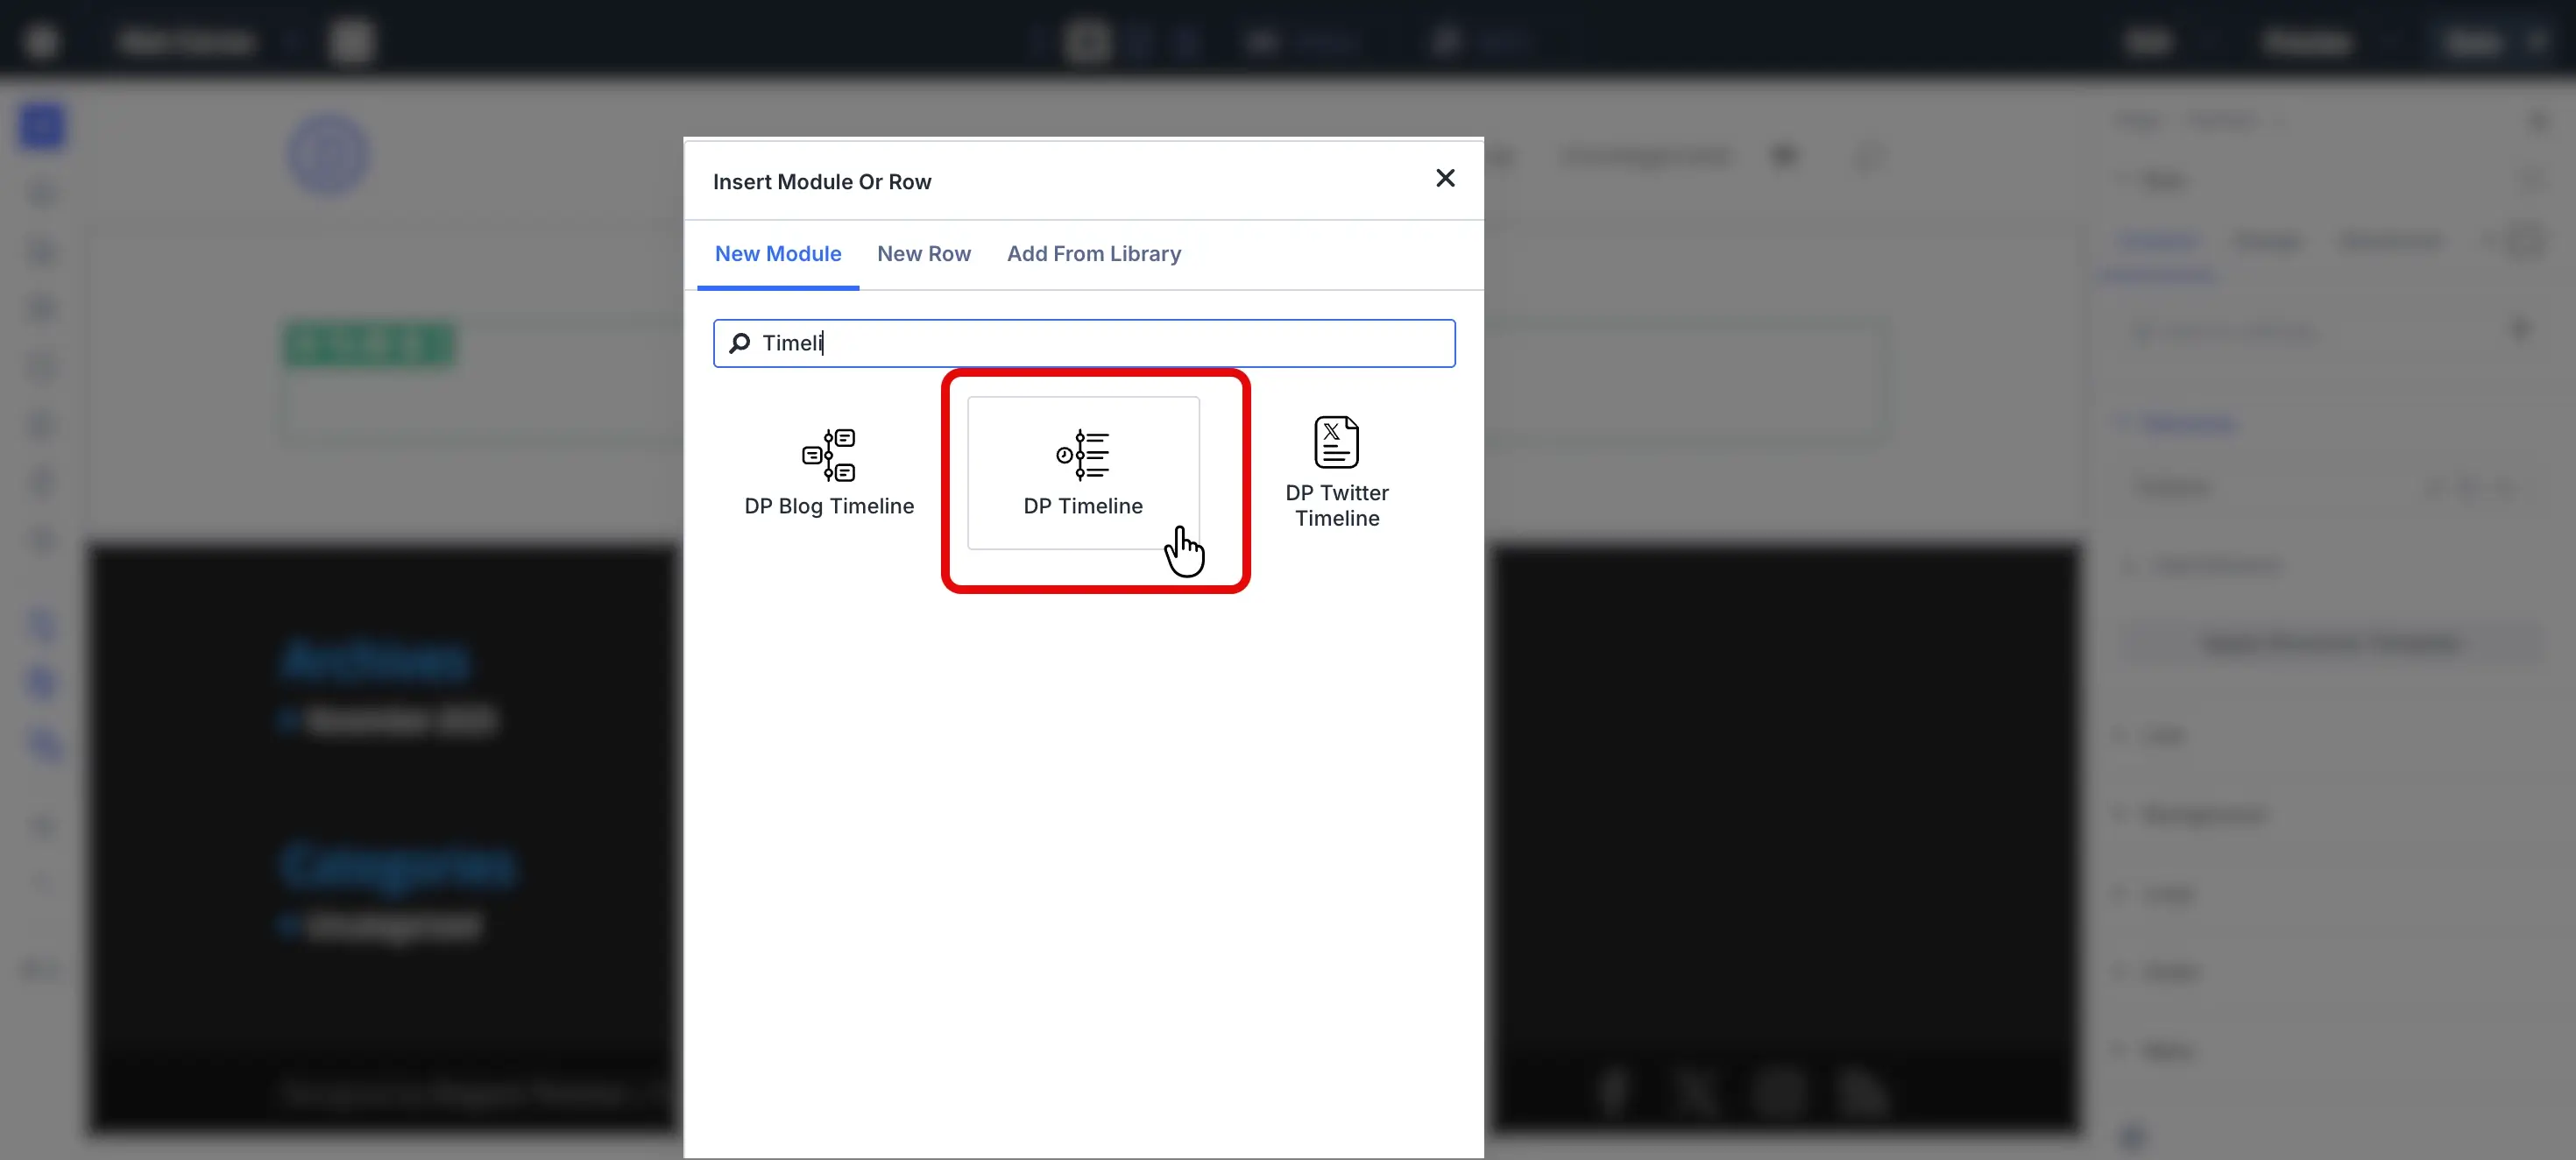
Now, click the green plus button, then insert a new row. After that, search for the Timeline module and select DP Timeline.
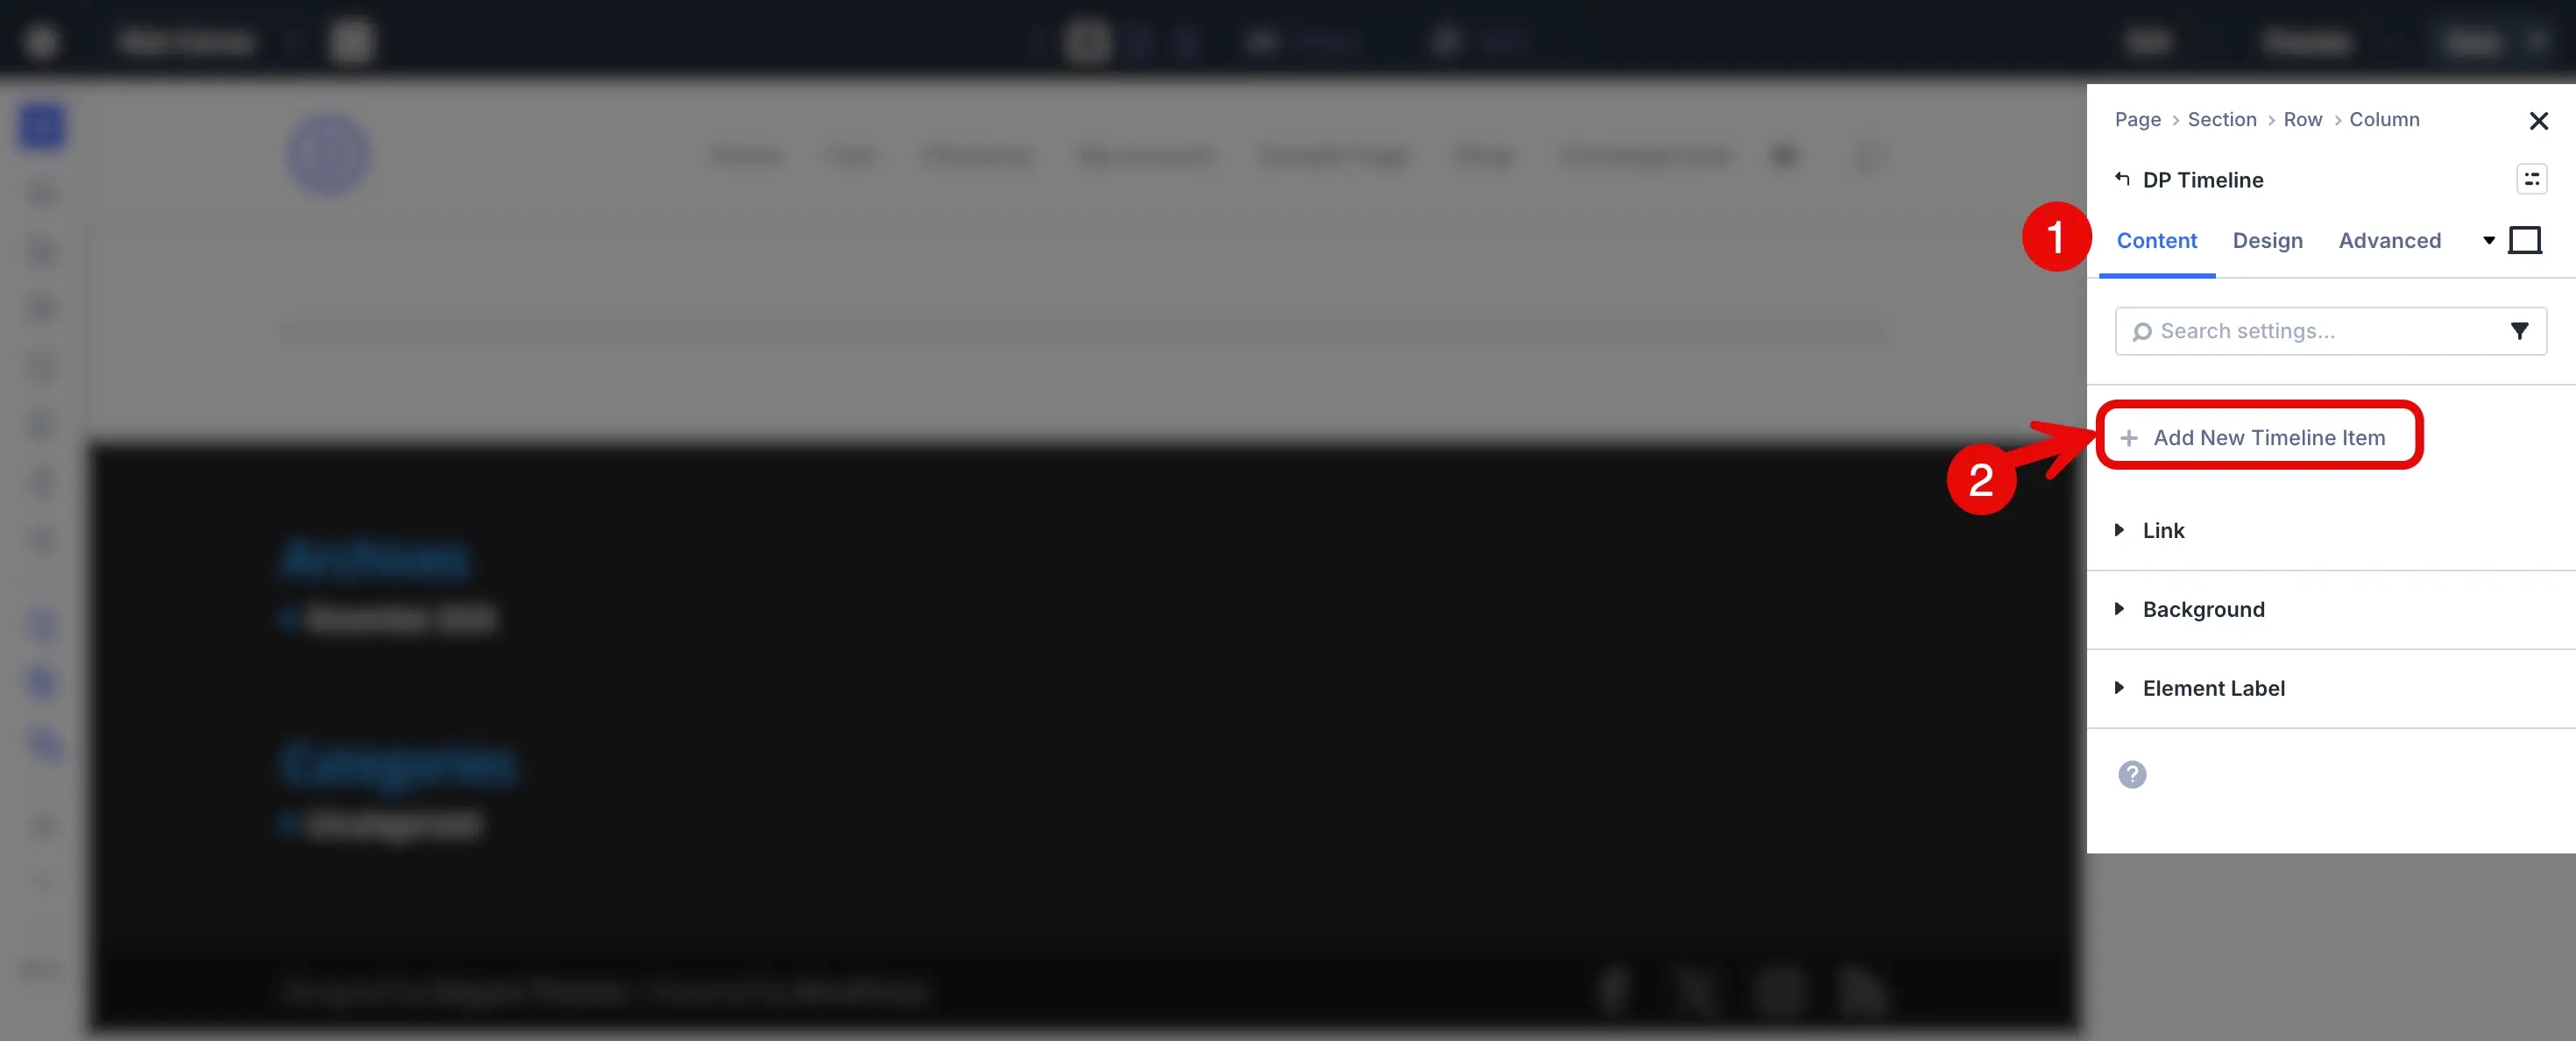
Once you’ve added the module to the builder, you can add timeline items. Go to the right sidebar → Content → click Add New Timeline Item.
This will add the photo timeline item, the circle, and the grey content area, in which you can add your timeline content.
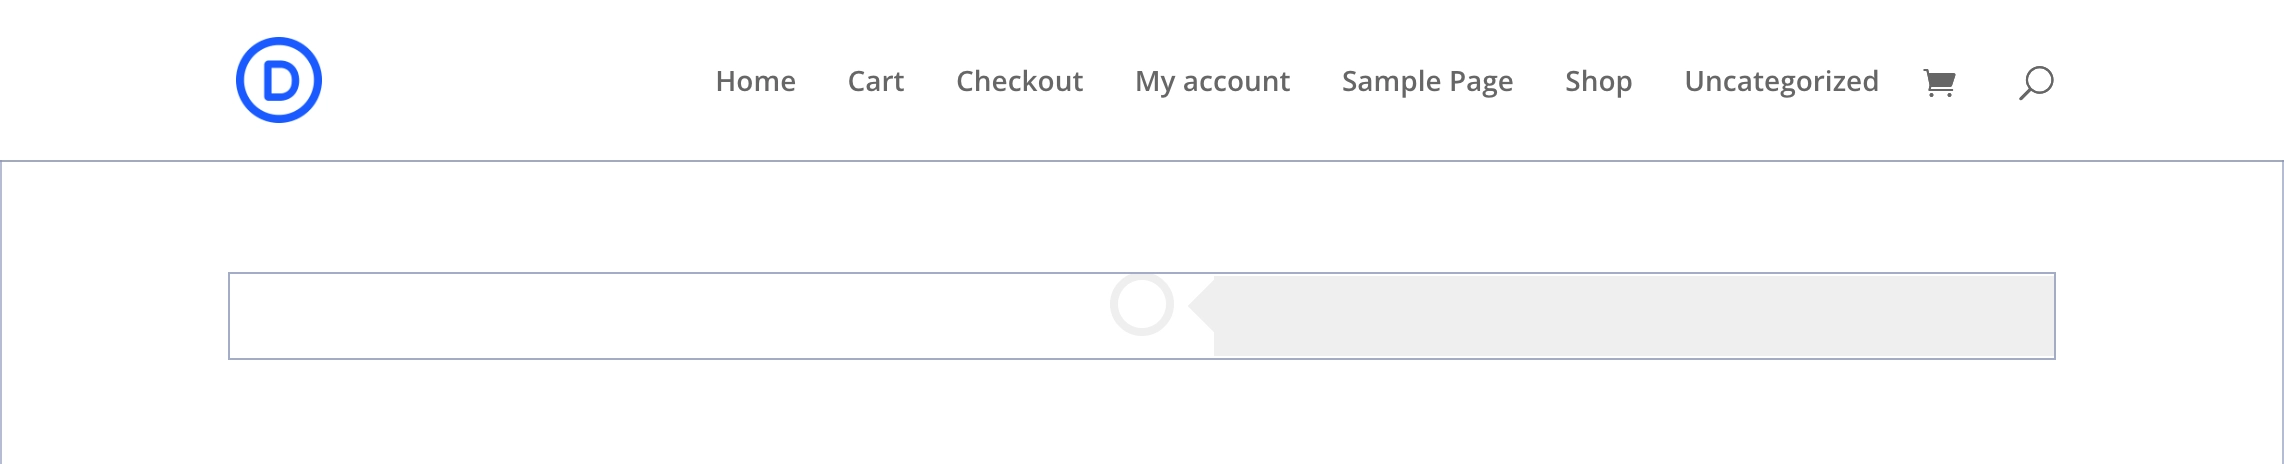
This is a single item for the photo timeline. To complete the timeline, add multiple items; once you do, it will look like the following.
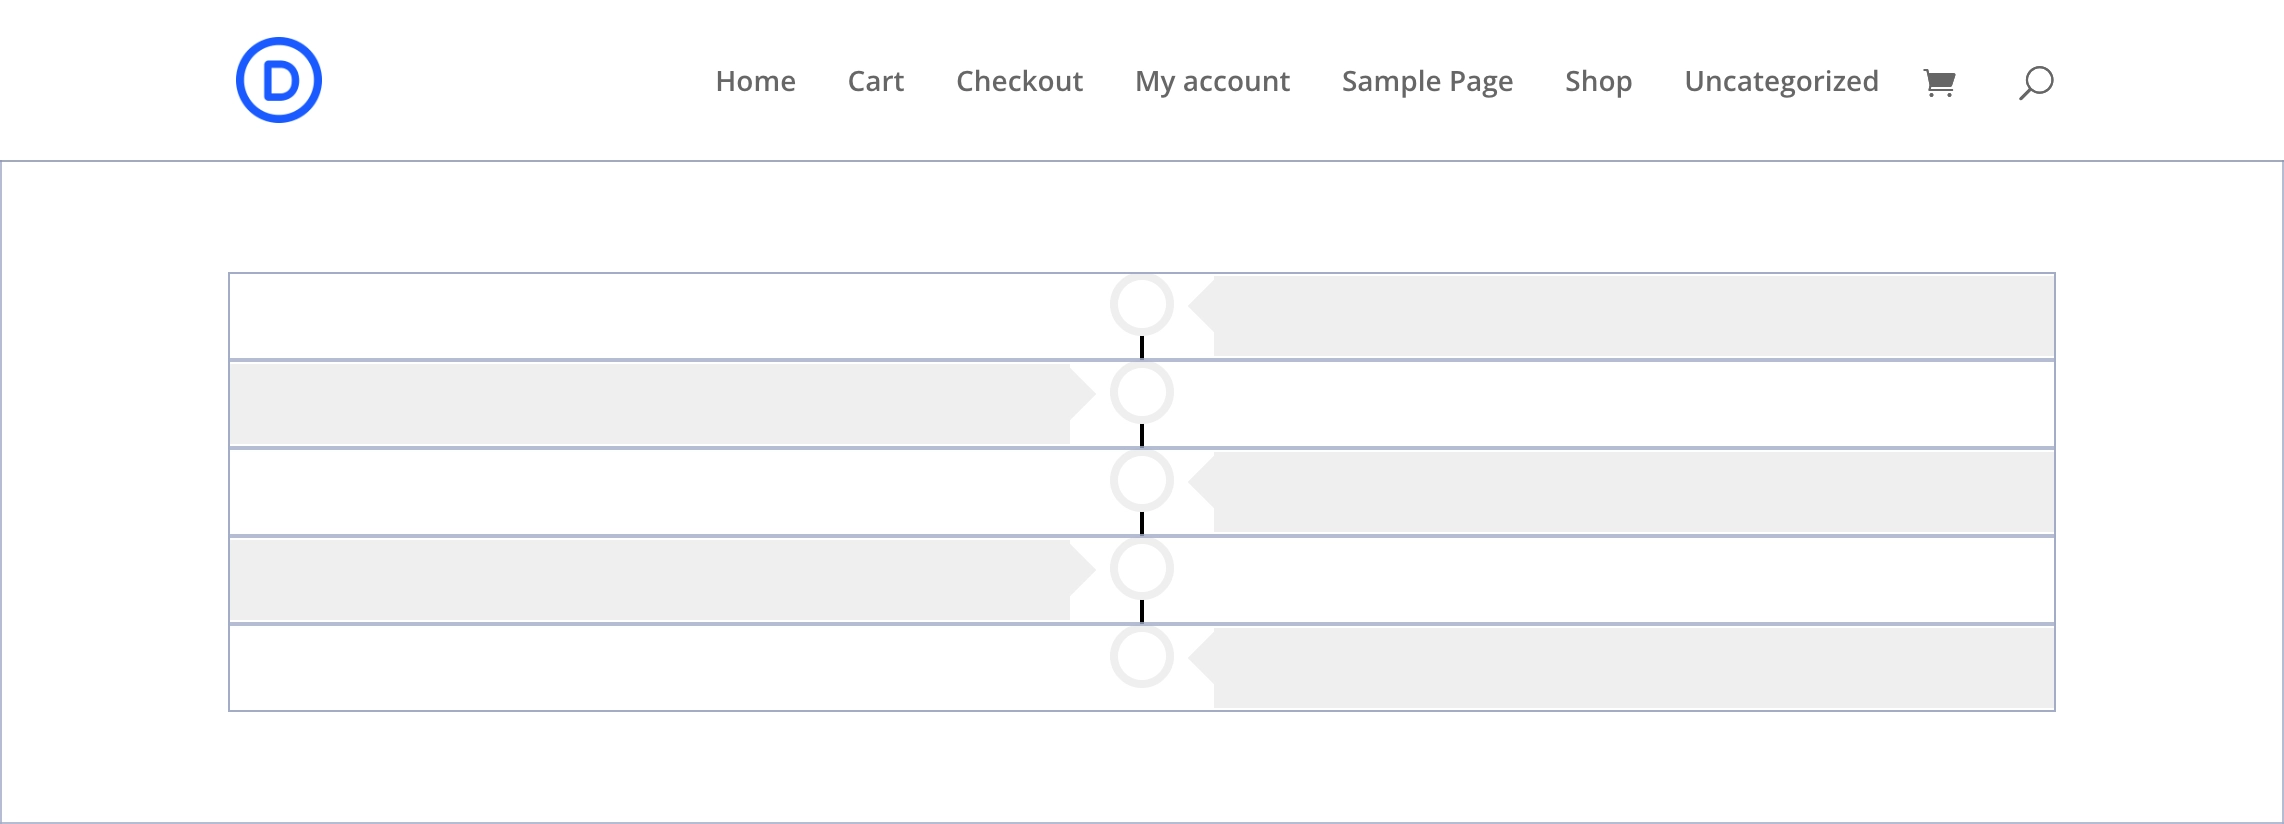
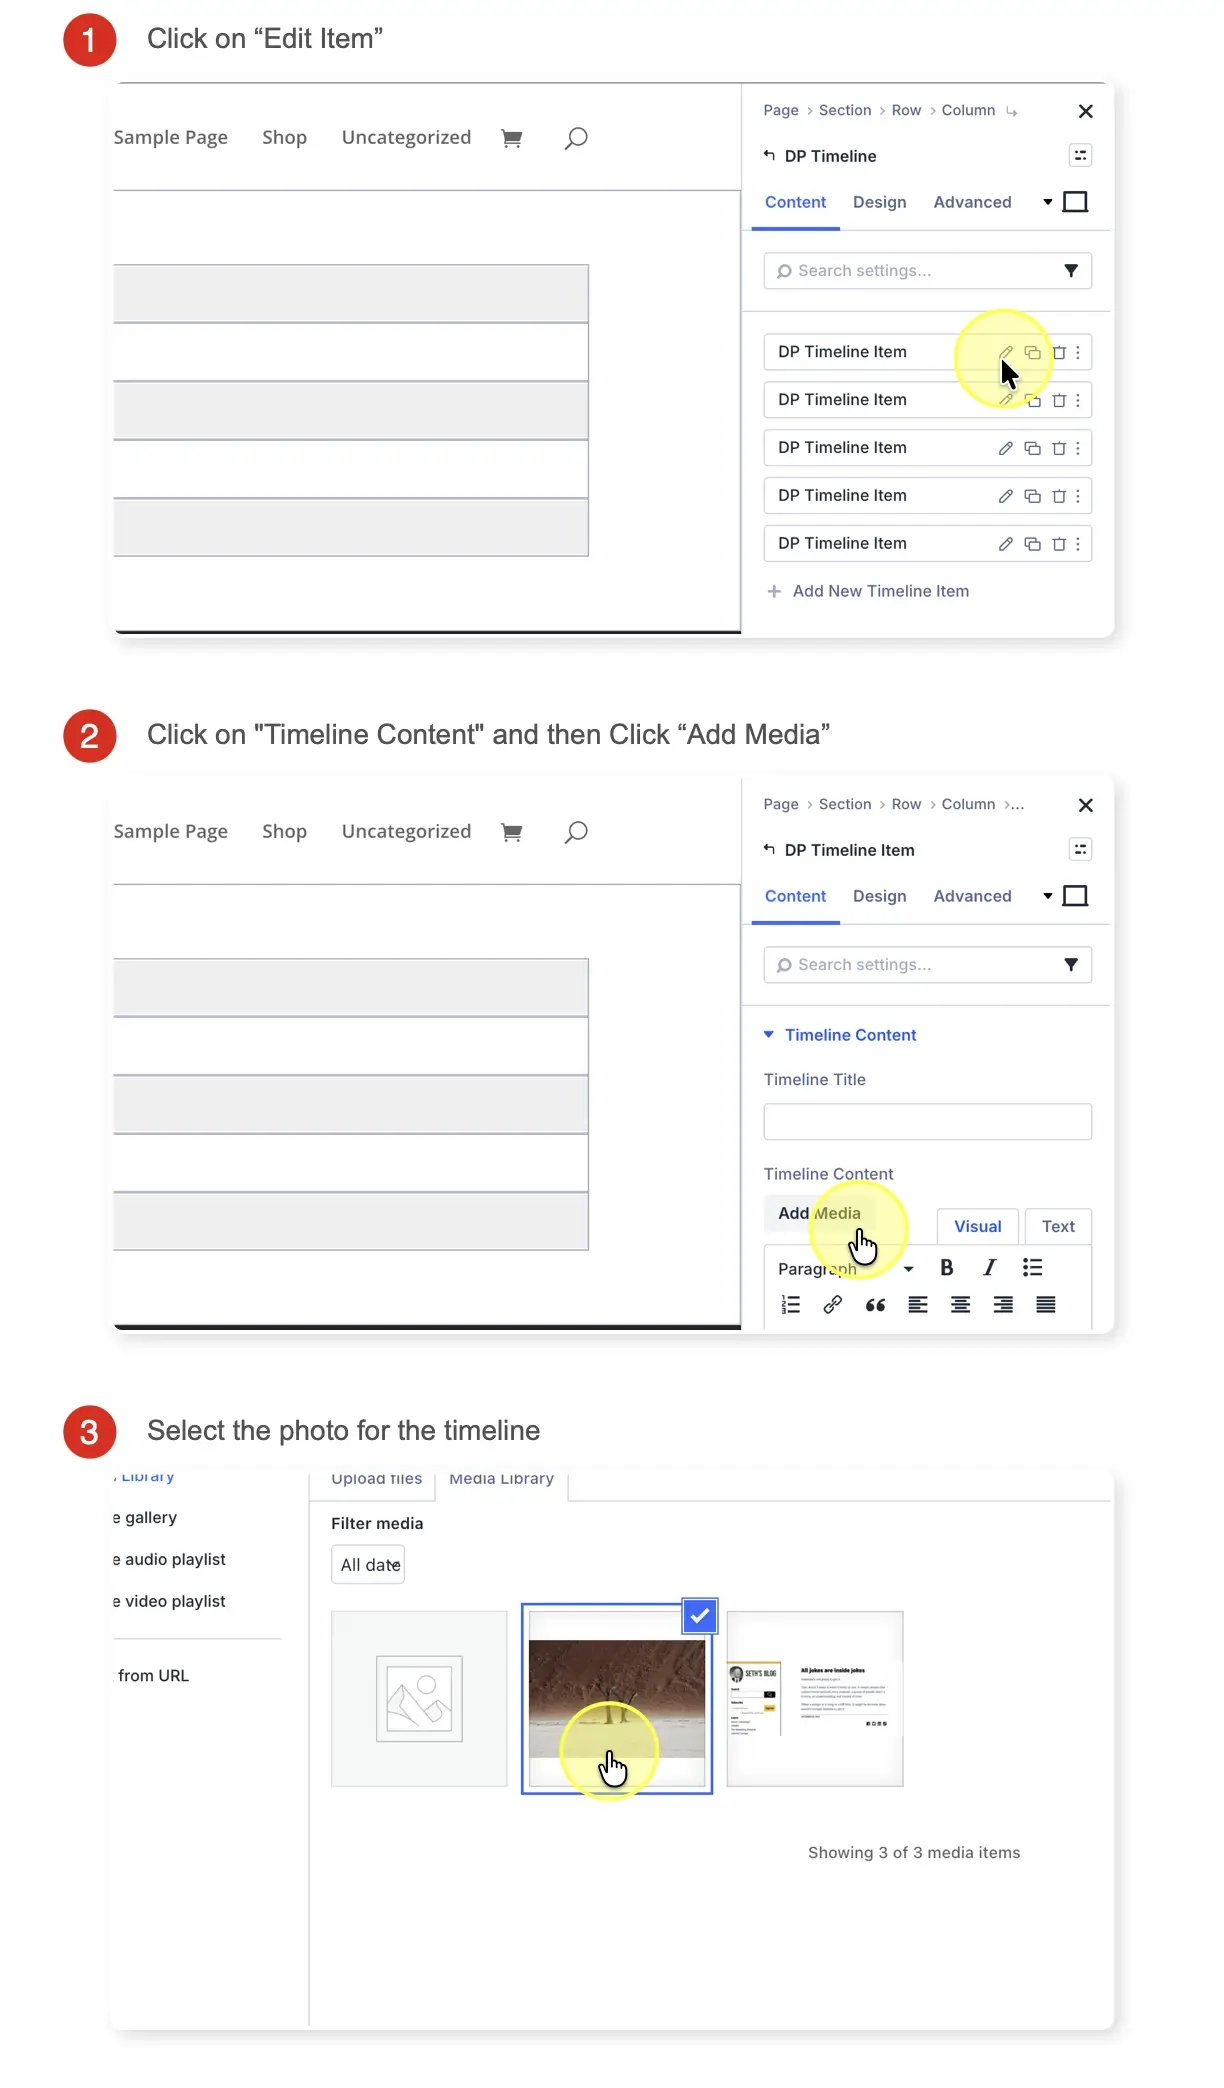
Now that we have multiple items in the timeline, it’s time to add our photos. So, to do that, go to each item and click the edit icon, then open the Timeline Content, click Add Media, choose the image, and click Select.
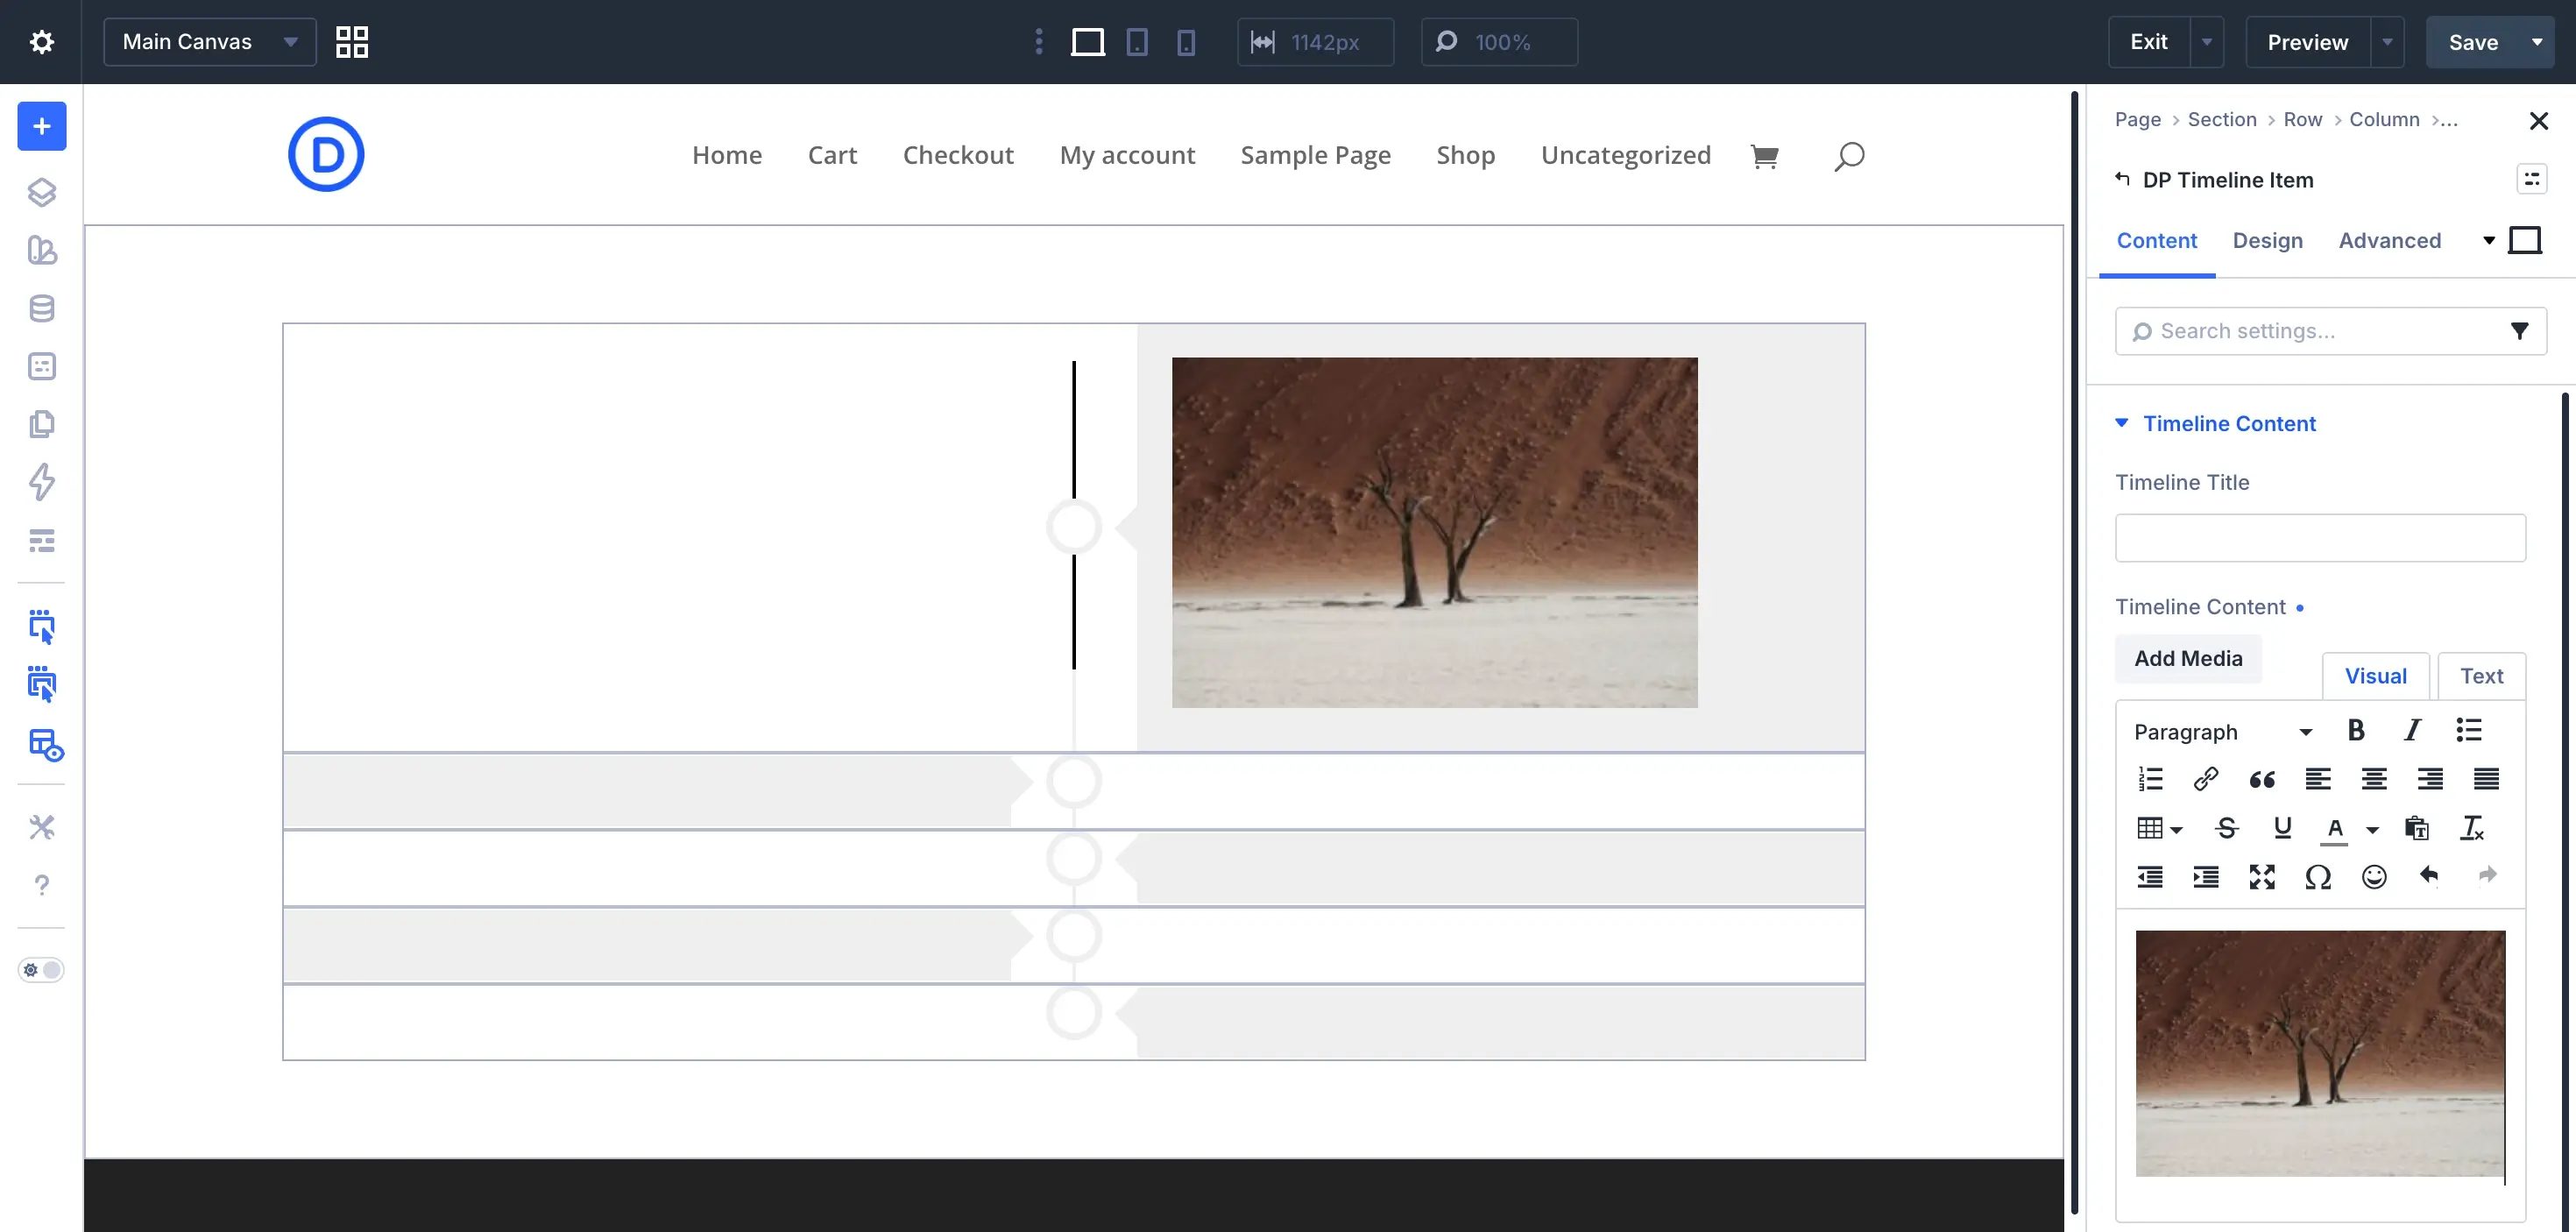
Once you finish the steps above, you can see your photo in the timeline, as shown below.
Likewise, you can add images to other items of your photo timeline one by one, and it will start to look like the following.
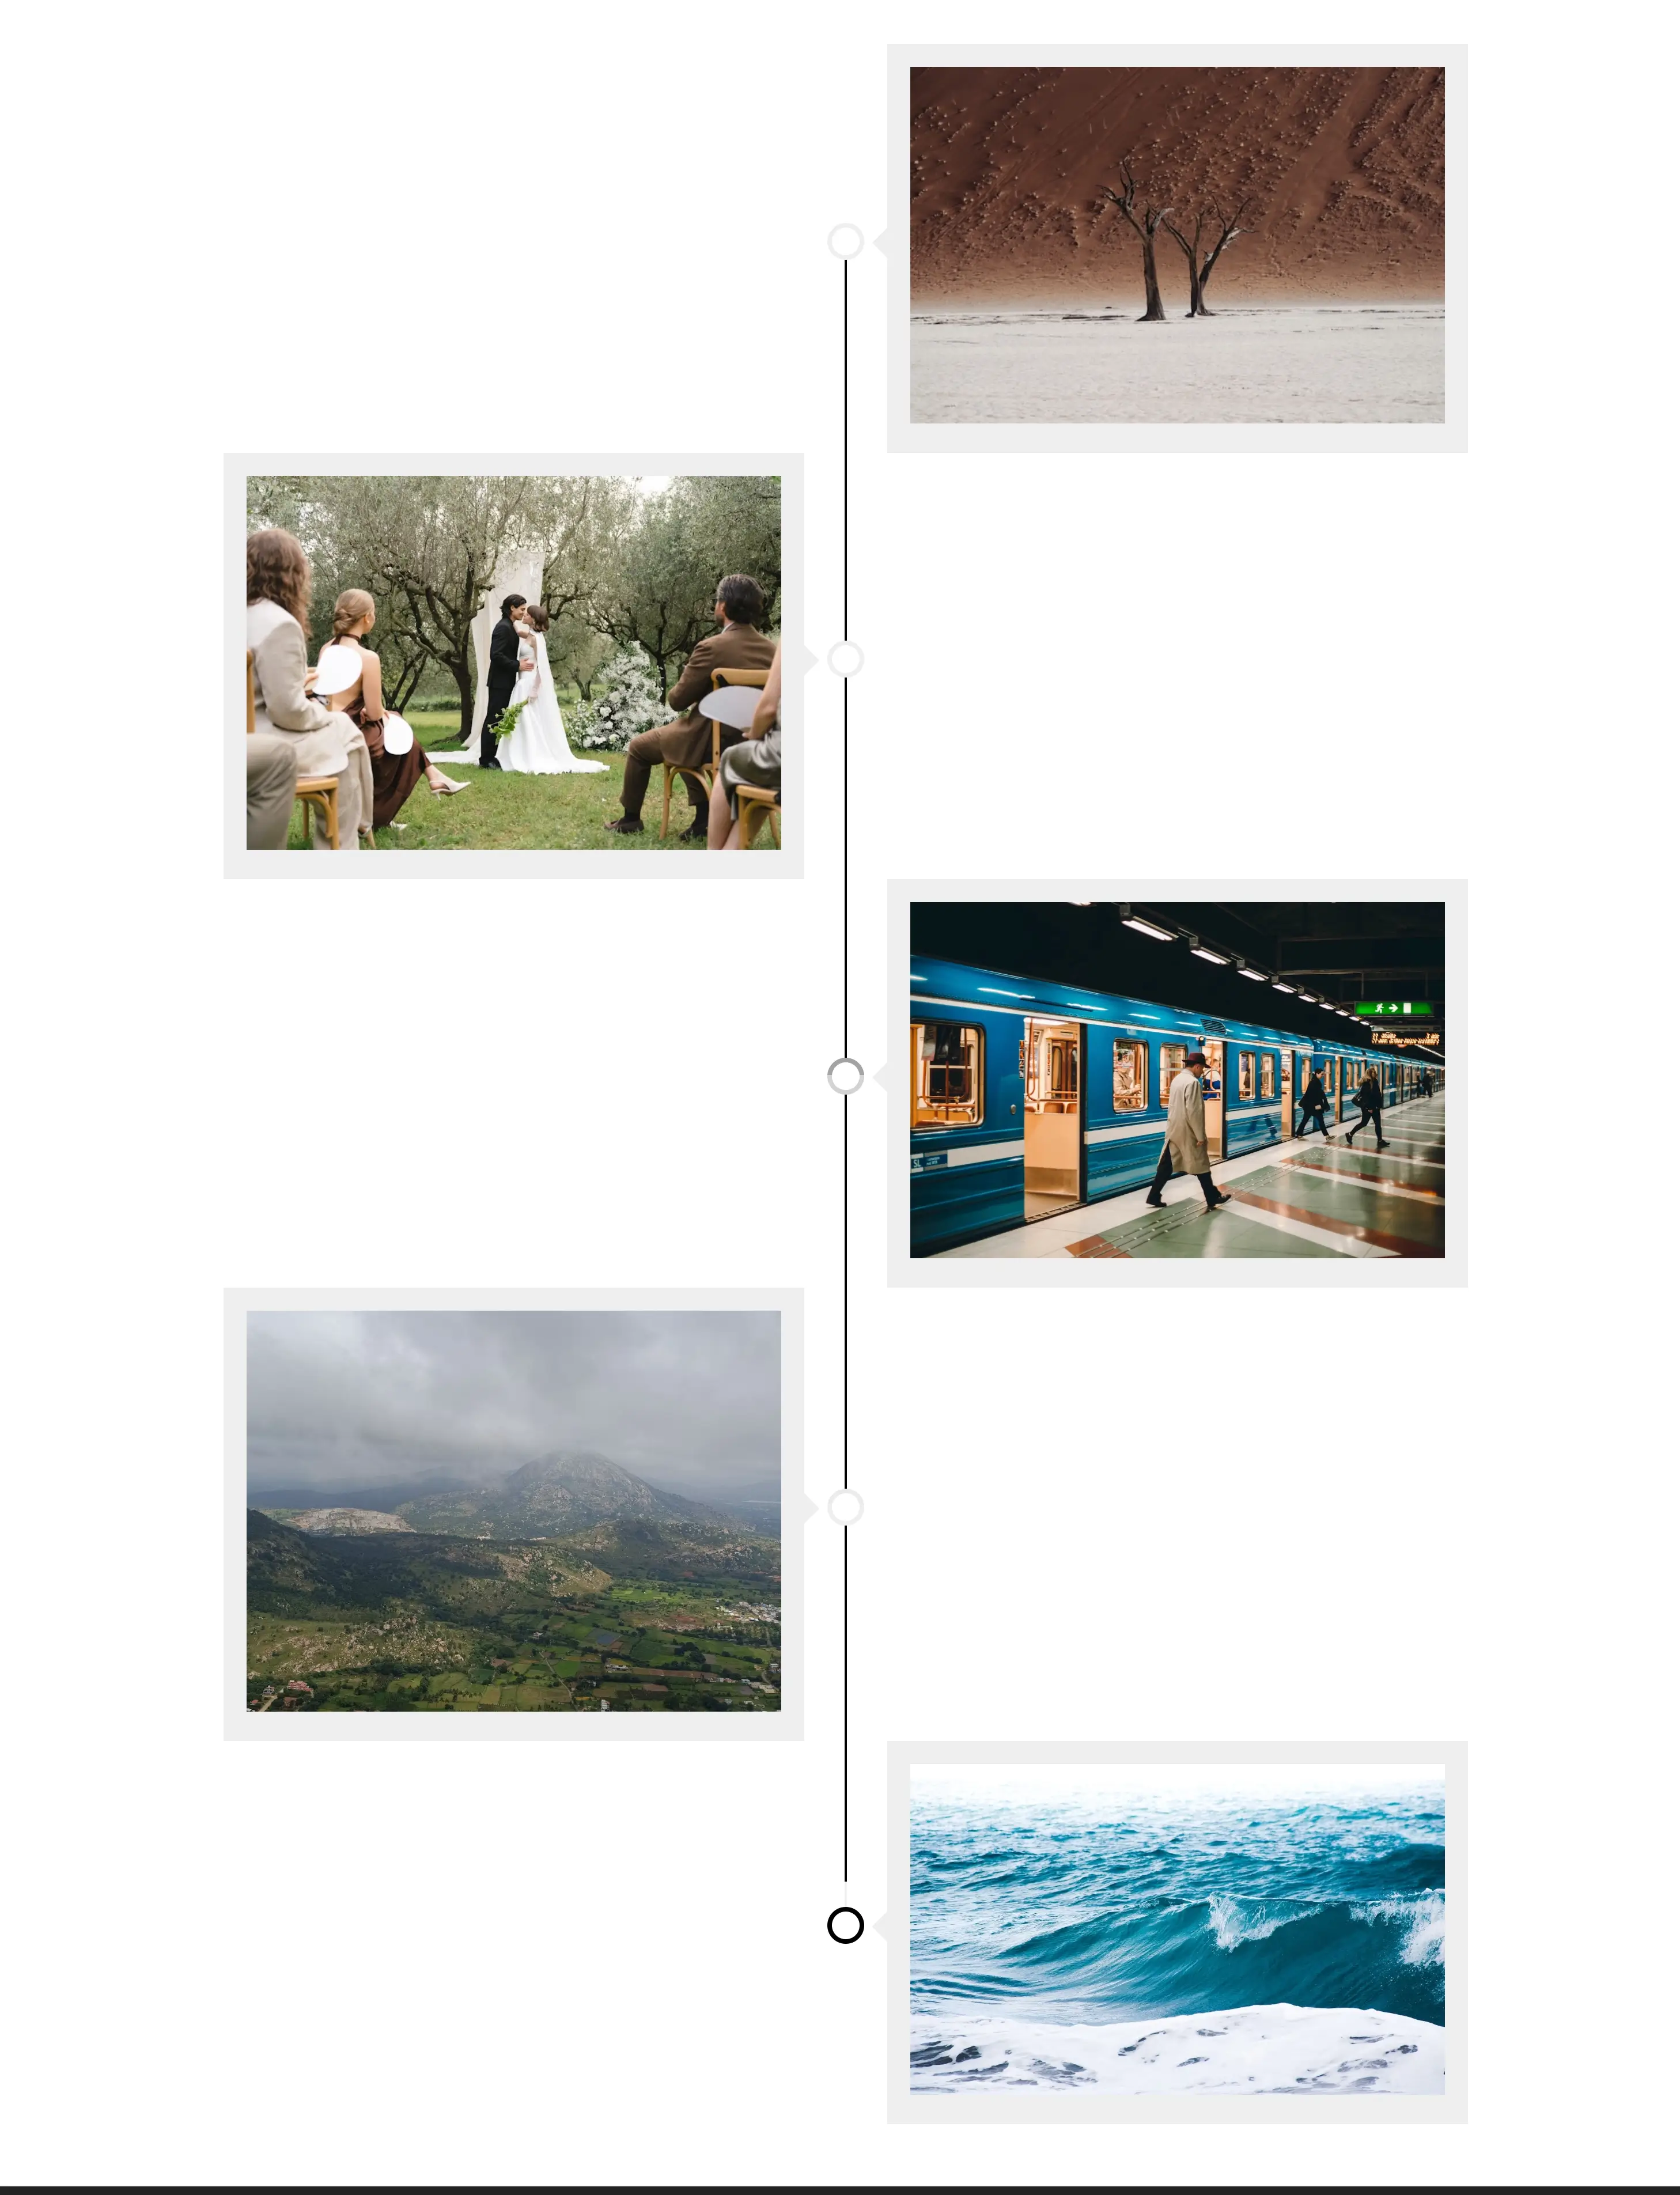
Now that we have added the images, it’s time we add a title and time to our photo timeline to make them look more informative and engaging.
Adding Title and Time to the Photo Timeline
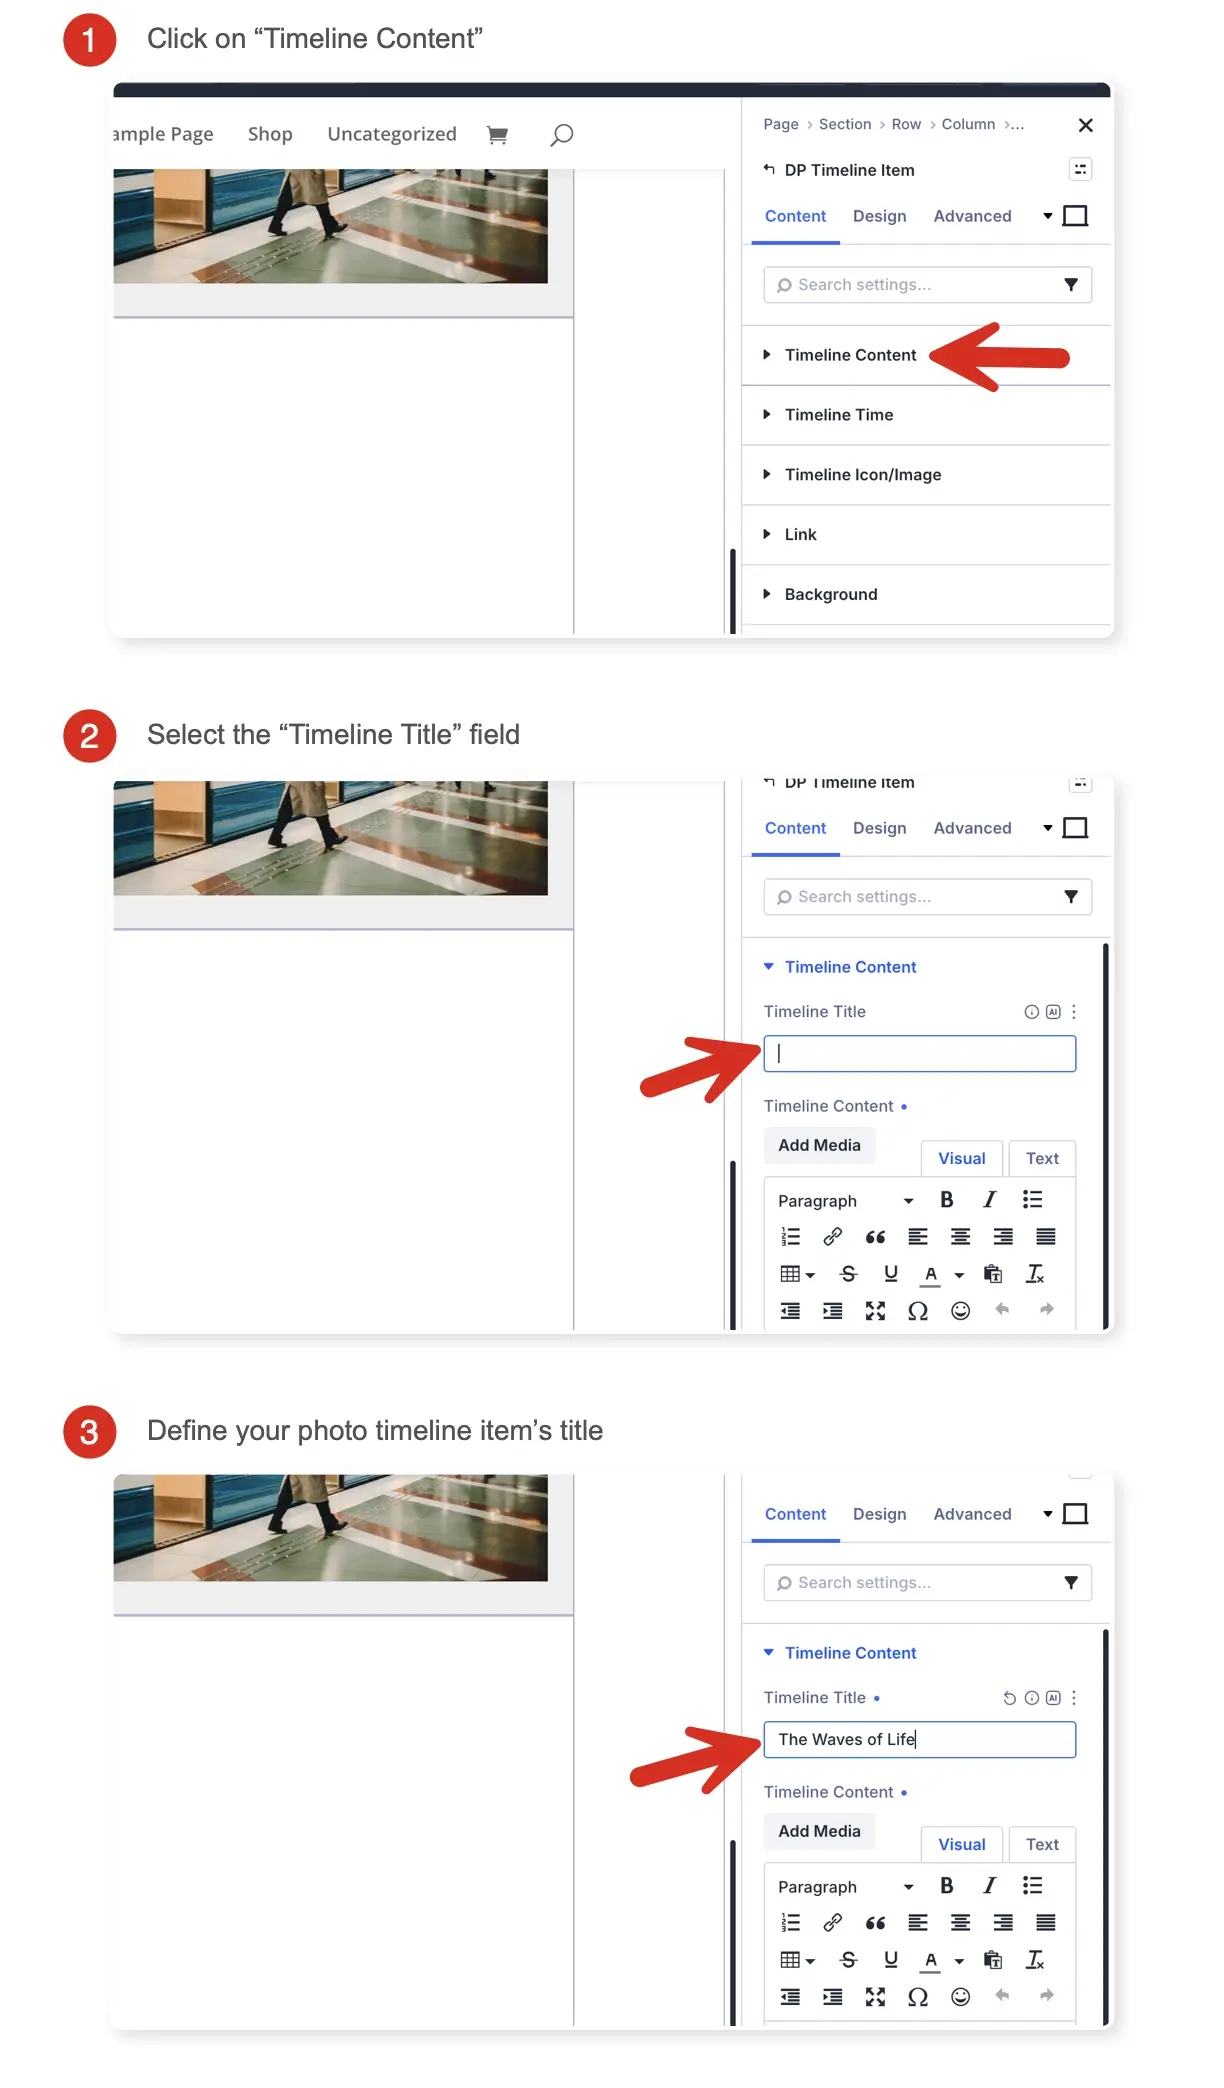
To add a title to the image, open the Timeline Content options again and enter the title in the Timeline Title field.
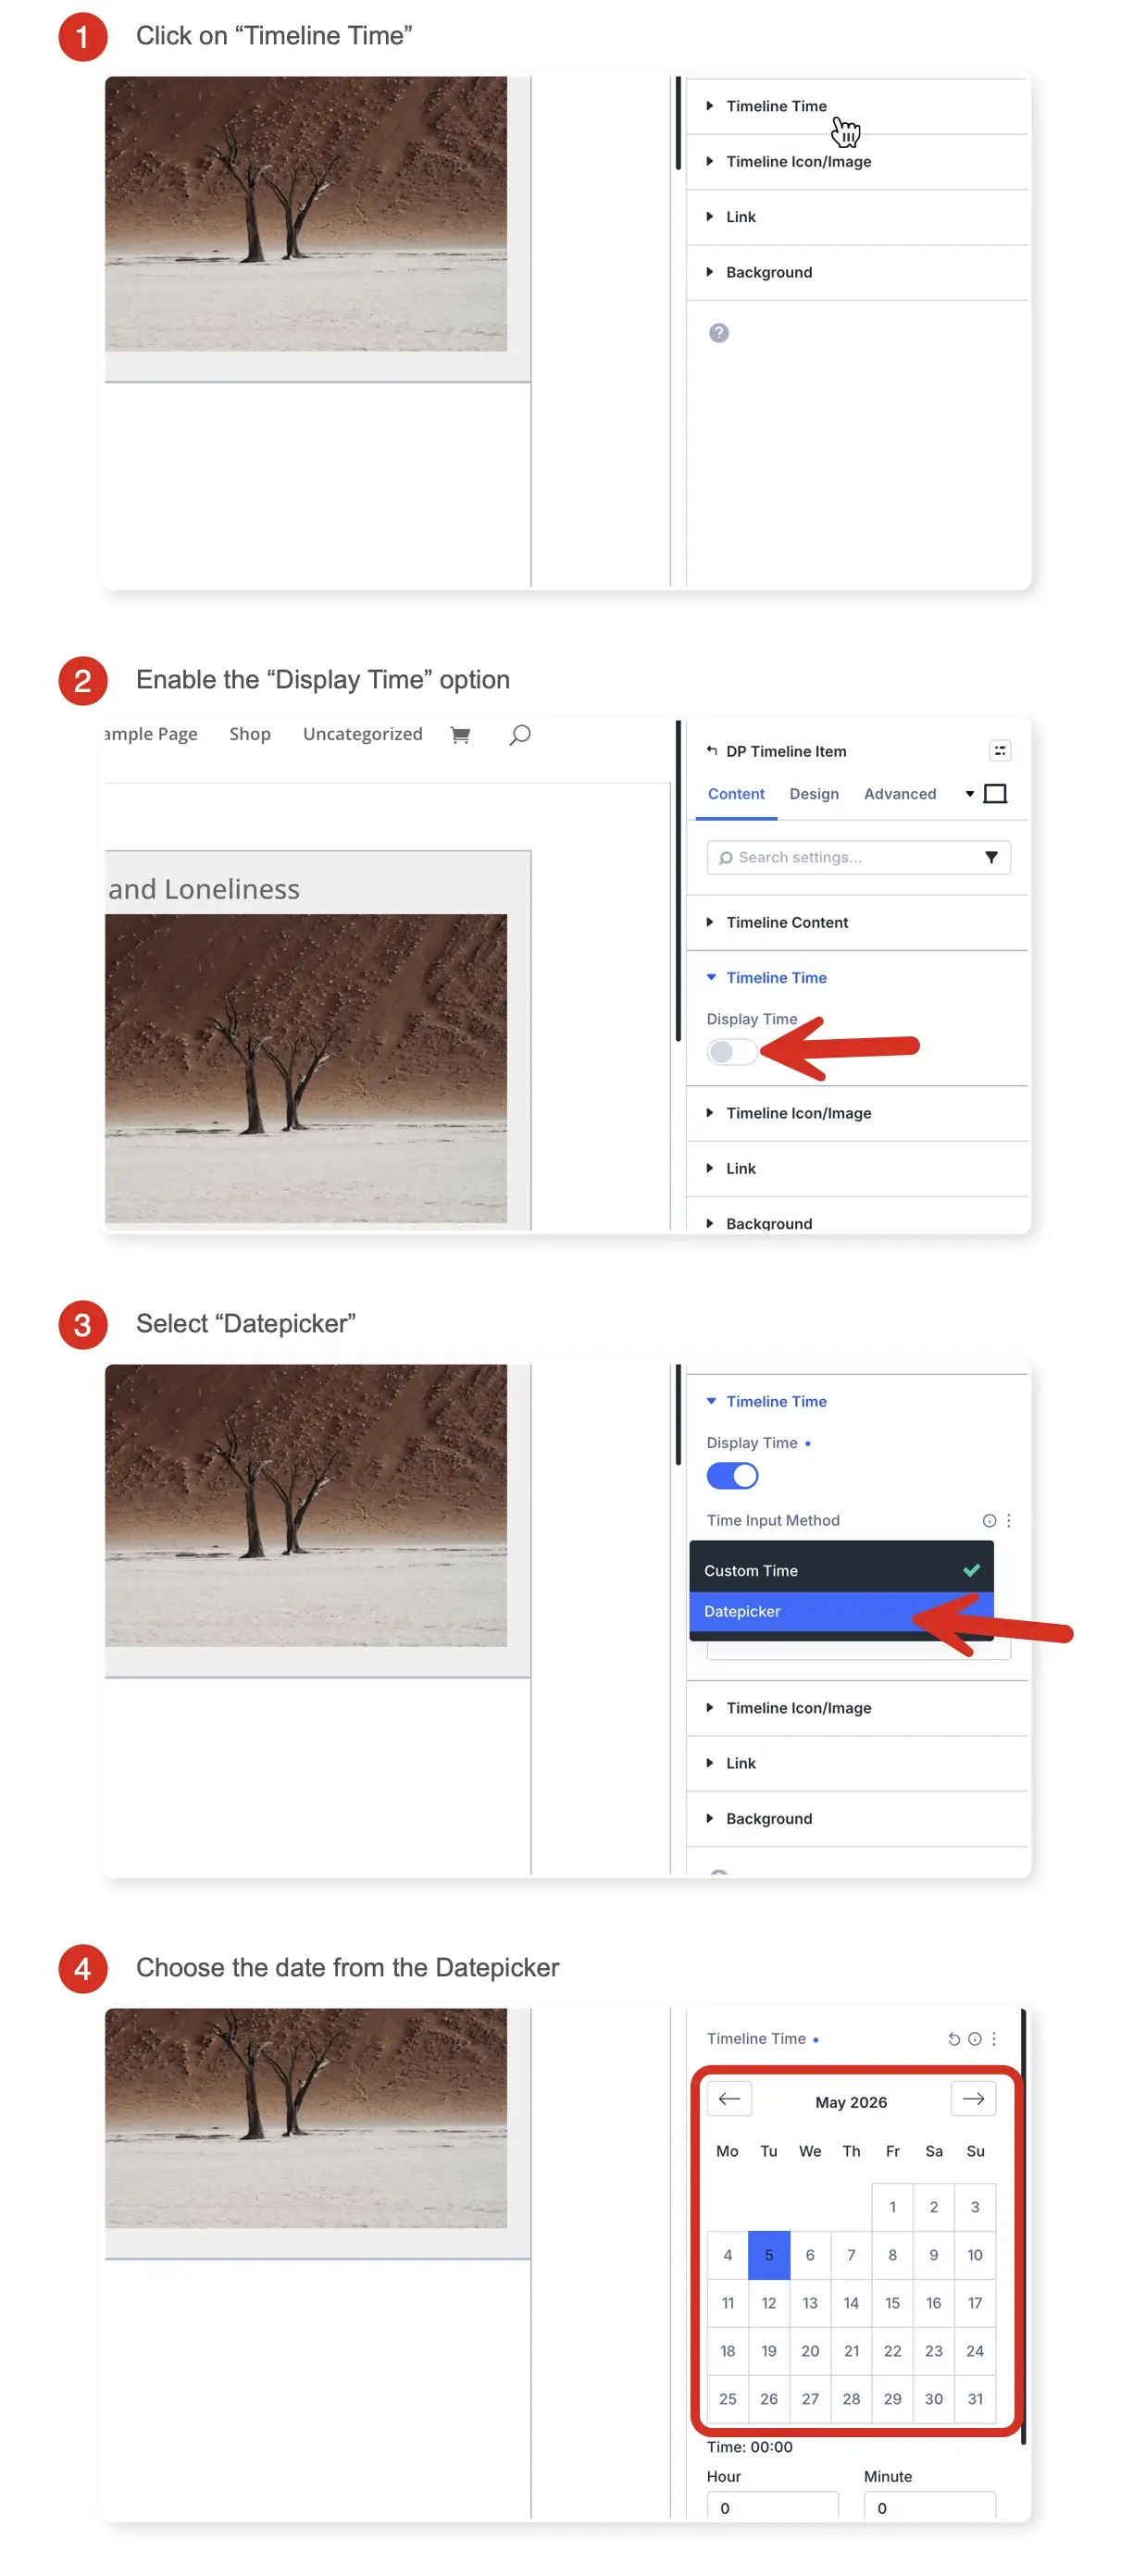
After defining the title, go to Timeline Time → enable Display Time → select Datepicker → choose the date.
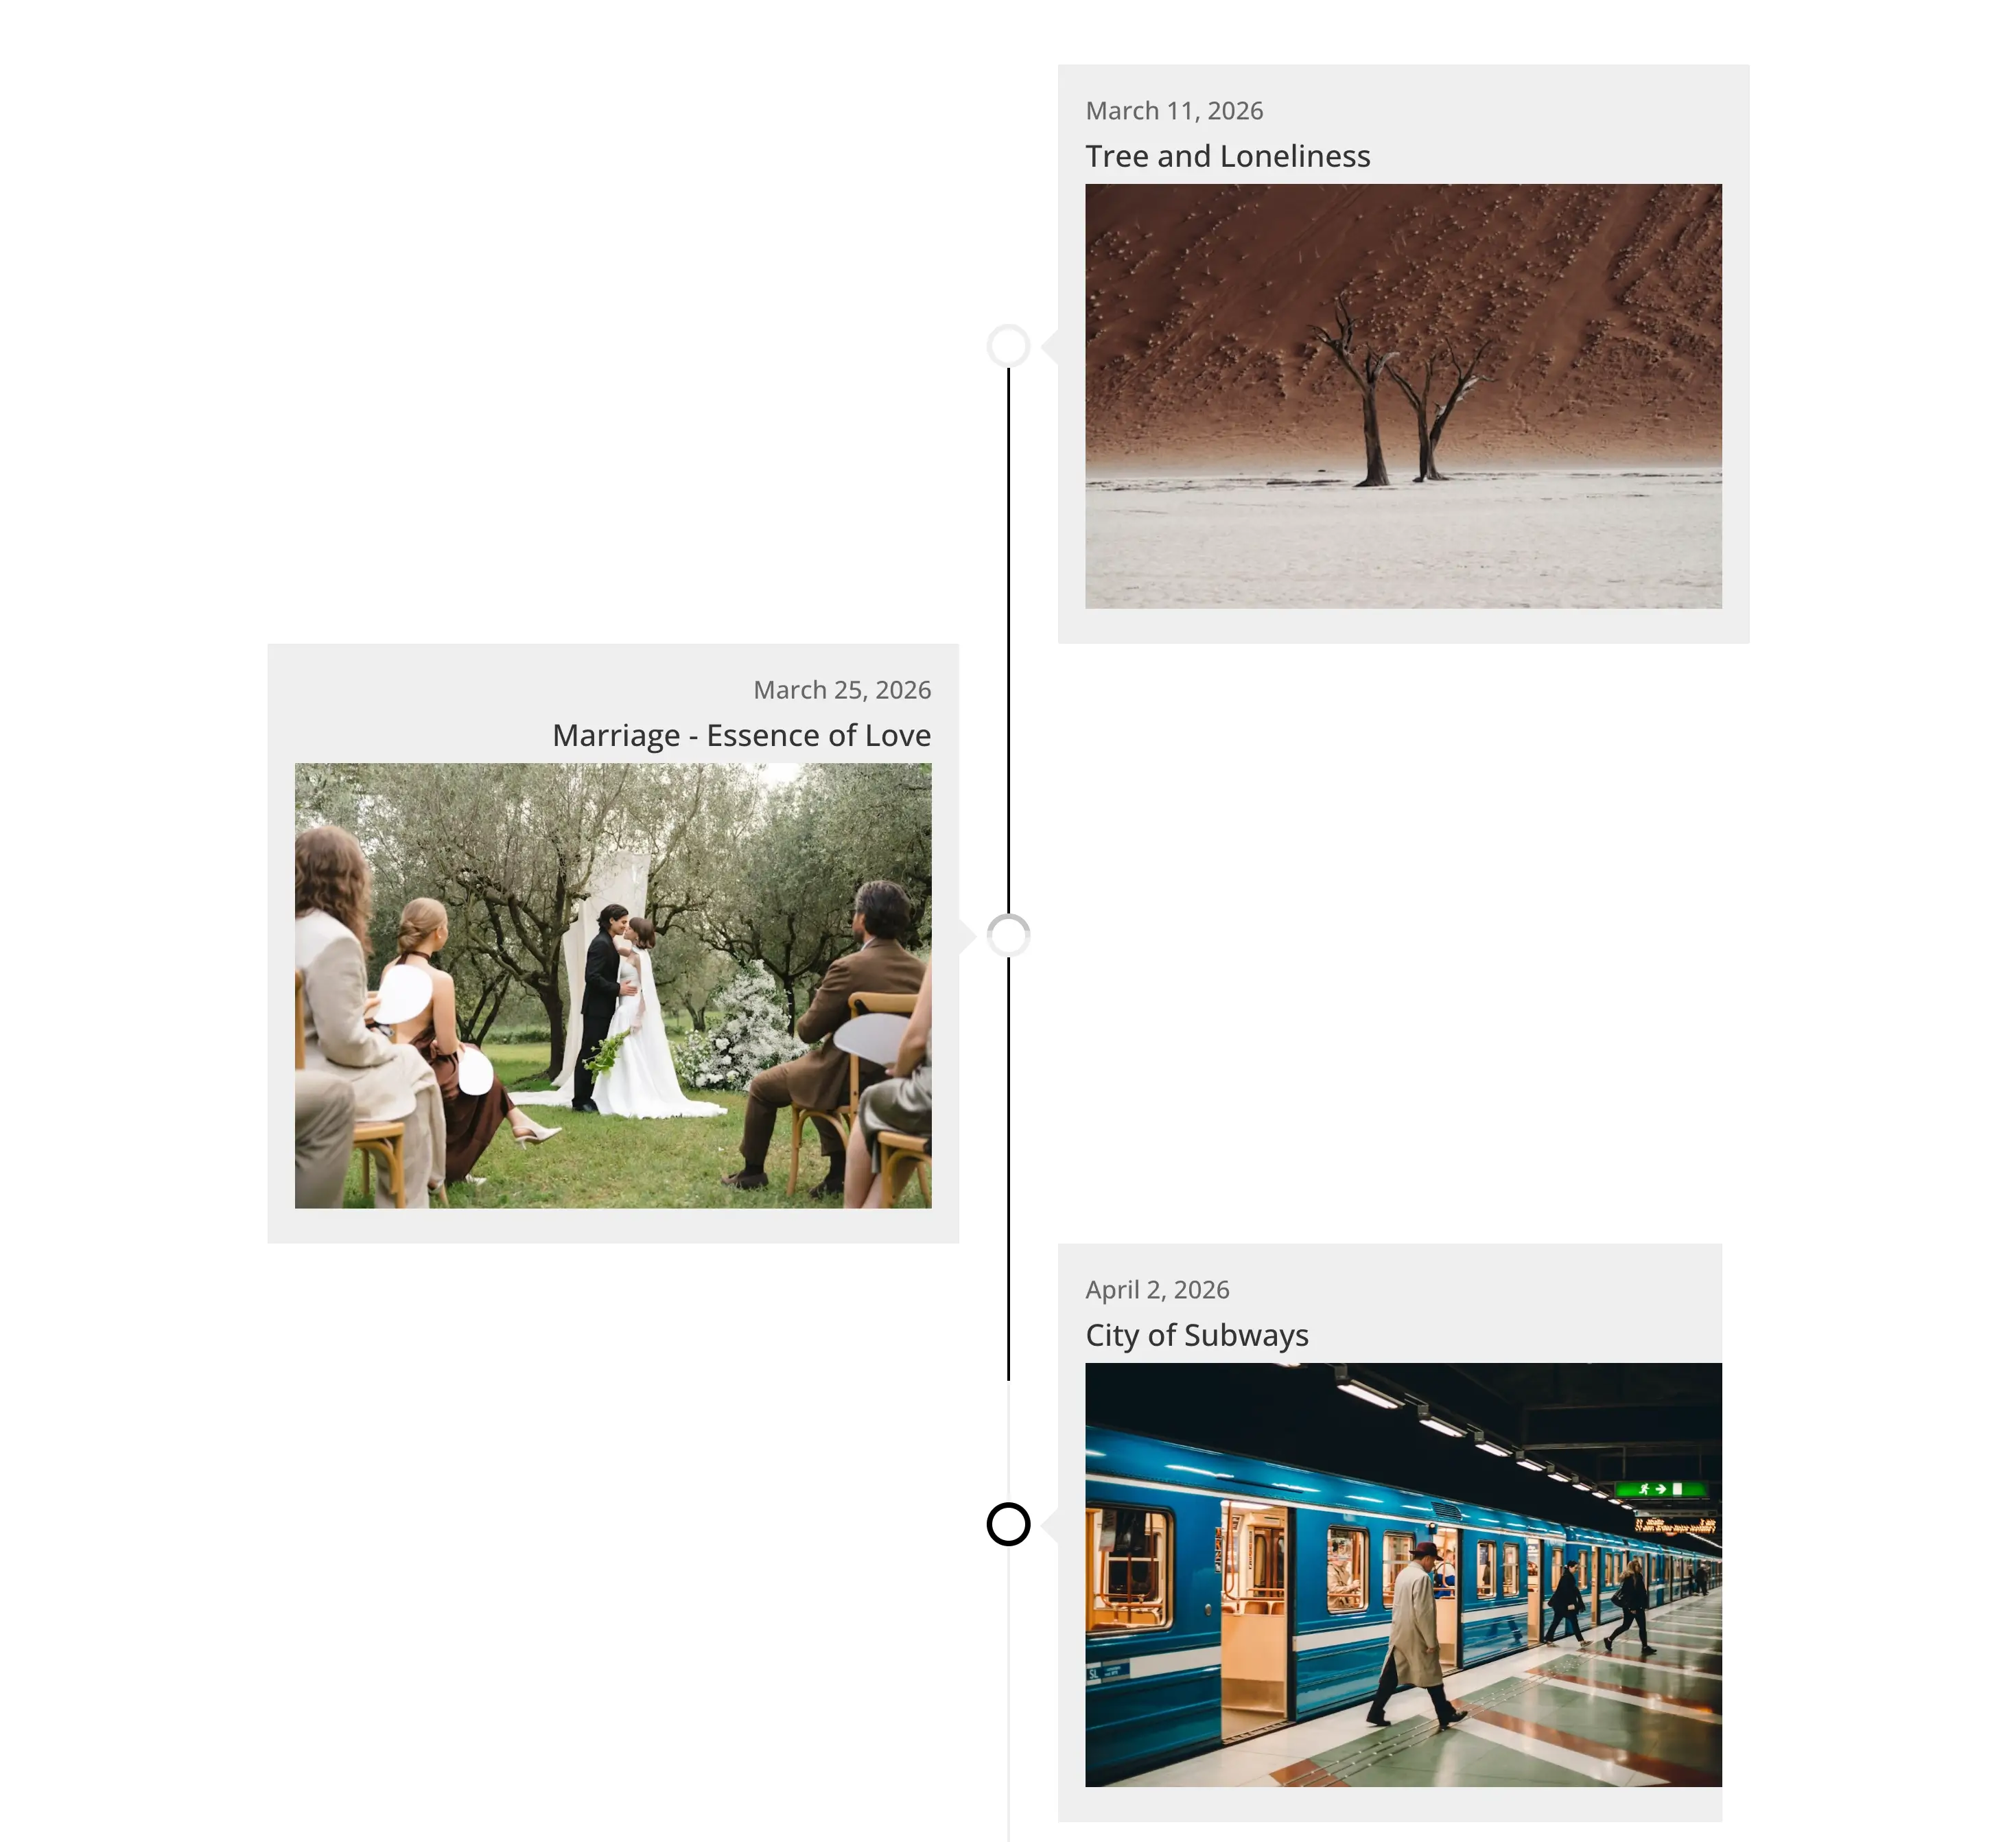
Repeat this for each of your photo timeline items, and your timeline will look the same as in the following example.
More Photo Timeline Customizations
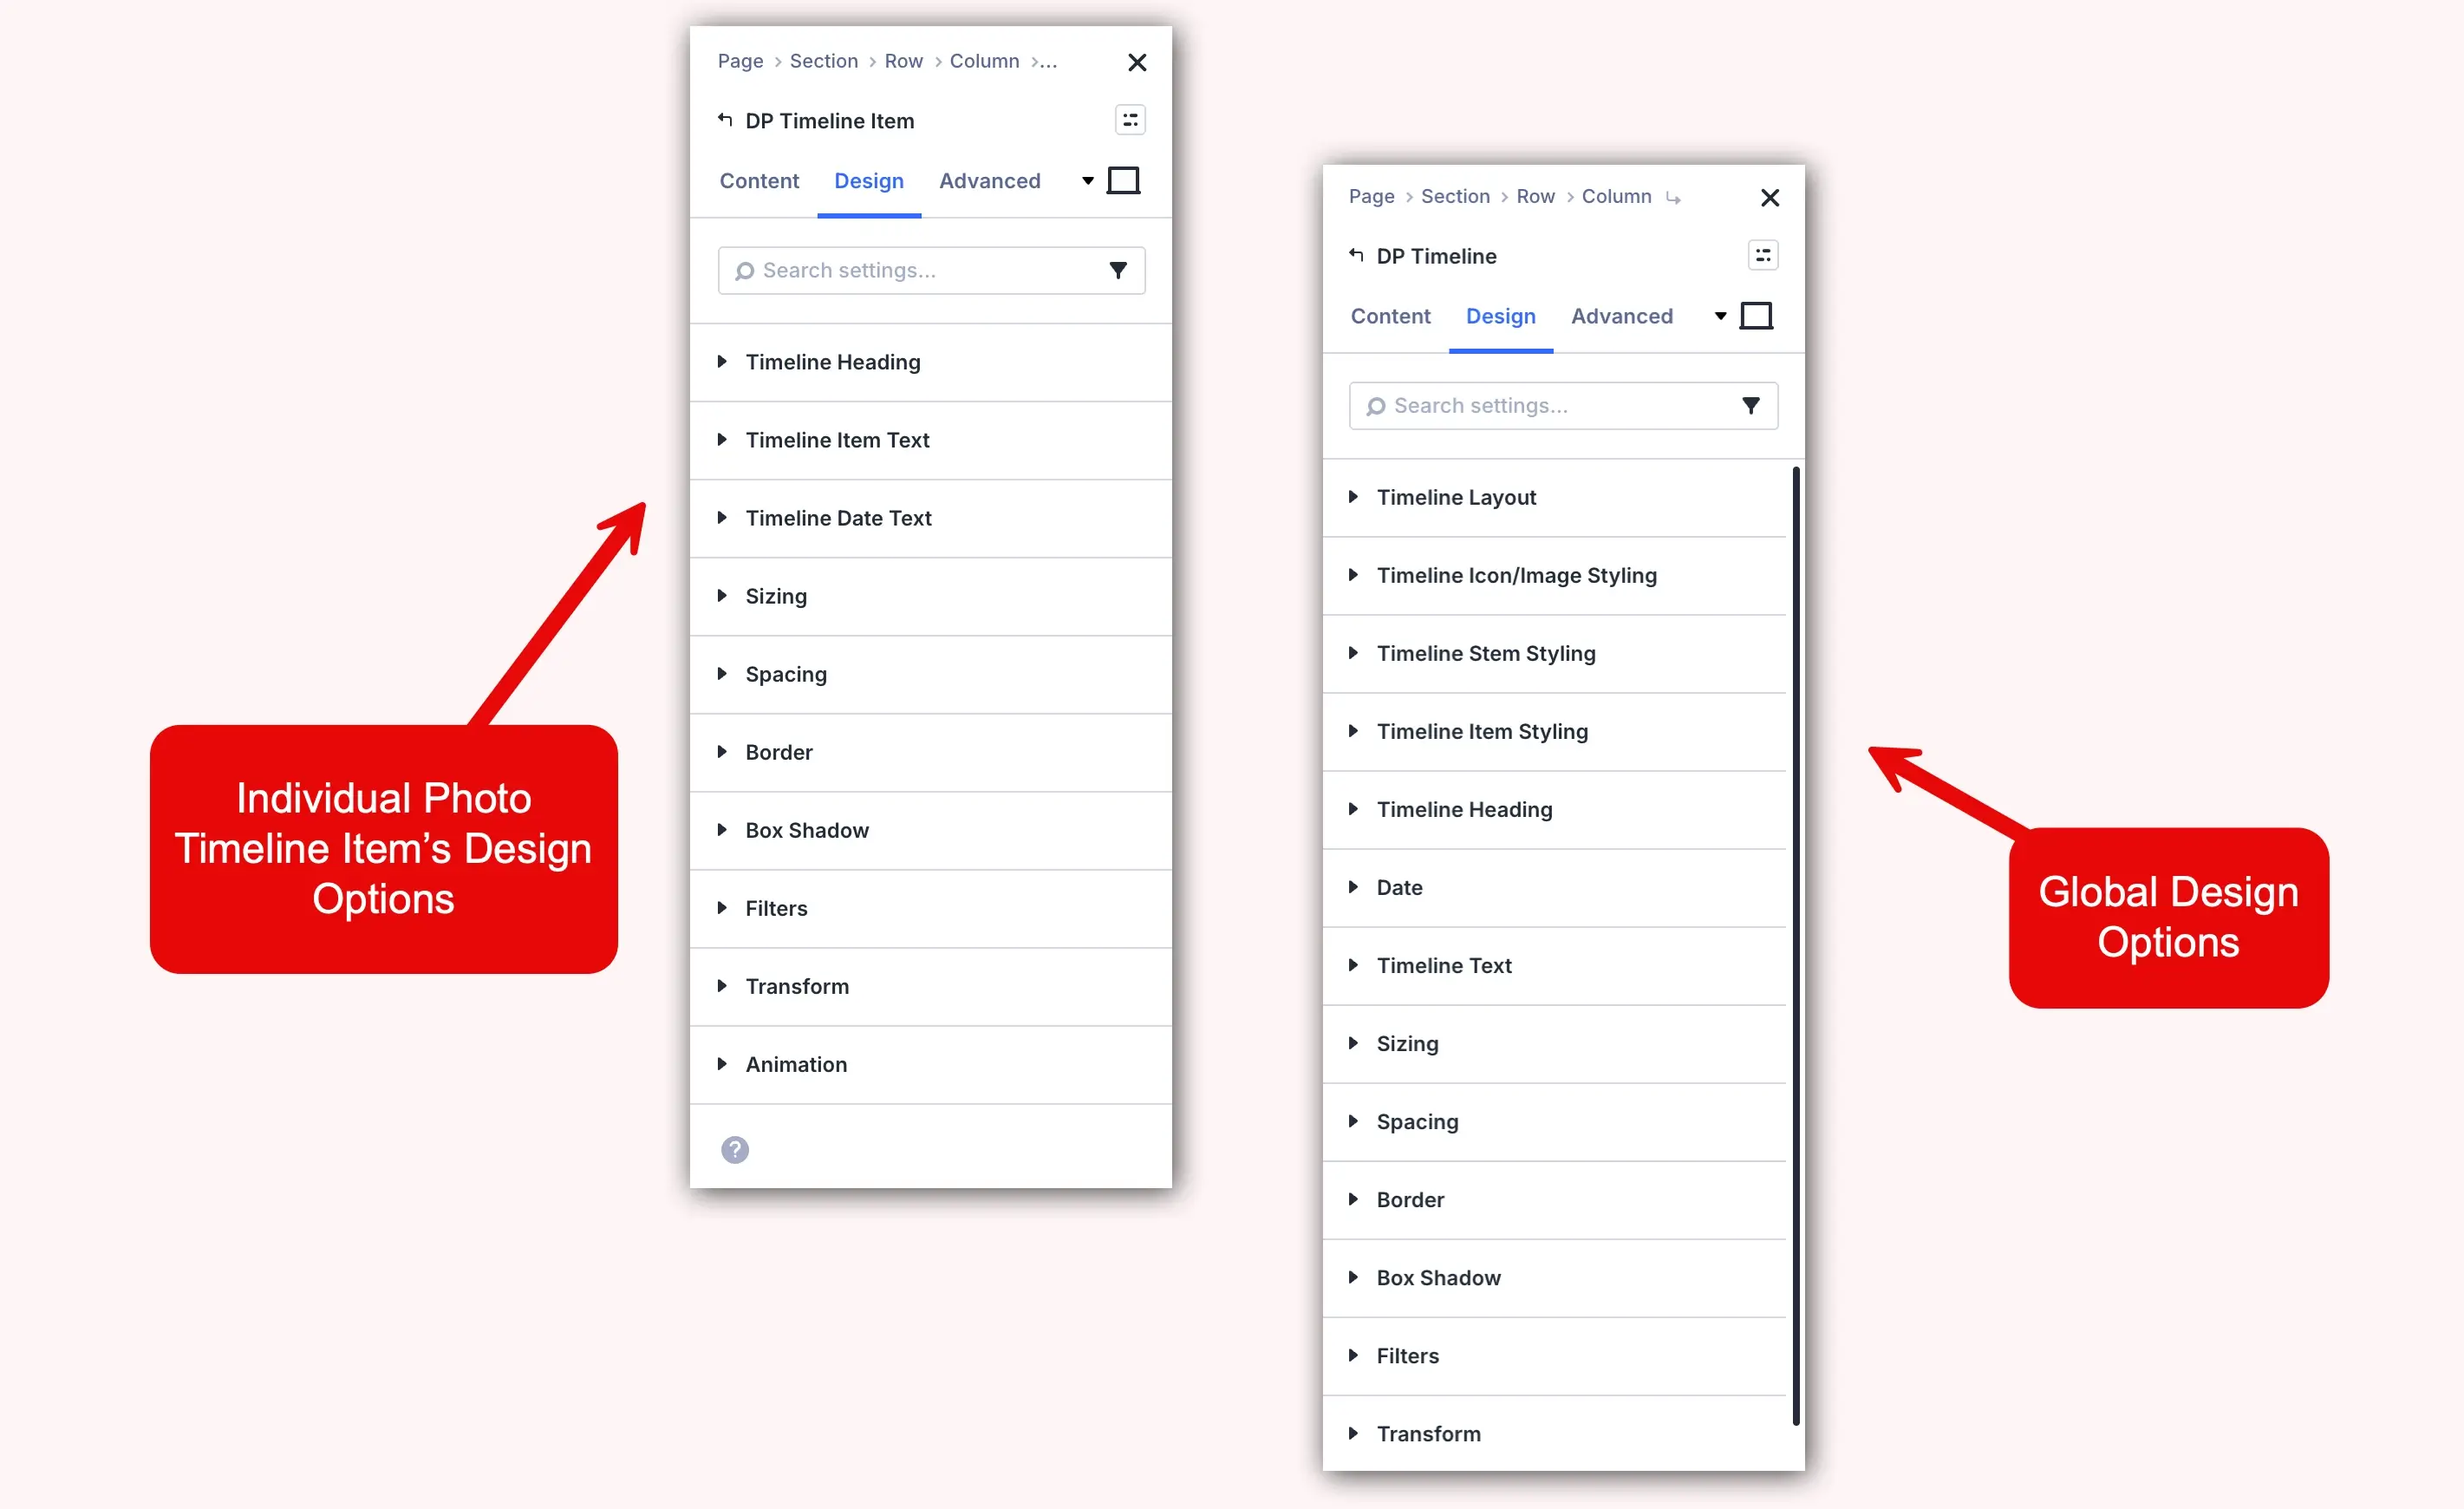
In addition to the above title and time customizations, the timeline module offers more options to enhance the look and feel of your photo timeline. For instance, removing the background using the Background options. Then, you’ve got text styling options for the Heading and Date in the Design tab, with additional options such as sizing, spacing, border, and filters.
By optimizing all available options, you can have a photo time-optimized photo ready to serve your customers to the max. Here’s what it looks like when you apply other options.
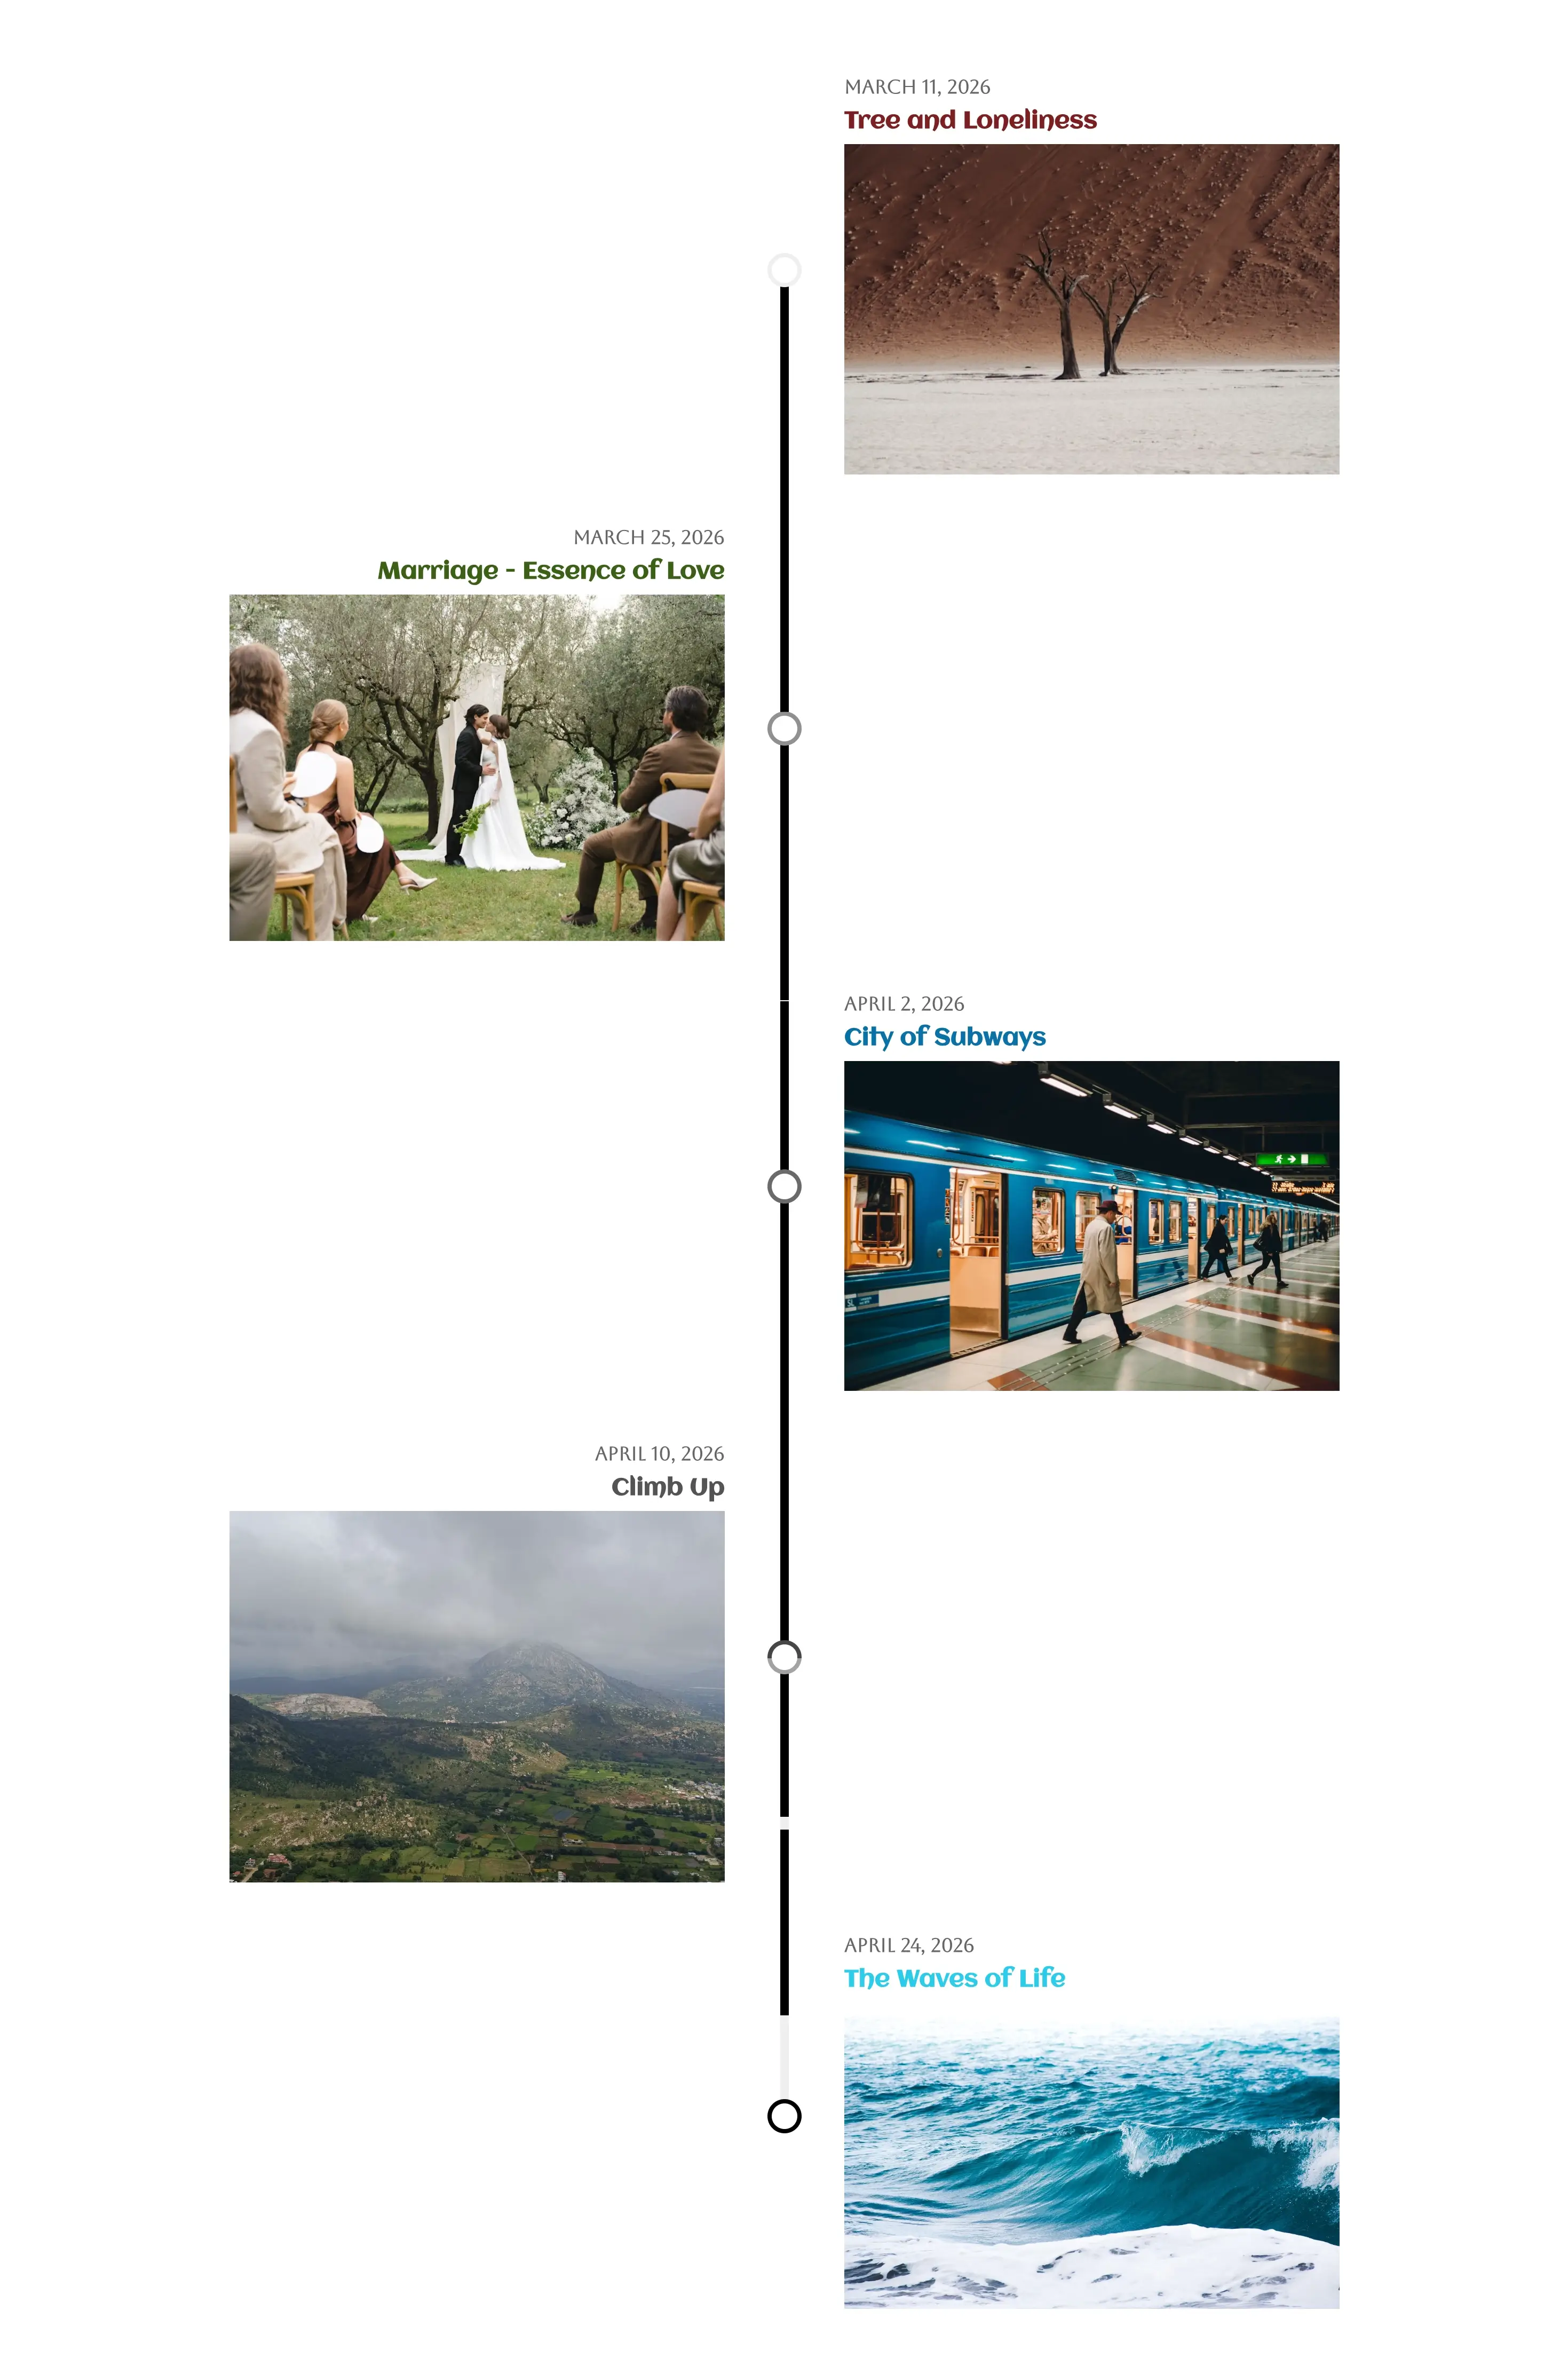
It’s good, right? We have explored the photo timeline; now let’s move on to the other one: Blog Timeline.
Type 2 – Blog Timeline

Best for: Blog archives, content hubs, post history, editorial timelines
Overview: A timeline showcasing blog posts, featuring the date, featured image, excerpt, and CTA in sequential order, is a Blog Timeline. You can use it as an archive to help visitors explore your website’s content more creatively and engagingly.
What You’ll Need
- Divi Plus Blog Timeline module
- Published WordPress posts
Steps to Create a Blog Timeline
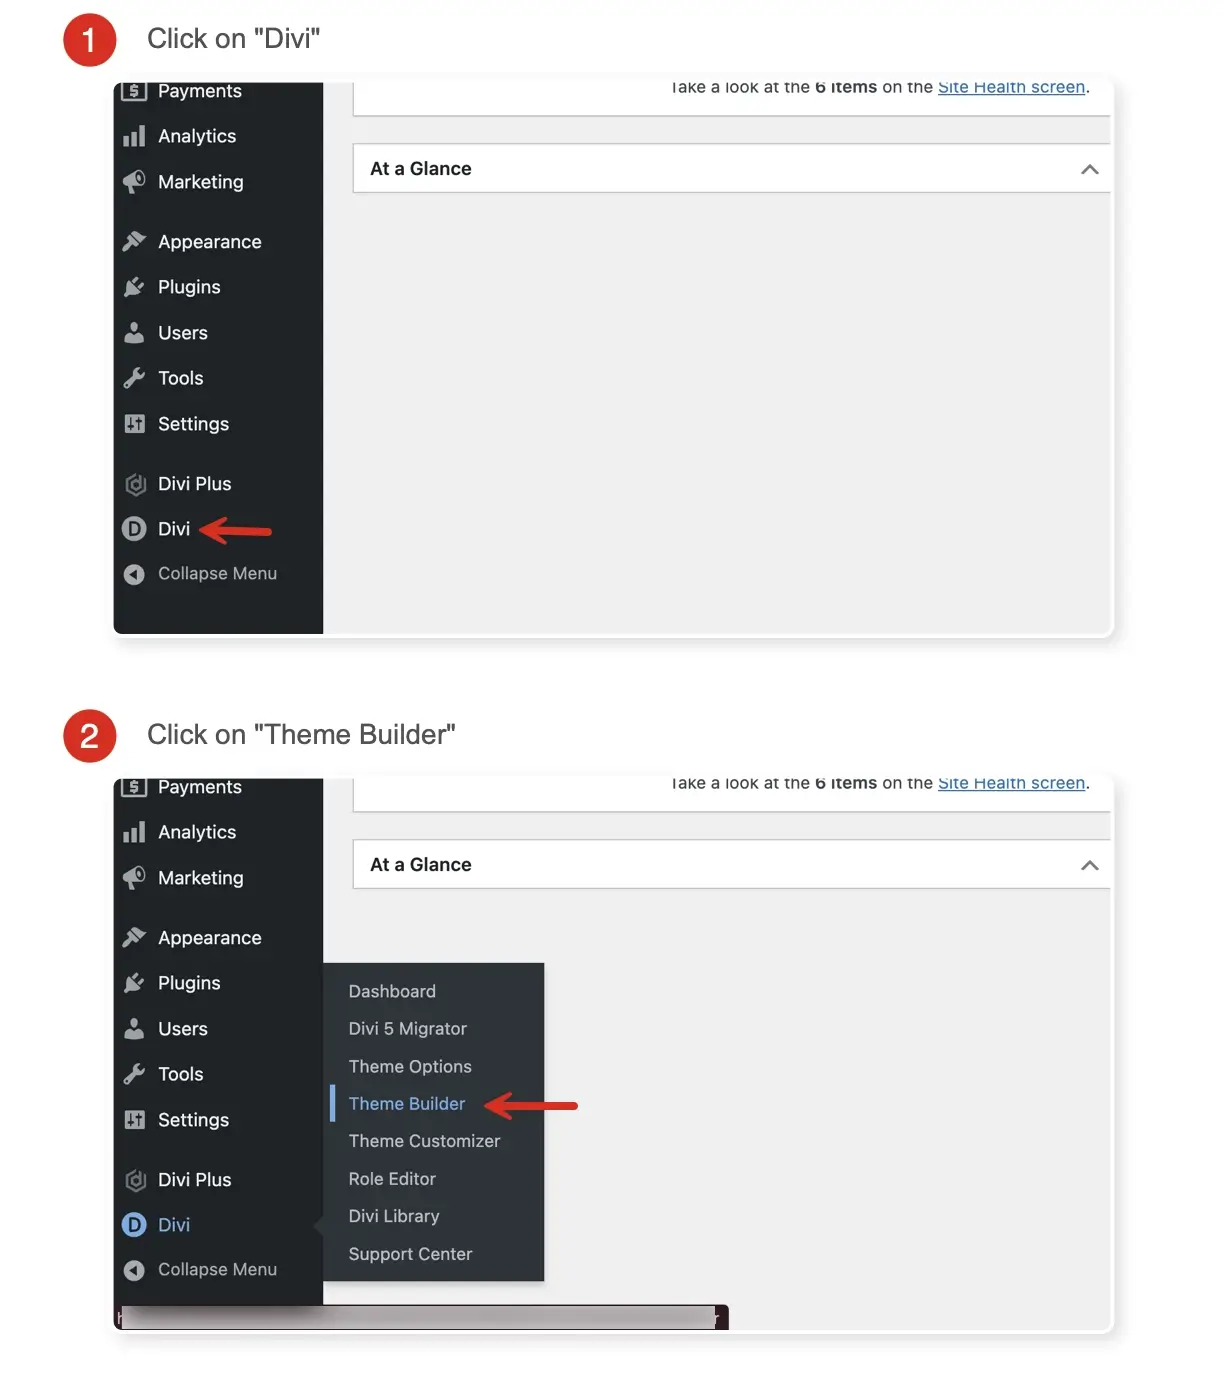
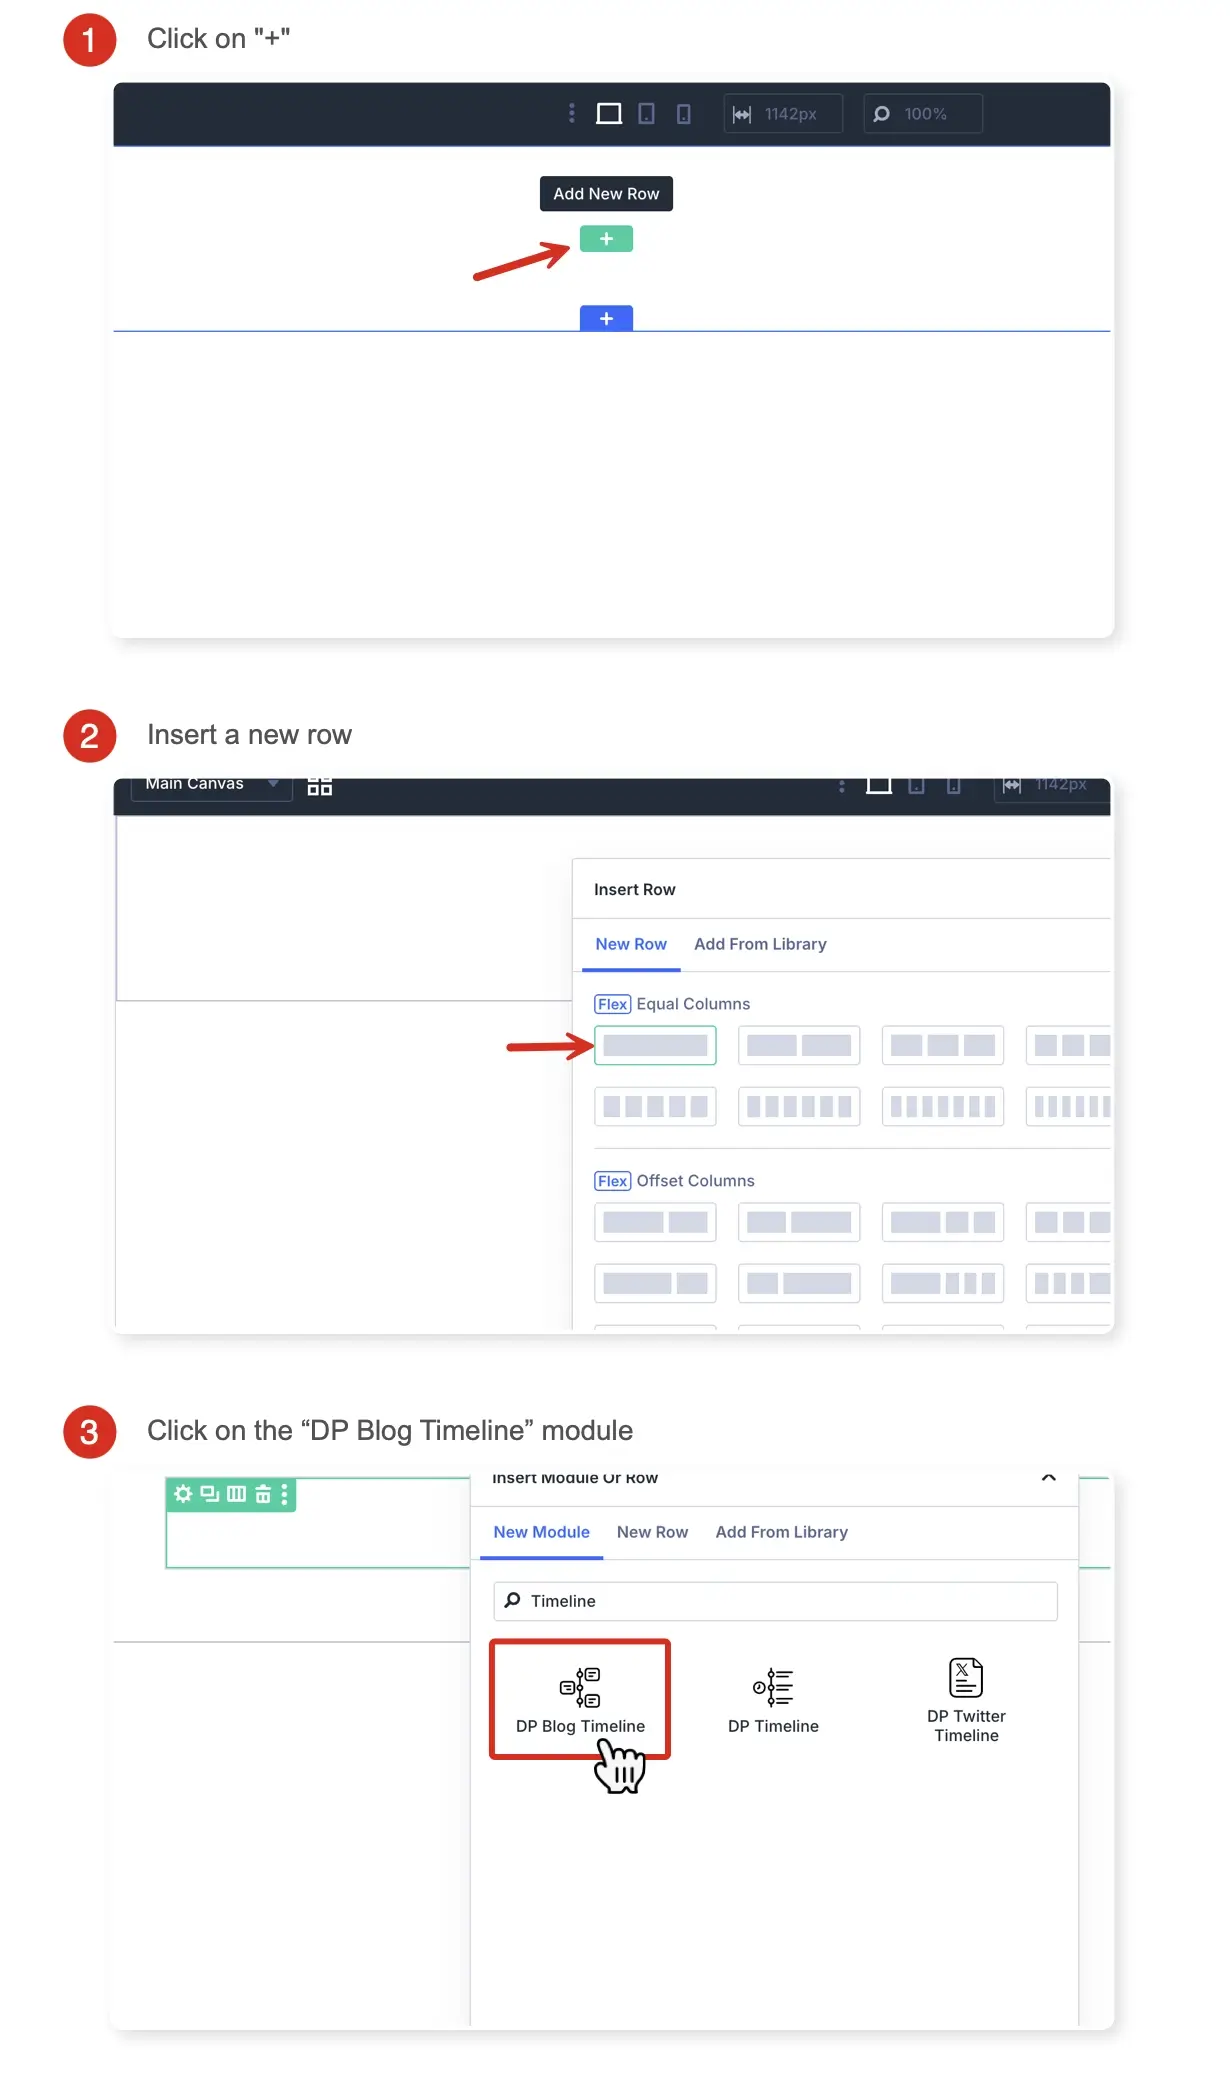
A blog timeline is a form of an archive; you can display it on the place of your blog page, or use it inside a blog template. For this tutorial, we are going to use it as a blog template using the Divi Theme Builder. So that we can build an archive page as a timeline, to do so, go to Divi → Theme Builder.
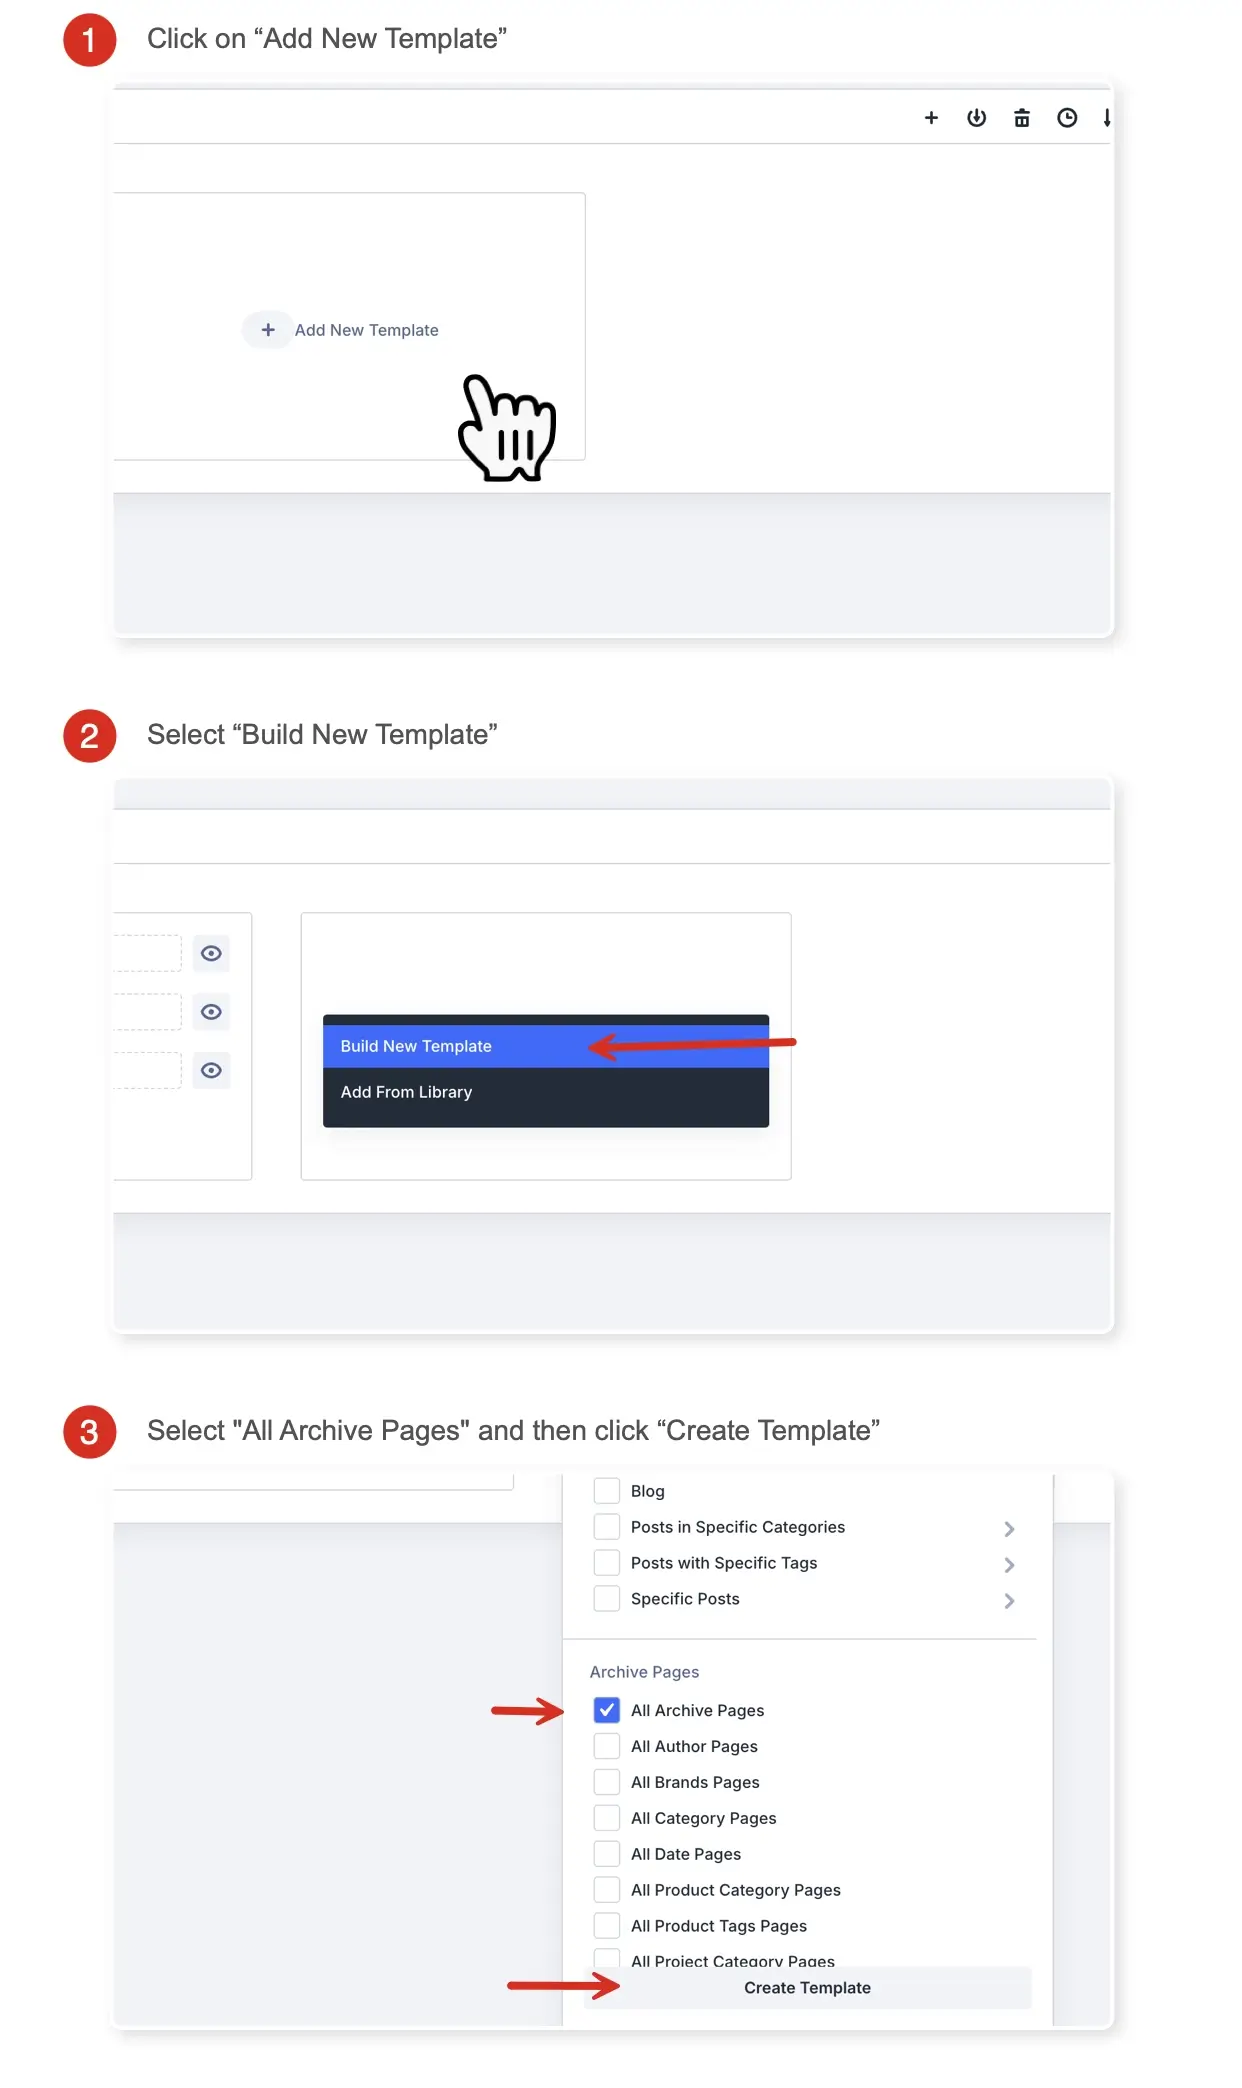
Then, inside the theme builder, click Add New Template → Build New Template → scroll to Archive Pages and select All Archive Pages → click Create Template.
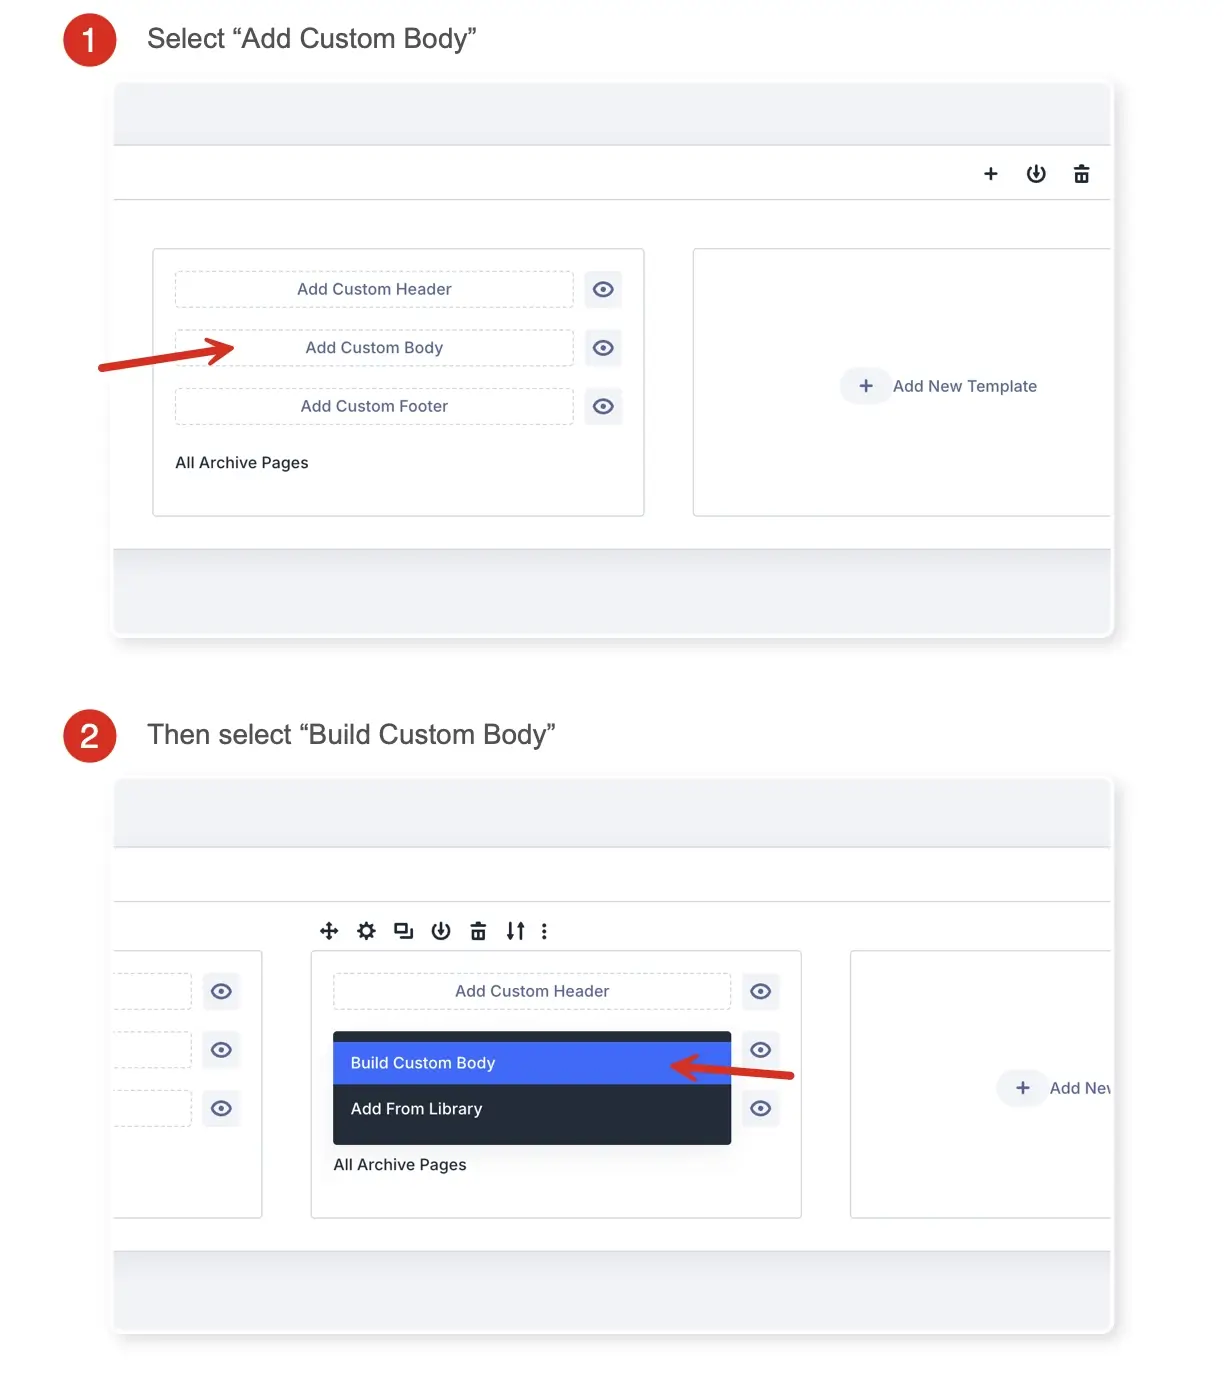
Then, select Add Custom Body → Build Custom Body, and it will launch the Divi Builder.
Insert Divi Plus Blog Timeline Module
Once the builder launches, click the green plus button, insert a row, and insert the DP Blog Timeline module.
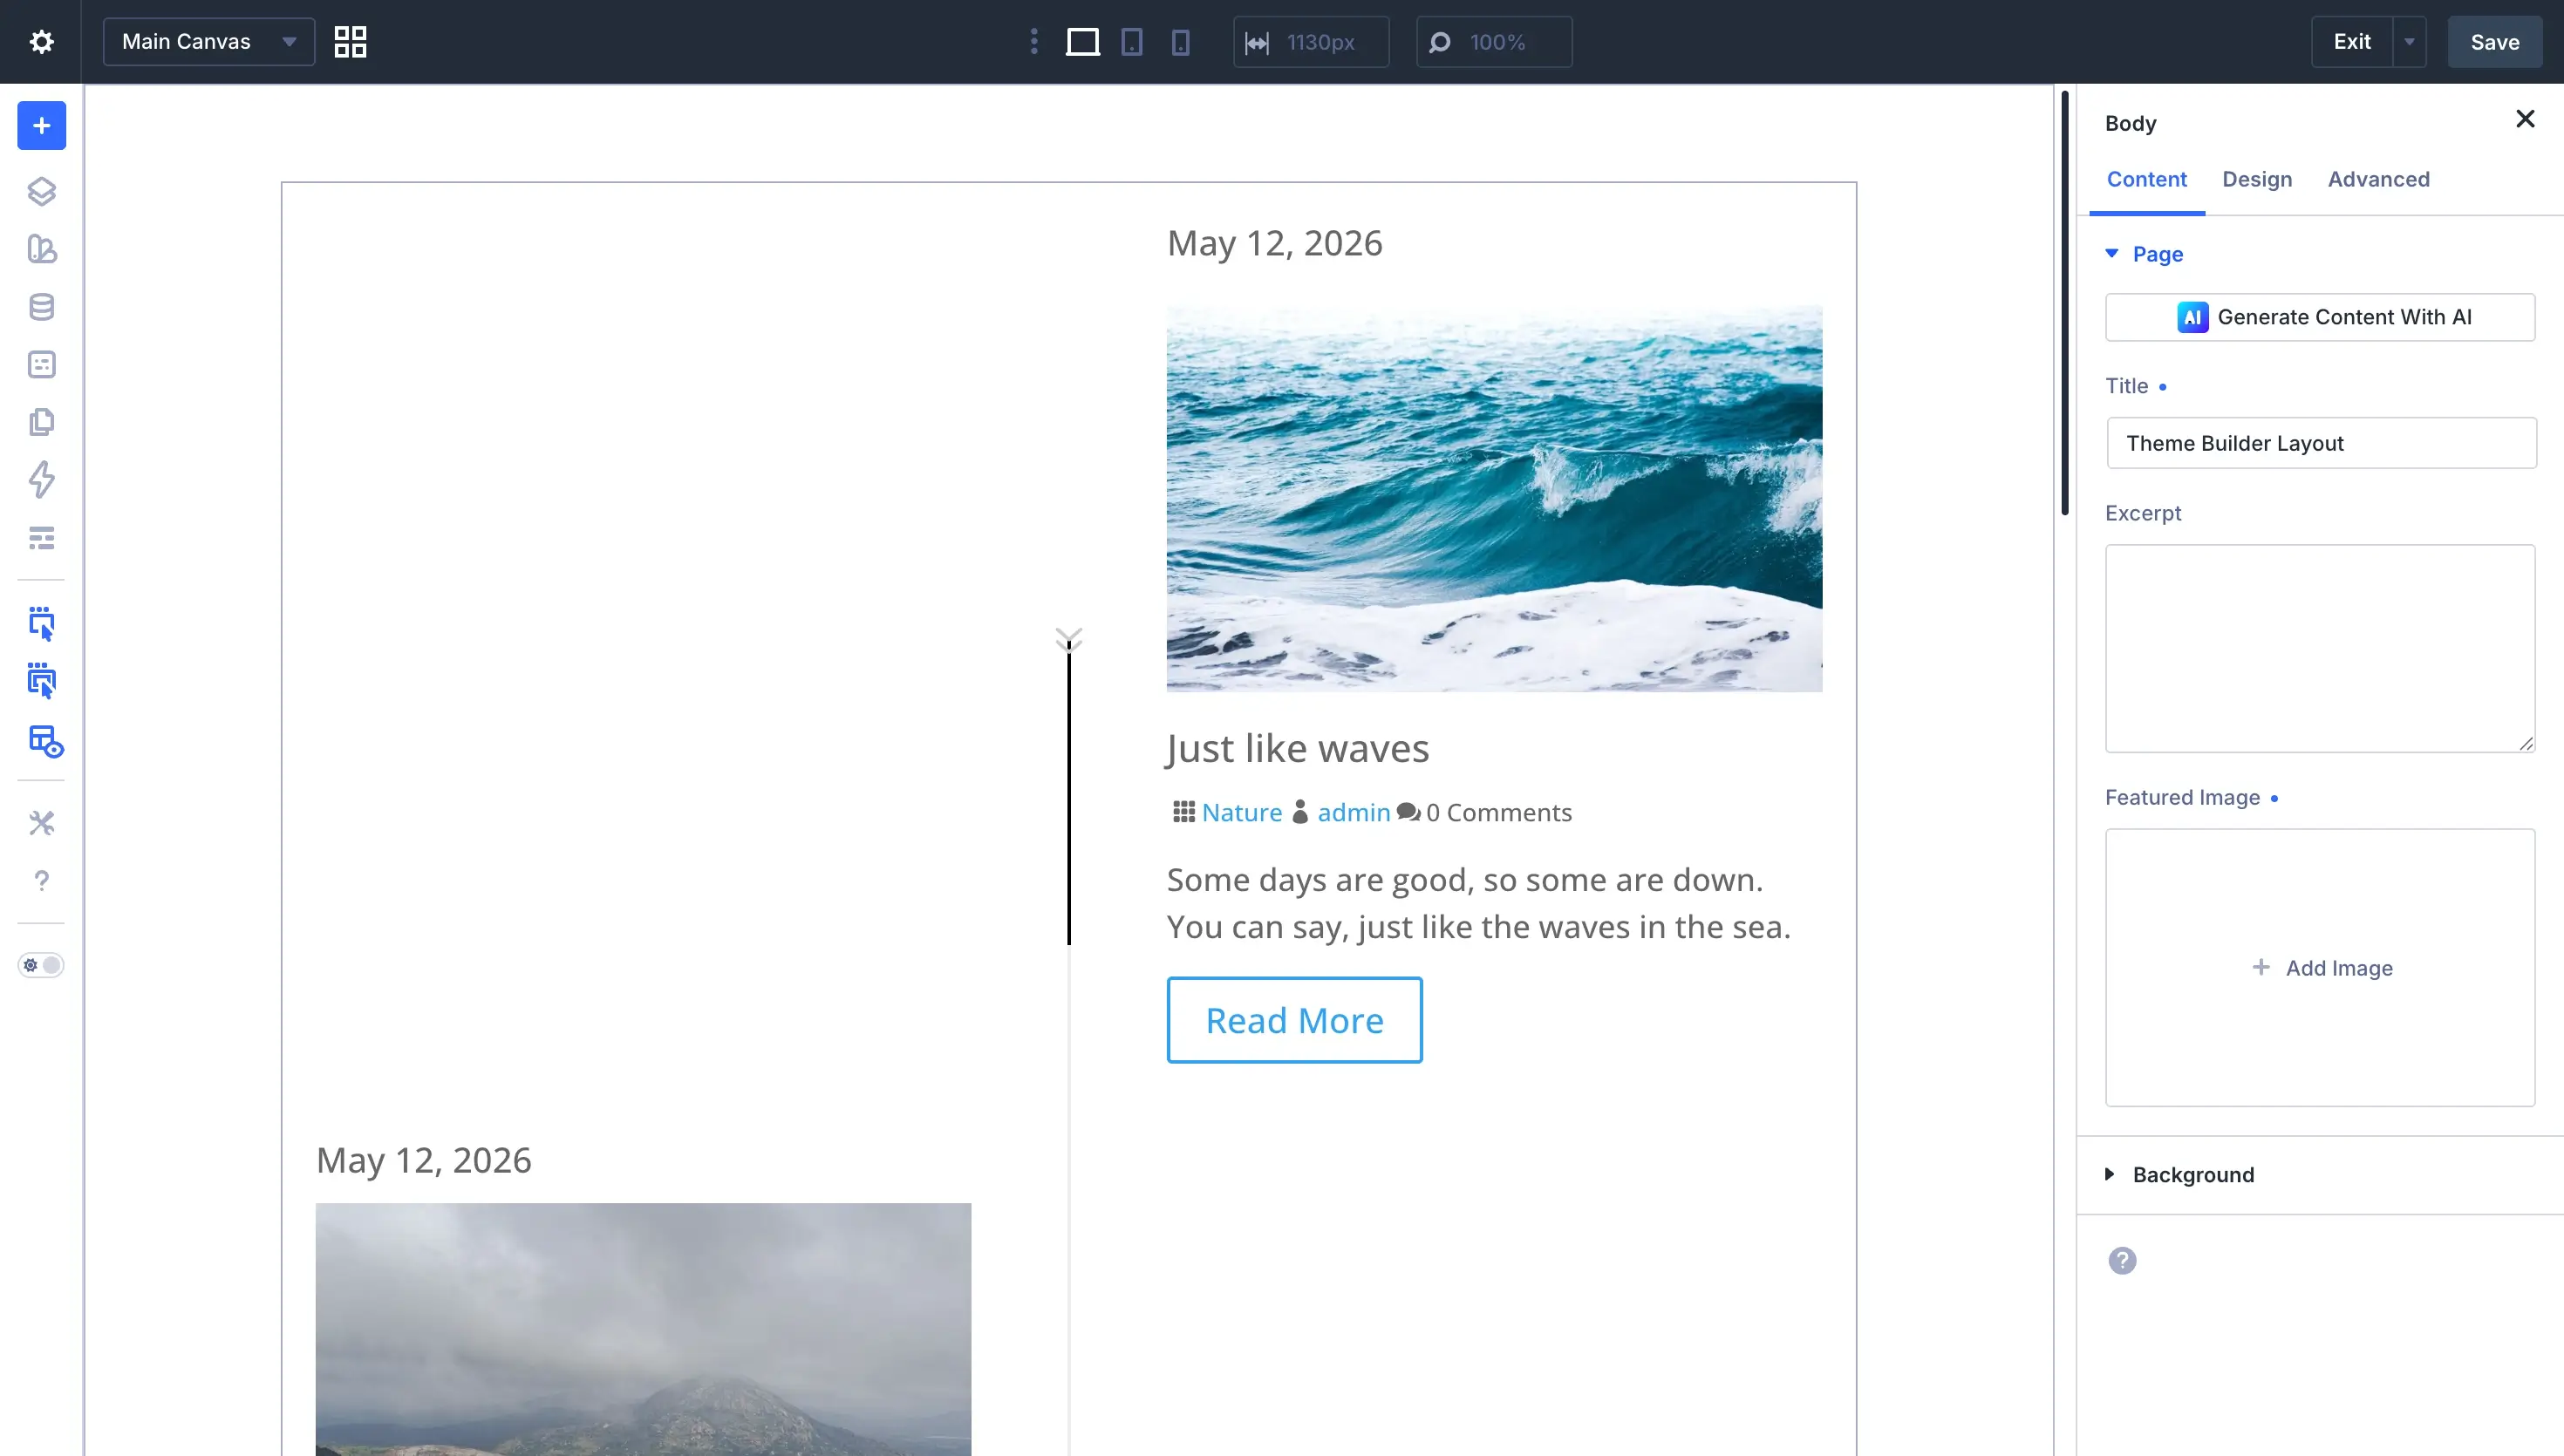
And as soon as you add the Divi Plus Blog Timeline module, you can find your blog timeline just like the following.
Customize Blog Timeline Content
As you can see, it showcases the post date, image, title, category, author, comment count, excerpt, and the read more button. This is the easiest way to add a blog timeline to your WordPress website. The module provides you with two layouts, one of which places the date above the featured image. So, the other one makes the date as the timeline stem’s element, as you can see below.
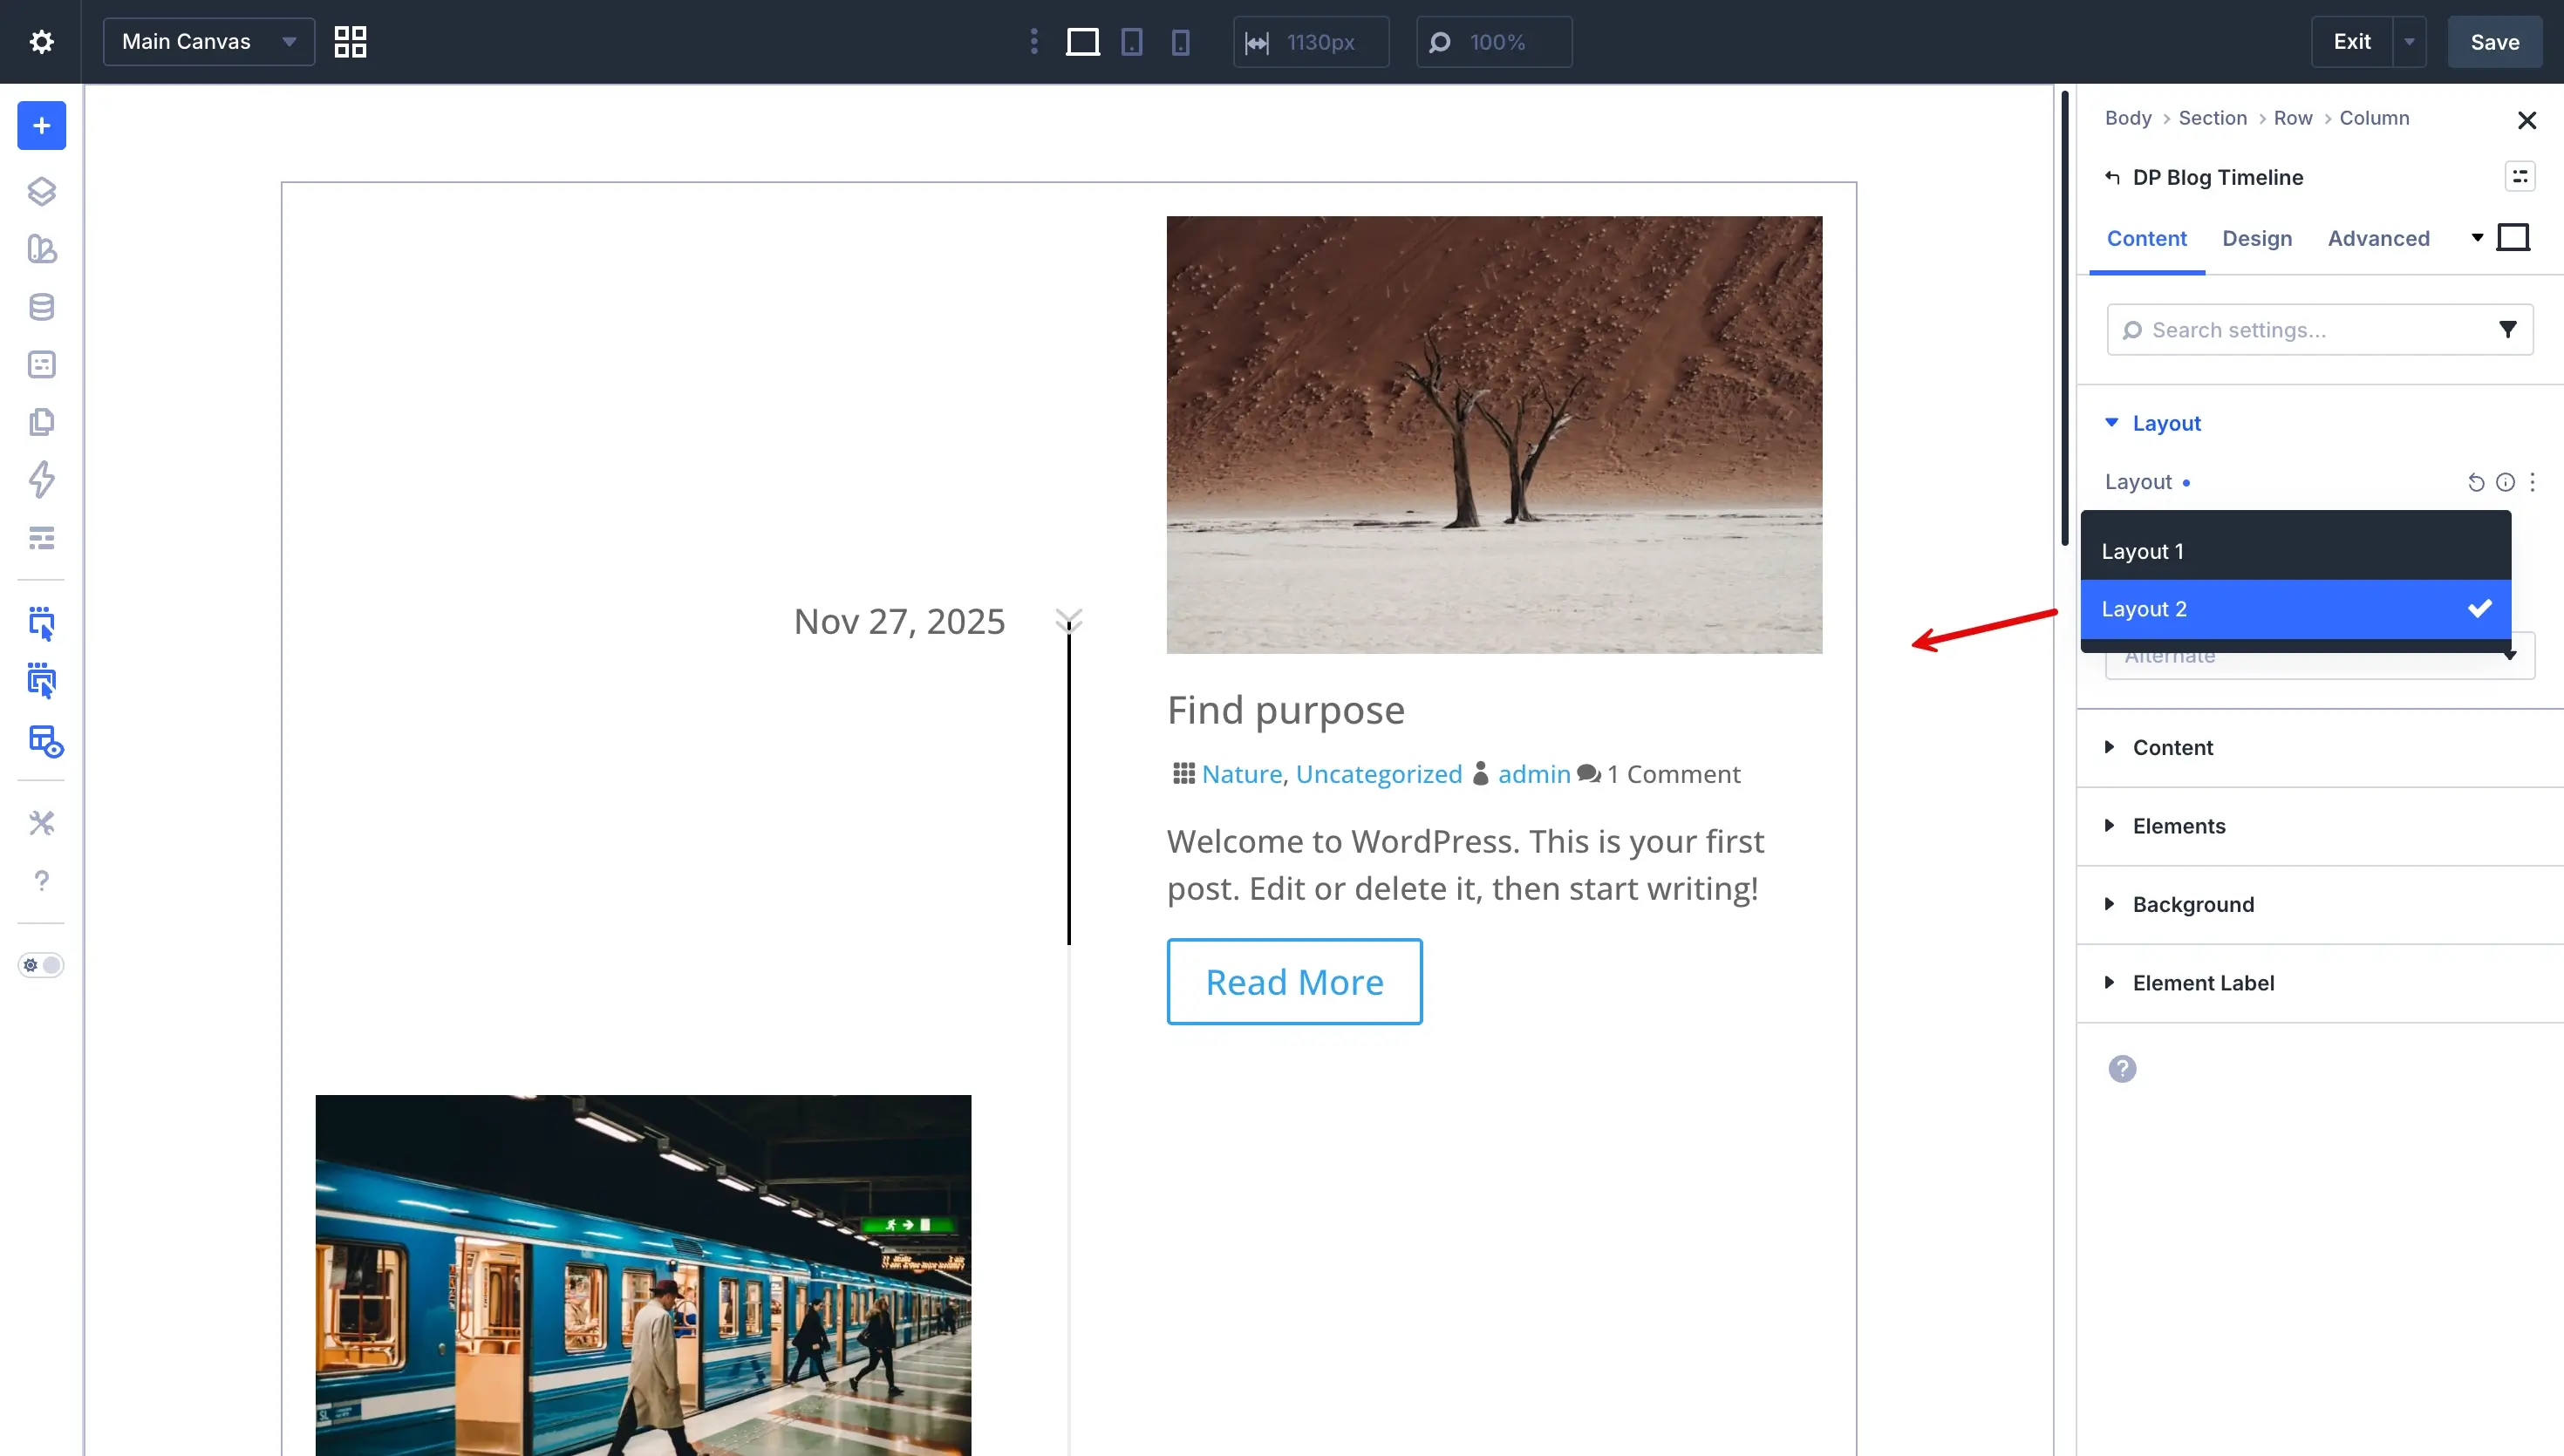
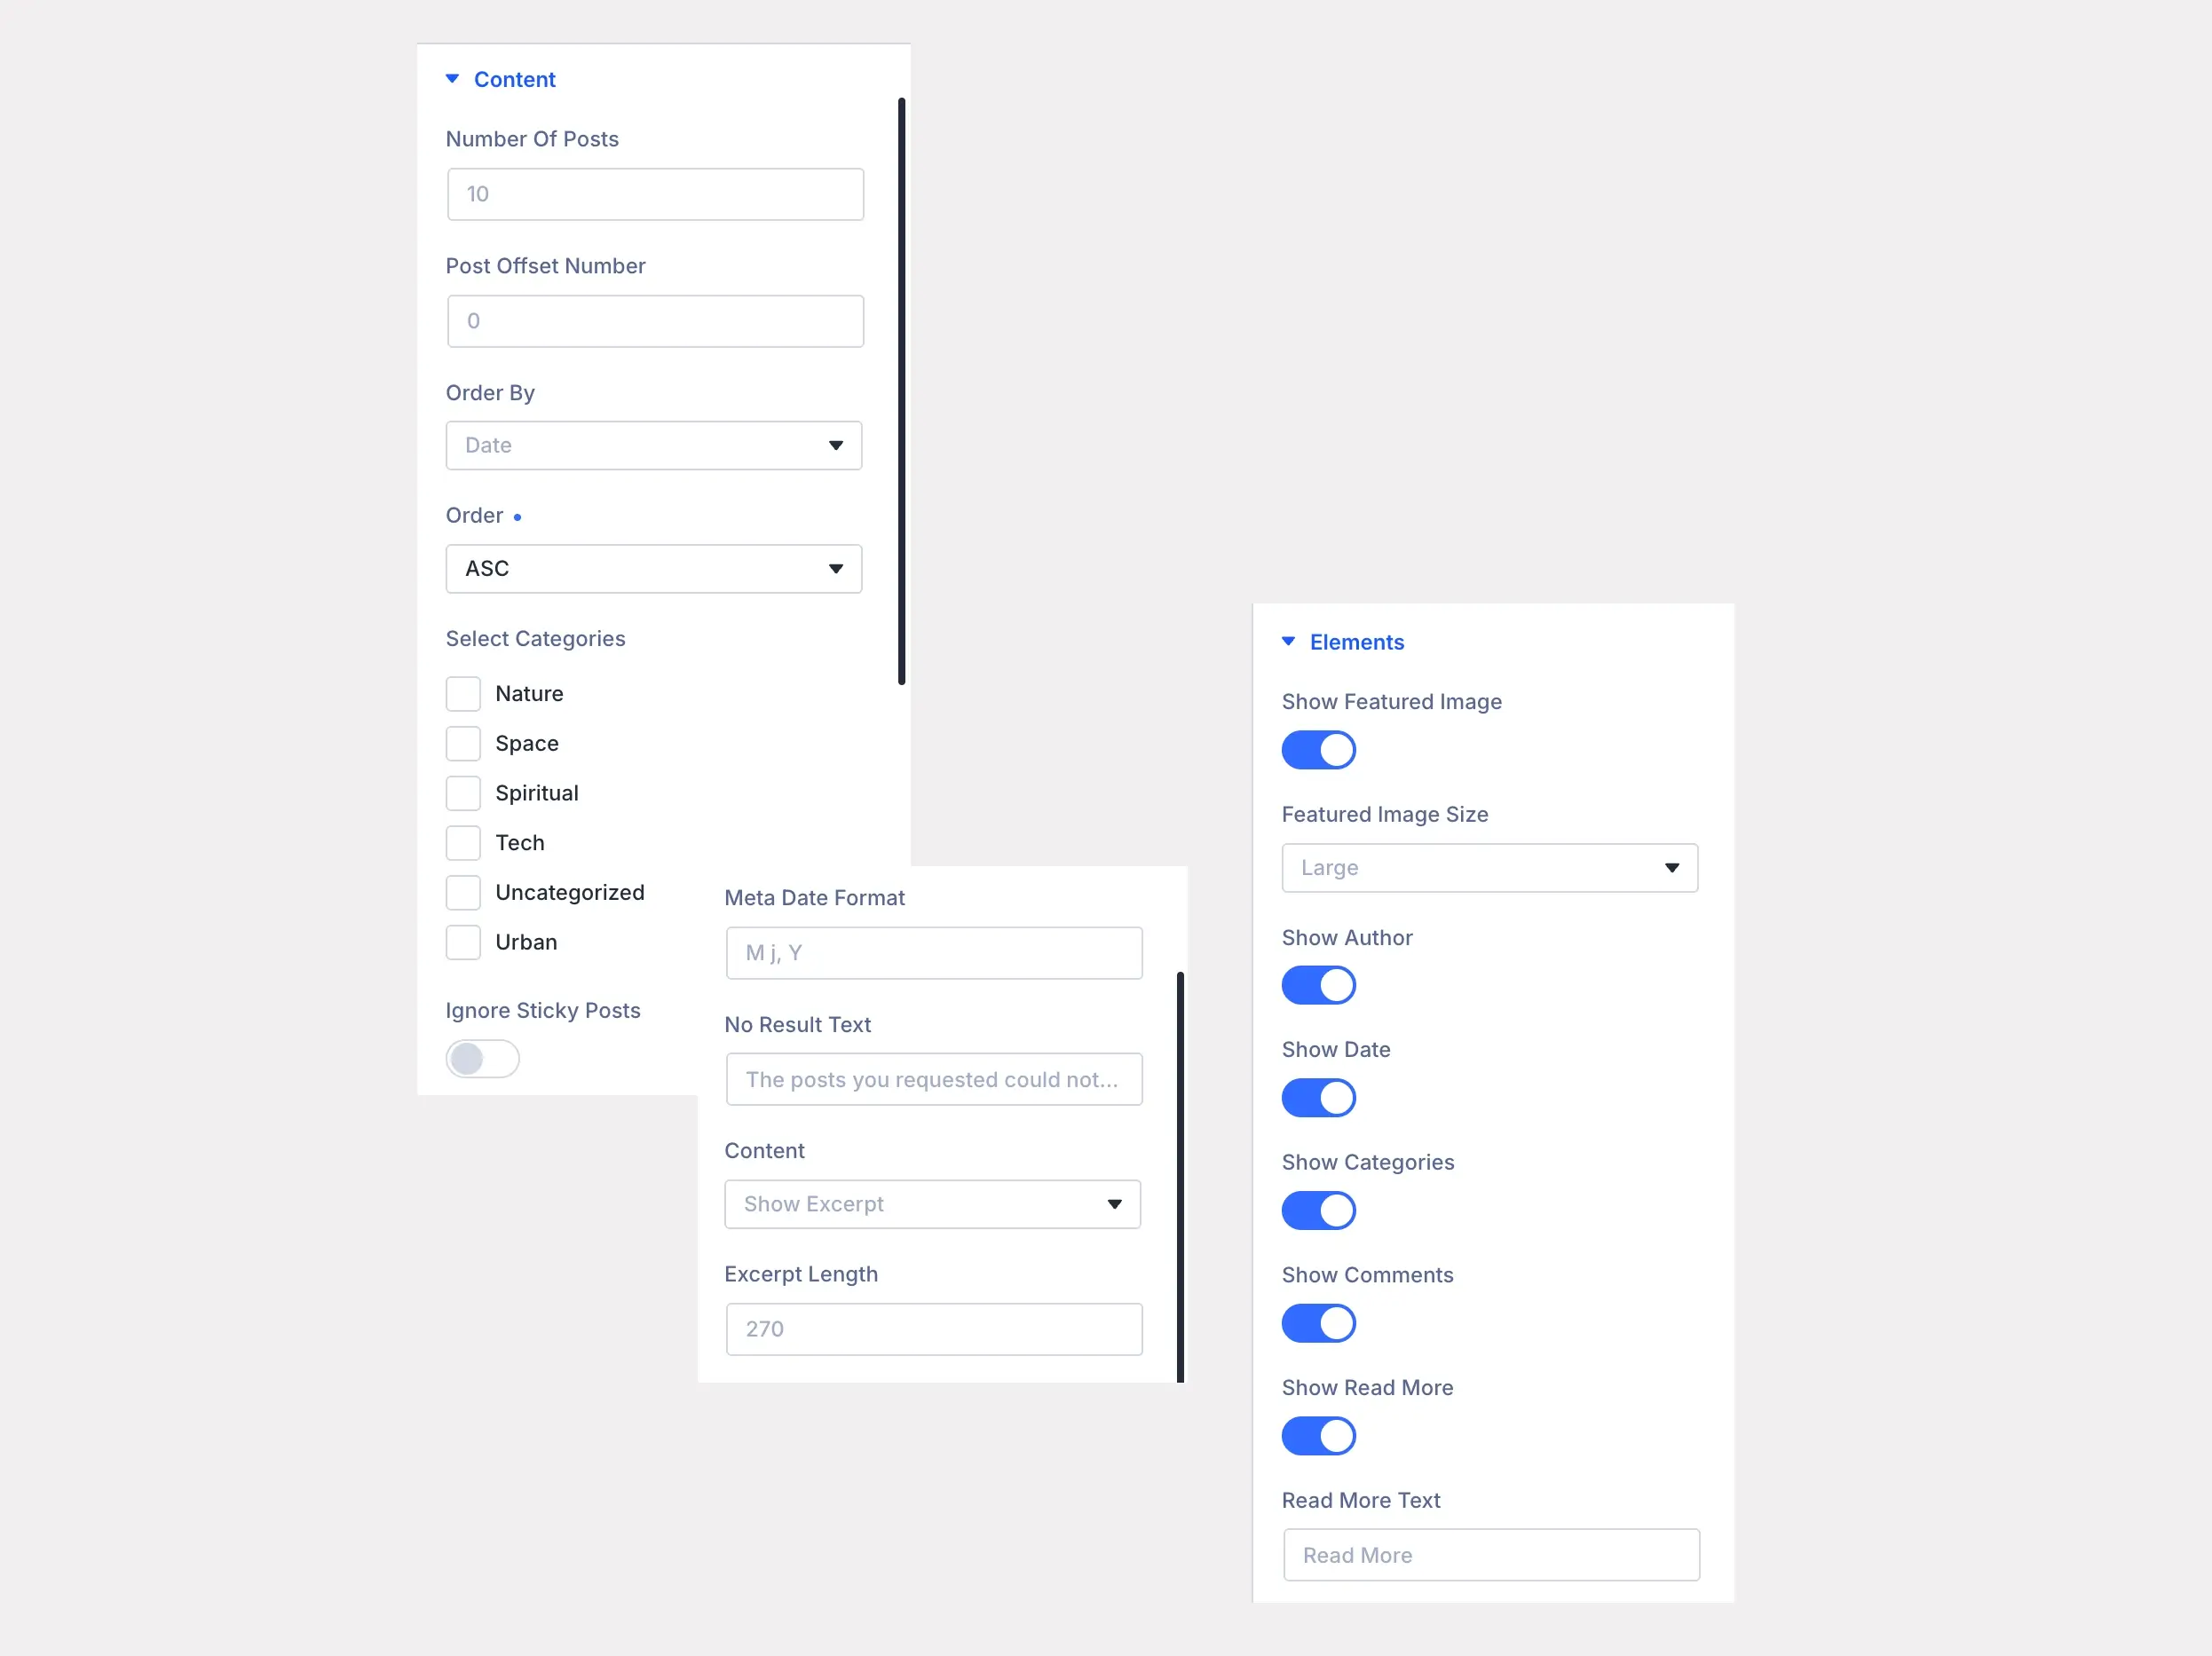
In addition, it supports showcasing the content in an alternate direction (as above), right, or left direction. This allows you to have variations for your archive pages without repeating the same design over and over. Now, when it comes to showcasing the posts in the timeline, the module supports:
- Unlimited number of posts
- Post offset
- Order by: Date, Modified Date, Title, Slug, ID, Random, Relevance, and None
- Order: Ascending or Descending (This option is very useful when you need to show posts related to the organization’s event history, as the module, by default, showcases recent posts. Using this, you can start the timeline from the very first event or the company’s history.)
- Category
- Custom No Result text
- Custom Meta Date format
- Content: Show excerpt or post content
- Excerpt length selections
All of these options make the blog timeline well-organized and highly informative. After this, you’ve got Elements options that let you enable or disable specific elements on the blog timeline. For instance, you can hide or show the featured image, author name, date, and readmore button. Make your blog timeline as customized as you want.
Design Options for the Blog Timeline
Once you’ve customized the content, move to the Design tab. Here, you’ll find options that allow you to:
- Customize the headings, body text, post date, and meta
- Set custom border radius for the post timeline
- Change featured image width
- Change the timeline icon size and the icon itself
- Decrease or increase the timeline stem
- Change the stem color and fill color
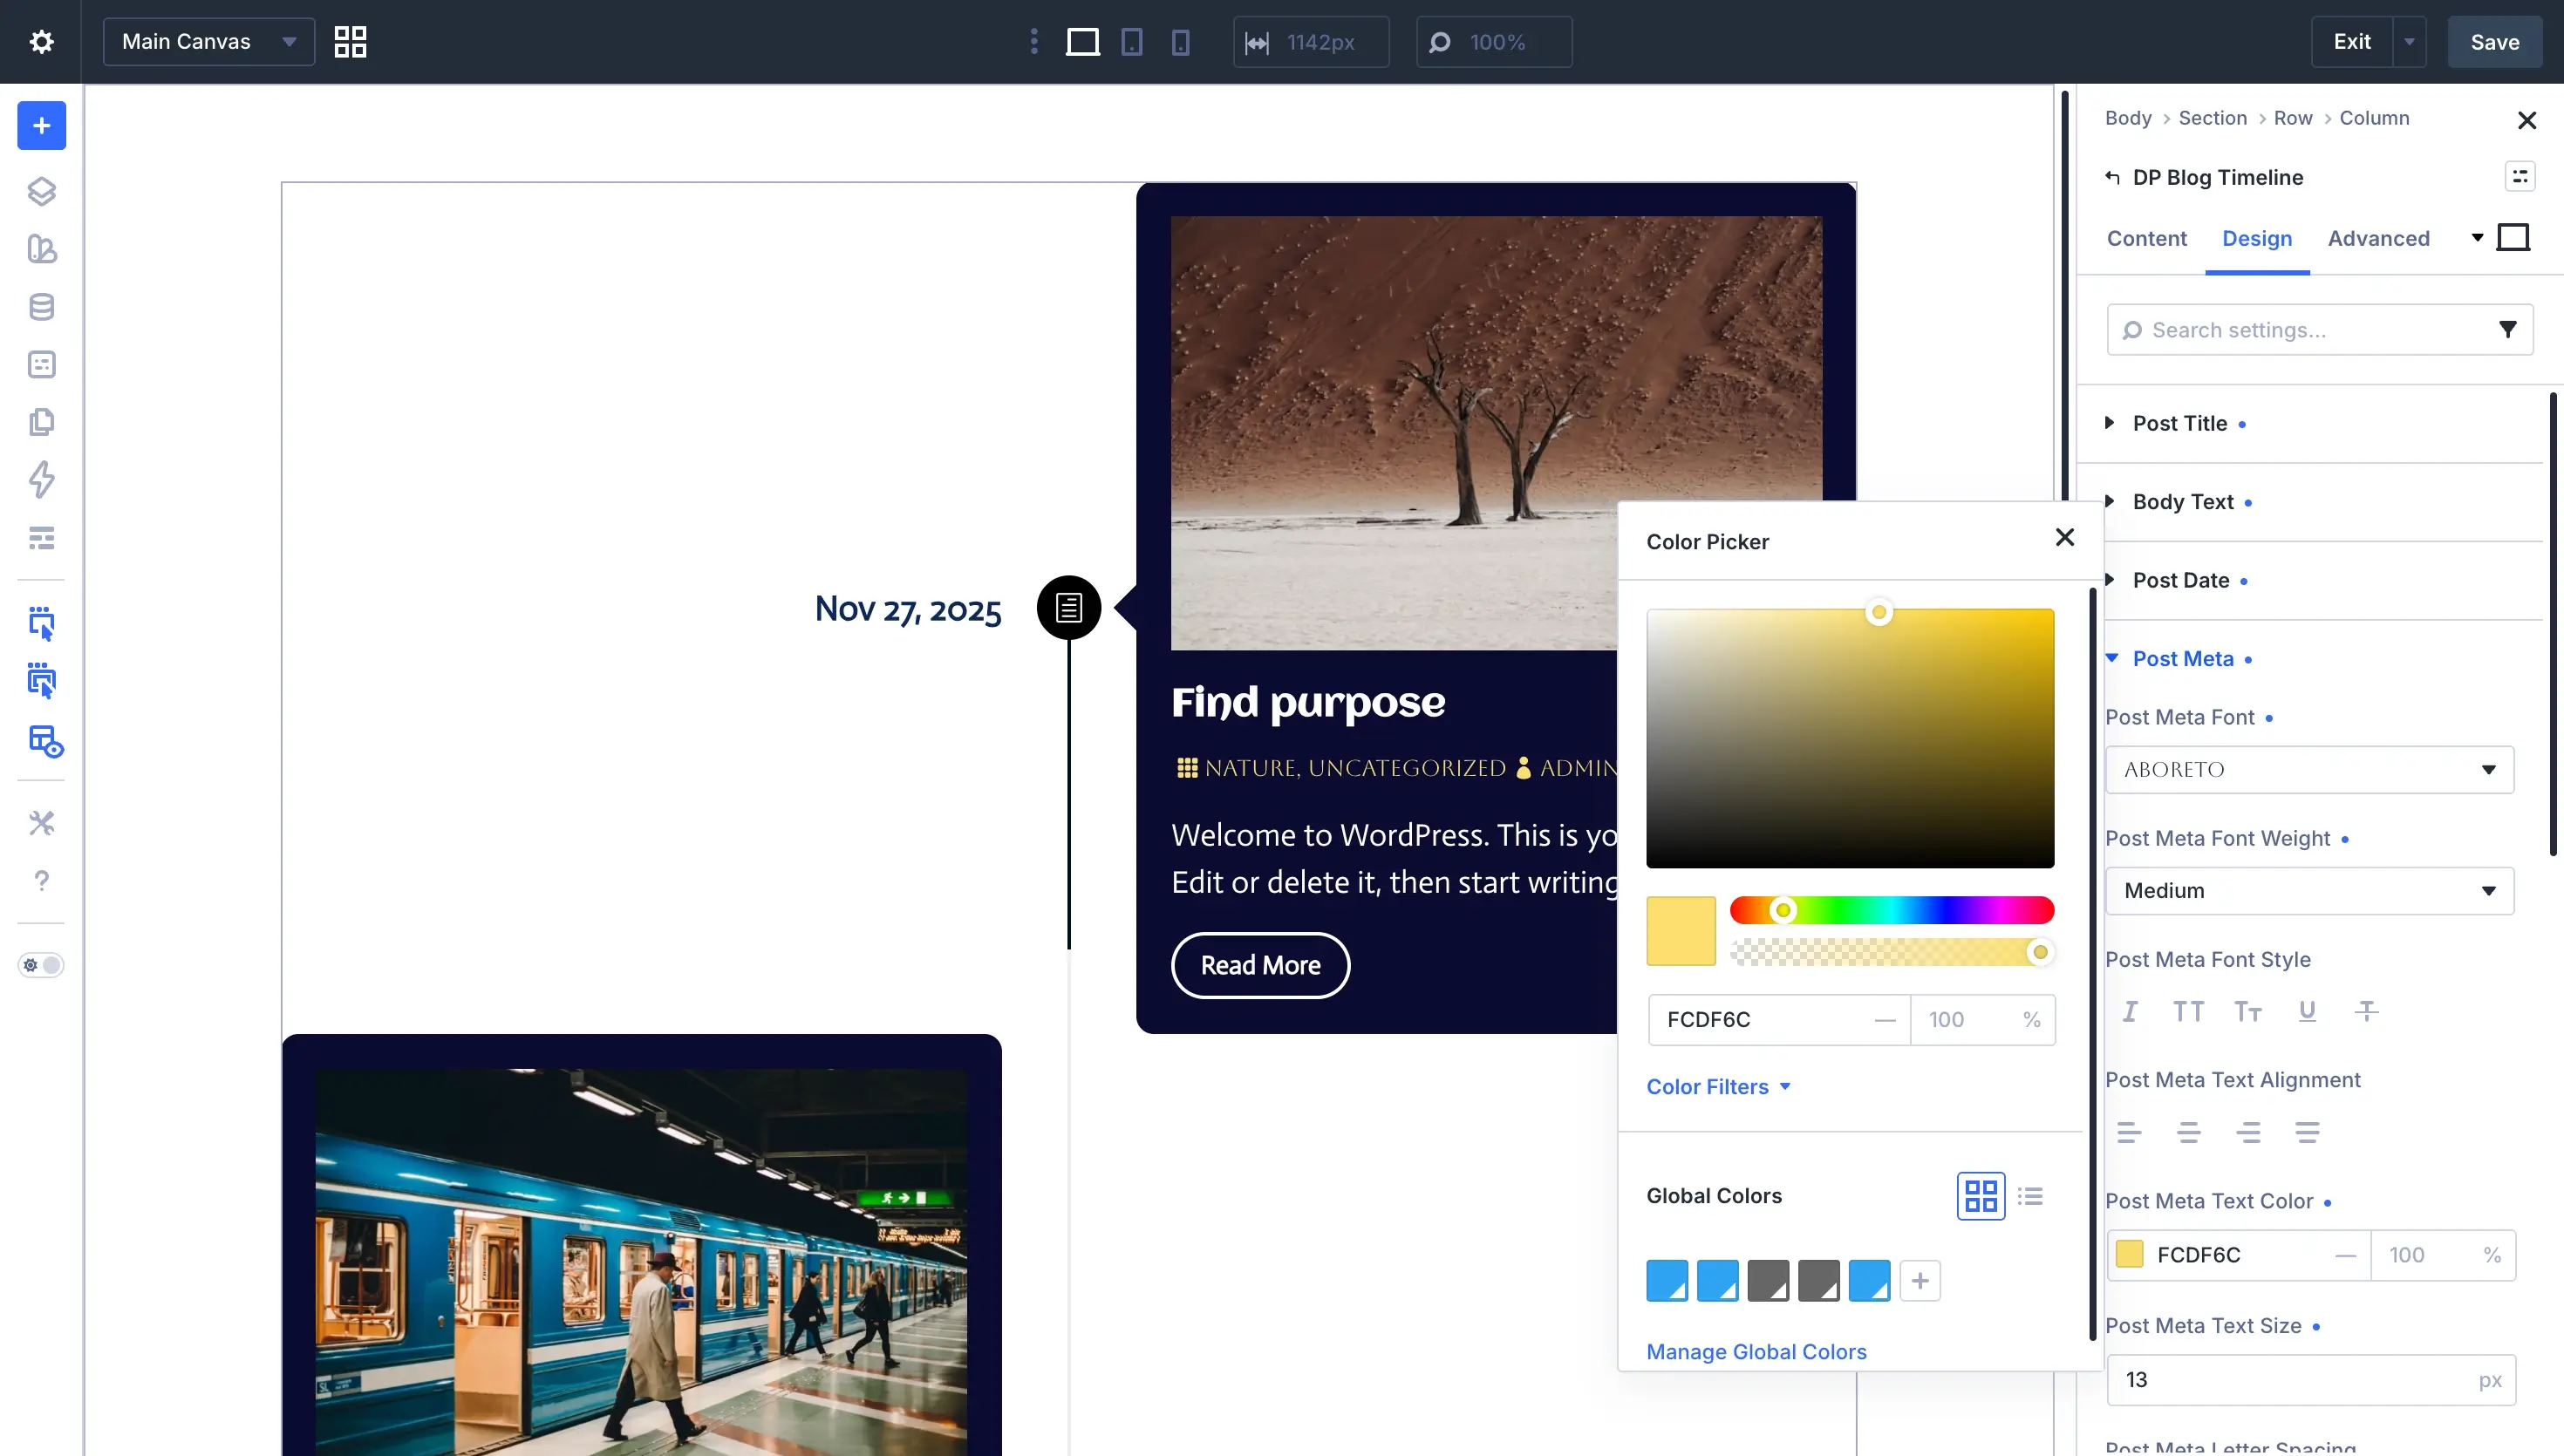
By utilizing all of these options, you can make the blog timeline more engaging. And once you’re done, save all your changes. Then, exit the builder and click Save Changes in the Theme Builder.
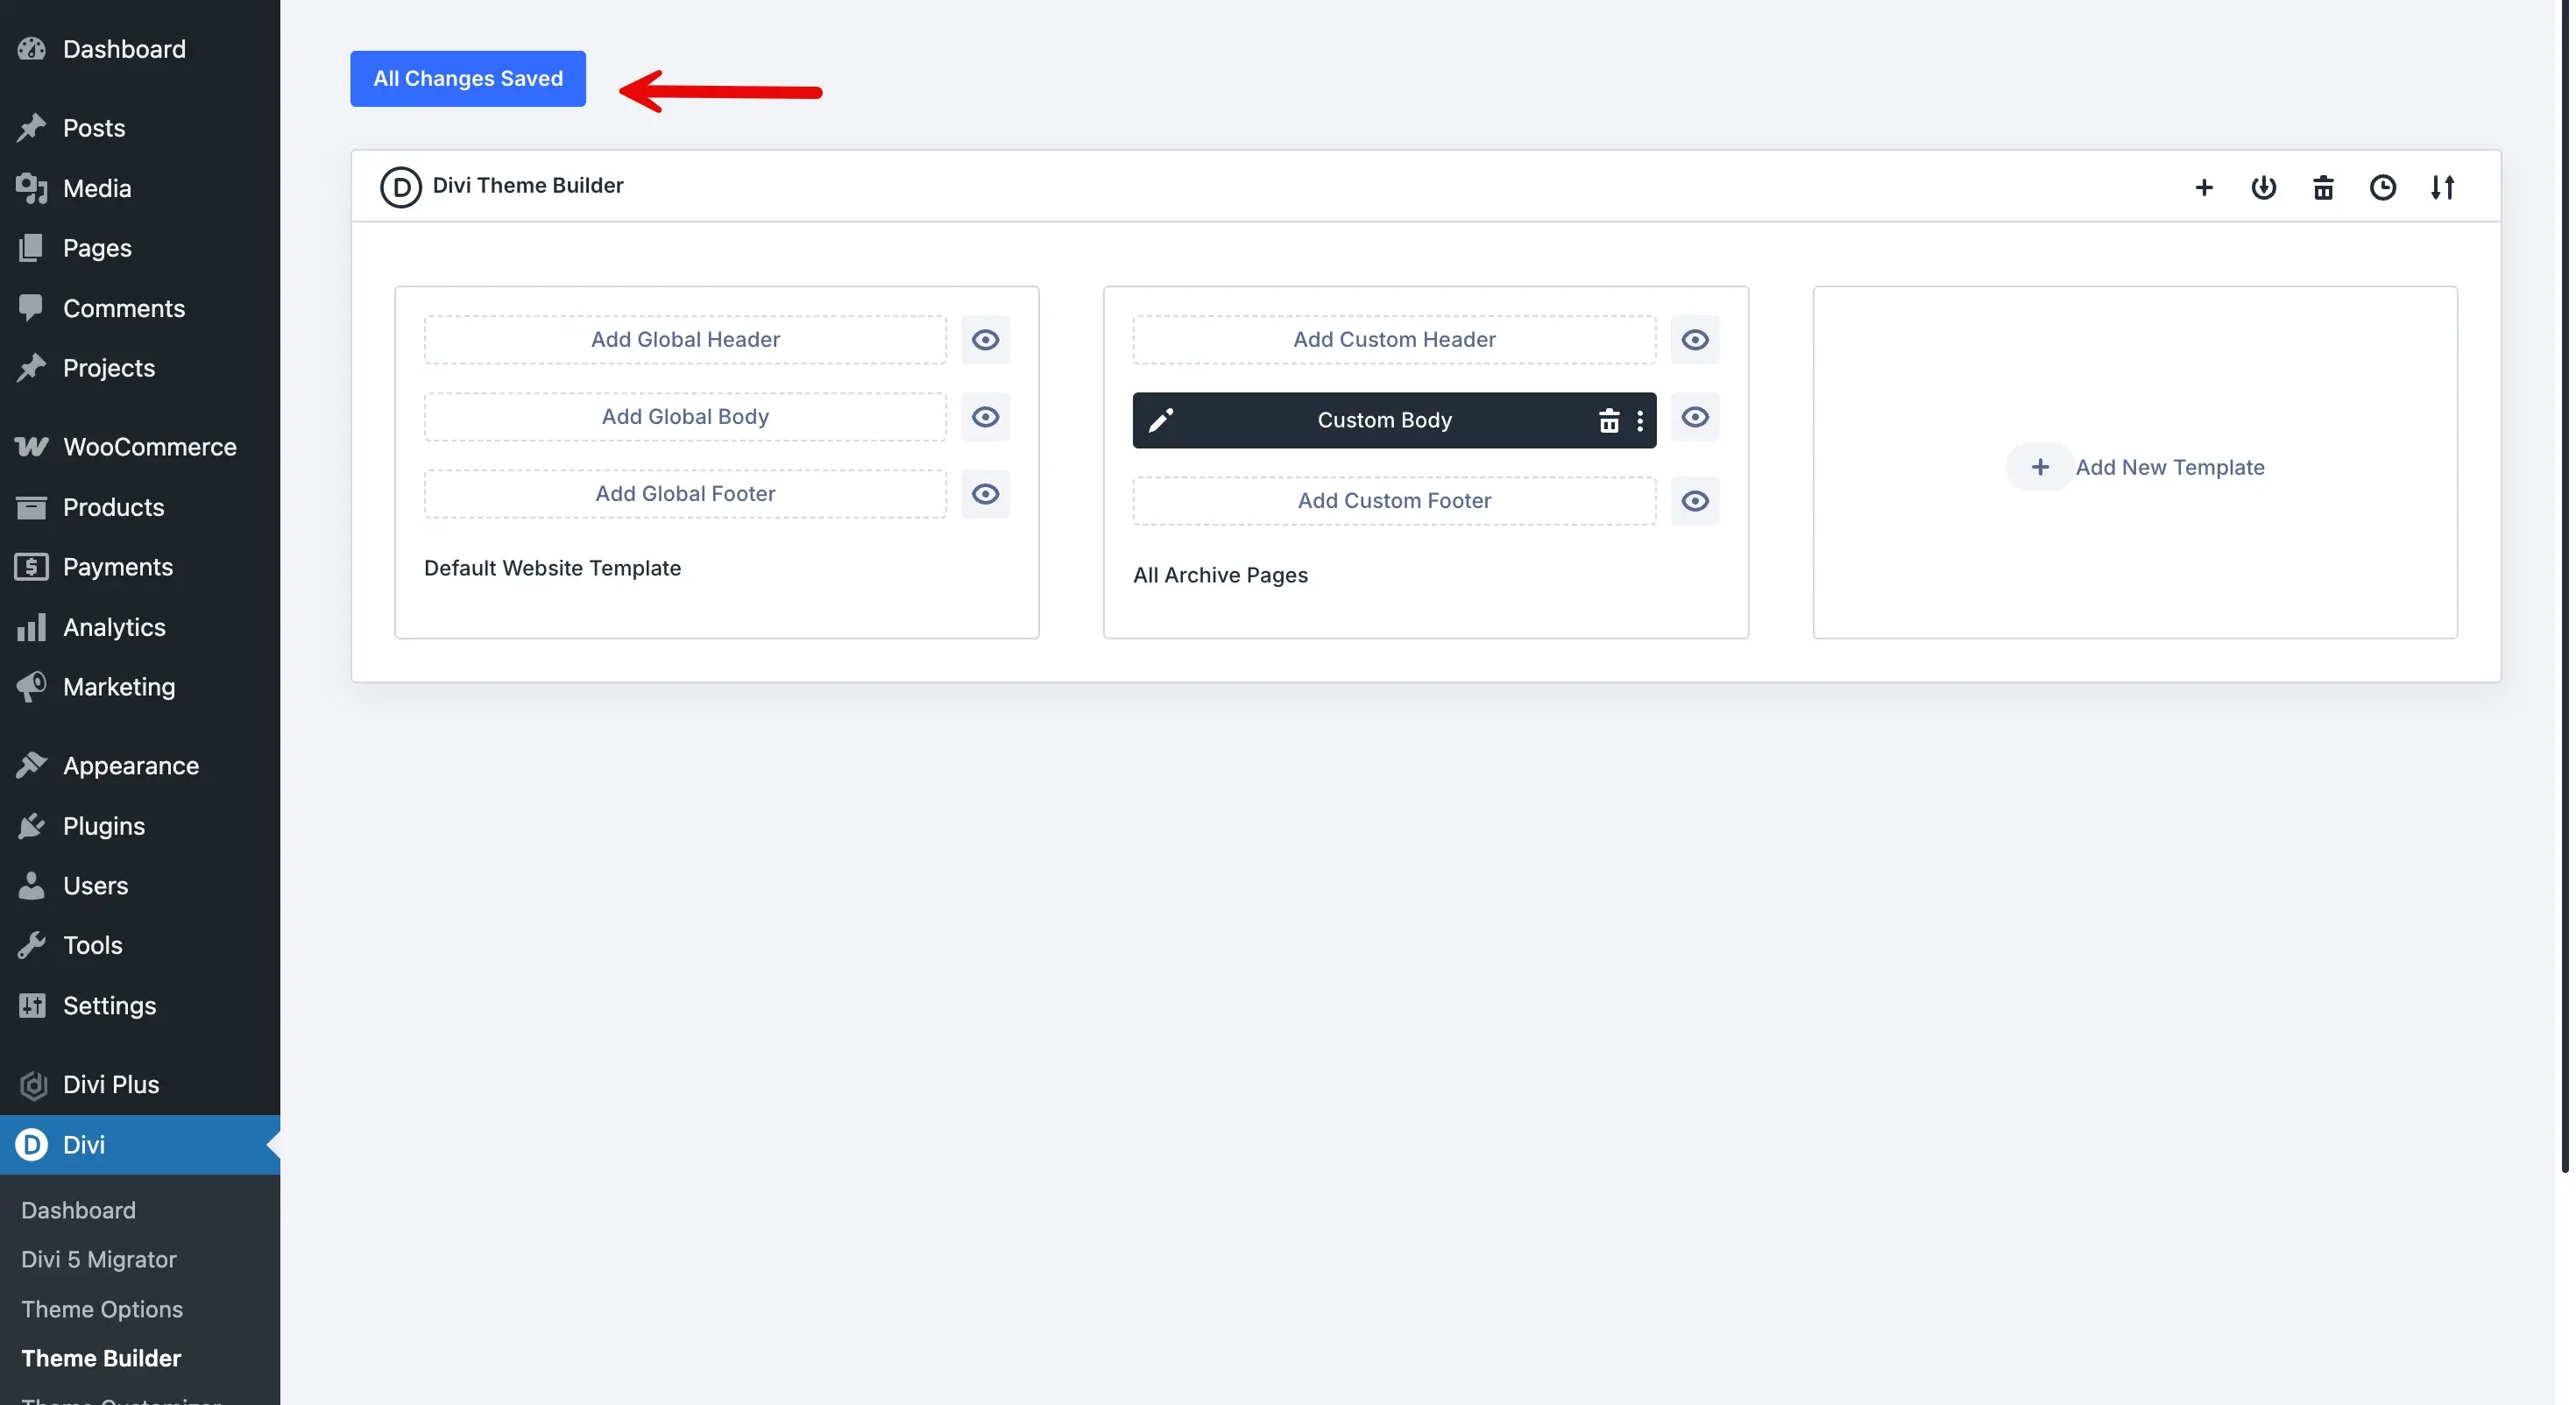
After that, open the blog page, and you can find your timeline showcasing all the posts the way you need them. Here are some examples of the Blog Timeline.

Type 3 – Content Timeline
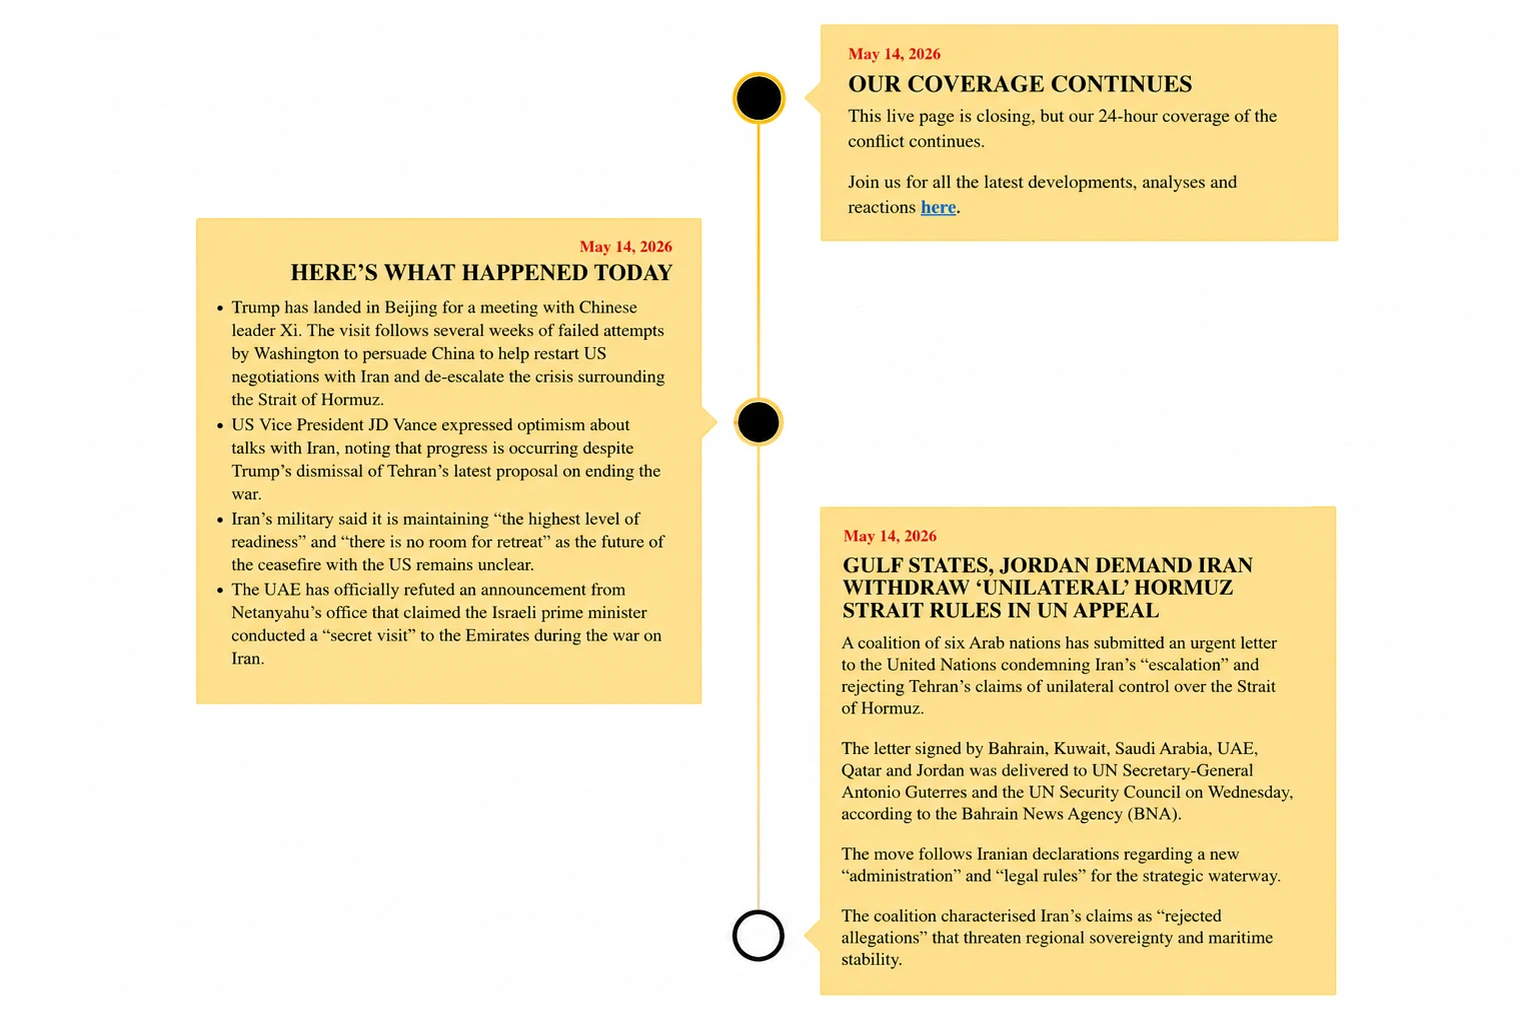
Best for: Company history, product roadmaps, project phases, how-to sequences
Overview: Content with a date and heading placed inside a timeline, connected to other content items in the timeline.
What You’ll Need
- Divi Plus Timeline module
- Your milestone content (dates, headings, descriptions)
Steps to Create a Content Timeline
A content timeline is no different than the photo timeline we discussed earlier. All options are there, but you only use them for showcasing text information, rather than visual storytelling. To add a content timeline, search for DP Timeline in the Divi 5 Builder, and insert the following one:
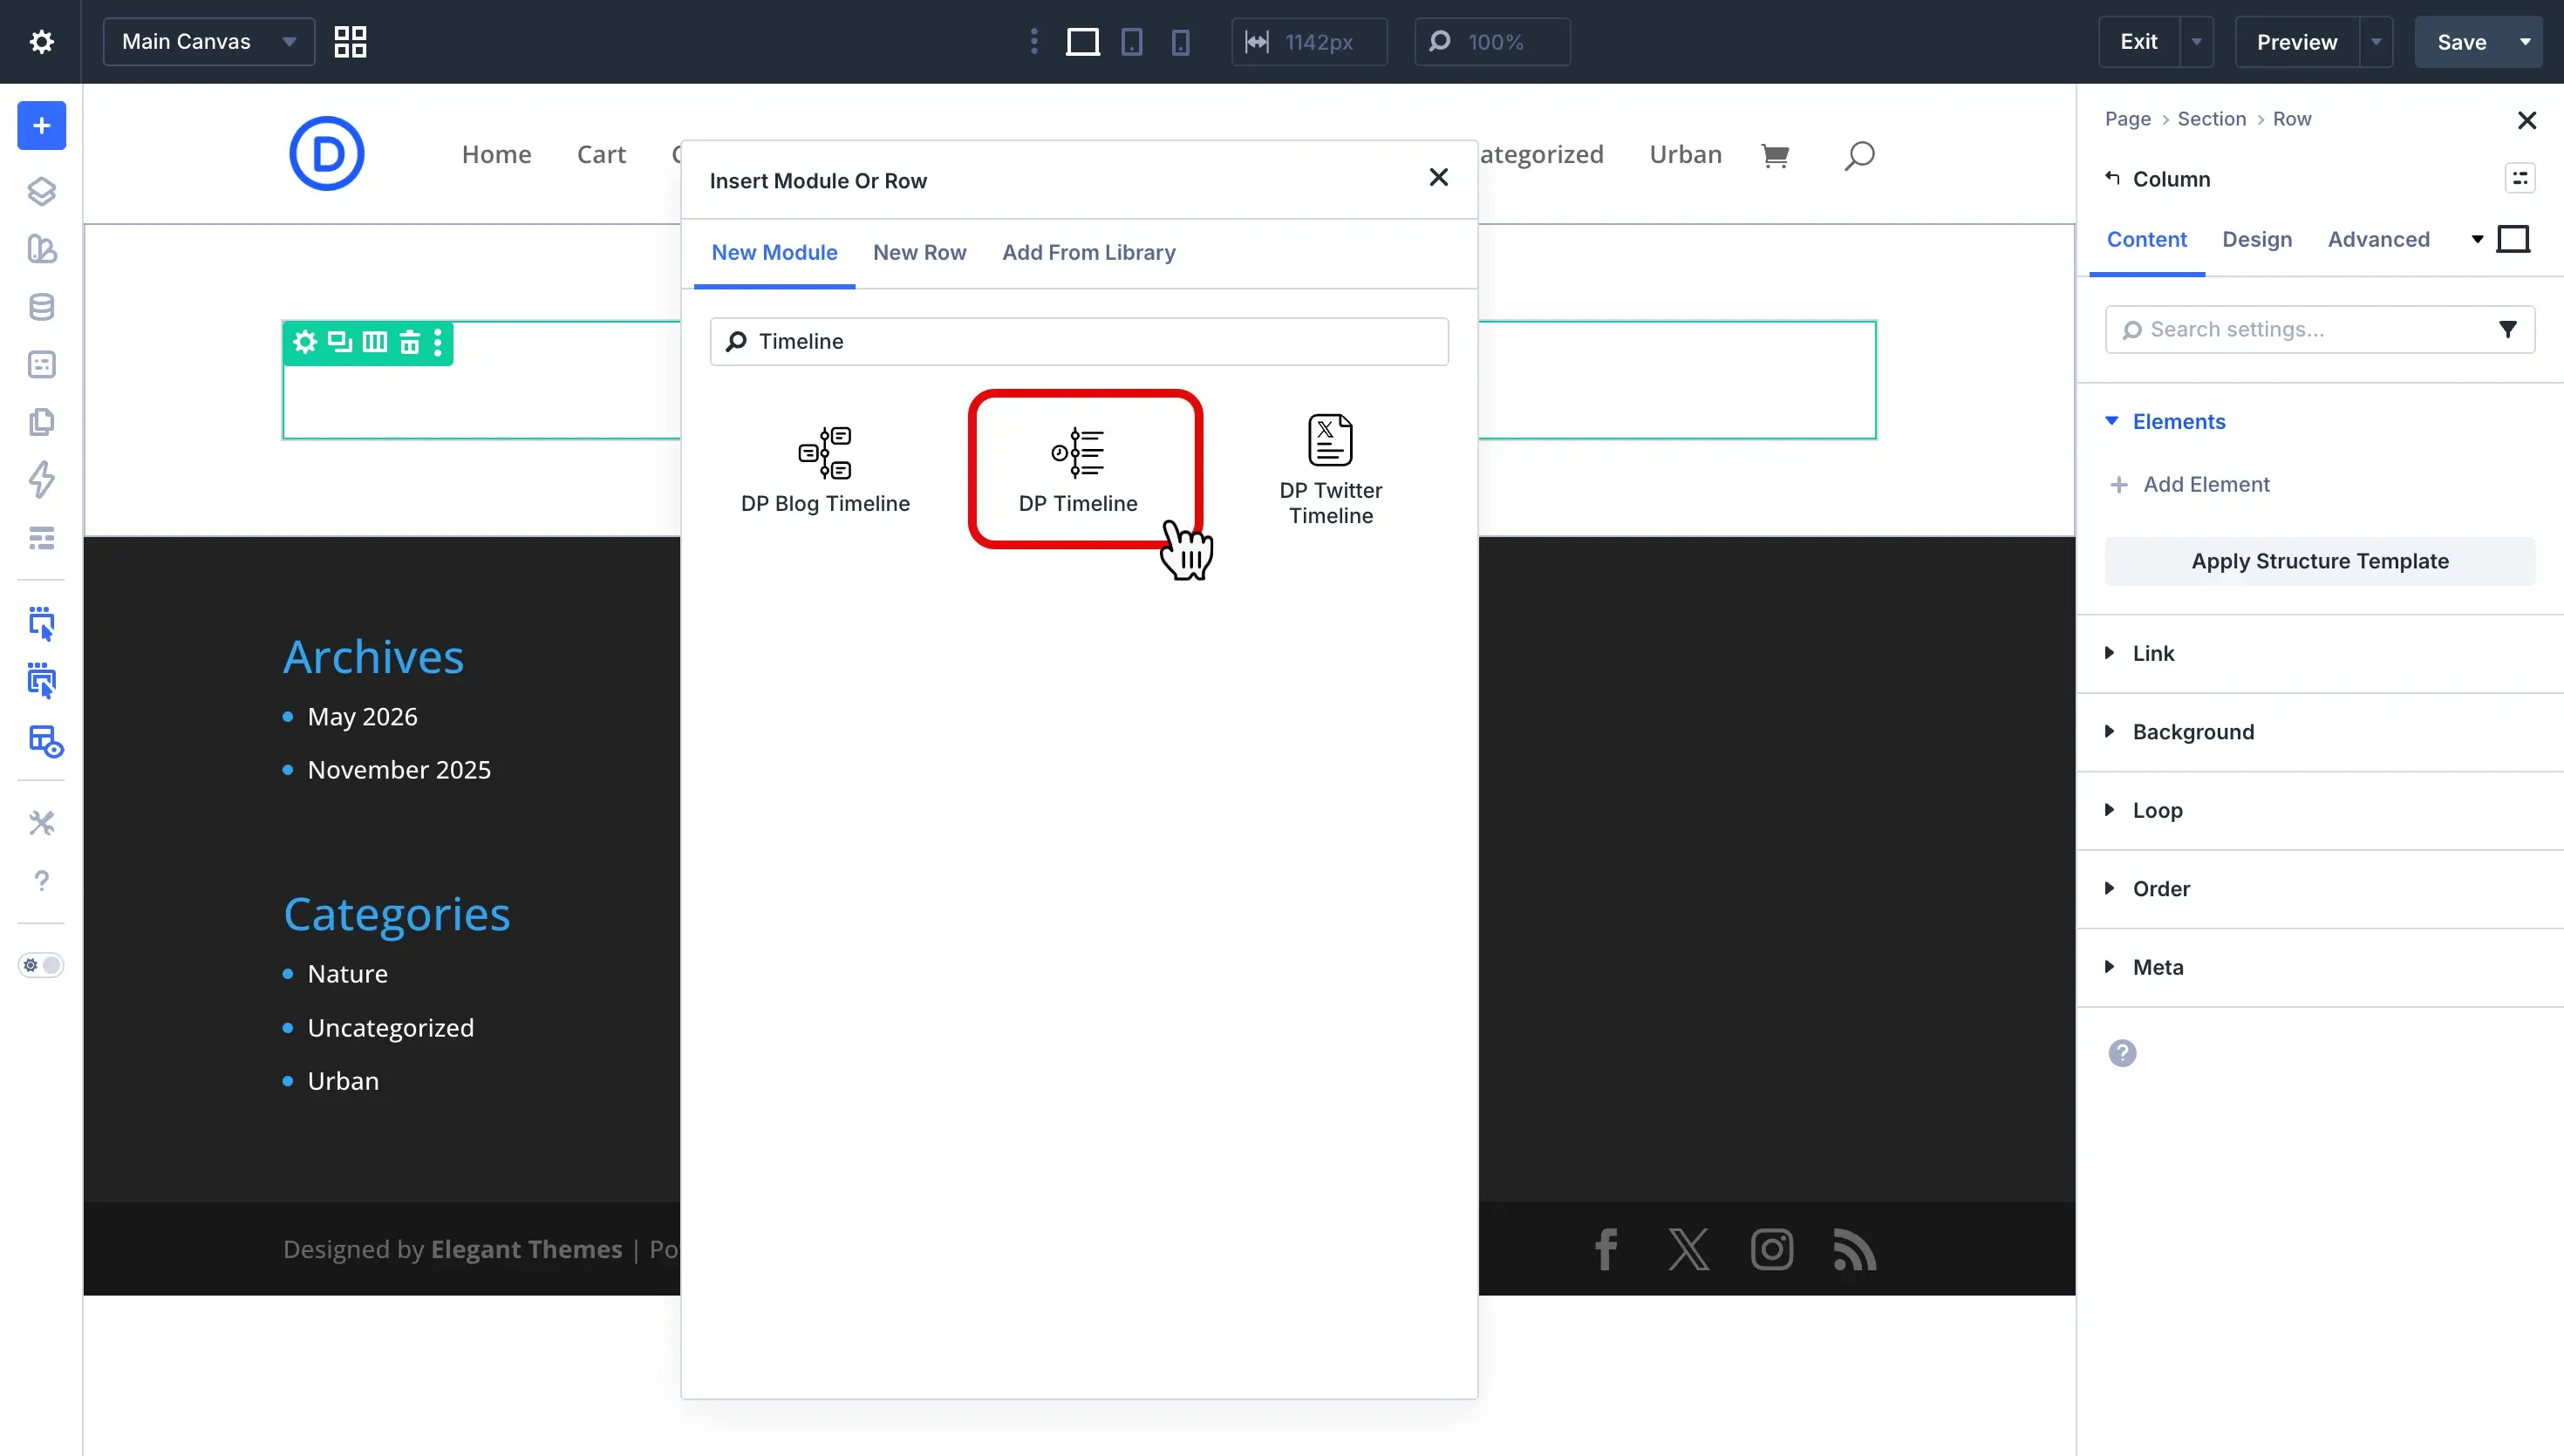
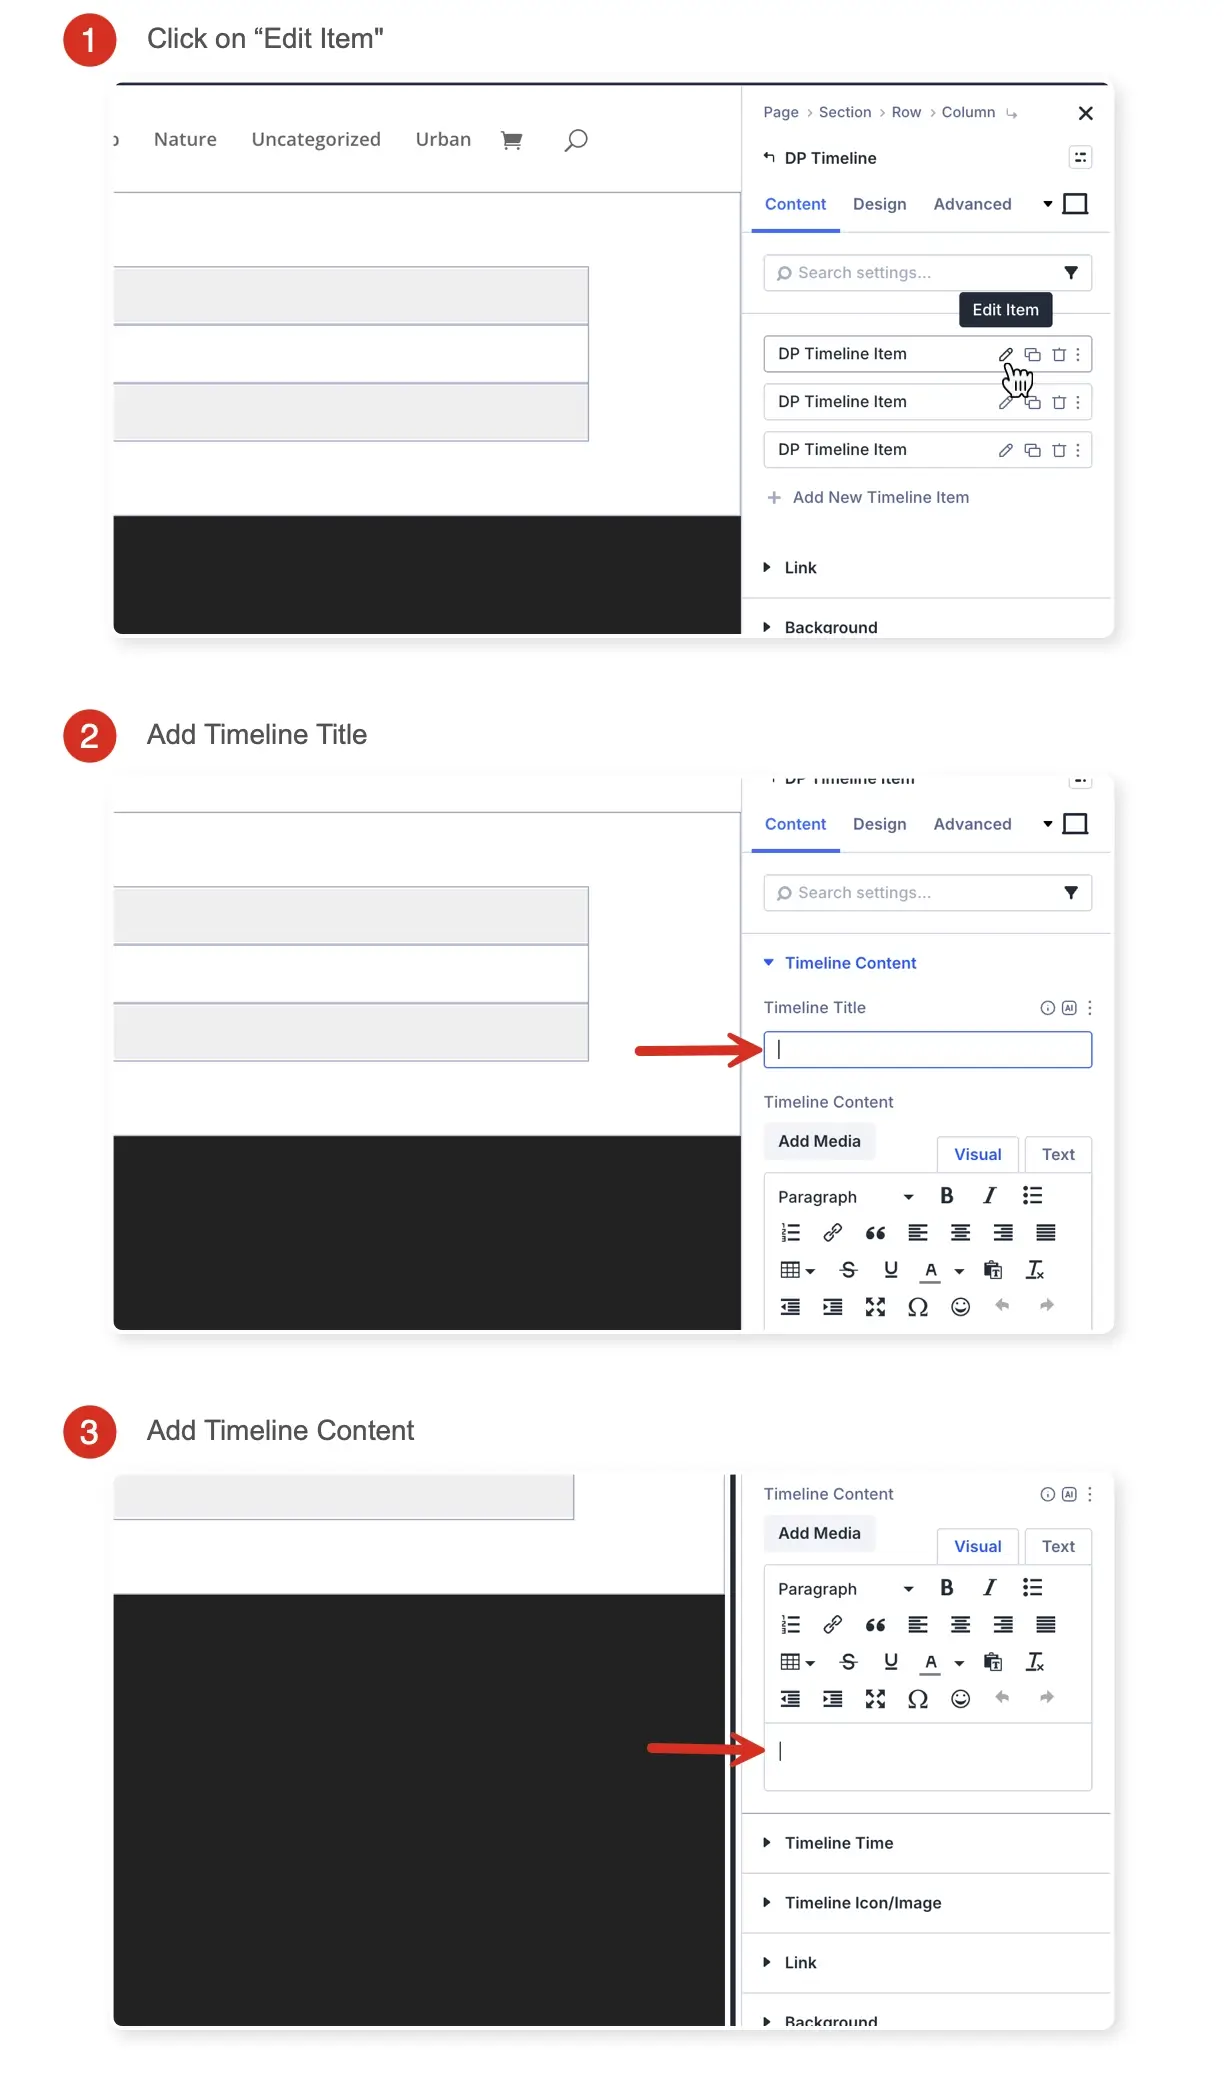
Once the module is added, you can see an empty rectangle on the page. In order to have a timeline, we need to add timeline items. So, to do that, click Add New Timeline Item in the right sidebar.

Do it multiple times to get the following structure for your content timeline.

Now, we need to add content inside each time, so simply, open each time, go to the Timeline Content, and add your Timeline Title and Content.
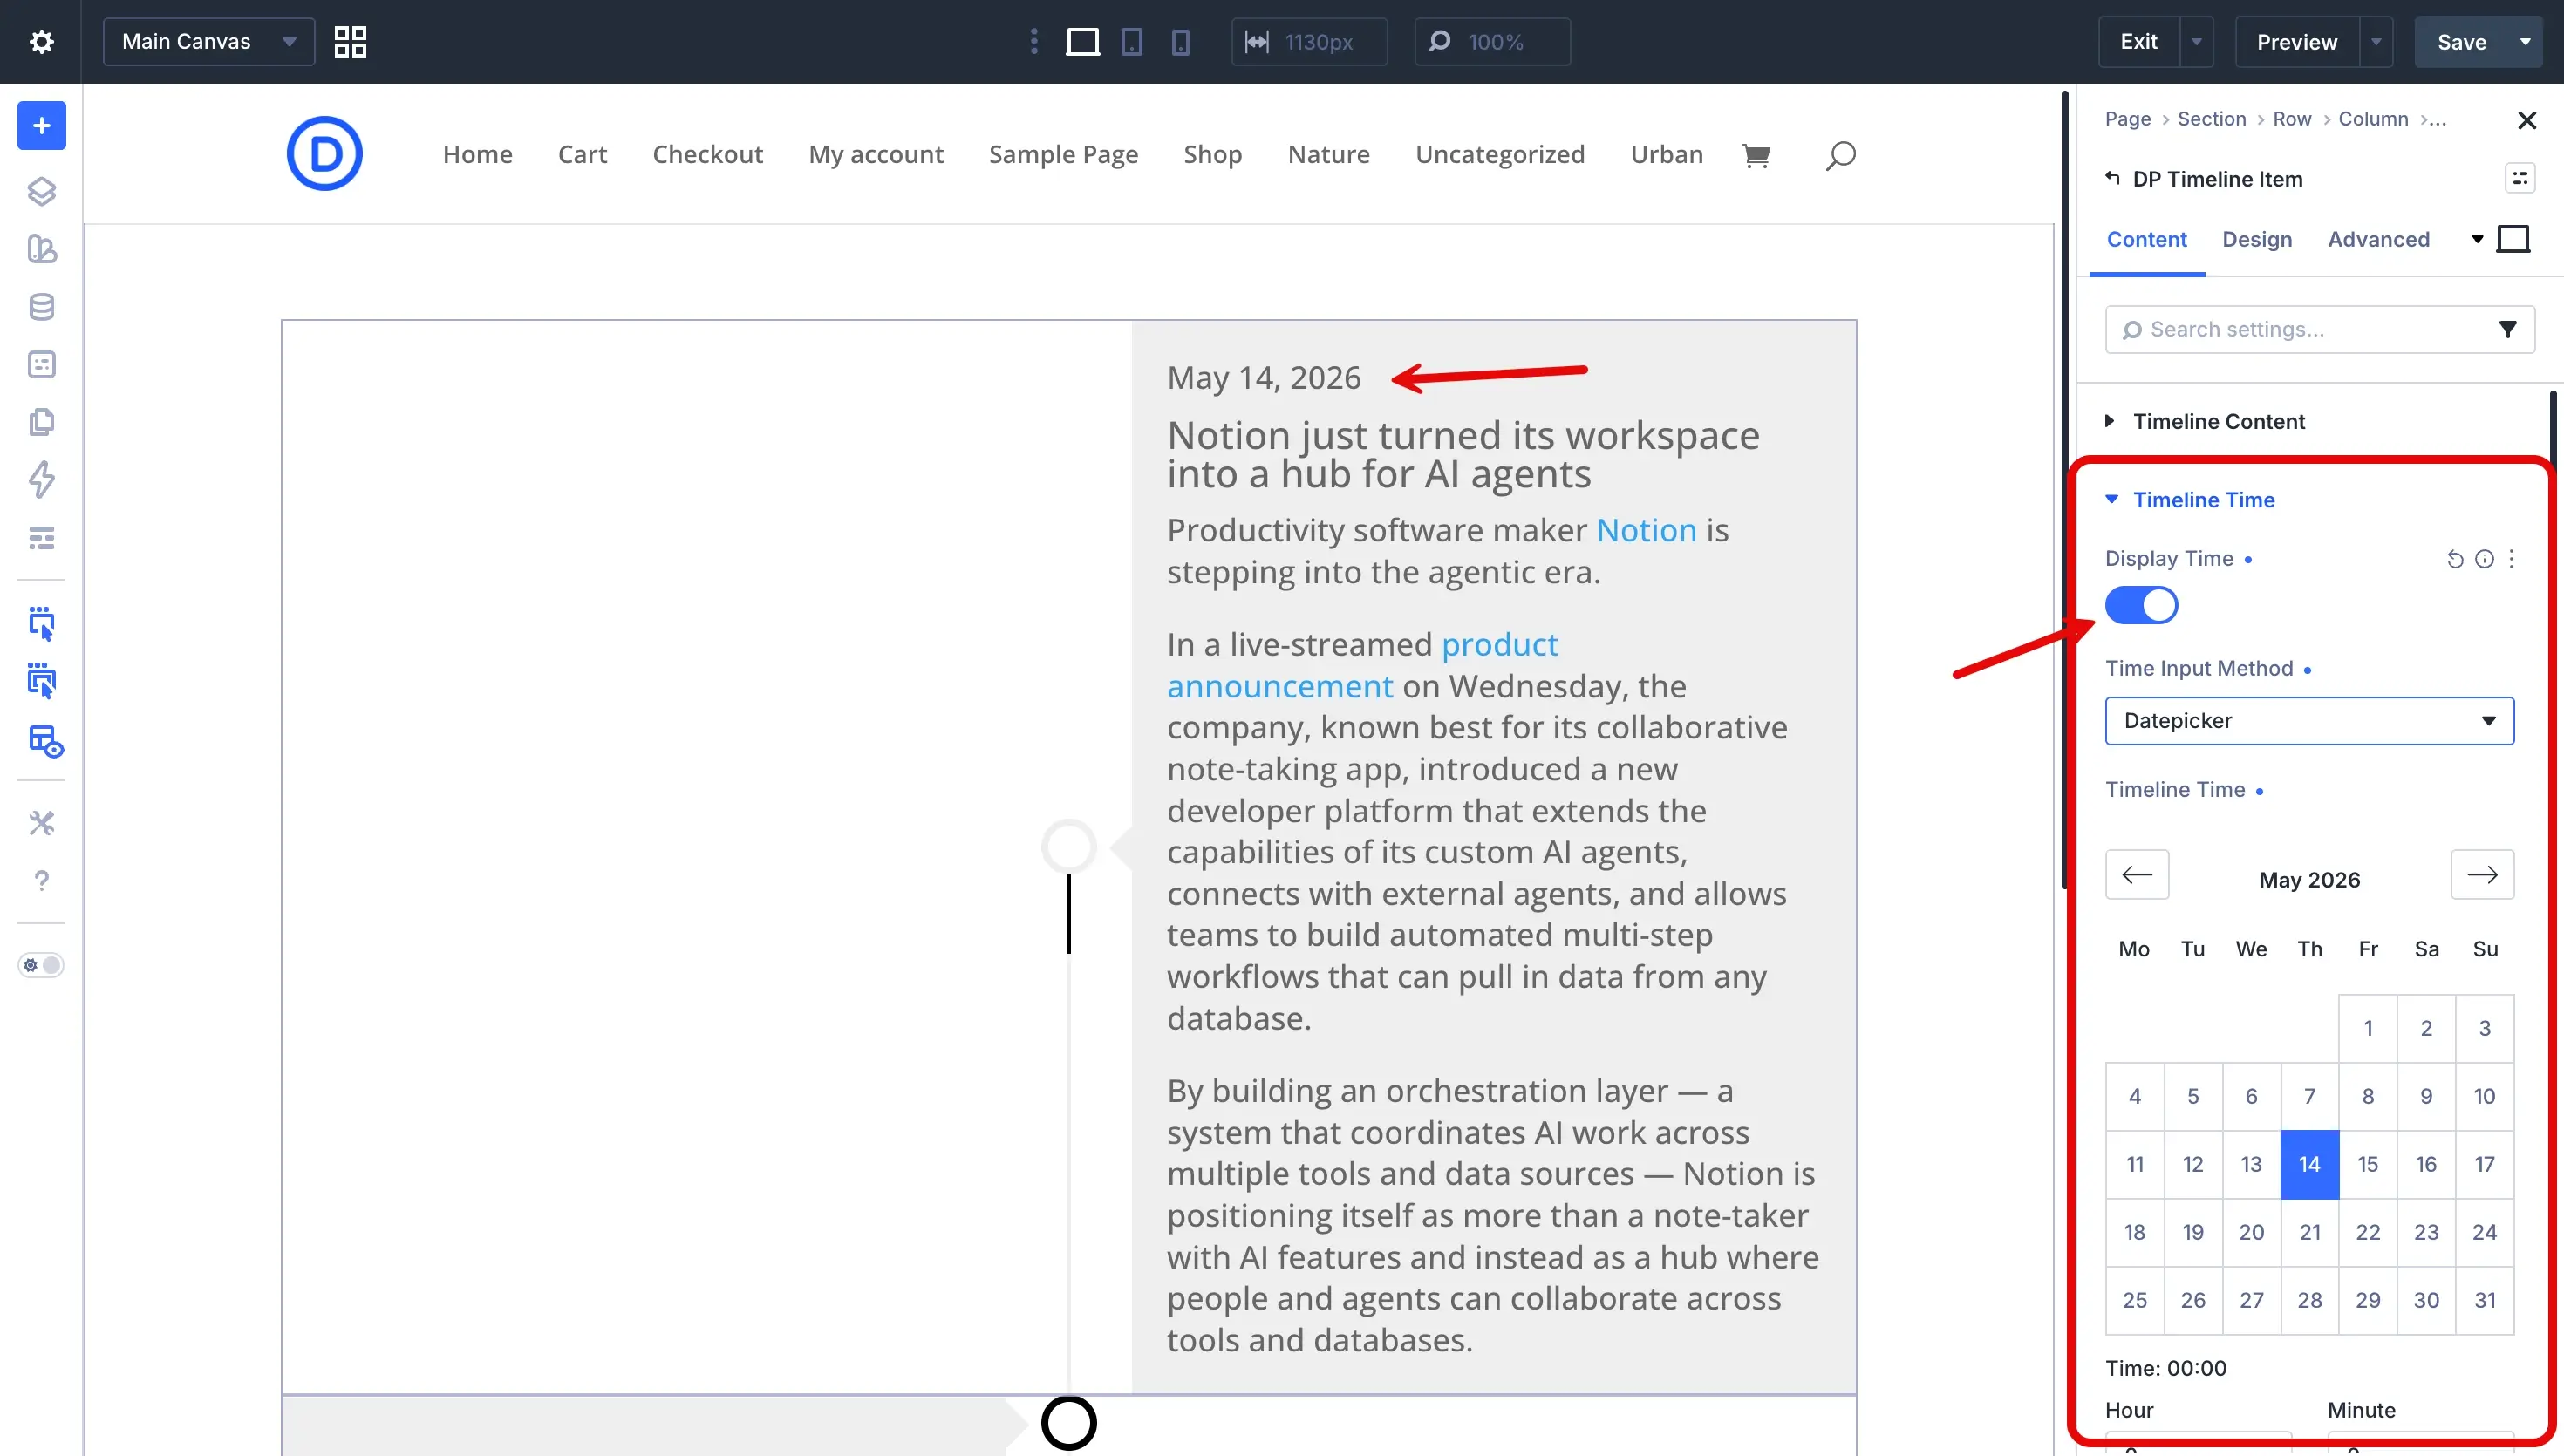
Repeat the same for all of your timeline items. Once done, go to the Timeline Time and enable the Display Time option. This will show the time on your timeline items square.
After doing this, go to the parent design options and apply style customizations as needed. Finally, you can get a content timeline just like the one below.
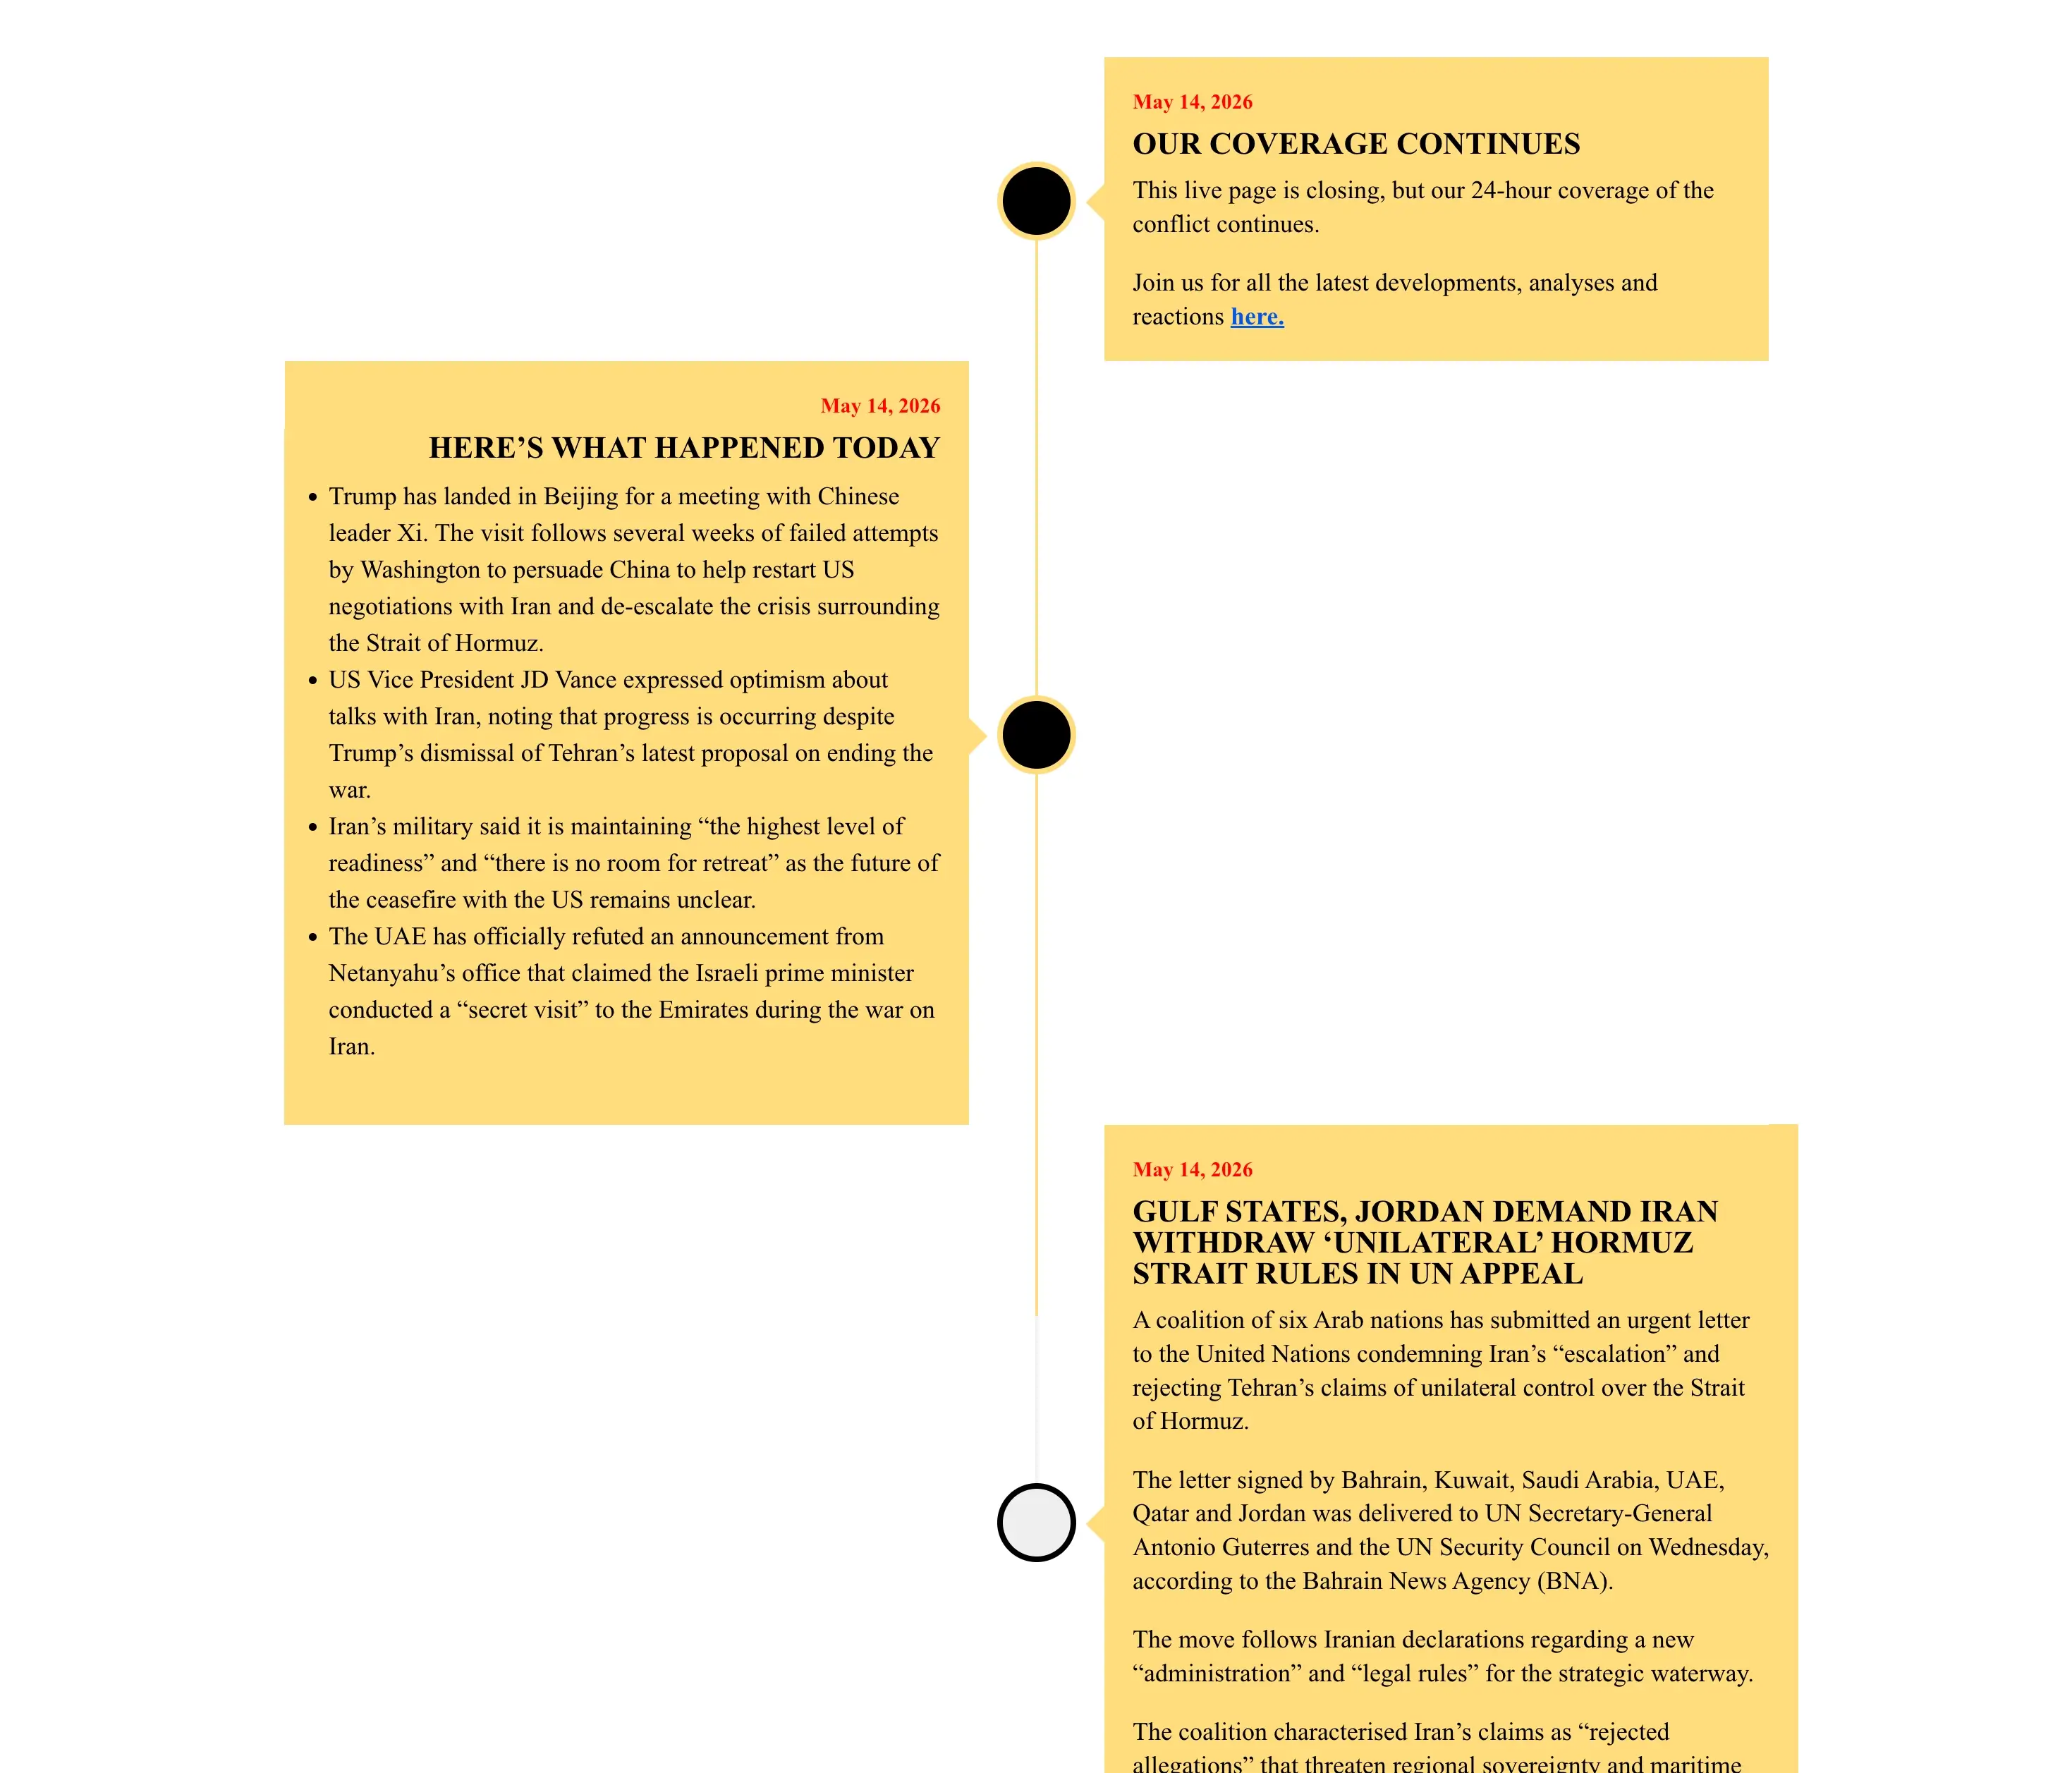
This is a very useful content type for websites like News where it has to add regular updates regarding a particular event, for instance, weather, war, or any time serious news.
Type 4 – Icon Timeline
Best for: Step-by-step processes, service pages, feature highlights, and onboarding flows.
Overview: An icon timeline is just like any other timeline; it supports different icons at the stem point. You can use it for Blog Timeline, Content Timeline, and even Photo Timeline.
What You’ll Need
- Divi Timeline module
Steps to Add an Icon Timeline
To create an icon timeline, add the Divi Plus Timeline module, then go to each item’s Content → Timeline Icon/Image → enable Use Icon option, then select your icon, and you can have an icon in the timeline stem like the following:
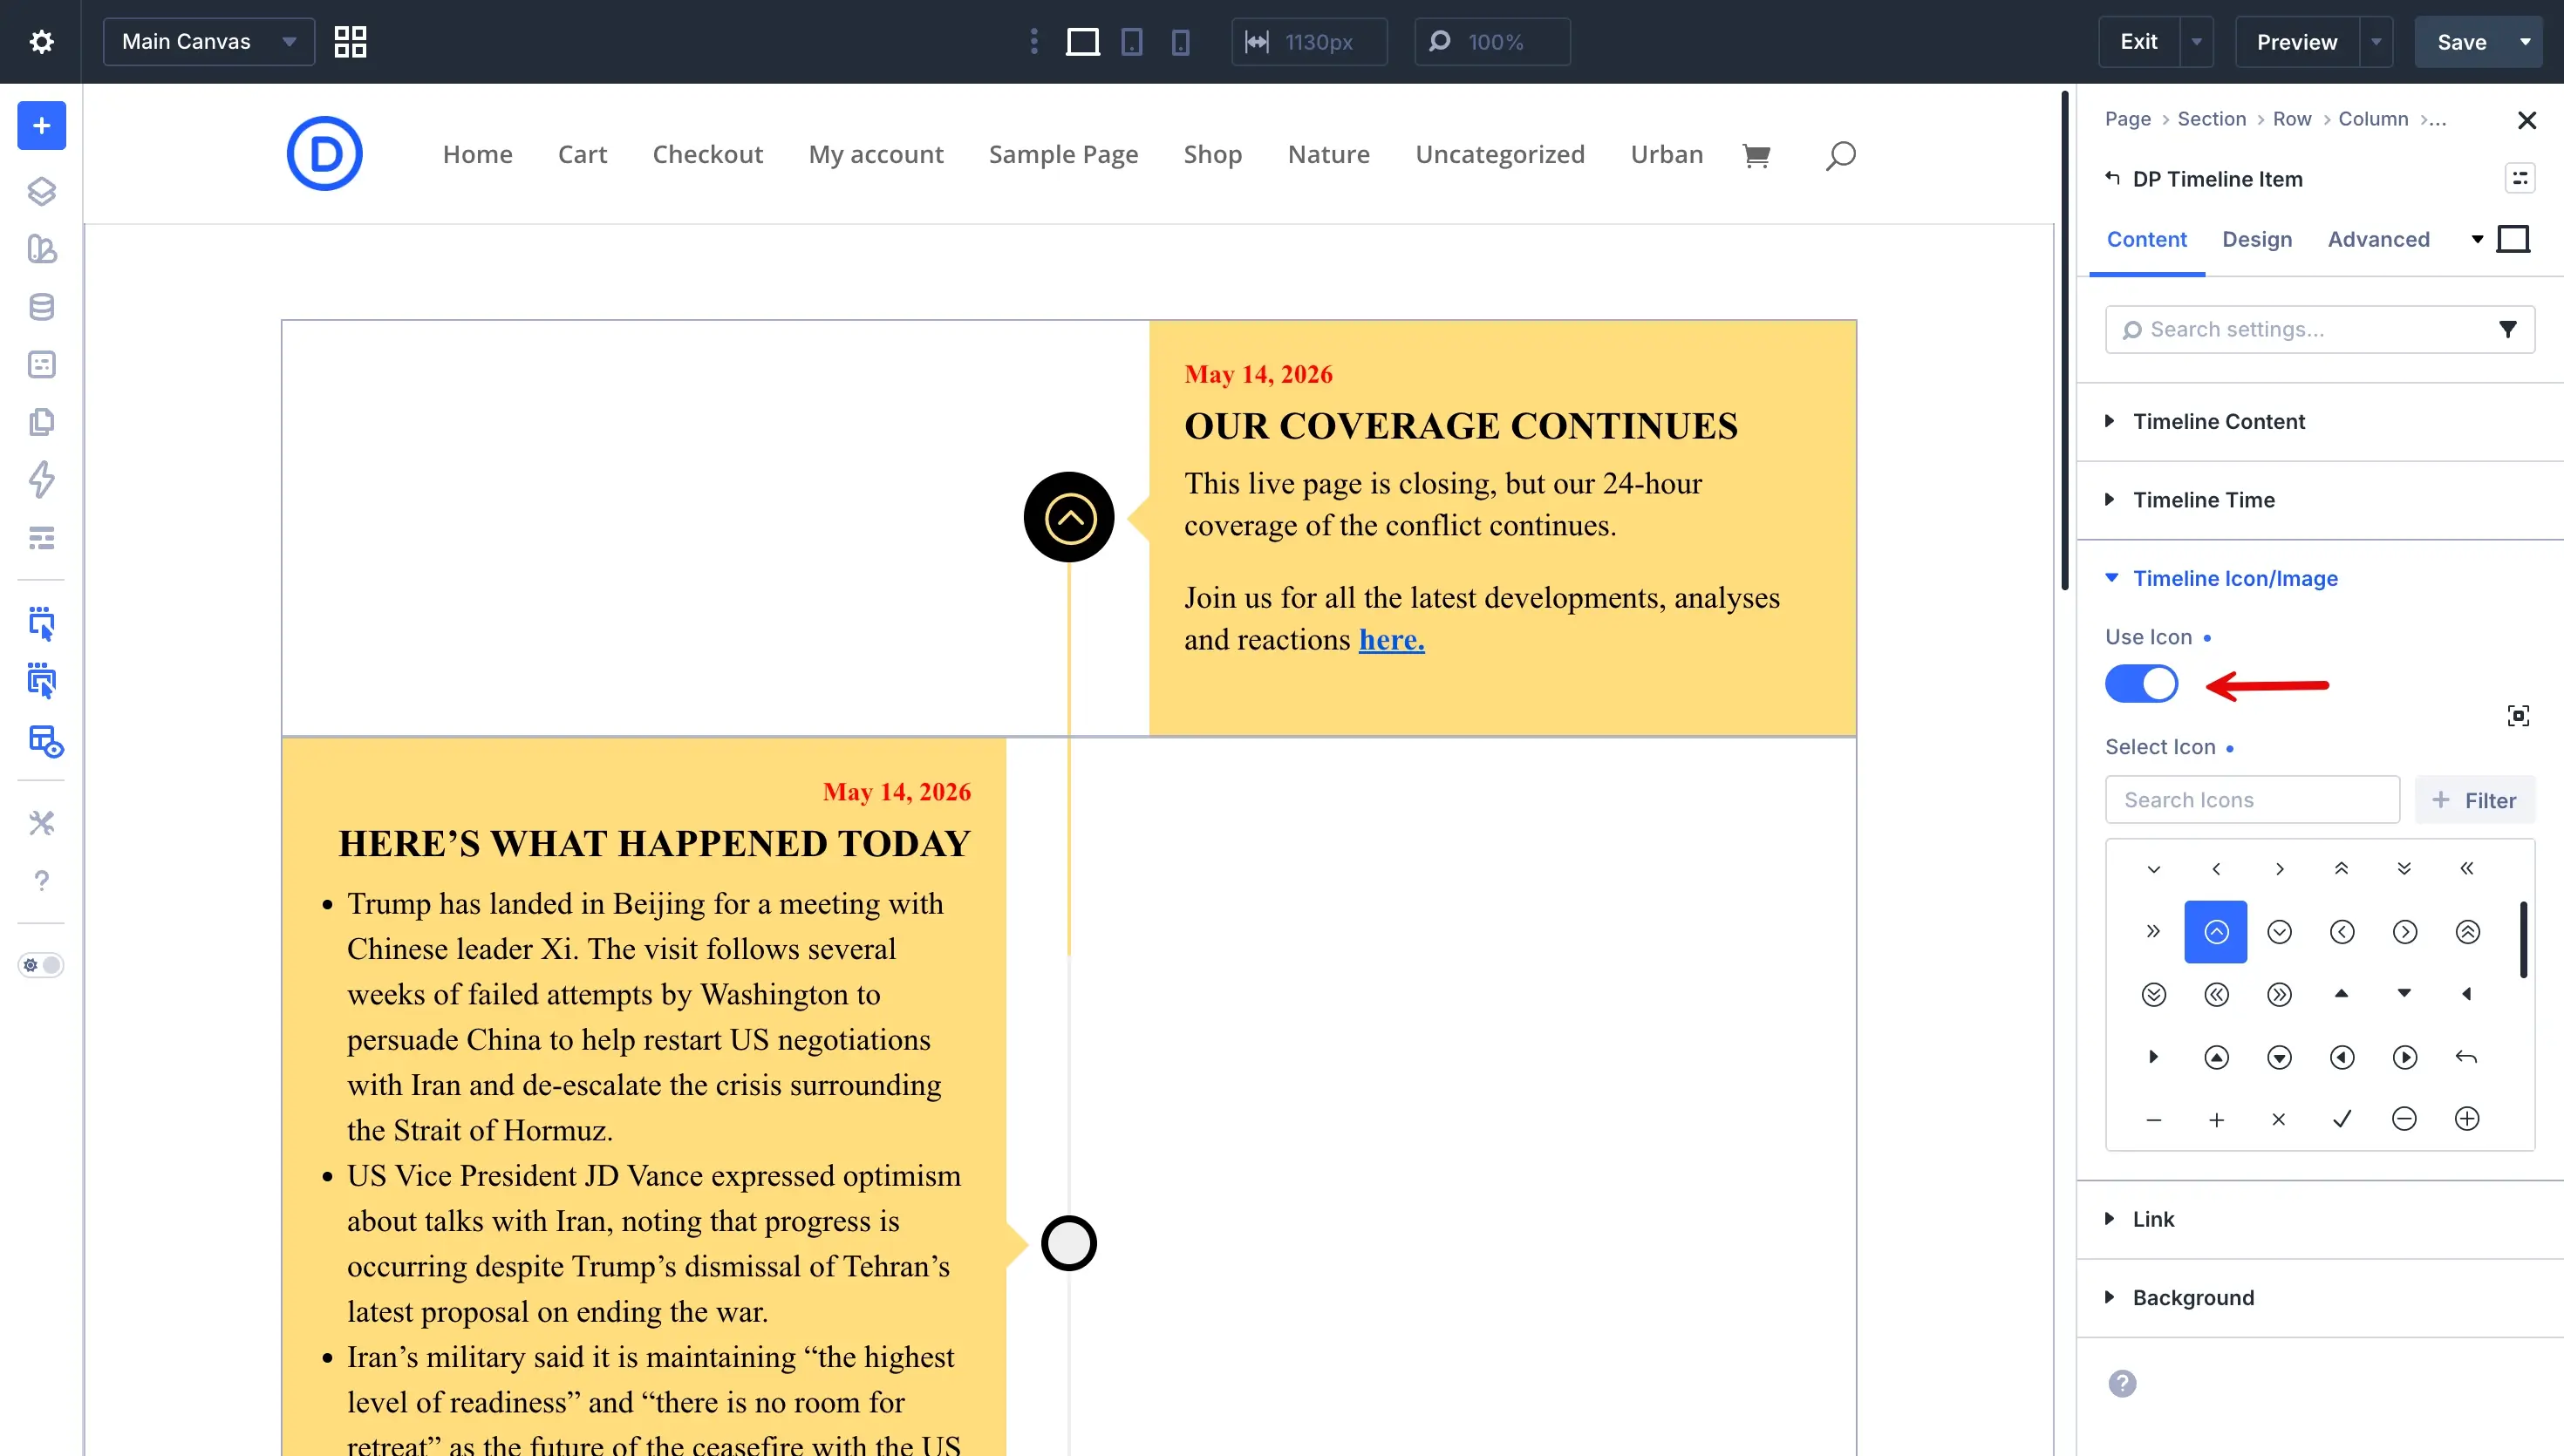
Furthermore, utilize the design options to optimize your timeline icon.
Type 5 – Twitter Timeline
Best for: Social proof sections, press pages, live brand feeds, community pages
Overview: A Twitter (now X) timeline displays all tweets from the feed. It is a nice way to engage your website visitors with your social media presence, such as Twitter.
What You’ll Need
- Divi Plus Twitter Timeline module
- Twitter/X account
Steps to Create a Twitter Timeline
To add a Twitter timeline, you need to create a new page or edit an existing one where you want to display it. Then, insert a new row, and search for the DP Twitter Timeline module.
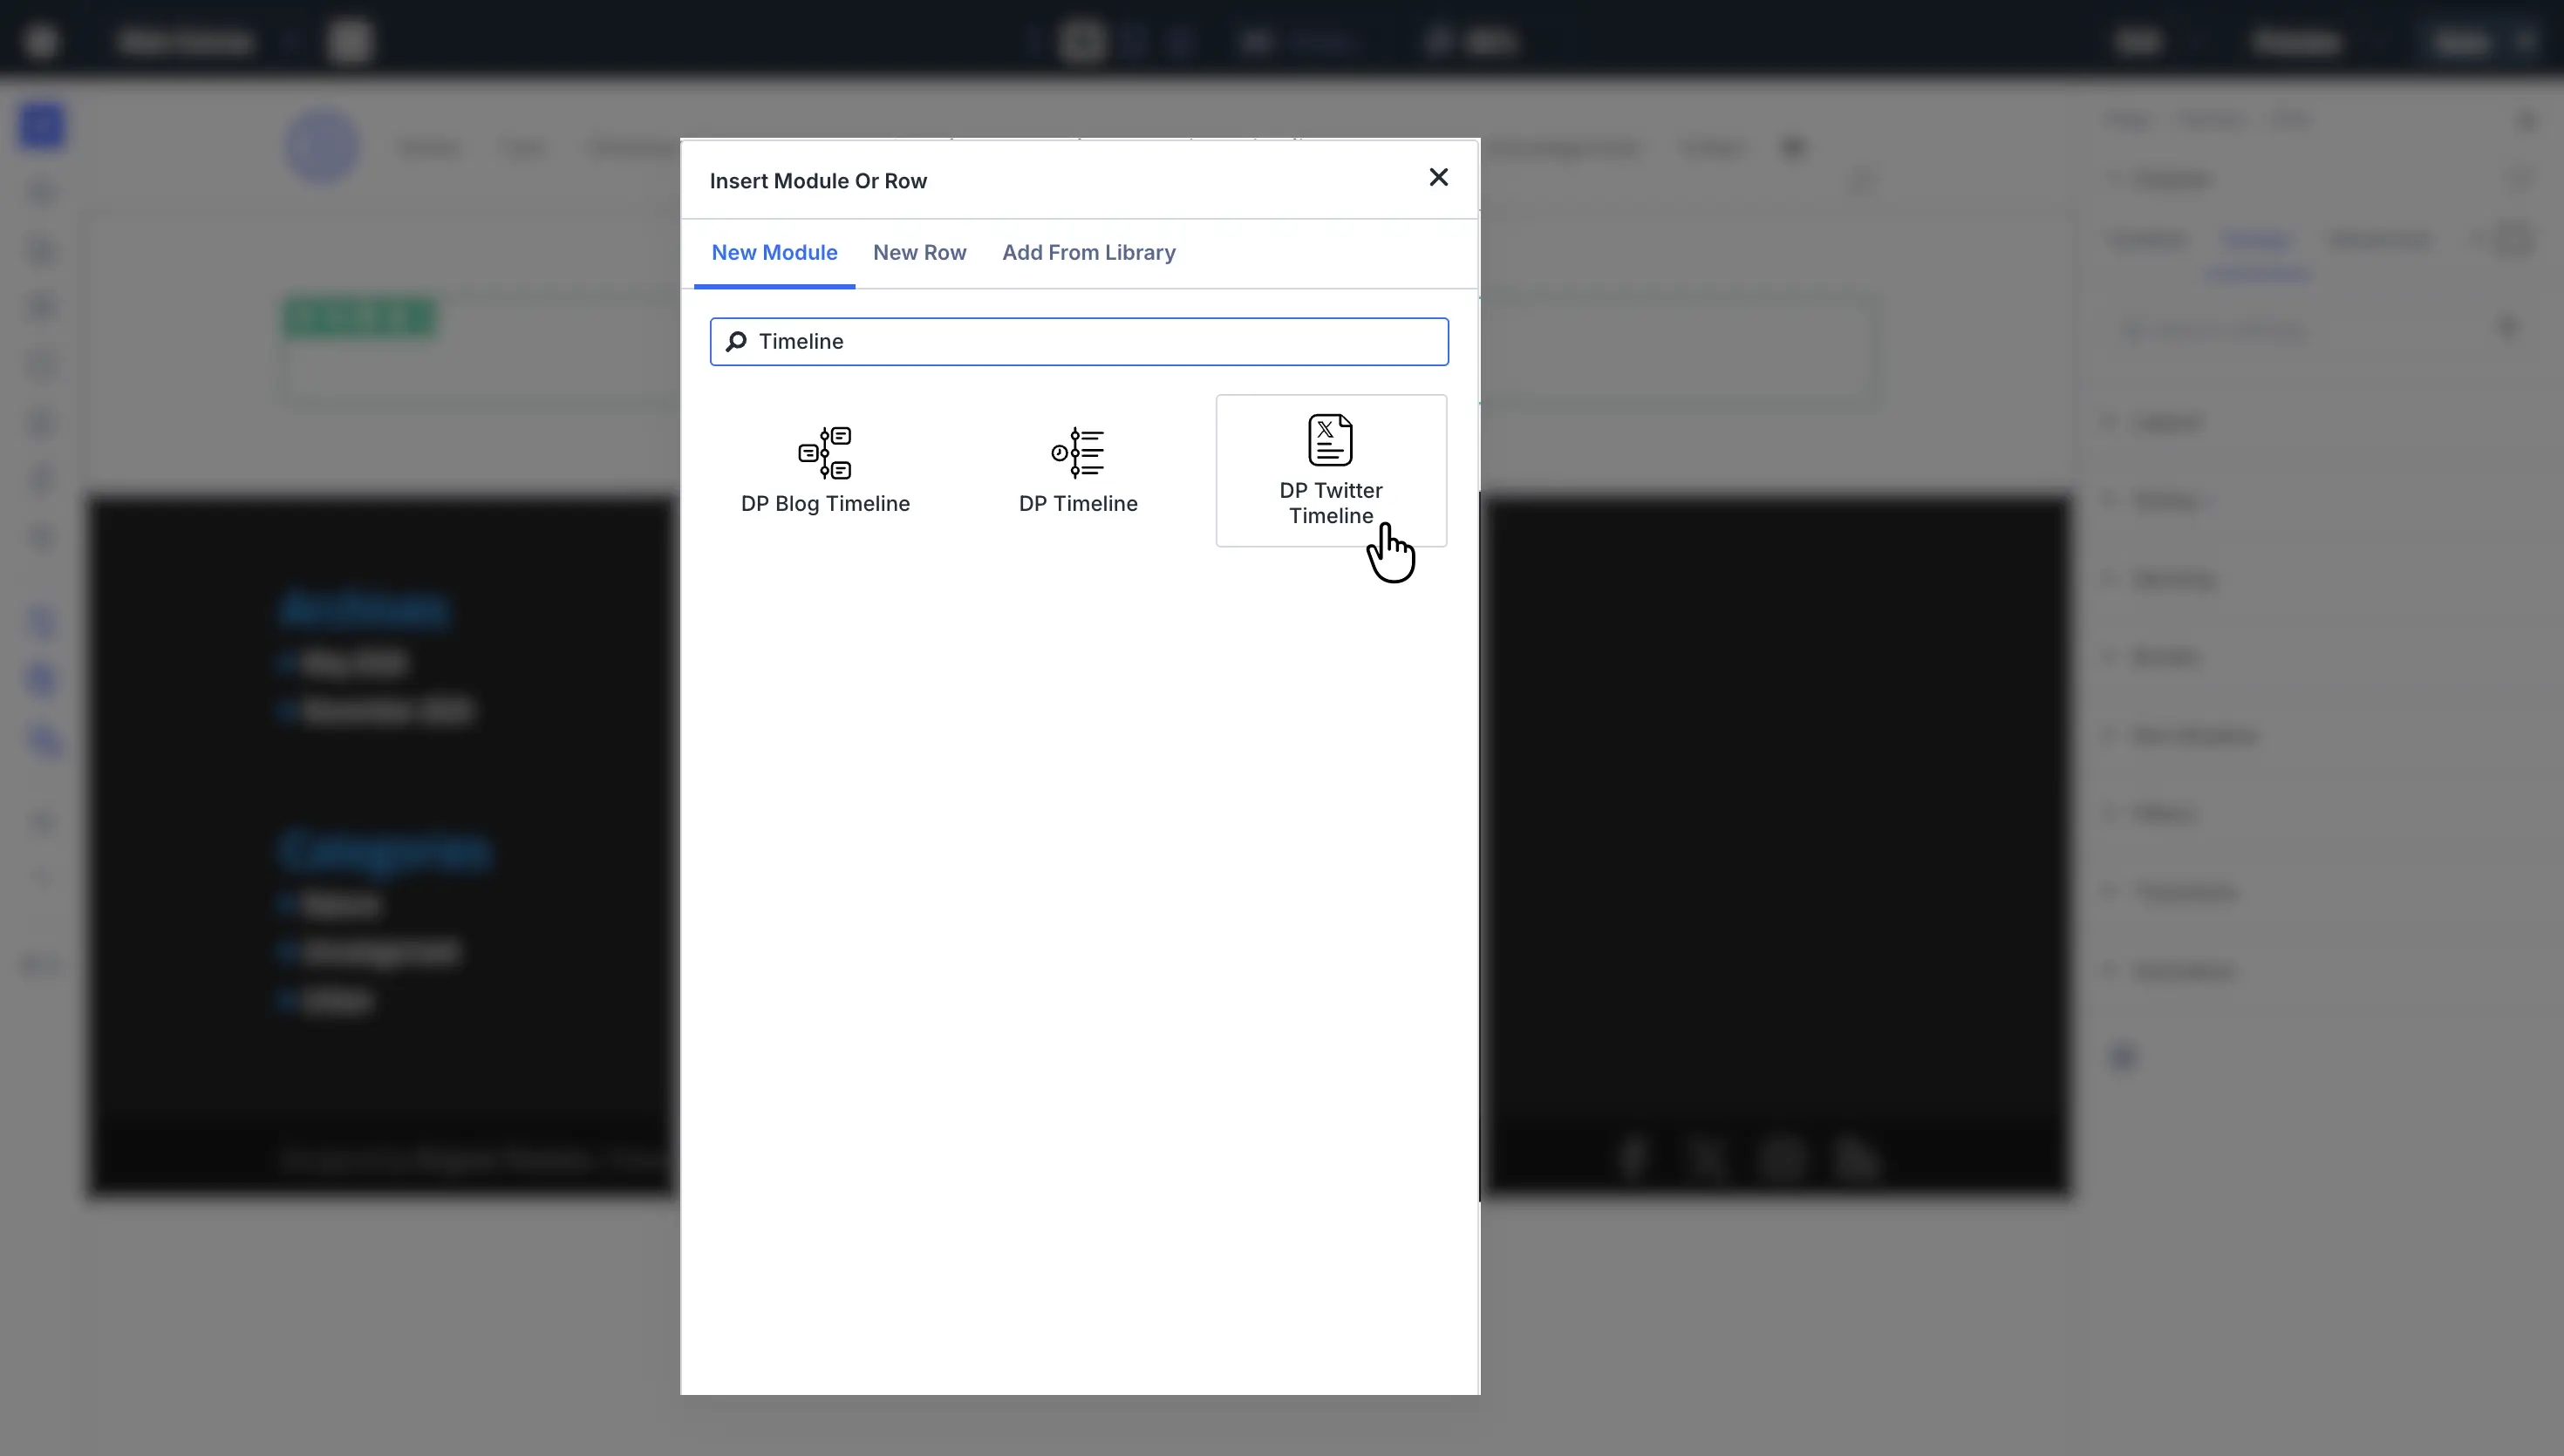
Once you have added the module to the page, go to Configuration → Twitter Username → enter your Twitter user name to add the Twitter timeline.
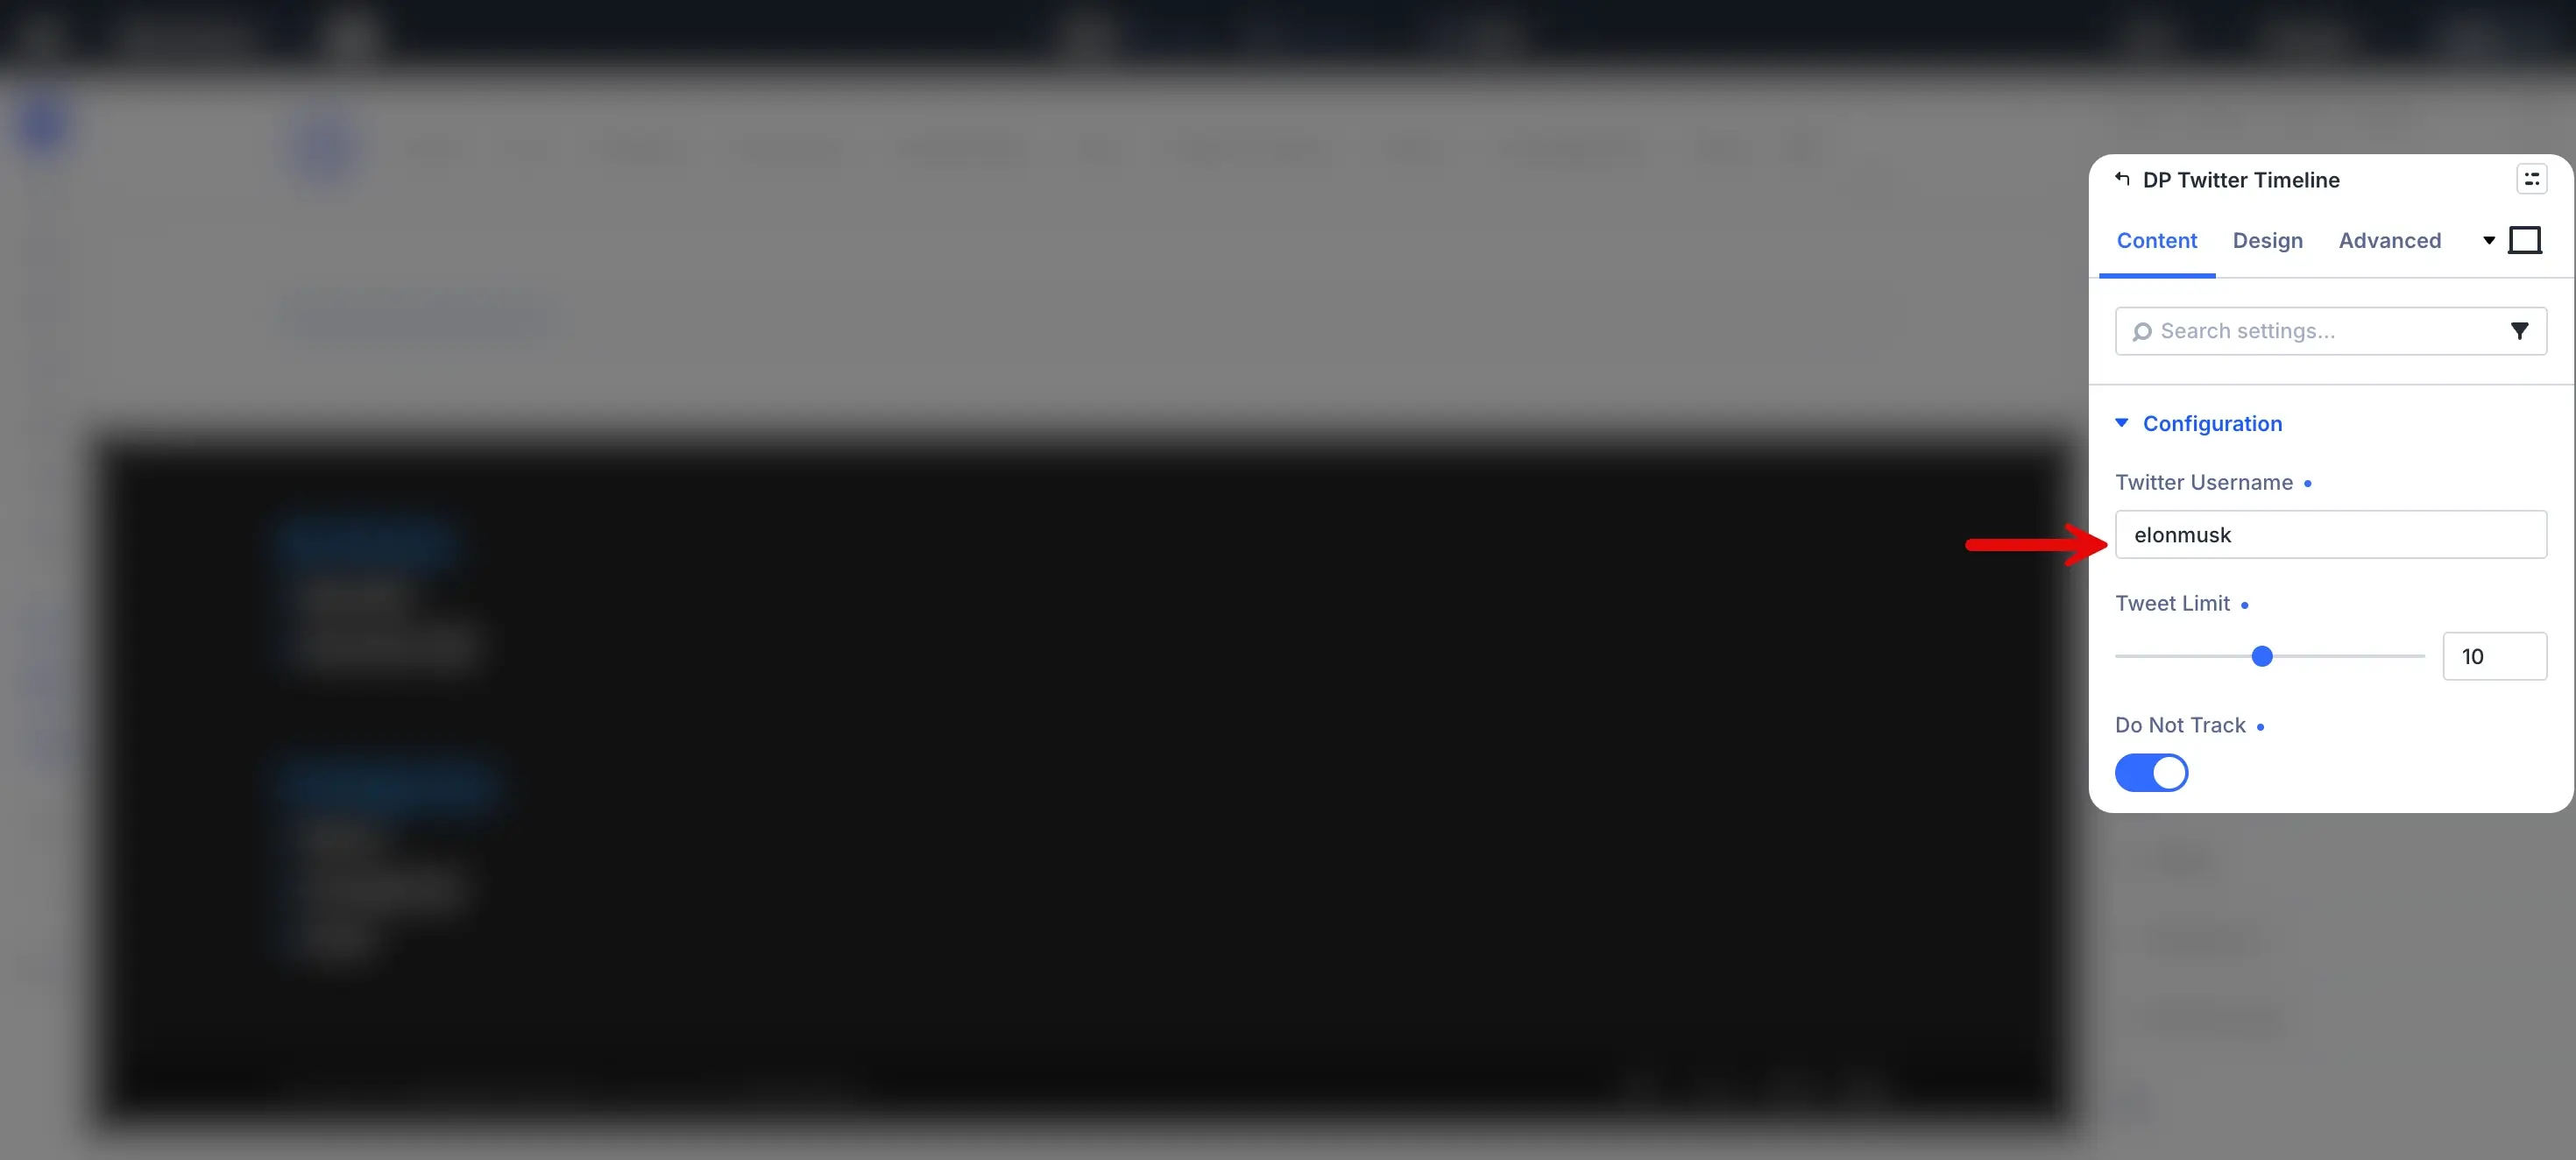
This will start to showcase your tweets on the website. The module provides you with multiple controls, such as:
- Tweet Limit
- Do Not Track
- Light or Dark Theme
- Width and Height customizations
- Hide Header, Border, Footer, Background
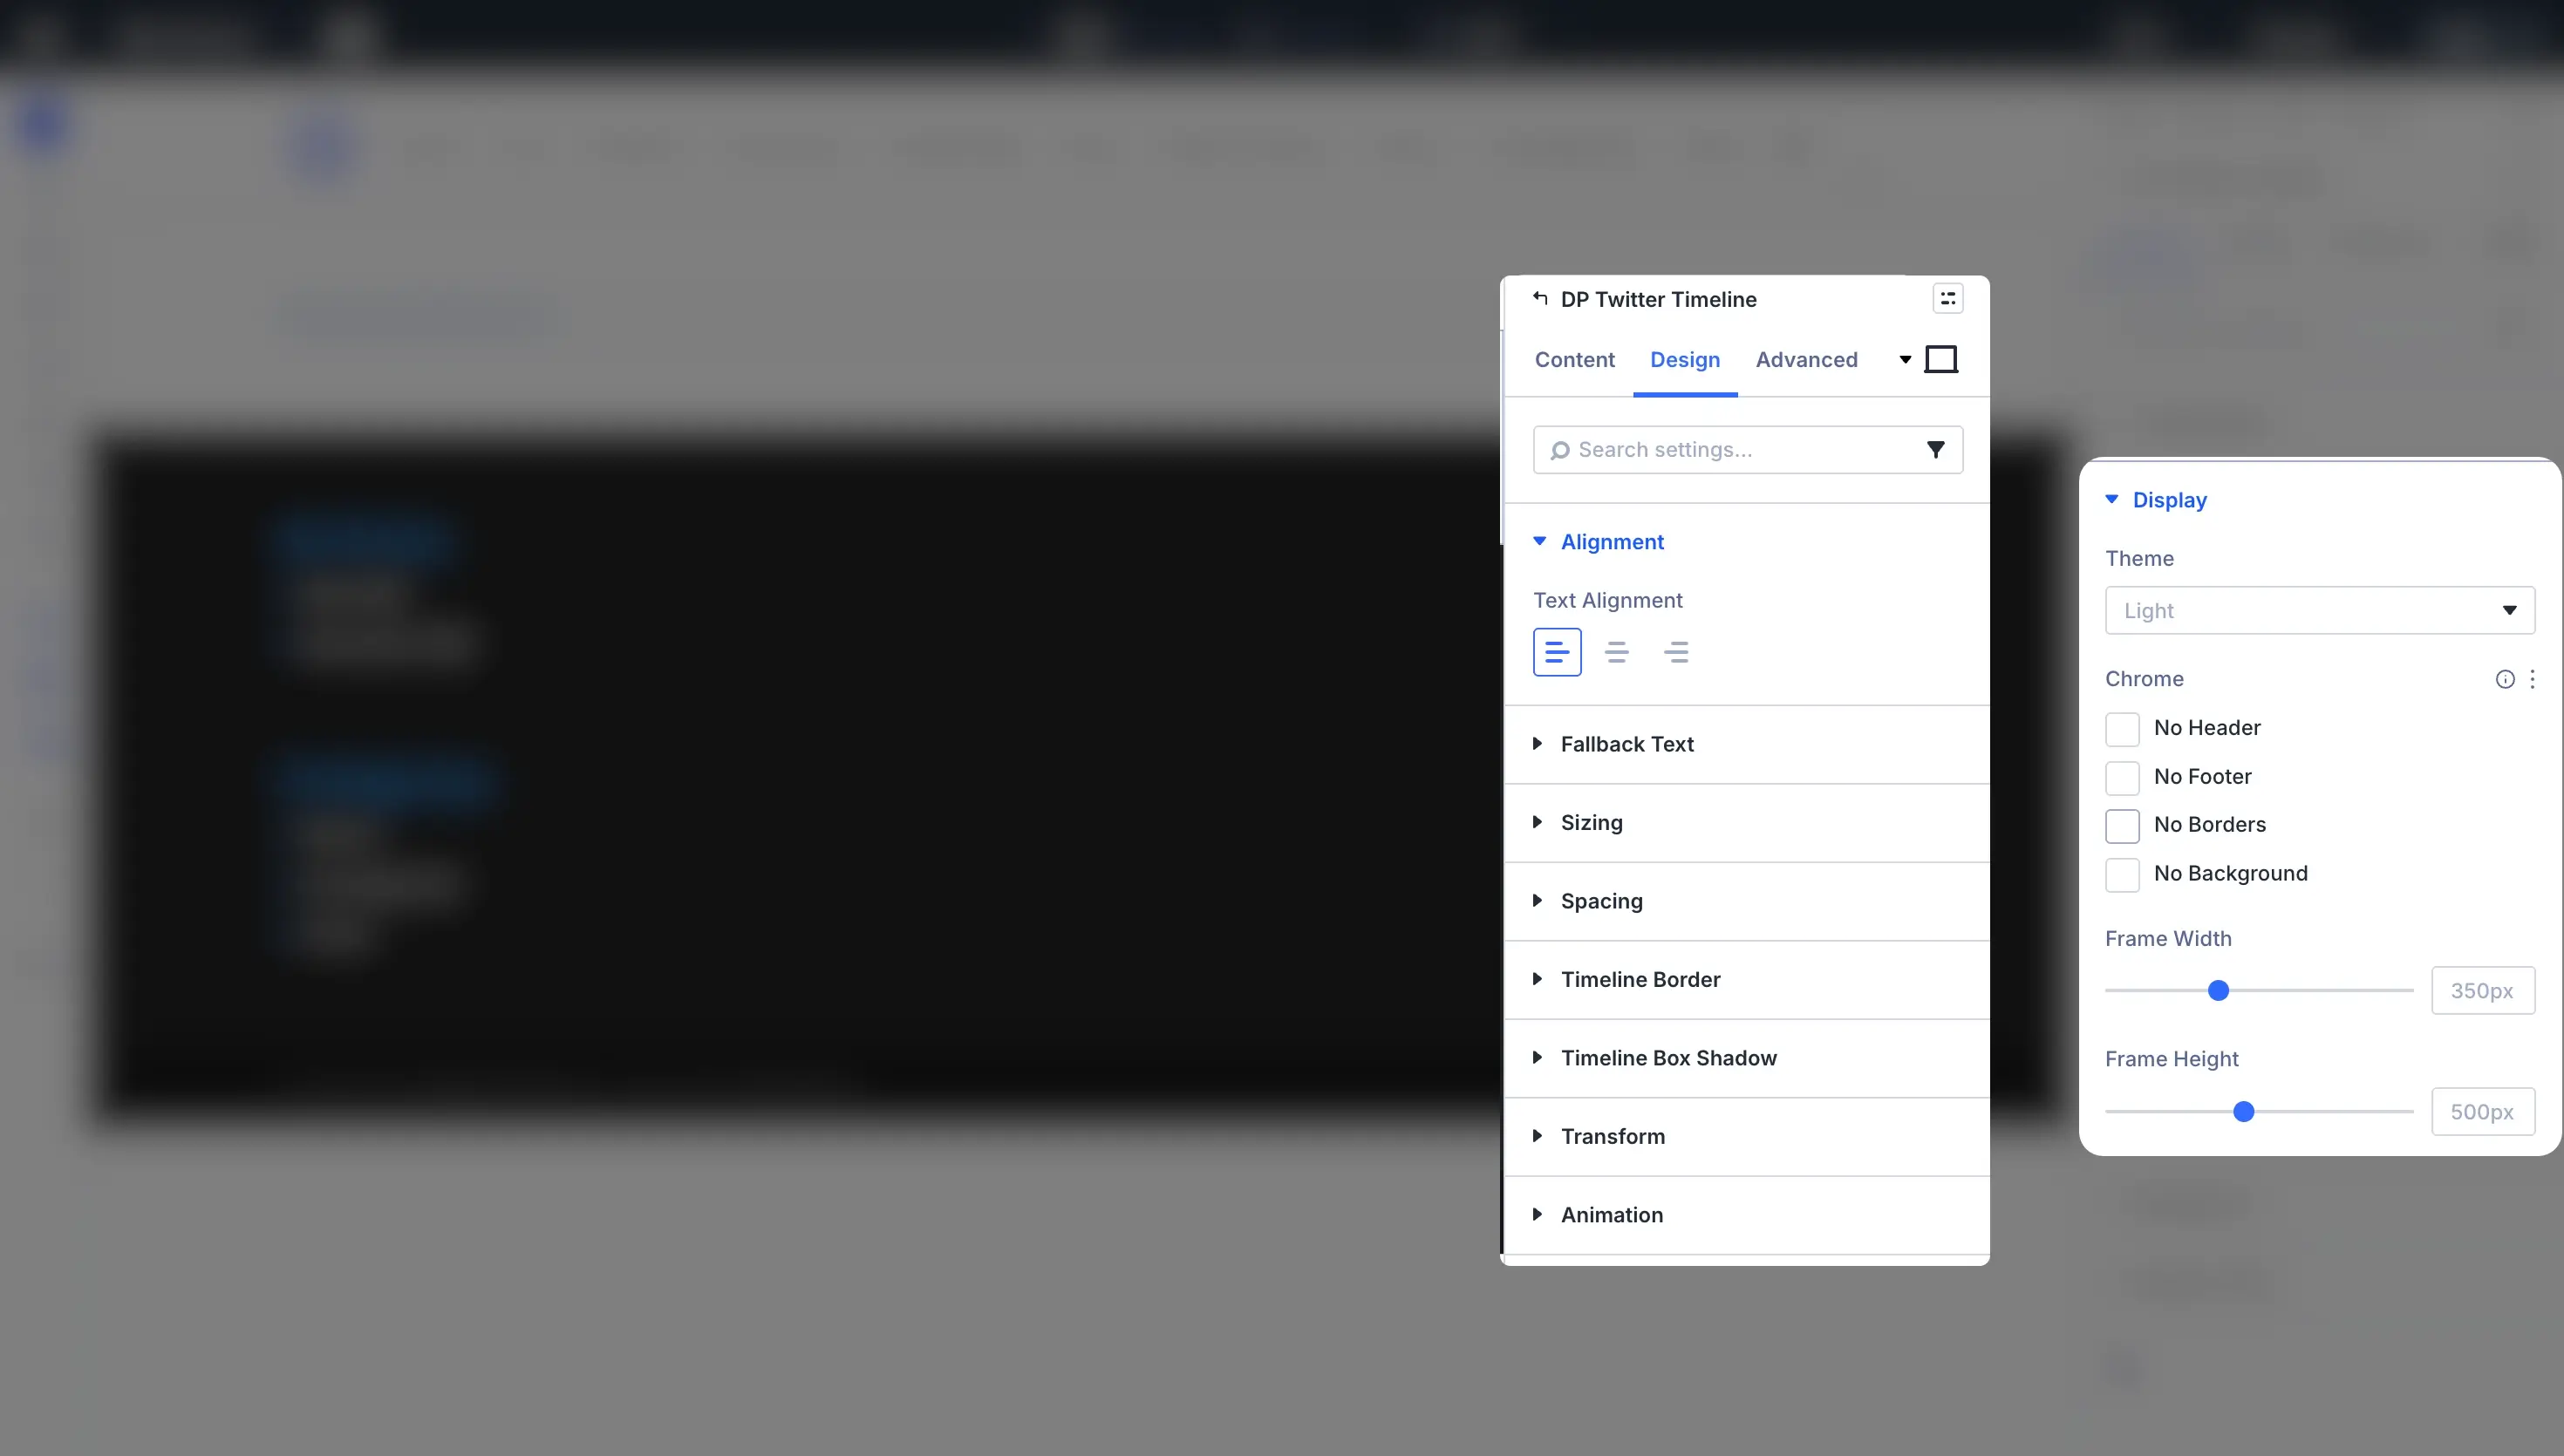
In addition to these, you get alignment options, fallback text customizations, and more to present the Twitter timeline more engagingly and informatively.
Divi Timeline Types — Side-by-Side Comparison
| Type | Divi Plus Module | Best For | Difficulty | Plugin Required | Mobile Friendly |
| Photo | Timeline — Photo Layout | Portfolios, events | Easy | Yes — Divi Extended | Yes |
| Blog | Blog Timeline | Archives, content hubs | Easy | Yes — Divi Extended | Yes |
| Content | Timeline — Content Layout | History, roadmaps | Easy | Yes — Divi Extended | Yes |
| Icon | Timeline — Icon Layout | Processes, steps | Easy | Yes — Divi Extended | Yes |
| Twitter Timeline | Social proof, feeds | Easy | Yes — Divi Extended | Yes |
Common Mistakes to Avoid When Building a Divi Timeline
From many mistakes, the following ones should be kept in mind when you add a Divi Timeline on your WordPress website:
- Adding too many entries. Don’t do it. Keep the timeline scannable; you don’t want to exhaust your users.
- Using inconsistent image sizes across photo timeline entries. Avoid this if you want to capture your website visitors’ attention.
- Overloading a Twitter timeline with too many tweets slows the page and makes the social account overly exposed.
- Using placeholder text to design — always test with real content.
FAQs
No, Divi or Divi 5 doesn’t have a native module for building Timelines.
Divi Plus is a paid plugin for Divi with over 100 modules and other resources.
You can use the Timeline and Blog Timeline module for a company history page.
Yes, you can use a Divi timeline on a WooCommerce page.
No, it won’t. The modules are optimized for speed and performance, so you don’t have to compromise the website’s load time.
Yes, the Divi Plus timeline modules support styling the connector line or the stem.
Yes, it is compatible with all browsers and works effectively.
You can use Divi Plus with Divi Builder.
Key Takeaways
- The Divi or Divi 5 theme does not have a native timeline module, but you can use Divi Plus Timeline modules to fill that gap.
- Divi Plus offers 5 distinct timeline types, each suited to a different content goal.
- The Content and Icon timelines have the broadest use cases across industries.
- Performance matters especially for Twitter and Photo timelines; therefore, optimize before publishing.
Conclusion
So, that’s a wrap for adding timelines to a WordPress website. We explored what a timeline is, how Divi Plus can help, and the key differences between a timeline, an Accordion, and a Slider. Lastly, we explored the detailed steps to create a timeline in WordPress using the Divi 5 builder and the Divi Plus modules. The modules are intuitive and offer extensive options for building highly engaging timelines of various kinds. You can meet various project requirements without installing multiple plugins or extensions.
Keep the common mistakes in mind and try on your own to build your Divi Timeline, and let us know your experience in the comments.




0 Comments