
Divi WooCommerce shop is a solution for many online business entrepreneurs to bring ideas to life and provide people with something meaningful. It could be a SaaS business or an invention to the tech industry. However, not all entrepreneurs are occupied with technical knowledge, and building a Divi WooCommerce store can become challenging. Though some business owners hold solid ground in web development, they too look for the fastest way. An ultimate way to build their Divi WooCommerce shop easily with all the latest trends without spending too much time.
Therefore, in this tutorial, we’re going to see how you can build an outstanding Divi store as per the latest web design trends of 2022. We’ll use some premium modules to get our final result. And by the end of this post, you’ll be able to create your own WooCommerce Divi store in no time.
So, without any further delay, let’s get started.
Step 1: Install & Setup WooCommerce
When you’re using WordPress for your business website, it’s easier to turn it into an online store. There are many tools and ways that can help you create an eCommerce store, but the famous among all is WooCommerce.
WooCommerce is a WordPress plugin that enables you to create a digital store on your website. After setting it up on your Divi website, you could manage the Login and Register page. User’s my account page, shop page, products and more. Thus, making it possible to create a complete Divi WooCommerce shop.
Now, how you can set up it on your Divi website? Just follow the below steps one by one and you’ll get your Divi WooCommerce store.
- On your WordPress dashboard, go to the Plugins → Add New.
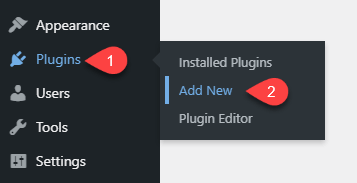
- Then, search WooCommerce in the search tab, and click Install Now for the following plugin.

- After this, click Activate.
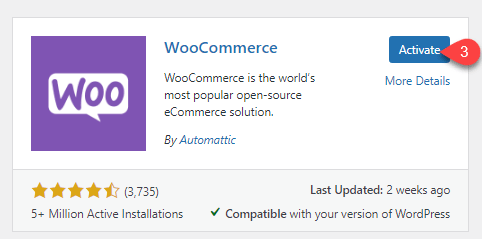
- And hence, WooCommerce on Divi website is successfully installed and activated. You’ll see the following four new menu items in the dashboard.
- You could go to each one of them and find out what options they consist of. However, before you use it, you should set up WooCommerce according to the requirements. To do that effectively, you could follow this guide on WooCommerce to set up. After setting it up, follow the next step to know how you can create a product.
Step 2: Create WooCommerce Products
Creating WooCommerce products is easy and interesting. But before we create WooCommerce products, it’s recommended that you should first create product categories. Follow the below steps to do that.
#Step 2.1 — Creating a WooCommerce Products Category
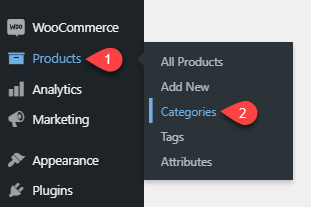
- On your WordPress Dashboard, go to the Products → Categories. It will open a new window with a default product category and different fields that enables you to create other product categories.
- Here, first, input the name of the product category in the Name field. Similarly, input slug and description in the Slug and Description field, respectively. After this, keep Display type as Default. Assign a category image in the Thumbnail option by clicking the Upload/Add image button and selecting an image in the media library.
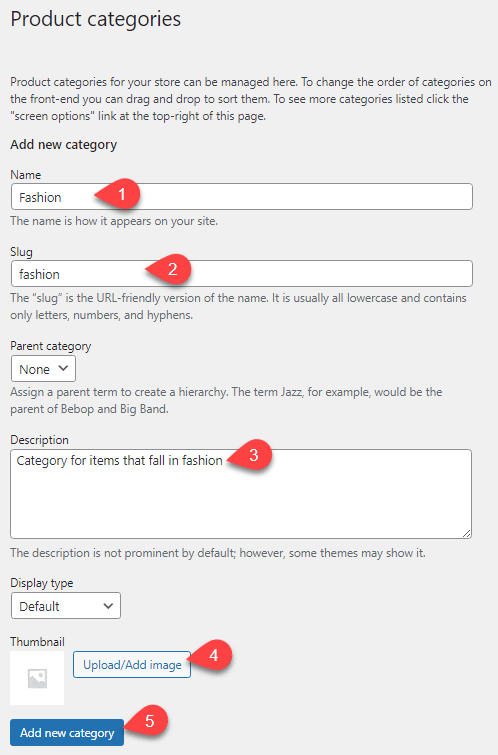
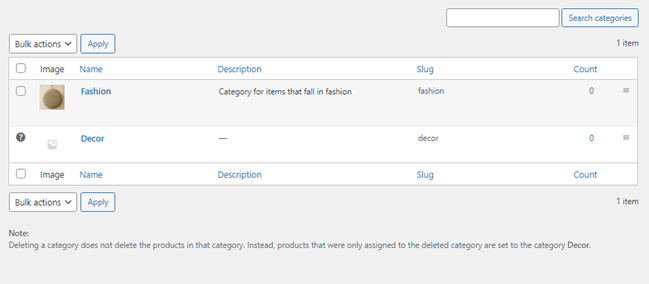
- Once everything assigned, click Add New Category. And your product category will appear in the list on the right side.
#Step 2.2 — Creating a WooCommerce Product
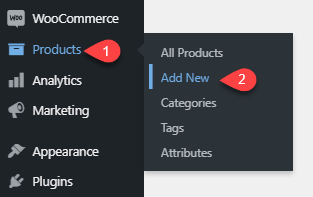
- To create a WooCommerce, go to the Products → Add New.
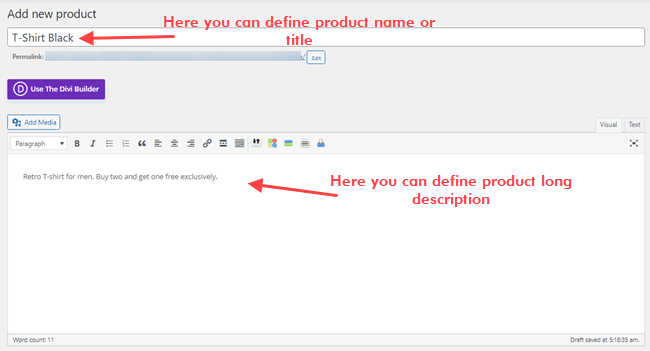
- This will open the editor that would allow you to add a new WooCommerce product. The first two options available in the editor is to define the product name and a complete description.
- After this, you get the Product Data tab to add more information about the product. For example, regular and sale price. Product type – Simple, grouped, affiliate or variable product. Define product availability, whether it’s virtual or downloadable. Input inventory, shipping, linked products and more useful data.
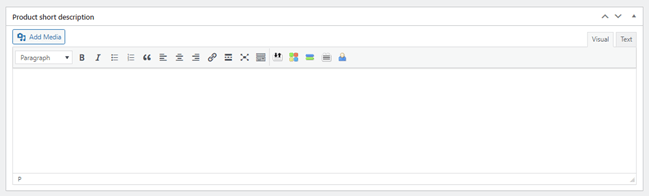
- Under the Product data tab, you get another tab, Product short description, allowing you to input a brief of the product.
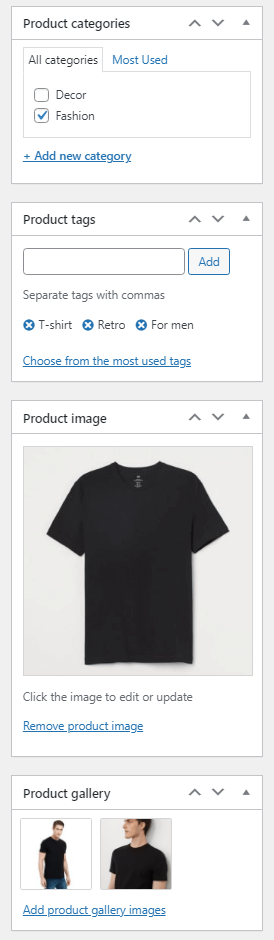
- In the editor’s sidebar, you get the option to define the Product’s Category, Tags, Image and Gallery. Thus, making your Divi WooCommerce shop product’s appealing with images and informative with adequate content.
- Use each option one by one to complete your WooCommerce product description. And once you’re done with everything, hit Publish.
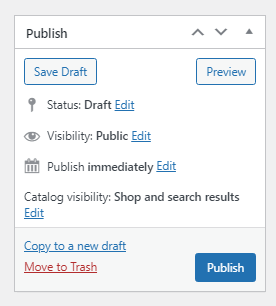
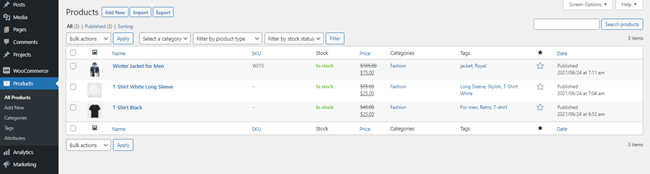
- Your WooCommerce product has been created, and to view it, you need to open Products → All Products. Here, you’ll find all your products listed.
- Apart from this, if you want to check out how the products look on the Shop page, you need to go to the Pages → All Pages and click View for the Shop page.
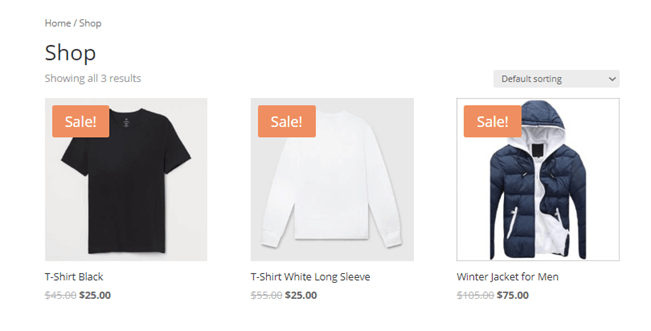
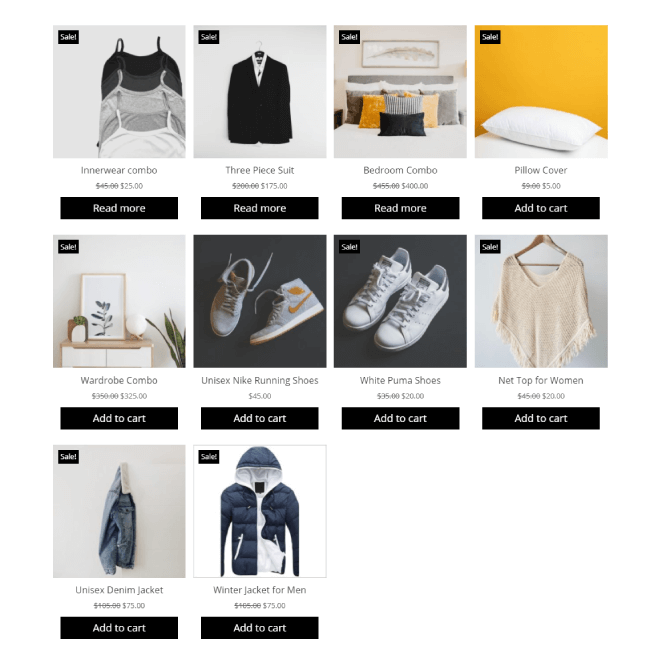
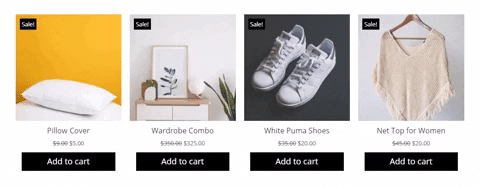
- As you can see in the above screenshot, the look of your products in the shop is basic and couldn’t attract users as they should. However, you can enhance this look for your Divi WooCommerce shop. And to do that, we’ll use the Divi Plus WooCommerce modules that would allow you easily improve your Divi WooCommerce store’s look and feel. The subsequent steps are all about that.
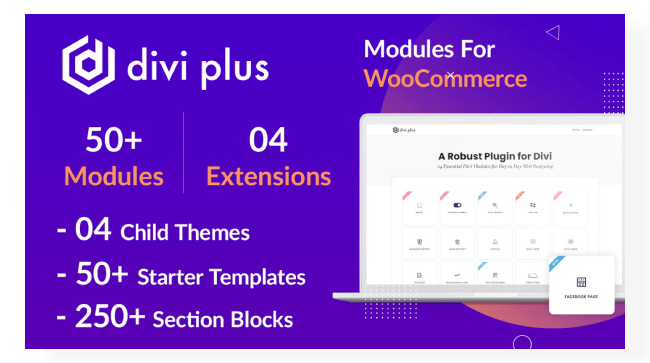
Step 3: Get Divi Plus and Enhance Divi WooCommerce Shop
Divi Plus is a multipurpose premium plugin with lots of different Divi modules. You can use this plugin to enhance your websites performance, design and even functionality. Whether you’ve got a personal Divi website or an organization’s, you could easily benefit from this plugin. It includes over 50+ Divi modules that also include Divi WooCommerce modules. In addition to these, it hosts 04 Divi extensions, multiple free Divi child themes, 50+ pre-built templates and over 250+ design sections.
If you go for this multipurpose Divi plugin, you’d only find yourself creating beautiful websites without compromising. It will boost your designing skills and save the time you might spend creating different elements using native Divi modules.
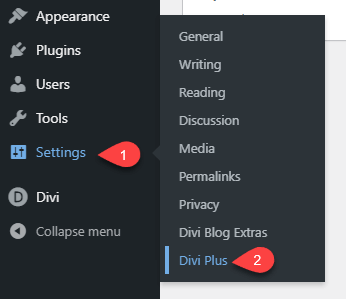
- Now after getting this plugin, follow these instructions to install and activate it on your website successfully. Once done that, go to the Settings → Divi Plus.
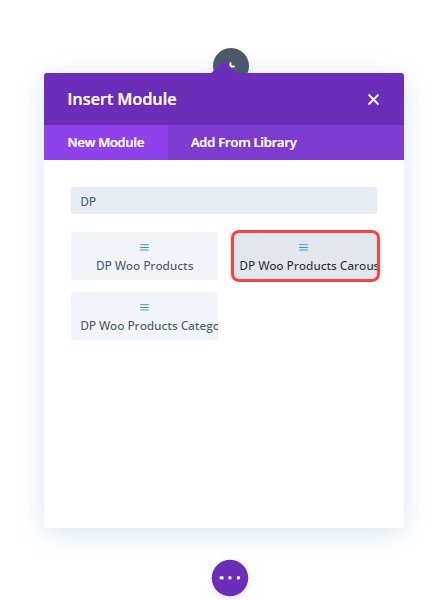
- Head over to the General tab → General and tick the checkbox next to the following modules – Woo Products, Woo Products Carousel and Woo Products Categories.
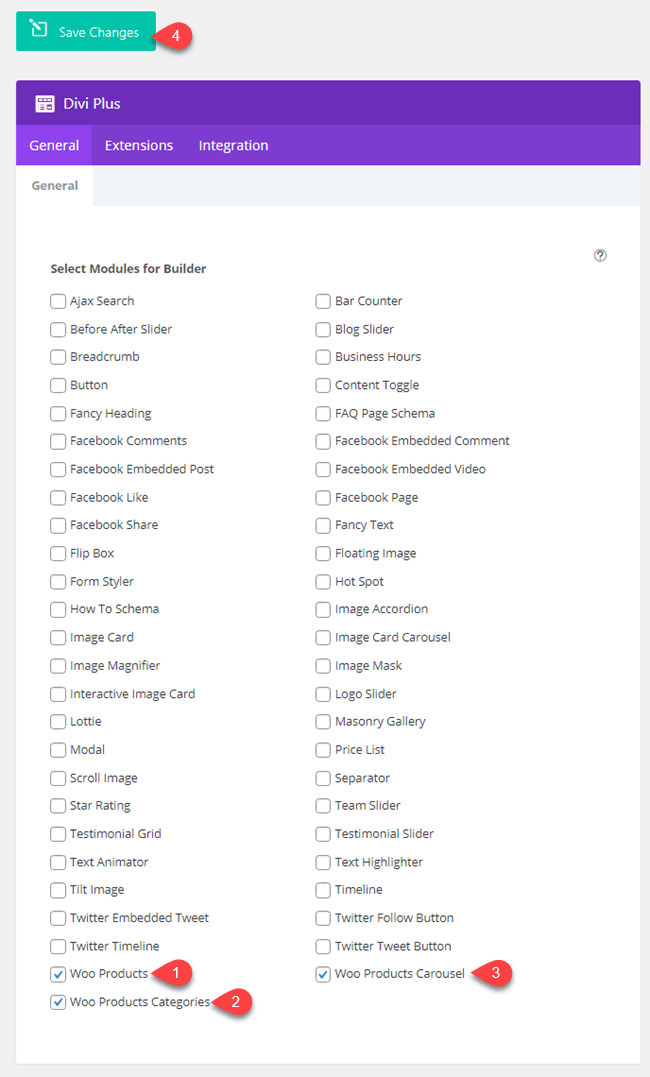
- Once enabled the modules, click Save Changes. Now, modules will appear in the Divi Builder module library. We’ve successfully enabled our Divi Plus module for the Divi WooCommerce shop; now, let’s see how we can use them to enhance our Divi shop.
Step 4: Design Shop Page With Divi Plus WooCommerce Products Module
To use the Divi Plus WooCommerce Products module for your Divi store, there are two ways. You could directly use it on a page or tweak the shop page using the Theme Builder.
Moreover, you can also any other Divi Plus WooCommerce modules on a regular page as well, but to dynamically present the content, it’s the recommended option. When you use these modules in the Theme Builder, Divi will render the same design specifications for different elements of a particular assigned template option.
Therefore, in this tutorial, we’ll use the module in the Theme Builder.
Step 4.1 – Edit the Shop Page in Divi Theme Builder
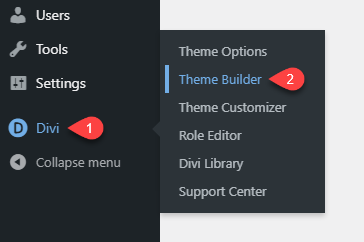
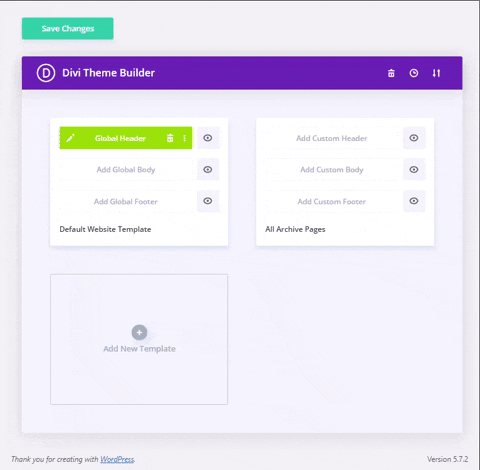
- On your WordPress Dashboard, go to the Divi → Theme Builder.
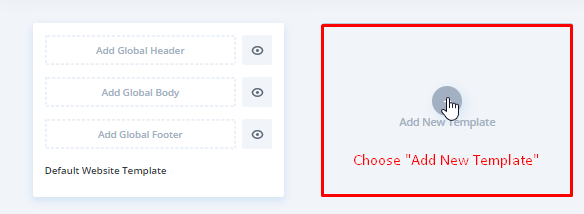
- Once Theme Builder opens, click Add New Template.
- It will open the Template Settings in which you need to select Shop in the WooCommerce Pages option and then hit Create Template.
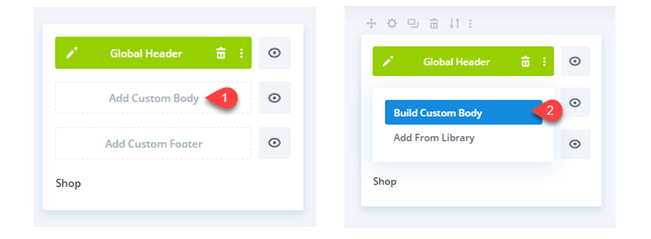
- A new template will be added to the theme builder. Now, you need to click the Add Custom Body option to design the shop’s body content. Then again, select Build Custom Body.
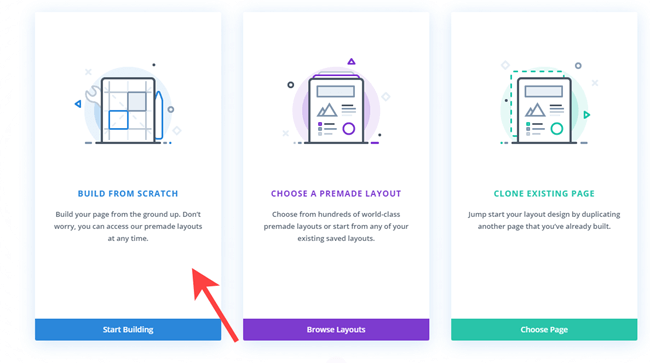
- To deploy builder canvas without any pre-inserted elements, select BUILD FROM SCRATCH.
- Once Divi Visual Builder gets deployed, insert a new row and then insert DP Woo Products.

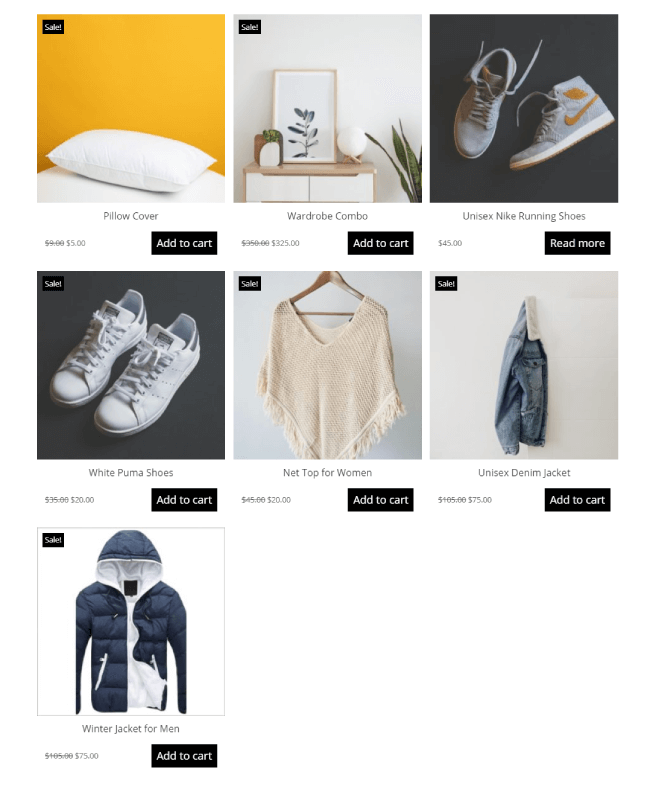
- As soon as you insert the module, it will bring WooCommerce products on the page with the following default look.
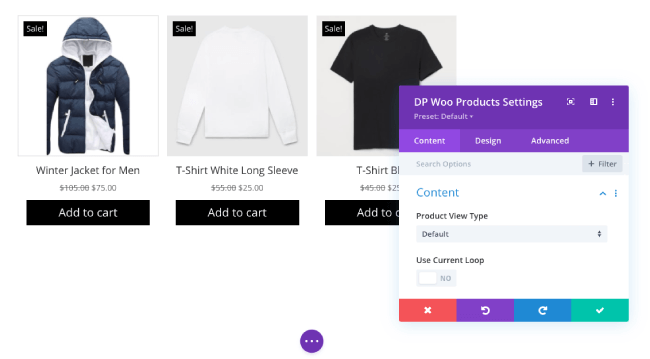
- Move to the next step to see how we can utilize the Content tab’s settings to optimize products look and feel.
Step 4.2 – Enhancing Divi WooCommerce Products Design
- The first setting available in the Content tab is Content settings with the following options,
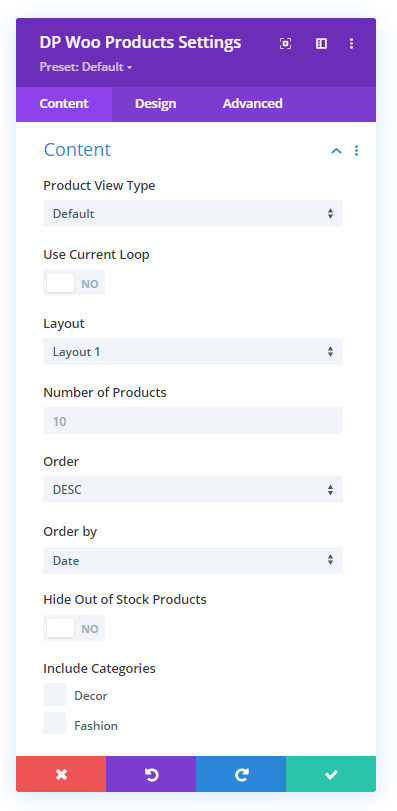
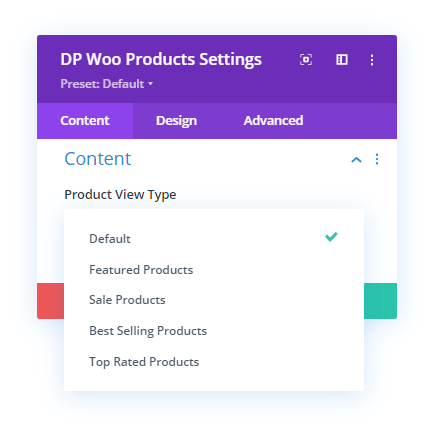
- Product Type View – It provides you with further options to select what type of products you want to display on your Divi WooCommerce Shop. It includes Default which showcases all types of products. Then comes the Featured Products, Sale Products, Best Selling Products, and Top Rated Products.
- Using this particular option, you can easily create distinction in the shop and even exclude certain type of products. Thus, making it possible for you to build a store with exclusive WooCommerce products. After Product View Type, you get the option to apply a loop on the shop page using Use Current Loop. How does this work? Well, when you select a particular Product View Type, for example, Top Rated Products. And you use theme builder for categories. Then it would only display top rated products from those categories.
- After loop, the module allows you to display products in two different layouts.
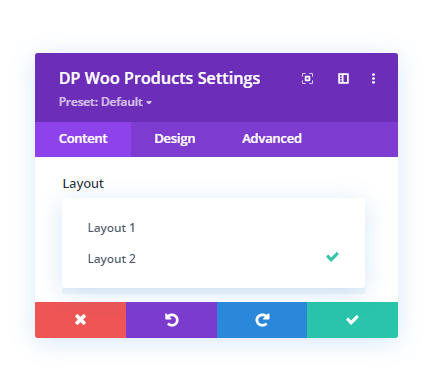
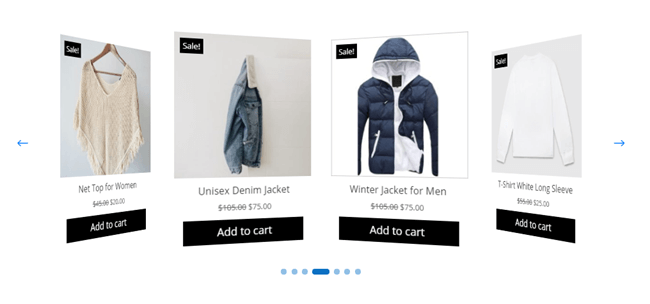
- The Layout 1 keeps Add to Cart button placed under the regular and sale price.
- Whereas Layout 2 places Add to Cart button at the right side of the price text.
- Then comes the Number of Products, which allows you to define the value of how many products you want to display on the Divi WooCommerce shop. If you got 20 products, you could easily show them together. Just input the value in the field.
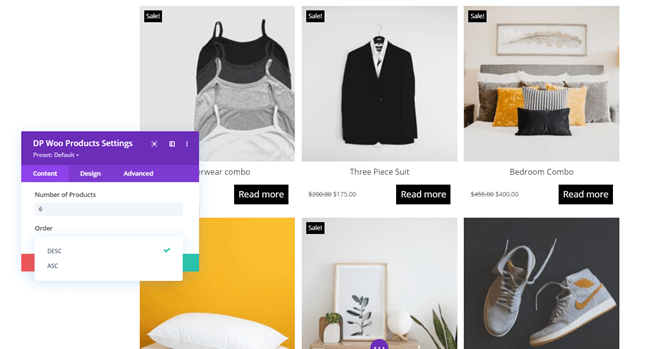
- Order option will make it possible to sort products in Descending and Ascending order. And Order by would enable you to further define sorting order type — Date, Modified Date, Title, Slug, ID, Random, and None.

- After Order and Order by, you get a product hiding option that is out of stock. To do that, all you have to do is check to Hide Out of Stock Products as YES.
- And the last option available in the Content settings is to select product categories. The Include Categories option will provide you with all the WooCommerce categories. If you don’t select any, then the module will render products from all categories.
- It’s a nice and easy way to include or exclude products from different categories. You could select a single category or multiple; it’s all up to you.
Display settings
- The Display settings of the Content tab enables you to customize products appearance. Plus, show and hide certain products elements with the following options,
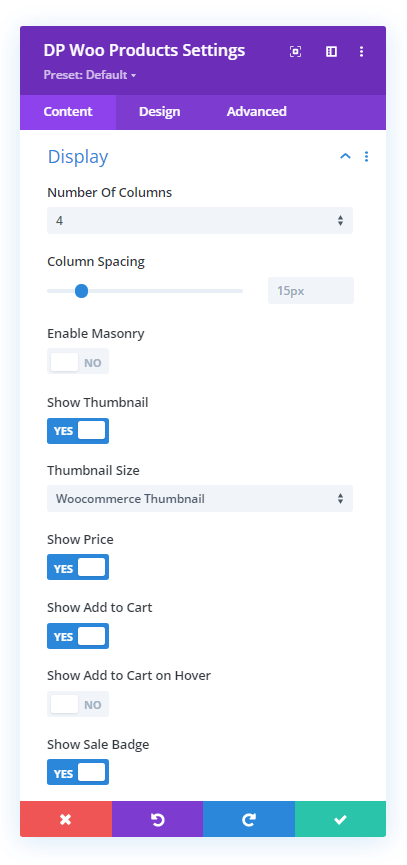
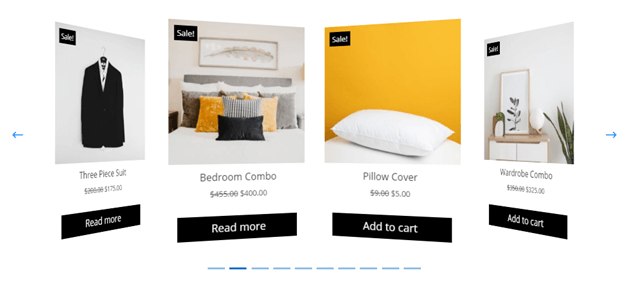
- The first option available is the Number of Columns. It allows you to show Divi WooCommerce shop’s products in up to 6 columns.

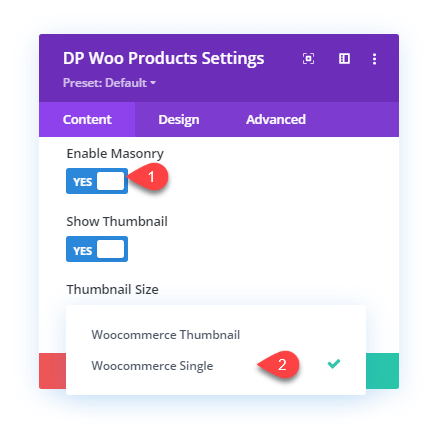
- Then using Column Spacing, you could easily create space between those products. If you want to show shop products in masonry format, you could do that as well. Simply check Enable Masonry to YES. And keep Thumbnail Size as WooCommerce Single. We will discuss this option later.
- And this is how your products will look like in the shop in masonry format.

- By default products thumbnail is enable in Divi Plus WooCommerce Products module. However, if you want to disable them, you need to check Show Thumbnail as NO.
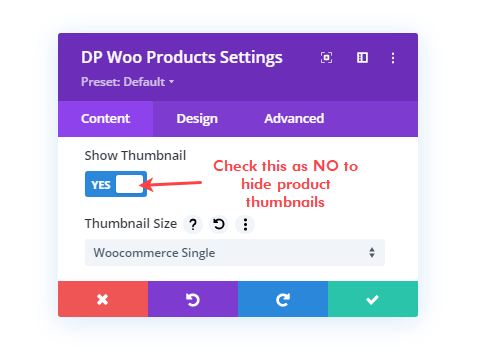
- With that, your products thumbnail will hide, and the option to keep thumbnails aligned with each other also. Nevertheless, if you keep thumbnails, then the module will provide you with the Thumbnail Size option.

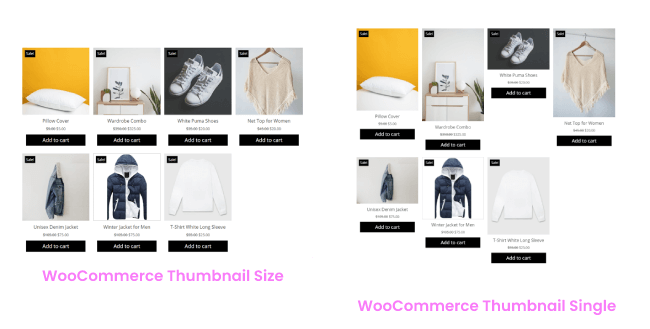
- WooCommerce Thumbnail — Keeps all thumbnails in similar height. At the same time, WooCommerce Single will show product thumbnails of their individual dimensions. To have an idea, look at the below screenshot.
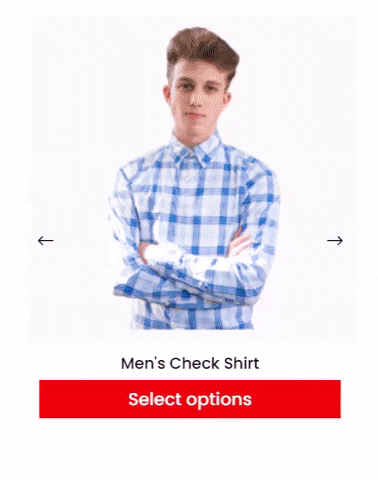
- Then comes the Pricing and Add to Cart button option.
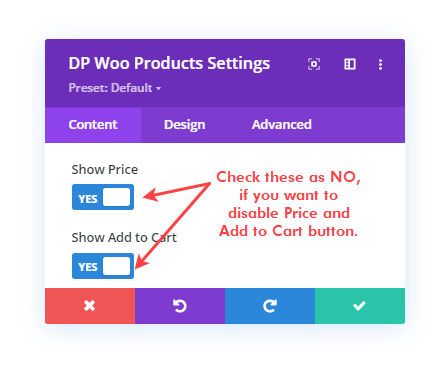
- If you want to disable pricing, check Show Price as NO. And if you want to disable Add to Cart button, then check Show Add to Cart as NO.
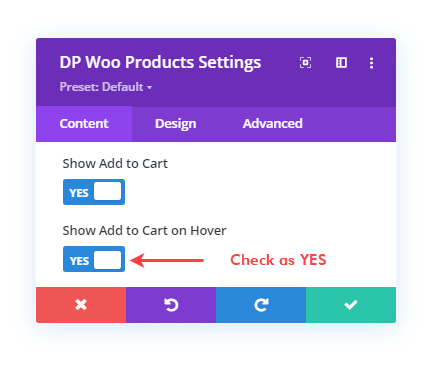
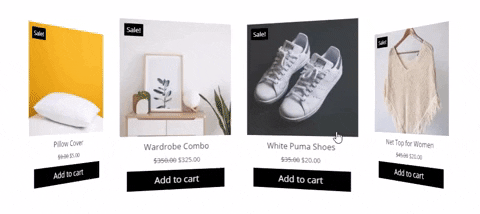
- However, when displaying Add to Cart button, it also provides you with the option to show it on hover. To do that, you need to check Show Add to Cart on Hover as YES. And this is how it would get displayed.
- The last option available in the Display settings is to display the Sale Badge. Plus, you could also change the layout using the Badge Text option. It allows you to display Sale Label and Sale Percentage.
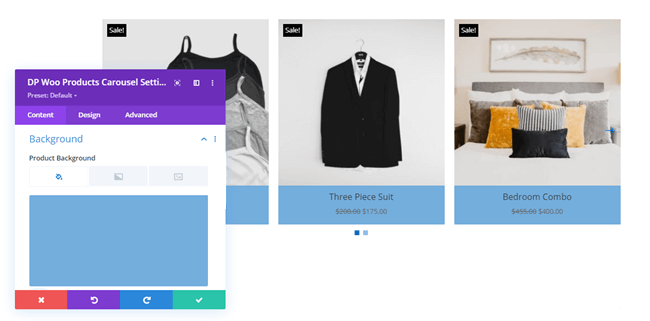
Background Settings
- The Background settings available in the Content tab, enables you to customize products’ background with color, gradient, and Image.
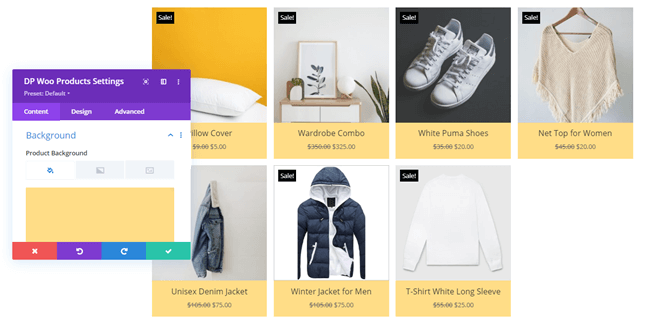
- Simply go to the settings and apply customizations as required.
Step 4.3 – Customizing Divi Plus WooCommerce Products’ Element in the Design Tab
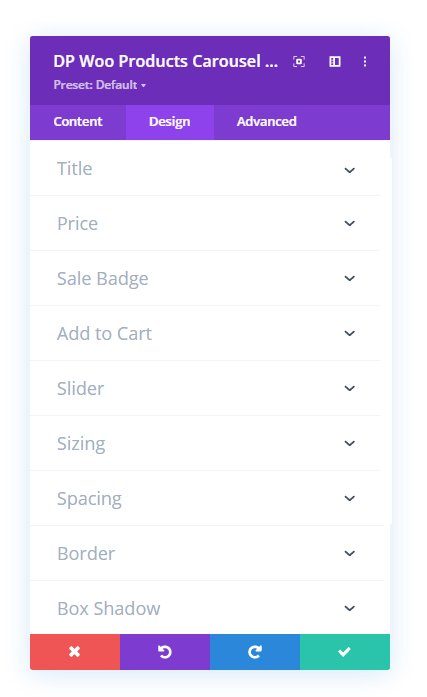
- Once tweaked all the option in the Content tab, the Design tab provides you with the option to take that modification to the next level. The following options are available in the Design tab,

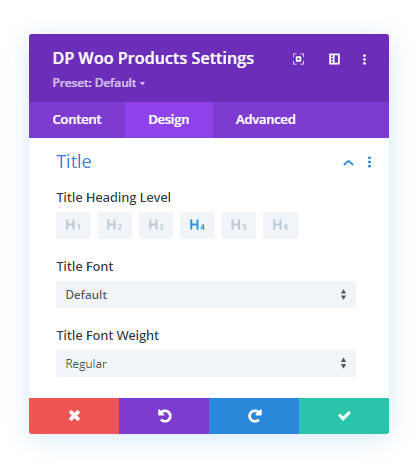
- Text — Here, you can apply text customisation to the product’s title. Change heading level, apply different font family, type, weight and style. You could also change color, alignment and much more using this particular setting.
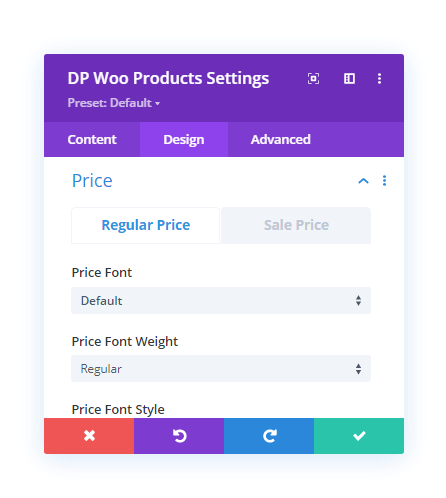
- The Price settings enable you to customize price text for both Regular and Sale price. Except for the heading level, the text customizations you could do for the product’s title text can be done for the price as well.
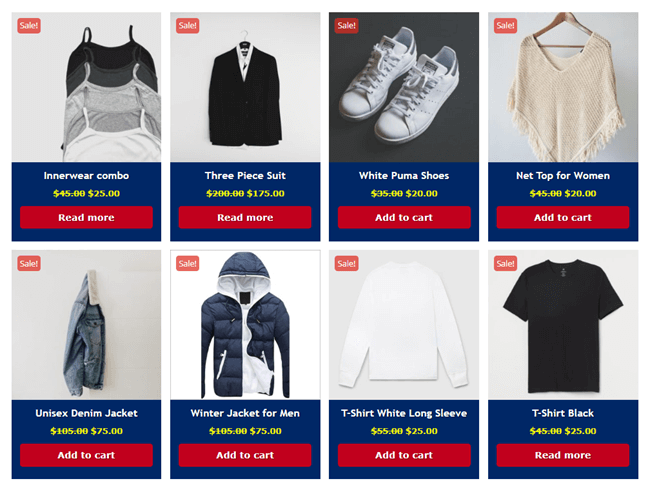
- After Price text customization, you get the option to customize the sale badge in the Sale Badge settings. Here you could change sale badge background color, text style and even apply rounded corners. In the following illustration, I’ve changes the sale badge color as well as applied rounded corners.
- The Add to Cart settings allow you to customize the button background with color, gradient and image.

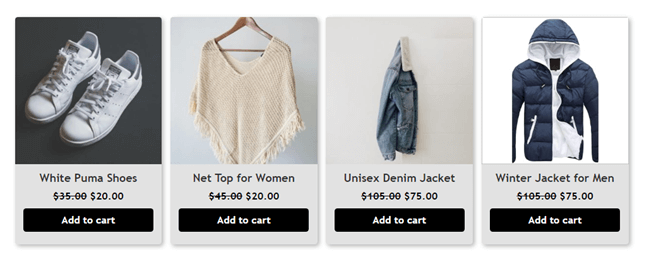
- You could also change Add to Cart’s text style and even apply rounded corners to it. WooCommerce products with customized Add to Cart button having rounded corners could look the same as the following screenshot.
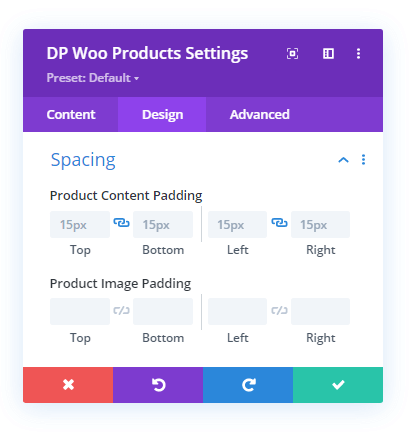
- After Add to Cart settings comes the Spacing settings that allow you to customize Product Content and Image Padding according to the requirements.
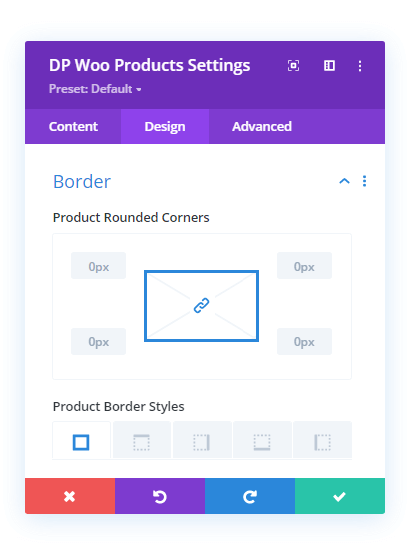
- Then comes the Border settings using which you can easily define rounded corners, border styles, border width and much more for the products.
- And the last option available in the Design tab of Divi Plus WooCommerce Products is Box Shadow settings.
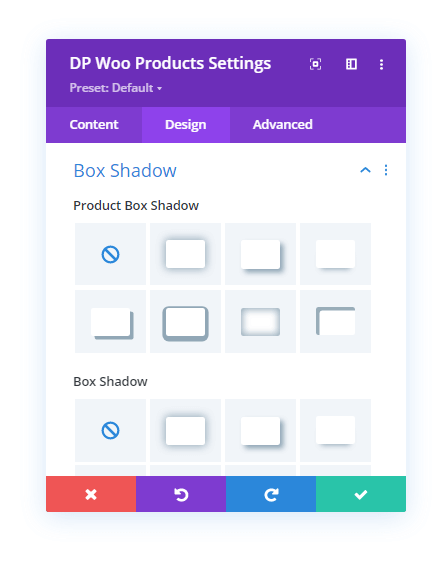
- Using this particular setting, you could easily apply box shadow to the products. WooCommerce products with customized rounded corners, border styles and box shadow look like the below screenshot.
We’ve explored all the option of the Divi Plus WooCommerce Products module. Now, it’s time to add another module to the shop template and see what it could do to improve Divi shop.
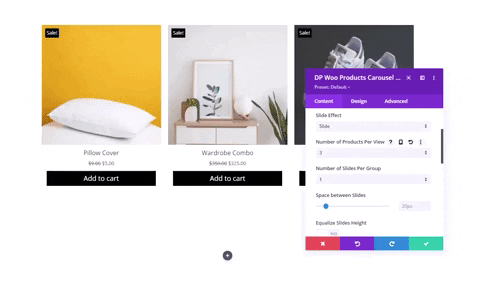
Step 5: Add Divi Plus WooCommerce Products Carousel to the Shop Page
Another WooCommerce module available in the Divi Plus plugin is WooCommerce Products Carousel. Using this module, users can display their Divi eCommerce’s product on a slider. And not only slider but they can also apply different sliding effects as well. The module is a nice choice whether you want to bring uniqueness to the page simply. Or you’d want to mix multiple things. For example, on a top-rated products shop page, you might also want to display bestselling products to recommend to the users.
Therefore, products carousel is the most suitable approach. The following will help you how to insert this module on the page. And further, use it at its best.
Step 5.1 – Insert Divi Plus WooCommerce Carousel Module
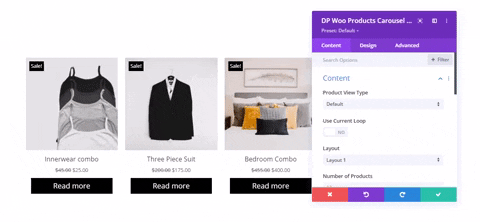
- You could create a new page or use the same shop template you used in the previous step. Then, add a new row and insert the DP Woo Products Carousel module.
- Upon insertion, it will start to display products on the carousel, and you’d have the Content tab open with all the settings.
- The next step will guide you to use the module’s Content tab’s settings effectively.
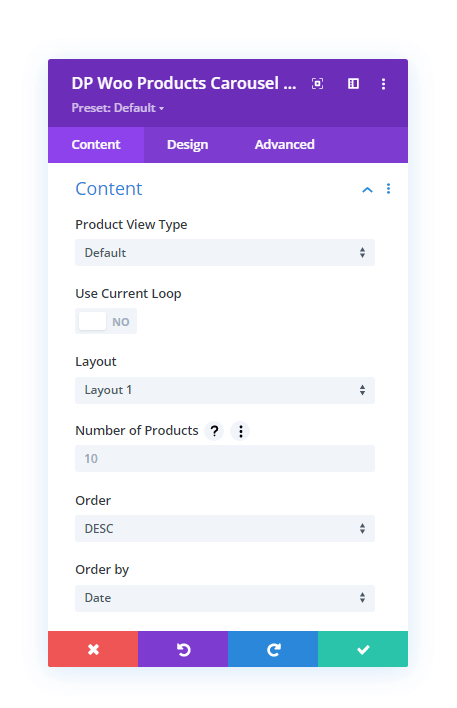
Step 5.2 – Customizing WooCommerce Products Carousel Content
The first two settings available in the Content tab are Content and Display. Both consist same options and features as the WooCommerce Products module. Content settings allow you to select Product View Type, Layouts, Number of Products and more.
The Display settings provide you with the options that you can use to Show and Hide products elements. Like thumbnail, price, add to cart and sale badge.
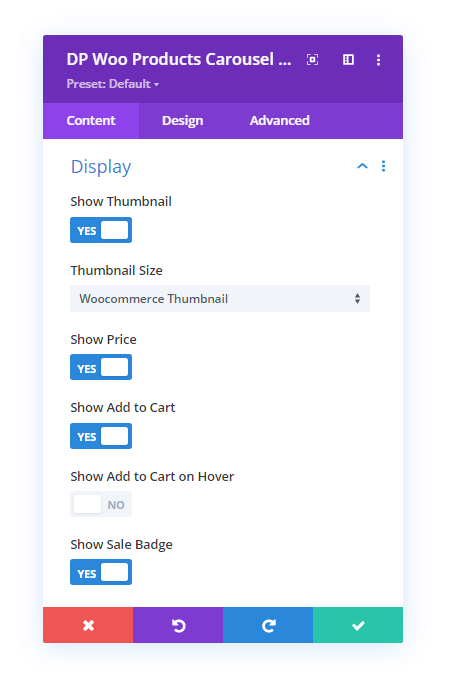
We’ve explored these settings already in the WooCommerce Products module. Therefore, we’re going to skip them and move to the next one, which is Slider.
Slider Settings
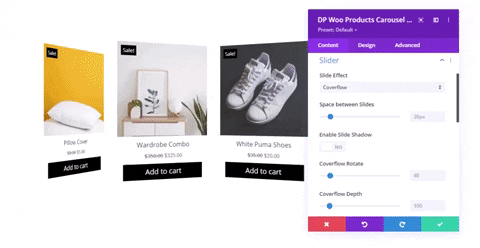
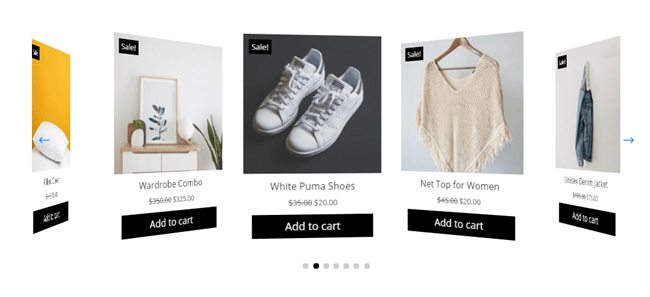
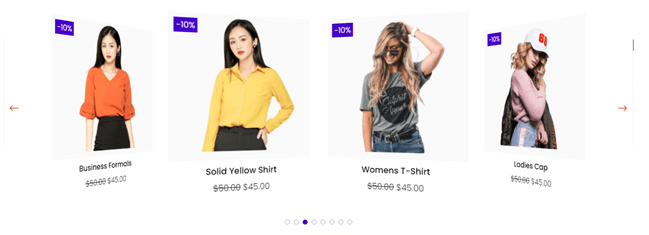
- The first option available in the Slider settings is the Slide Effect. It includes four different WooCommerce products carousel effects that you can easily apply to your shop. The four slide effects are Slide, Cube, Coverflow, and Flip.

- And this is how WooCommerce products carousel looks with each slide effect.
Slide WooCommerce Products Carousel Effect
Cube WooCommerce Products Carousel Effect
Coverflow WooCommerce Products Carousel Effect

Flip WooCommerce Products Carousel Effect
- When you select the Slide and Coverflow effect, they open some additional options also. Using them, you can enhance the products carousel look even more. Let’s check out what they are, and they work.
Slide Effect Additional Options
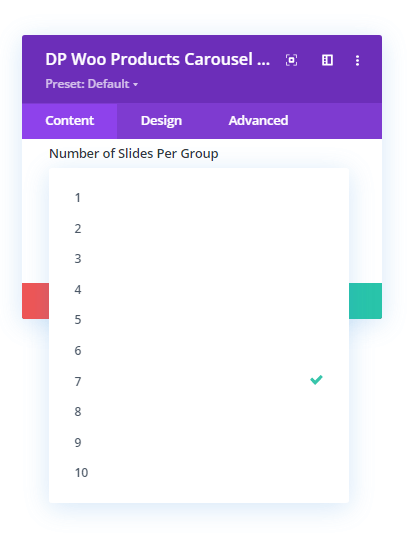
- Upon selecting Slide effect, it provides you with Number of Products Per View, Number of Slides Per Group, and Space Between Slides options.
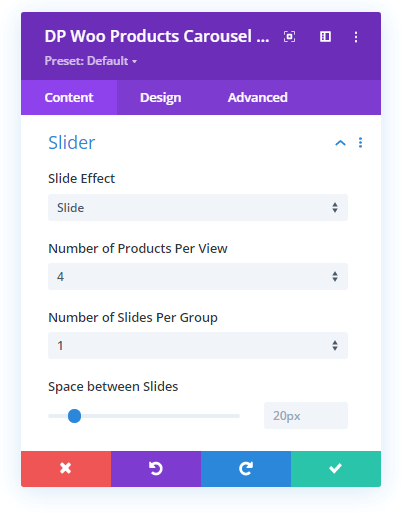
- The Number of Products Per View option let you define how many products you want to display on the carousel at a single time. It allows you to select the number of products per view in up to 10 products. To use this option, you need to click the drop-down menu and select your value.
- Then comes the Number of Slides Per Group option. It provides you with the control to slide up to 10 products at a single time. By default, it’s 1 product slide at a time, but you can easily change that using this option.
- And the last additional option that becomes active upon selecting the Slide effect is the Space between slides. This allows you to increase or decrease the gap between each product on the carousel.
Coverflow Effect Additional Options
- With Coverflow WooCommerce products carousel effect, you get Space between slides, Slide Shadow, Coverflow Rotate, and Coverflow Depth as additional options.
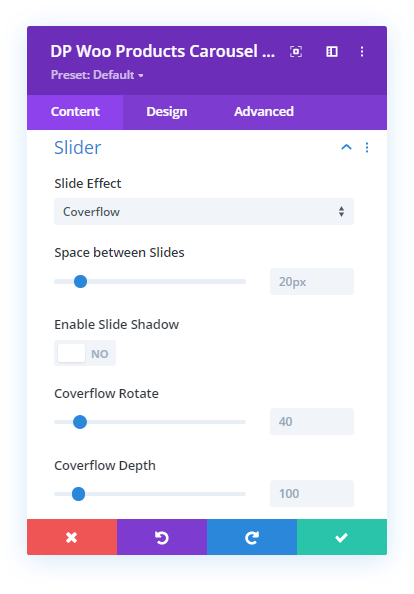
- Like the Slide effect, the Space between slides option of the Coverflow effect enables you to increase or decrease the gap between carousel products.
- And if you want to apply a shadow effect on the carousel products, then you can check Enable Slide Shadow as YES. It further provides you with the option to choose different shadow colors. Coverflow Rotate option makes it possible to increase or decrease the tilt angle of the products on the carousel. And the last option, Coverflow Depth, allows you to zoom in and zoom out on the products. The more Coverflow depth’s value would be, the more it will zoom out. Nevertheless, if you keep Coverflow depth at a lower value, then products will be seen enlarged.
Common Slider Setting’s Slide Effects’ Options
- The common options available in the Slider settings for each carousel effect are the following,
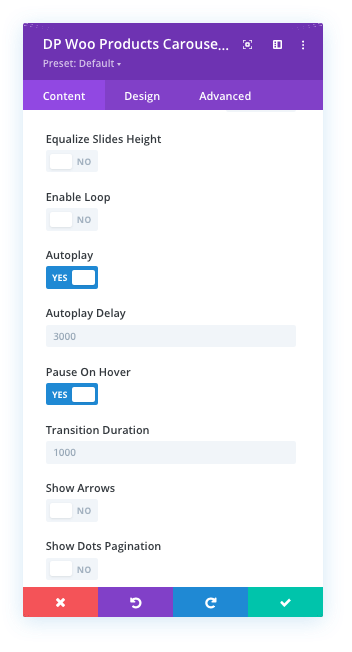
- The Equalize Slides Height option makes it possible to bring each carousel product to a similar height as some products may have different image dimensions and a longer title. So, they could create non-uniformity in the layout. But using this option, you could easily create uniformity among all the products.
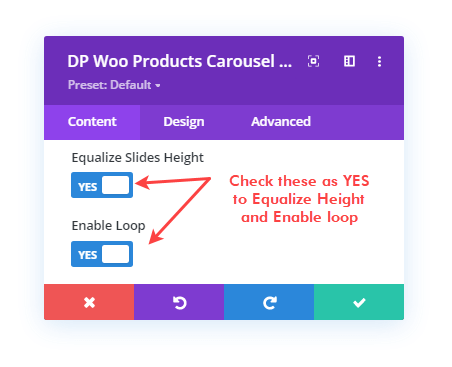
- Then comes the Enable Loop, which allows you to apply a loop on the products carousel. To do that, all you have to do is check Enable Loop as YES. And your Divi WooCommerce shop’s product carousel will rotate without stopping once.
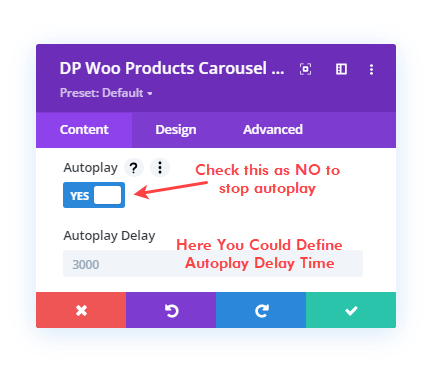
- By default, the products carousel is set to slide automatically. But if you want to turn that off, then you could easily do that by checking Autoplay to NO. However, if you keep autoplay on, then you could also set the value for autoplay start with the Autoplay Delay option.
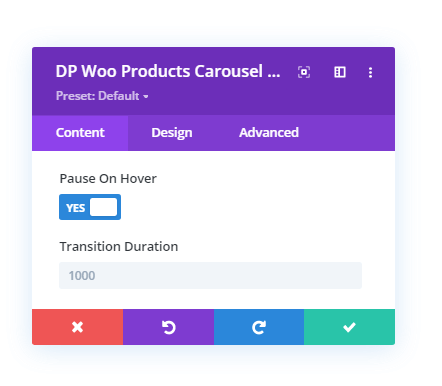
- After the autoplay option, you get Pause On Hover and Transition Duration. If you don’t want to stop the carousel when users hover on it, check Pause On Hover as YES. And with Transition Duration, you can decide how much time the carousel should take to showcase all the products completely.
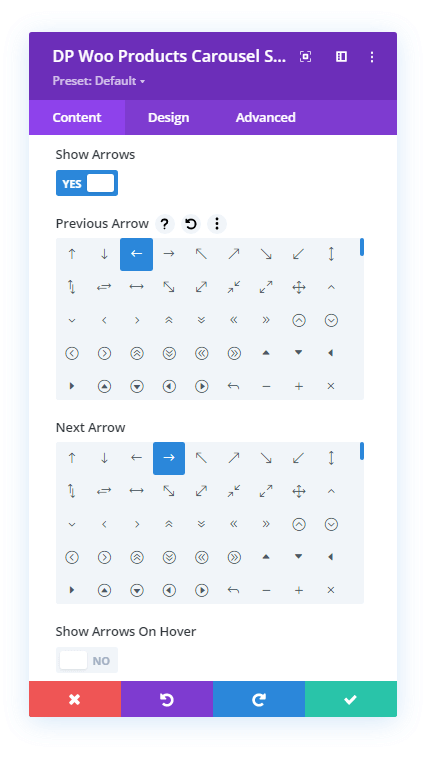
- After these, you get Slider Arrows and Pagination options. To display slider arrows, check Show Arrow as YES. It further opens the options to select the icon for Previous and Next arrows. Plus, Show Arrows On Hover.
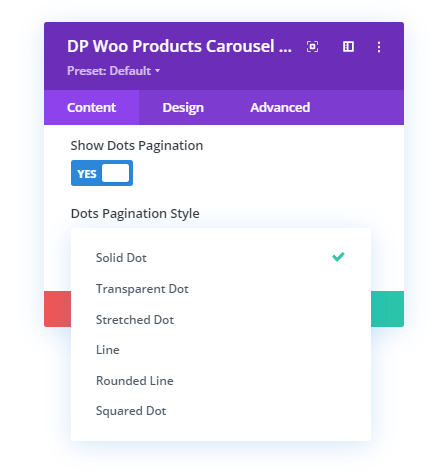
- To enable pagination, check Show Dots Pagination as YES. It further provides you with the option to change the dots pagination style. This is how the products carousel looks with each dots pagination style.
Solid Dot
Transparent Dot
Stretched Dot
Line
Rounded Line
Squared Dot
Background Settings
- The Background setting of the Divi Plus WooCommerce Products Carousel module is the same as the previous module. It allows you to change the products background with color, gradient and image.
- Simply go to the settings and apply customizations according to the needs.
Step 5.3 – Customizing WooCommerce Products Carousel Design
- The Design tab of the products carousel module consists of the same settings with the same functionalities as the WooCommerce Products module.
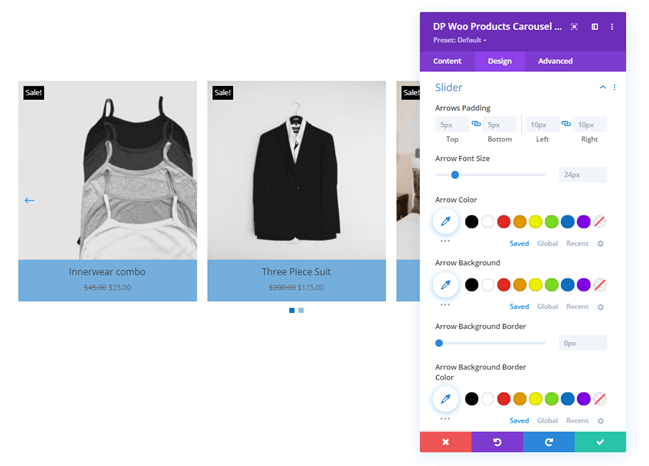
- You can apply customizations to the carousel products as you could with the WooCommerce products module, except for Slider and Spacing settings. The Slider setting available in the Design tab allows you to change Arrow Padding, Font Size, Color and Background. Plus, you could also apply an arrow background border with background border color.
- What else it allows you to do is change color for active and non-active (inactive) pagination dots.

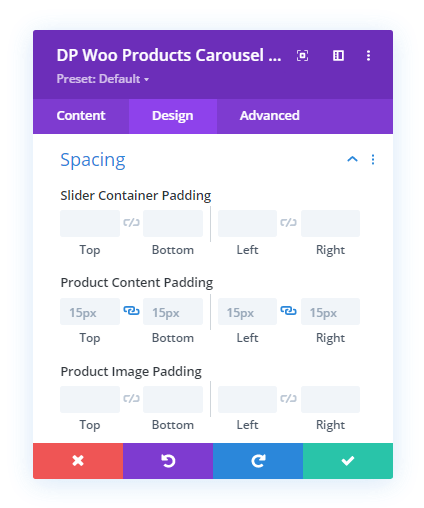
- With Spacing settings, you could change the Padding of the Slider Container, Product Content and Image.
- Apart from these, all the other options are the same as the Divi Plus WooCommerce Products module.
Step 6: Create Divi WooCommerce Shop Categories With Divi Plus Woo Products Categories Module
Divi WooCommerce shop is incomplete without working on its categories. Therefore, Divi Plus includes another WooCommerce module that enables you to customize the category archive page. Or you could use any regular page where users can easily find all the categories. The following steps will help you how to use the products categories module in Divi effectively.
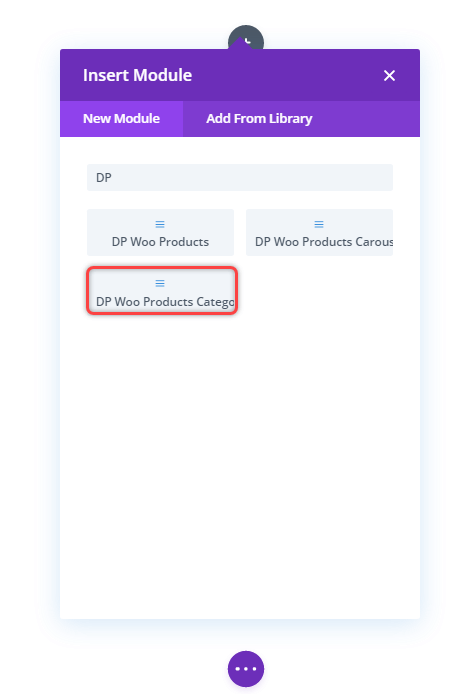
Step 6.1 – Insert Divi Plus WooCommerce Products Categories Module
- To create customized WooCommerce products categories, insert the DP Woo Products Categories module on a page.
- Upon insertion, it will display products categories that include some products assigned to them. Categories without any product won’t get displayed.
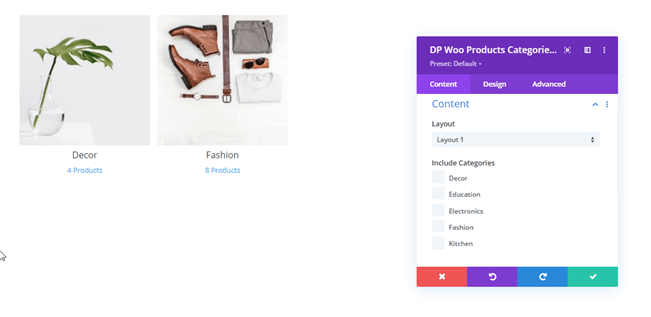
Step 6.2 – Customizing WooCommerce Products Categories in Content Tab
- The first setting available in the Content tab is Content. Here you can select layout and categories to display.
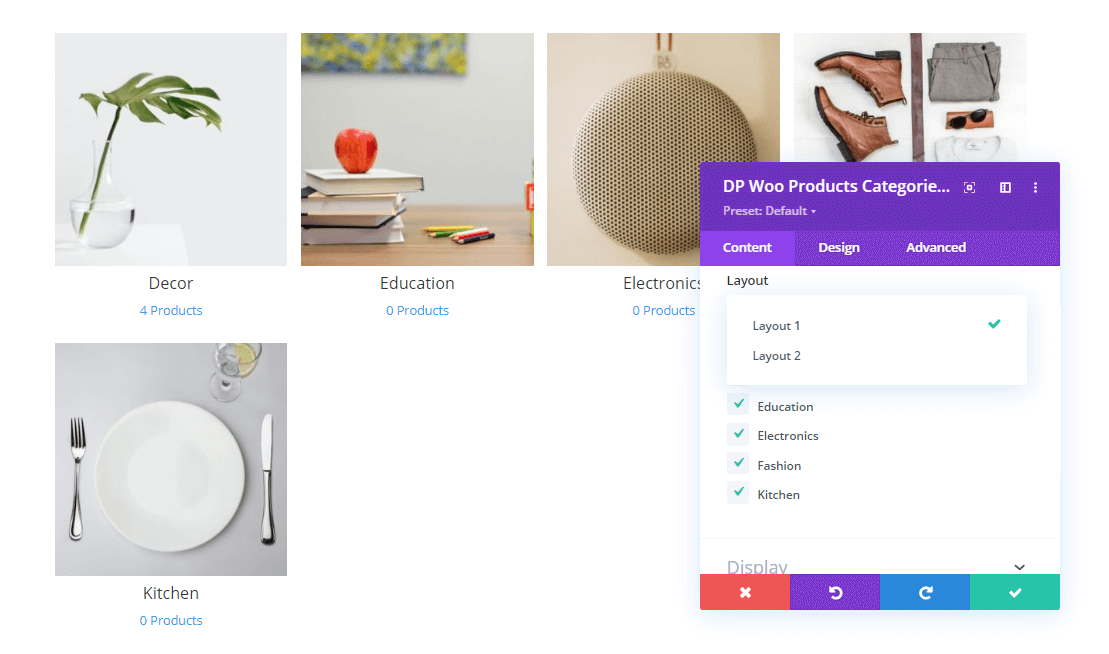
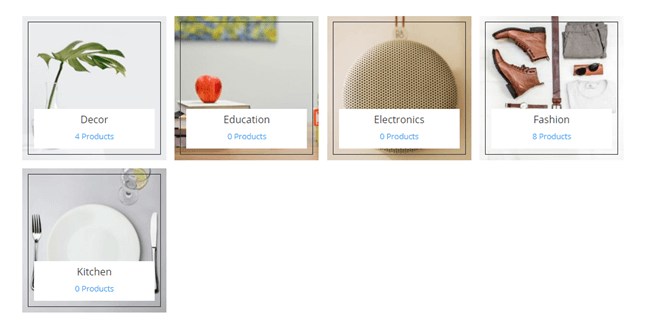
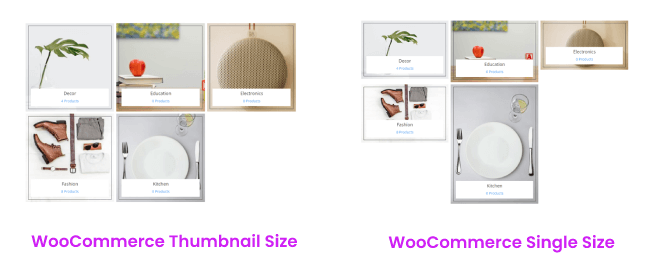
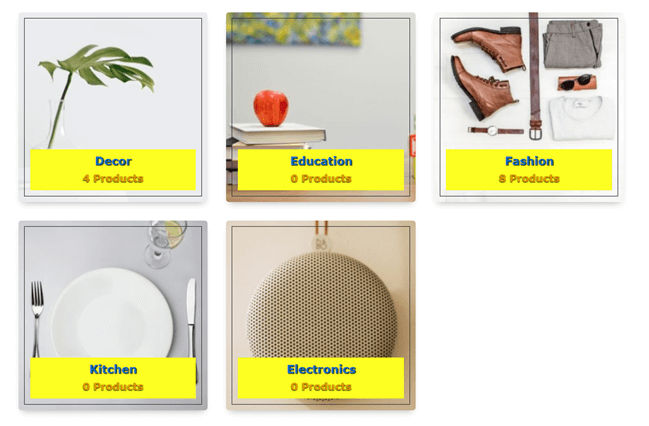
- Layout 1 showcases product categories thumbnail with title and product count underneath, as shown in the above screenshot. Whereas, Layout 2 showcases product title and product count on thumbnails with a content background.
Display Settings
- Display setting allows you to select Number of Columns in which you want to display product categories. It allows up to 6 number of columns for now.

- Then Column Spacing to assist you to increase or decrease the gap between category tiles.
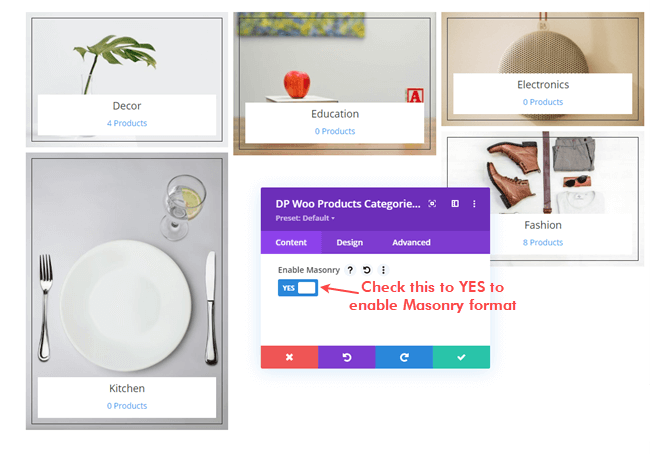
- If you want to enable masonry format on Divi WooCommerce shop’s product category, then you could do that by checking Enable Masonry as YES.
- After this, you get the option to show or hide the category thumbnail. By checking Show Thumbnail as NO, you could hide thumbnails. And if you want to display, do the opposite.
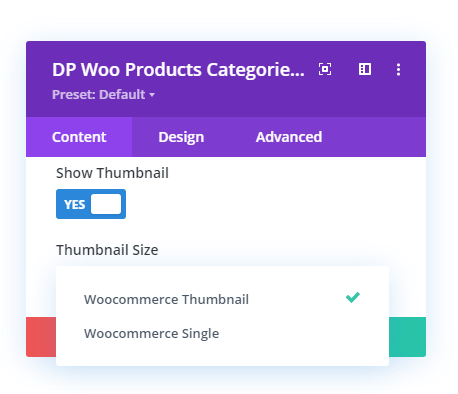
- However, when you choose to show thumbnails, you get the Thumbnail Size option which provides you with further options — WooCommerce Thumbnail and WooCommerce Single.
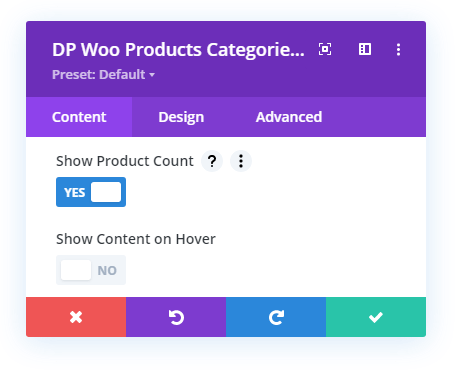
- And the last option available in the display settings is to display product count on categories. To display, check Show Product Count as YES. It further opens the option to Show Content on Hover.
Background Settings
- Like the previous Divi Plus WooCommerce modules, the Background setting, available in the Woo Product Categories, allows you to customize the product’s content background with color, gradient and image.

- Simply apply the customizations as required.
Step 6.3 – Customizing WooCommerce Products Categories in Design Tab
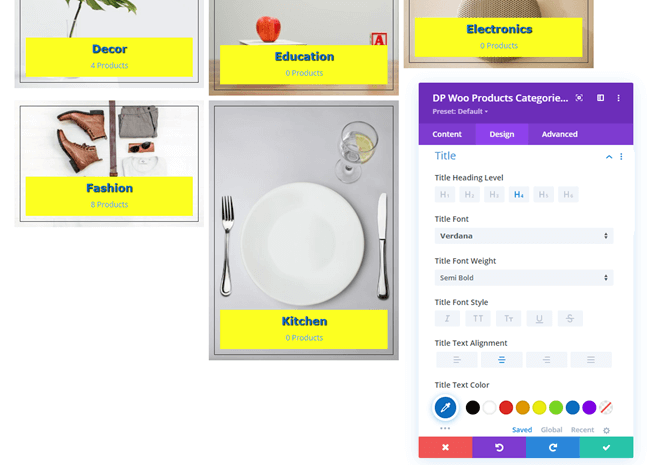
- The following additional settings are available in the Design tab of the Divi Plus Woo Products Categories module.
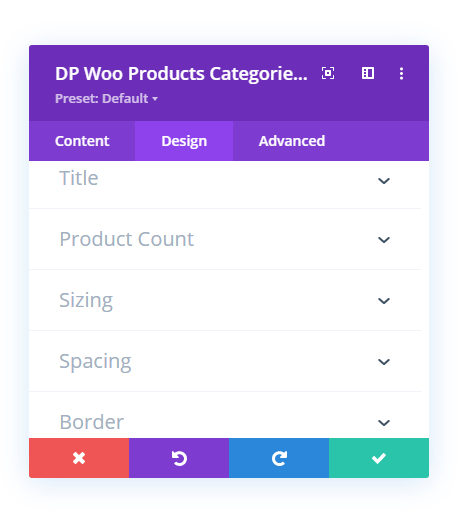
- Title — It allows you to customize the text style of the products categories title.
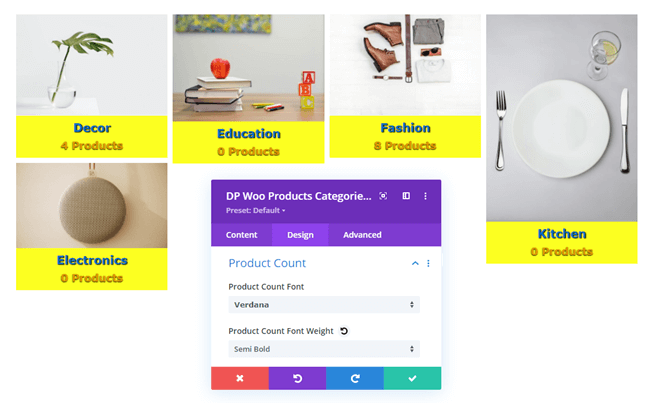
- Product Count – Using this particular setting, you could easily customize the text style of product count.
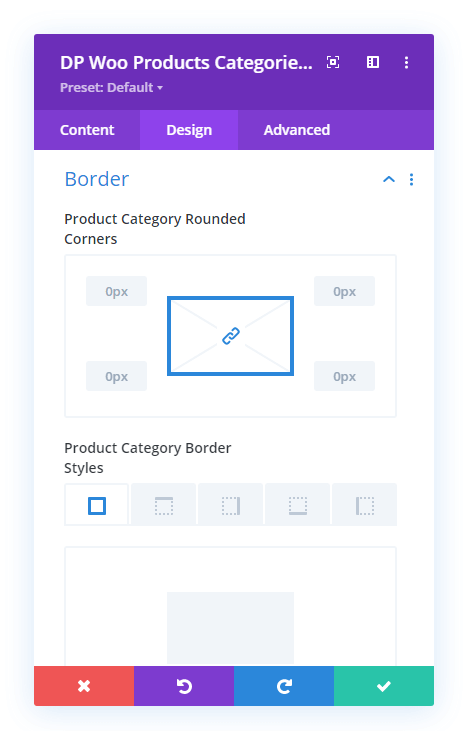
- With Border settings, you can apply rounded corners around products categories thumbnail and different border styles.
- And the Box Shadow settings make it possible to enhance product categories look with different shadow on them. This is how products categories look with a customized box shadow and rounded corners.
Wrapping Up
So, this was our take on Divi WooCommerce and Divi Plus modules for the WooCommerce shop. Using these modules, you could take your Divi shop to a new level. And help users find their favorite products without any effort.
You can also try another plugin Divi WooCommerce Extended that provides you with many Divi WooCommerce Modules, Extensions, and Layouts. Using this, it’s easier to build a WooCommerce store on Divi from scratch. You get the option to customize the Divi WooCommerce Checkout page, shop layout, categories and more.
Give this WooCommerce and Divi plugin a try. If this article helped you find out the best solutions to create your amazing Divi eCommerce store and you’ve got any thoughts in mind, let us know in the comments.
Till then, happy Divi web designing.


plz plz plz add out of stock label and some option that we can only show one specific product
hello, how can we modify the functioning of the plugin?
I would like to add a whitelist button of the YITH extension to my products?
can you help me please