In the previous post, we discussed how the Divi WooCommerce modules of the Divi Plus plugin could help a store owner or developer build a beautiful Divi shop easily. Divi modules like WooCommerce Carousel can display products on a slider and more. Recently, Divi Extended released a new version of Divi Plus, 1.9.0, that features multiple new modules and various features to the WooCommerce modules.
In this post, we’ll check out those new features and how they can improve a Divi shop’s look in no time. And the new features are as follows,
- Pagination Control for WooCommerce Products Module
- Control for Sale Price Text on WooCommerce Carousel Products
- Control for Offset Number
- Support for Product Tags
- Control for Taxonomies Relation
- Options for Add to Cart Button Icon
- Control for Add to Cart Button Text for Each Product Type
- Control for Sale Label Text in Divi Plus WooCommerce Modules
- Products Carousel With Added Control for Arrows Position
- Display Products Carousel With Dynamic Dots
- Display Star Rating on Products
- Show Products With Quickview
1. Pagination Control for WooCommerce Products Module
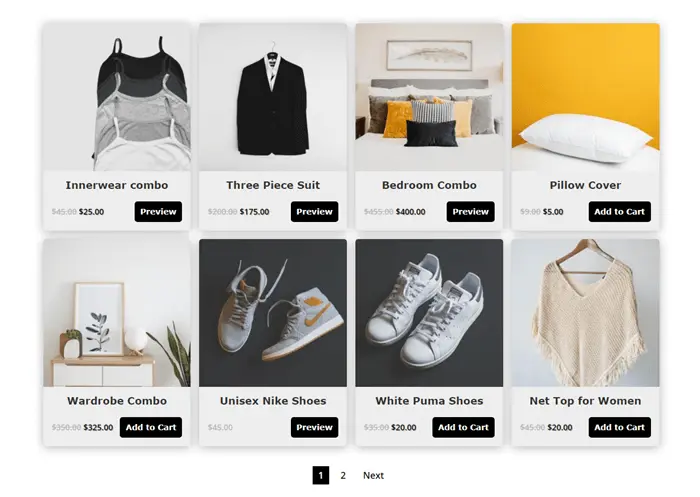
Prior to this update, there was no option to display pagination on products. And you had to showcase all the products on a single page if there was more. But now, with pagination support, you can divide them into separate views. For example, you’ve got 10 products in your Divi WooCommerce shop. Then this is how products were showing up using the Divi Plus Woo Products module.
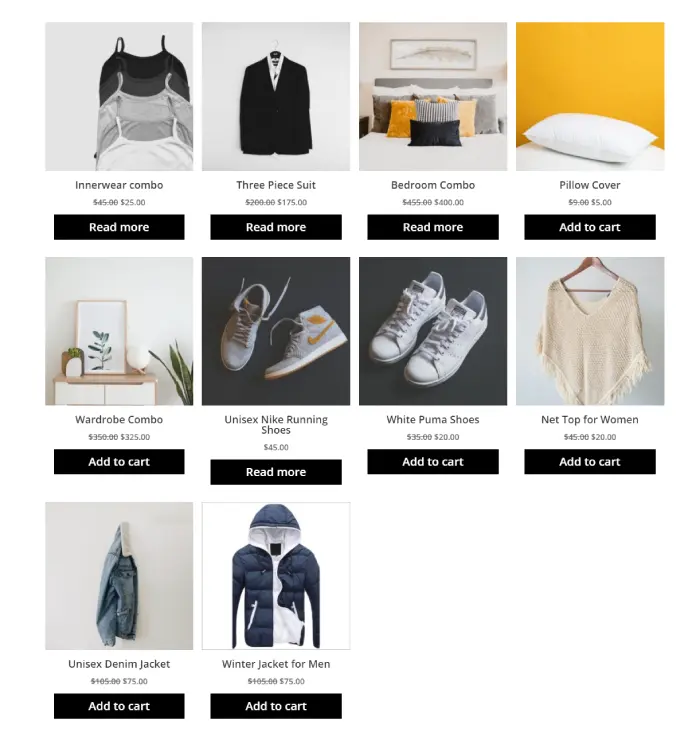
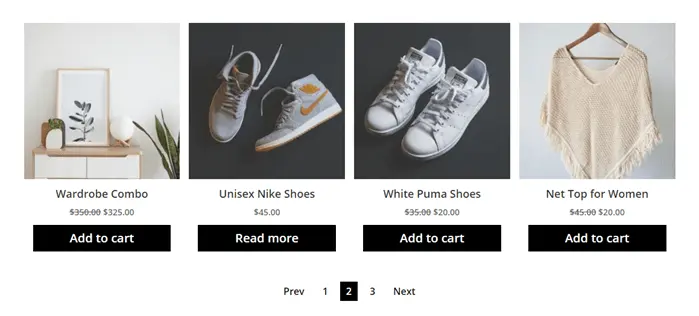
Now with pagination, this is how you can display your products using Divi Plus WooCommerce Products module.
And how can you do that? It’s simple. After inserting the module, first, go to the Content settings, then Number Of Products. Here, input the value to define how many products you want to display in a single view. Below, I have defined 4 as the number of products. According to your requirement, you can input any value. Then, close the content settings, move to the Pagination. Here, check Show Pagination as YES, and it will start to display pagination.
Moreover, the same setting allows you to display Previous and Next links with pagination as well. All you need to do is, check Show Previous Next Links as YES.
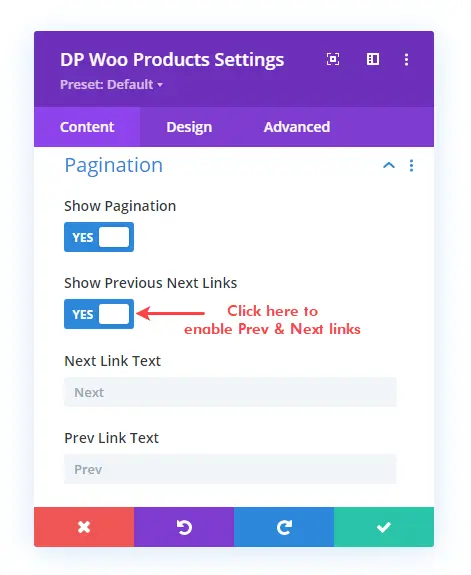
Further, input text in Next Link Text and Prev Link Text to define custom previous and next pagination links. This is how your products look with all the pagination customizations on your Divi WooCommerce store.
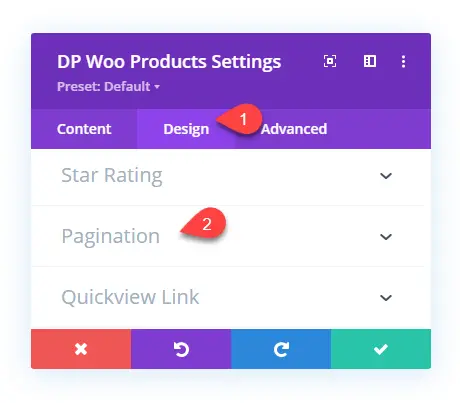
Furthermore, you can also design the appearance of product pagination. To do that, you need to go to the Design tab, then open Pagination settings.
Here, you’ll get the option to change the color of active and non-active pagination links and their backgrounds.
2. Display Customized Sale Price Text on WooCommerce Carousel Products
The new update now allows you to display customized sale price text on products created using Divi Plus Woo Products Carousel module. To motivate users and excite them to view a product, displaying sale price text is a nice approach. And with this new feature, you’ll be able to enhance the way the text look. A WooCommerce product carousel with customized sale price text looks the same as the below screenshot.
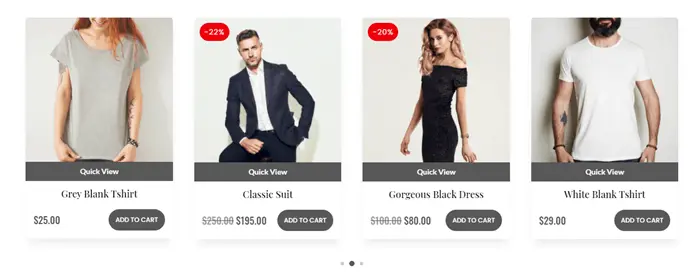
You can access the options by going to the Design tab, then Price settings, and finally Sale Price.
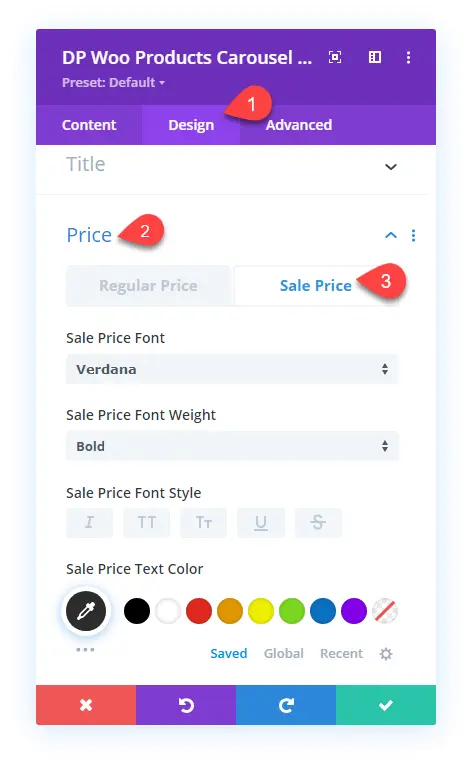
This Divi WooCommerce module provides you with all the essential options to customize the sale price text. You can change font family, text color, font type, and more to make the sale price text look engaging and readable.
3. Control for Offset Number
Under this new update, both the Woo Products and Woo Products Carousel module of Divi Plus now supports the product’s offset feature. You can hide starting ‘N’ number of products according to your requirement. For Woo Products, you need to open the Content settings in the Content tab, then go to Offset Number.
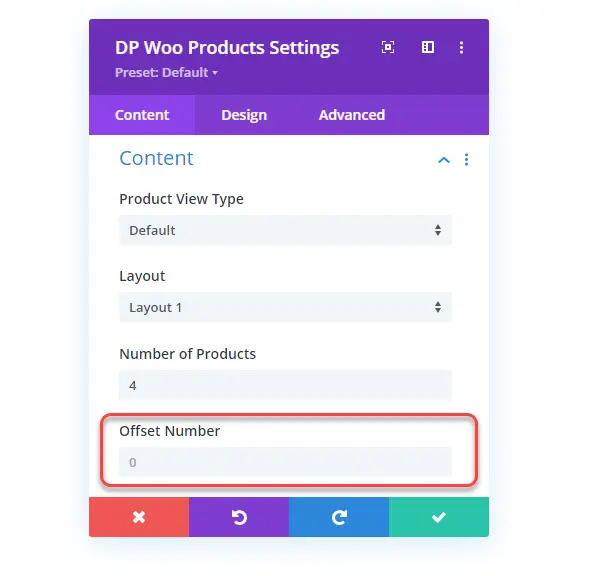
Here, input the value for the number of products you want to hide. If you input 3, then the first 3 products will be hidden from the Divi Plus Woo Products module. Similarly, you can hide the products for products carousel. For that, you need to open Content settings, then go to the Offset Number and input the value.
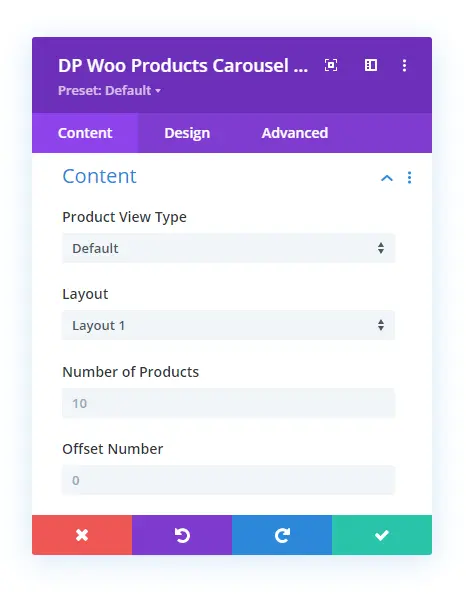
If we look at the comparison between offset and non-offset carousel, this is how our products carousels look.
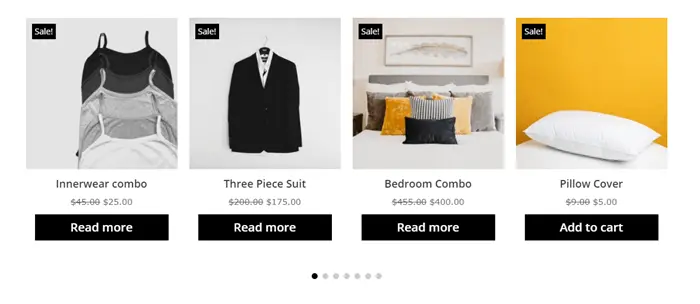
Products carousel before offset
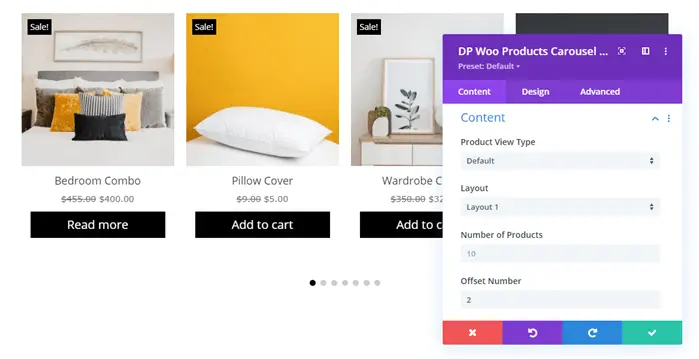
Products carousel after the offset.
4. Divi WooCommerce Modules With Support for Product Tags
If you’ve assigned tags to the products and want to display products based on them, then using the Include Tags option, you can easily do that. And it’s available for the Woo Products and Woo Products Carousel module. You need to open the Content settings in the Content tab to access this option.
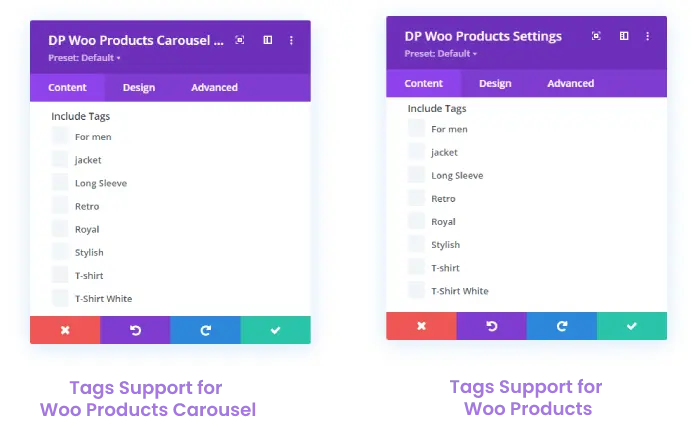
Upon your choice of tags, the modules will start to display products according to that.
5. Control for Taxonomies Relation (OR, AND)
If you want to display products based on both category and tags relation, you can do that using the Taxonomies Relation option. To access this option, you need to open the Content tab’s Content settings in both modules.
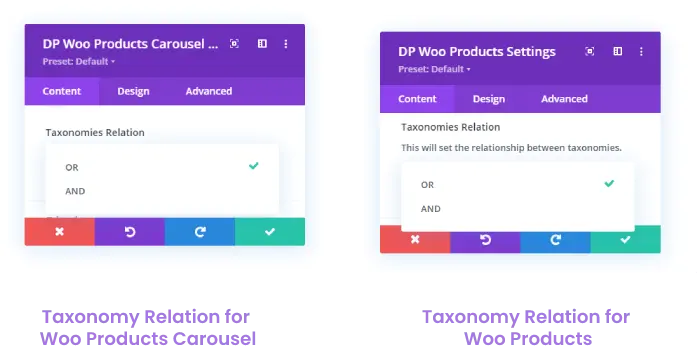
It allows you to define the ‘OR’ and ‘And’ relation between categories and tags. For example, if you want to display products when either tags or category available. In that case, you’ll use the OR taxonomy relation.
However, if you want to display products only when both taxonomies products are available, you’ll use the AND taxonomy relation.
6. Display and Customize Add to Cart Button Icon
In addition to the Add to Cart button on WooCommerce products, now you can also display add to cart button icon.
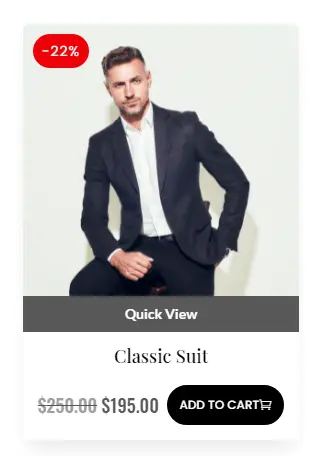
The option is available in both modules. We’ll look at the steps that allow us to display add to cart icon in Divi Plus WooCommerce Products module. The same could be followed for Woo Products Carousel.
First, make sure you’ve enabled Add to Cart button in the Display settings of the Content tab.
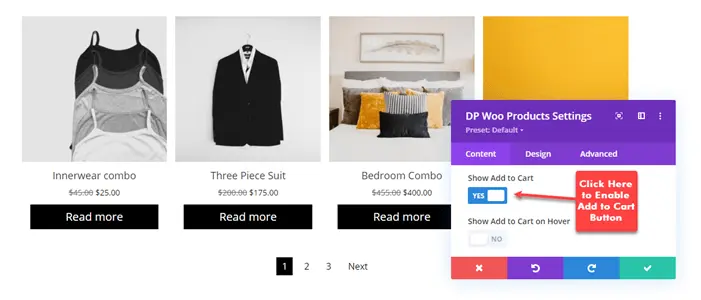
Then move to the Design tab, then open Add to Cart.
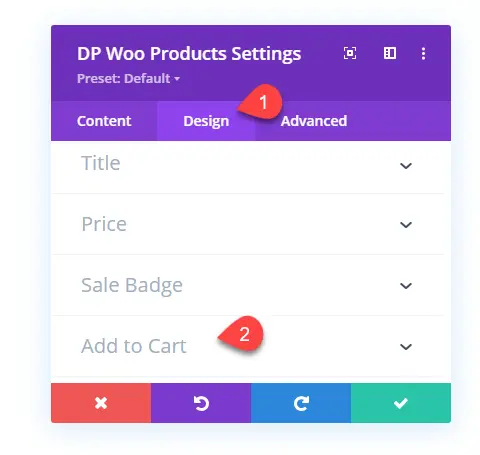
Here, you’ll get all the options to customize the WooCommerce products add to cart button.
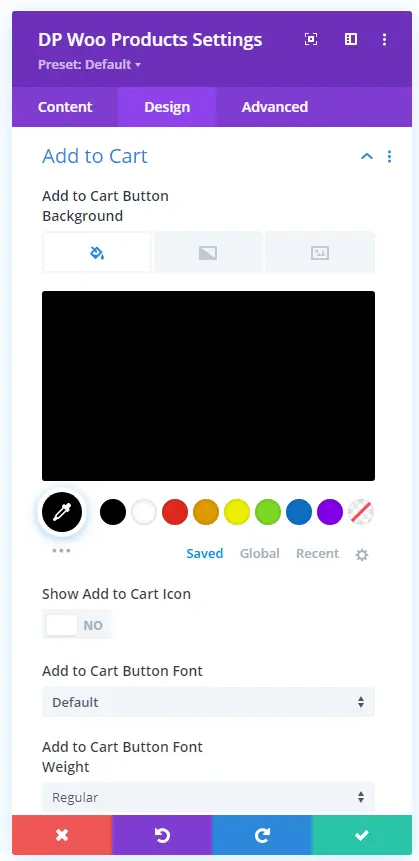
Now, under the background option, you’ll get the Show Add to Cart Icon. Check it as YES, and it will further open the options to customize the add to cart icon.
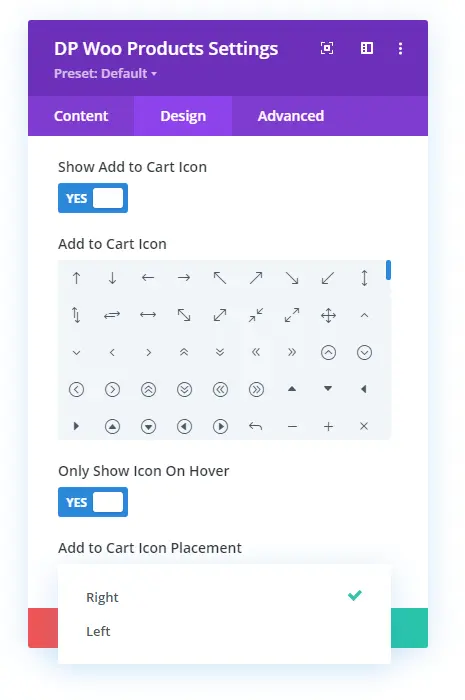
Using these options, you can select which icon you want to display from Add to Cart Icon field. Select whether it should appear on hover or always using the Only Show Icon On Hover. If you keep it as YES, then it will display an icon when the user hovers over the products. Otherwise, it will be displayed by default. This is how the add to cart icon button gets displayed.
Add to Cart Button Icon on Hover
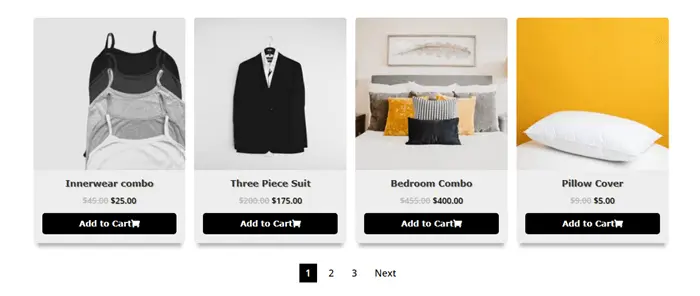
Add to Cart Button Icon Without Hover
In addition to these, you can also select to change the icon’s placement to either Left or Right from Add to Cart Icon Placement option.
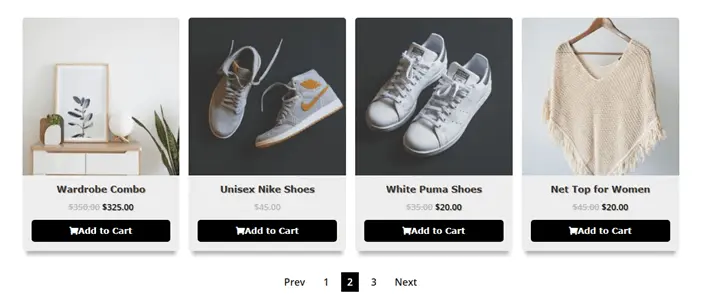
Add to Cart Button Icon on Left
7. Control for Add to Cart Button Text for Each Product Type
Before this update, Divi WooCommerce Modules of Divi Plus only showed Add to Cart and Read More text. But, now both modules allow you to define custom text for each product type. Even you can now set a different text for products that are out of stock. To access this option, you need to go to the Display settings of the Content tab. And after Add to Cart button option, you’ll get the fields that would allow you set custom text for Add to Cart Button.
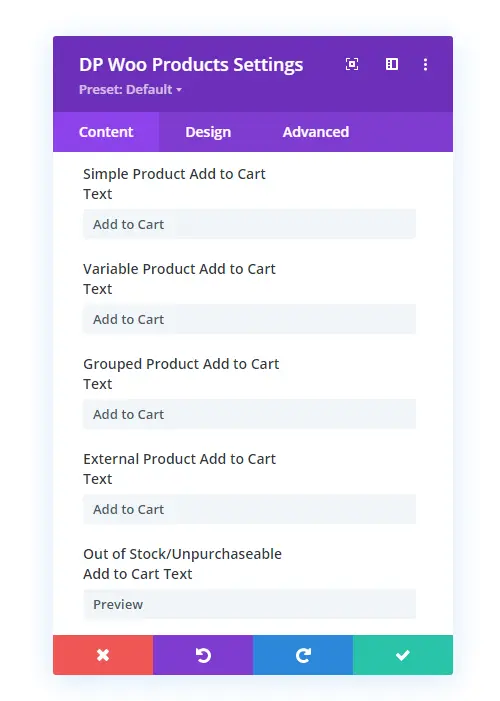
The custom text you can set for products are,
- Simple
- Variable
- Grouped
- External
- and Out of Stock.
Simply input the text in the available fields, and it will start to show on Add to Cart Button. In the below screenshot, I’ve set Preview as Out of Stock products’ add to cart button text. And for products that are available, the text is simply Add to Cart.
8. Control for Sale Label Text in Divi Plus WooCommerce Modules
The Divi WooCommerce Modules were already providing you with the option to display Sale Badge. Users were able to show either Sale or percentage sign (%). But now, they can set a custom text as Sale Badge.
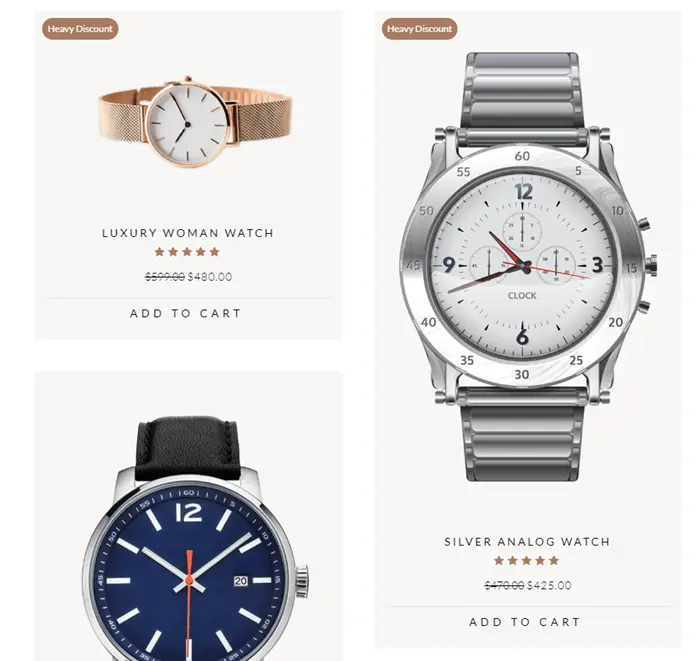
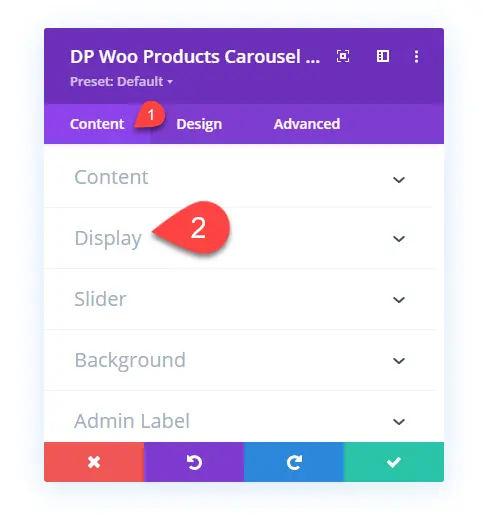
Simply go to the Display settings in the Content tab of both Woo Products and Woo Products Carousel module.
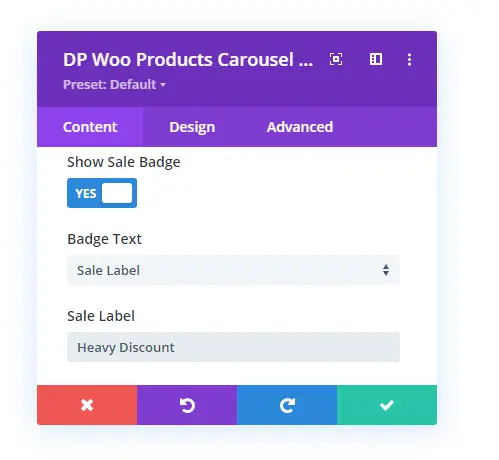
Then check Show Sale Badge as Yes. It would display an option to choose Label or Percentage. Select Label, and you’ll get the Sale Label field to input custom sale badge text.
9. Divi Plus WooCommerce Products Carousel With Added Control for Arrows Position
With products’ carousel arrow display, now you can also change their positions. The Divi Plus Woo Products Carousel module now supports a total of 8 types of arrow positions. To access this option, you need to open the Slider settings in the Content tab. Then go to the Show Arrows, where you’ll get the Arrow Position option.
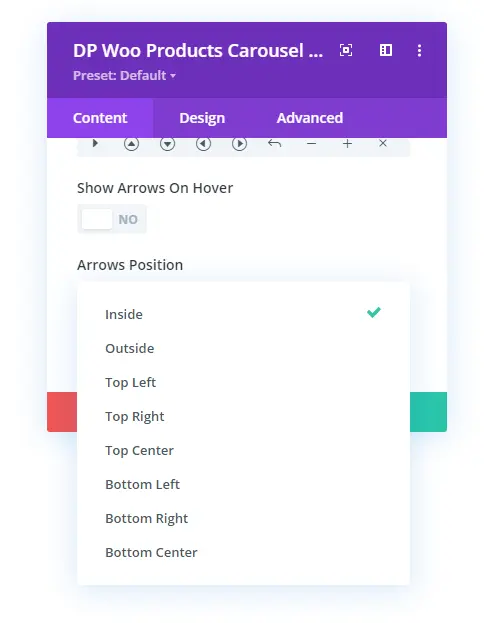
The available WooCommerce product slider arrow positions are,
1 – Inside
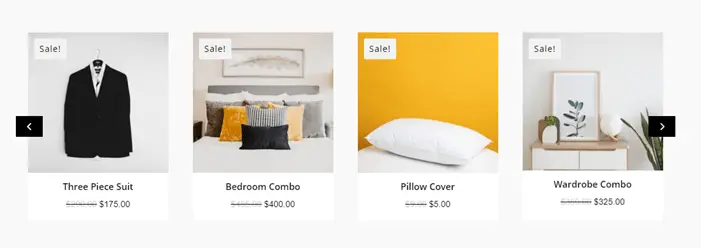
2 – Outside

3 – Top Left
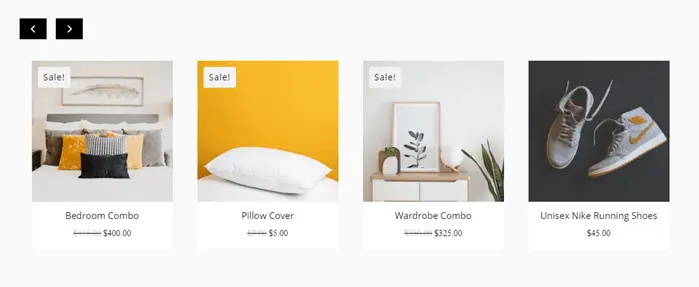
4 – Top Right
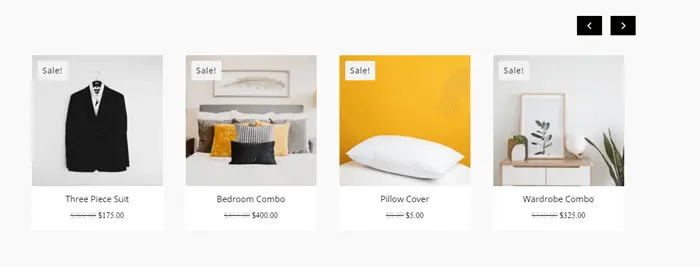
5 – Bottom Left
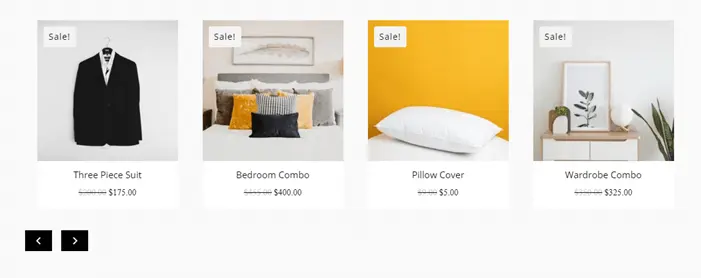
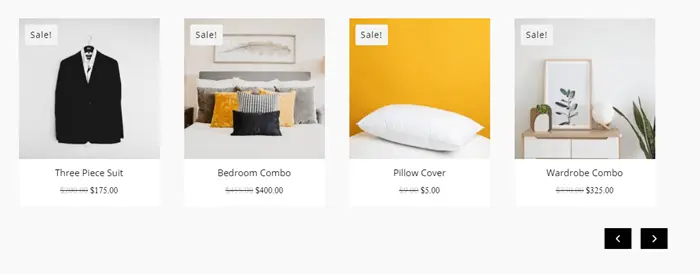
6 – Bottom Right
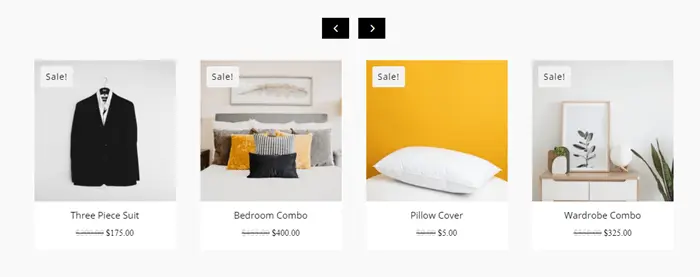
7 – Top Center
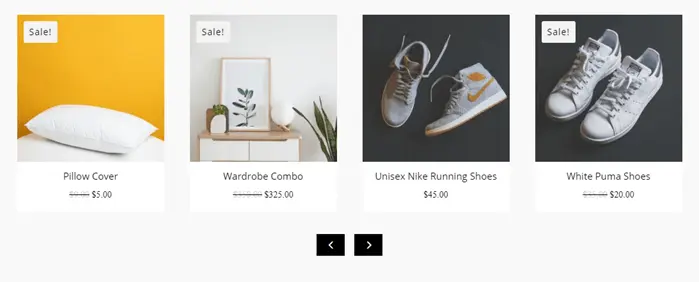
8 – And Bottom Center
10. Display WooCommerce Product Carousel With Dynamic Dots
Bring a sense of novelty to your Divi WooCommerce products carousel with dynamic dots. Under this option, the active pagination dots will come to the center and show non-active dots smaller. Plus, unlike regular dots, it won’t move to change its place based on slider rotation. To understand this better, look at the below visual.
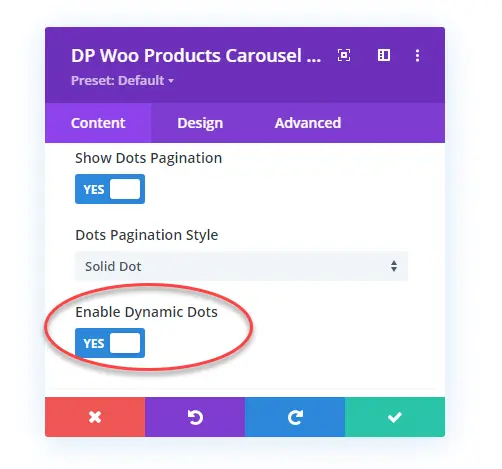
And to enable this option, you need to go to the Slider settings. Then scroll till you reach the Show Dots Pagination option and check Enable Dynamic Dots as YES.
11. Display Star Rating on Products
Bring more attraction towards your WooCommerce products by showcasing star ratings. With the new update, the WooCommerce modules of Divi Plus now allow you to show star ratings. Once the customer leaves a review for the product, the star rating for it will start to appear.
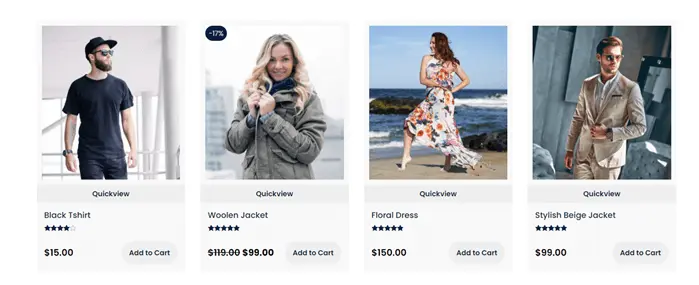
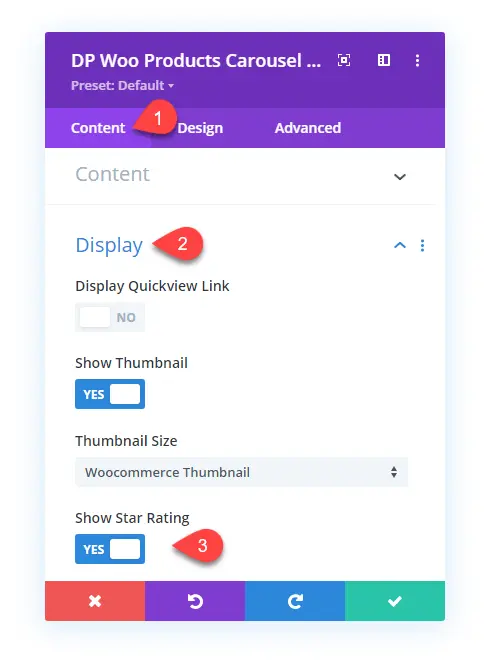
With attraction, what else star rating does is that it appears in the search result as a rich snippet. So, your store will have more chances to receive a better amount of organic traffic. To enable star rating, you need to go to the Display settings in the Content tab for both modules. Then after the Thumbnail Size option, you’ll find the Show Star Rating. Check it to YES, and your products will appear with a star rating.
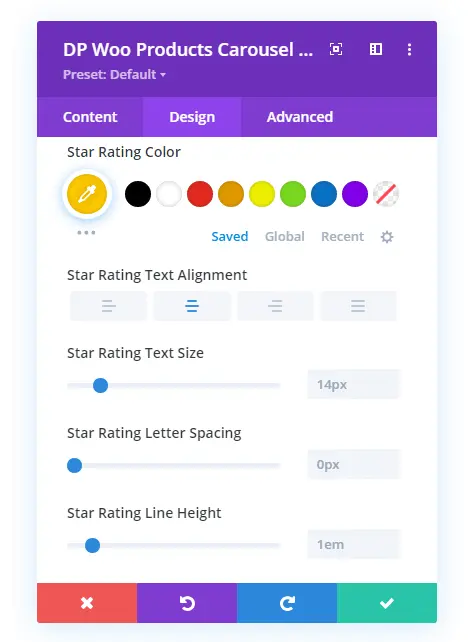
Furthermore, you can optimize the look of the star ratings. To do that, you need to go to the Design tab and open Star Rating. Here, you’ll get the options to change star rating color, alignment, text size, spacing, and line height.
12. Divi Plus WooCommerce Modules With Product Quickview
It was absent in the previous version of the Divi Plus plugin. But now, you can create a products carousel and simple products with the option to allow users quickview each product. With the addition of this feature, the Divi shop created using Divi WooCommerce modules of Divi Plus will look comprehensive and functional.
Without opening a particular product, users can easily find out more about it and quickly add it to the cart. Then, further, continue to explore other products as well. The modules allow you to customize how the Quickview text looks on the product. Plus, you can also customize the look of each element in Quickview.
To enable Quickview, you need to go to the Display settings of both modules. Then, check Display Quickview Link as YES. It will further provide you with the field to set custom text for the Quickview link.
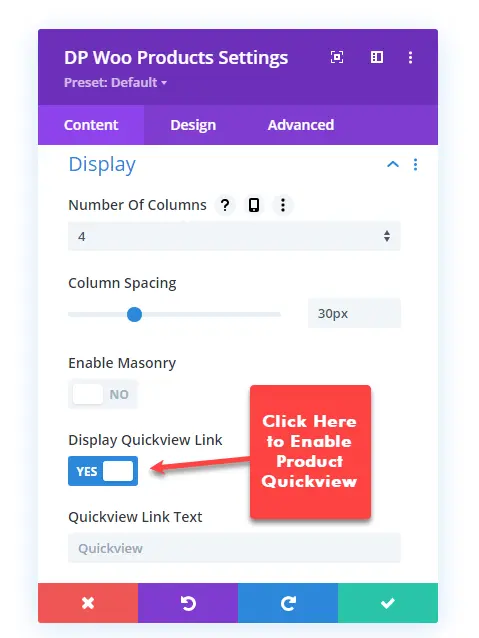
Once enabled the option, it will start to display the Quickview link. Now to optimize its look, you need to move to the Design tab.
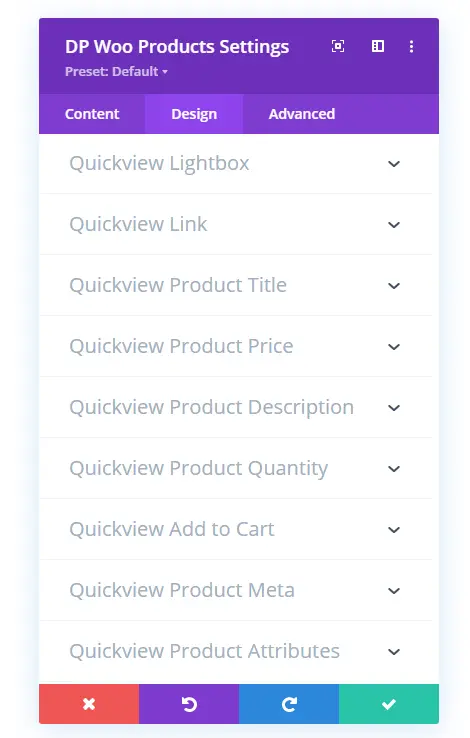
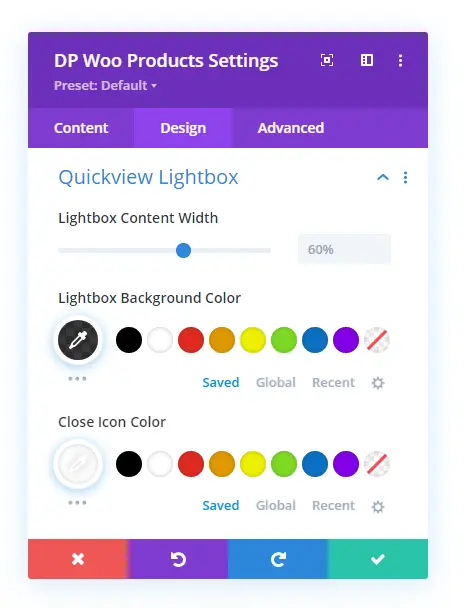
Here, you’ll find multiple settings to customize the Quickview link and its different elements. For instance, the Quickview Lightbox settings provide you with the options to change lightbox width, background color, and close icon color.
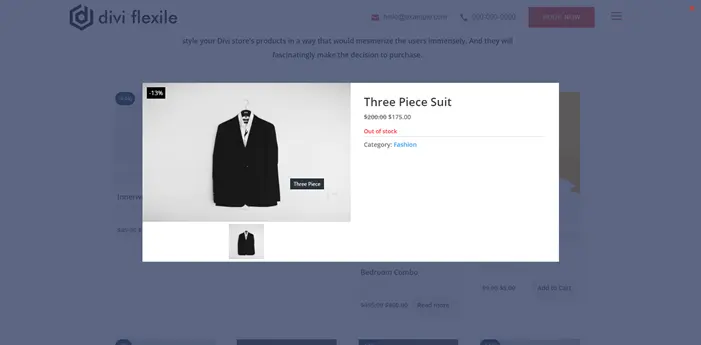
After applying customizations, this is how the Quickview lightbox looks.
Similarly, you can apply customizations to other areas of the Quickview link and elements in the lightbox using other Quickview settings.
Ending Thoughts
So, that’s our look at the new features added to the WooCommerce modules of Divi Plus. Each option is easy-to-use, and you can quickly customize and enhance the look as well as the functionality of your Divi shop and its products. The modules are fast and compatible with the new Divi Performance Update. Thus, no matter how you design your Divi WooCommerce store, there will be no performance issues.
If you’ve tried the new Divi Plus and its WooCommerce modules, then let’s know what your experience was. We’ll be thrilled to know your views.




0 Comments