Affiliate Disclaimer: Clicking on links on our website may earn us a commission. Thank you for your support.
The one thing that’s very akin to nature’s law of change is technology. What works today might not work tomorrow or get in less use. And in technology, what’s growing so fast is computer system technology — hardware, software and peripheral equipment. What we used 2 decades ago are either traded off to a scrap dealer or became an attraction in an IT museum. WebP file is also part of this growing technology’s face — software technology, if we are specific.
More and more people are discussing this new file format, WebP, and getting interested in using it in their projects. Whether it’s software projects, designing projects, web development or anything related to computers. Because of its popularity, users and developers have started to consider it as the next-gen image format. And recently, WordPress, in its 5.8 update, added support for WebP file to ease web developers’ many image-related issues — paving a new direction for the web development industry.
What’s WebP file format, how it works, how to use it on your WordPress website, and why people around the web are considering it as the next-gen image format? There are many questions and areas that make people get excited about it, and in this blog post, we intend to discuss all of them with you.
Therefore, without any further ado, let’s get started!
What is a WebP File Format?
Most developers or users might pronounce WebP as Webpea/Webpee, but it’s actually pronounced as weppy (wepɪ), and it is an image format like PNG, JPEG and GIF but different in terms of working. It was based on the technology used to create the VP8 video format (part of the WebM project), which Google acquired when they purchased On2 Technologies. Later in September 2010, Google announced that WebP is a new open format that could be used for lossy compressed true-color graphics on the web.

Since then, it is developed and maintained by Google and gradually got support from most modern internet browsers. Apple added support for WebP images in Safari’s 14th version making it the last modern browser to do so.
WebP images have a .webp extension, uses a Lossless/lossy compression algorithm and are contained by RIFF — Resource Interchange File format, a general file container format for storing multimedia data in labelled fragments.
And because of all of these, it serves images smaller than JPEG(JPG), PNG and GIF without compromising the quality, which further provides different benefits, such as,
- Faster loading times
- Less media storage
- Transparency
- Animation
- Color profile
- Metadata
Therefore, users prefer WebP files over others. But, how all of it is possible. Let’s find out how the WebP image format works.
How WebP Works?
The reason WebP image format provides users with the above benefits is that it is derived from a video format VP8 video codec, as we already discussed earlier, which uses intra-frame compression. A type of file compression that compresses every frame of the video, then also compresses the differences between subsequent frames—giving a smaller sized video file.
Though WebP doesn’t actually follow the same process, but, its Lossless and Lossy compression algorithm’s core is based on WebM, which is the same VP8 video codec. Let’s have a look at WebP compression algorithms.
Lossless WebP Compression
In WebP Lossless compression, several techniques are carried out to transform an image. After that, entropy coding is performed on the converted image data that encodes symbols by using a number of bits inversely proportional to the probability of the symbols. Meaning, it represents regular occurring patterns with lesser bits and occasionally occurring patterns with more number of bits.
The following are the techniques that are carried out to transform images,
Image Spatial Transformation (Predictor) –
It is used to reduce entropy because most of the time, neighboring pixels in an image show a mutual relationship that either affects or depends on another. Moreover, it’s a predictor transform, which values the current pixel from the already decoded pixels, and only the predicted pixels get encoded.
Once the prediction mode is selected, the image will be divided into several square regions containing multiple pixels in each. Then all the pixels in a particular area use the same prediction mode that has been selected.
Image Color Transformation (Decorrelation) –
This type of transformation used in lossless compression is carried out to separate the R, G and B values of each pixel. So, there would be no mixing or overlapping of the RGB values. Except for R and B, it keeps the green (G) value the same. Then, it transforms red (R) based on green, and blue (B) based on green and then based on red.
G = Same value.
R = Transformation based on green.
B = Transformation, first based on green, and then red.
Green Subtraction Transform –
This particular technique in WebP lossless compression is carried out to subtract green values from R and B values on each pixel. So, their uniqueness would remain intact.
Color Indexing Transformation –
The color indexing transform creates a set of matrix arrays and replaces the individual pixel values with them to create uniqueness in the image pixels. However, this is only done when there are not many unique pixels available. And to find out the pixel uniqueness, it checks the unique ARGB values in the image.
Color Cache Coding –
WebP lossless compression uses existing image bits to reconstruct distinct pixels. It can also be used as a local palette to match if there are no matches. This palette is continually updated to reuse new colors. As the scan continues downwards, you will see the local color cache in action. It is updated with 32 new colors each time.
LZ77 Backward Reference –
After all of the above techniques get performed, the lossless compression performs entropy coding using the LZ77 Huffman Coding.
To sum up, the lossless compression utilizes precise (exact) matching to the location data points in each place. This ensures images retain their quality but also results in larger files.
Lossy Compression
In comparison to lossless compression, the lossy compression in WebP takes an opposite approach. Where the lossless compression provides you with a big sized image without reducing its quality, the lossy compression delivers a small-sized image with a reduced quality. And uses the predictive technology for the compression that is found in the VP8 video codec. Though, the quality would always be better than JPEG and other image formats.
The techniques that get in used in the WebP Lossy Compression is as follows,
- MacroBlocking
- Prediction
- JPEGify
MacroBlocking
The same as lossless compression, the lossy compression divides an image’s part into blocks, and those blocks further include squared regions—the same as the following illustration.
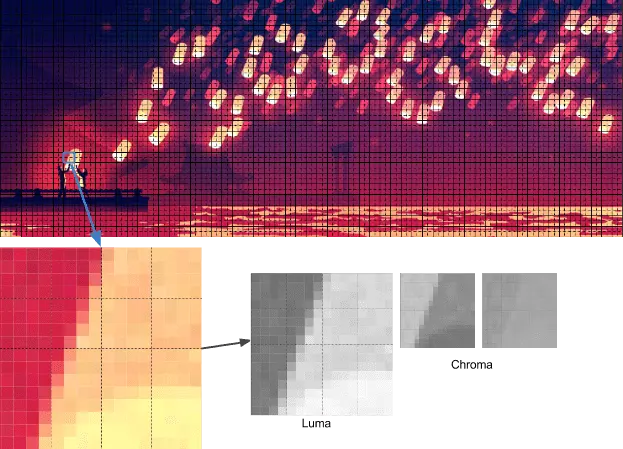
From Colt McAnlis
Each macroblock includes a single 16×16 block of luma pixels and two 8×8 blocks of chroma pixels. Once the macro blocking is done, it starts the prediction process, which is also known as filtering in simple terms.
Prediction
The application of prediction mode is made to each 4×4 sub-block of a macroblock in the image. Unlike PNG, where filtering is done per scan-line, the WebP file compression uses a block method. The filtering of macroblocks is carried out using two sets of pixels around a block that touches its boundary first horizontally, Row A, and vertically left to it, which is Column L.
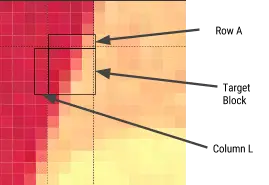
Using Row A and Column L, the encoder inserts a test block of 4×4 pixels to identify which one produces values closest to the original block. The way these test blocks get filled is called intra-prediction mode. And this intra-prediction mode has four different modes that get shared by the macroblocks,
- Horizontal Prediction (H_PRED) – Serves each line of the block to represent the left column, L.
- Vertical Prediction (V_PRED) – Fills each row of the block with a representation of the above row, A.
- DC Prediction (DC_PRED) – Fills the block with a singular value using the aggregate of the pixels.
- TrueMotion Prediction (TM_PRED) – In addition to row A and column L, TM_PRED uses the pixel P above and to the left of the block. Horizontal differences among pixels in A (starting from P) are developed using the pixels from L to start each row.
Above points from Google Developers article.
The below illustrations depicts how the prediction modes are used in WebP lossy compression.
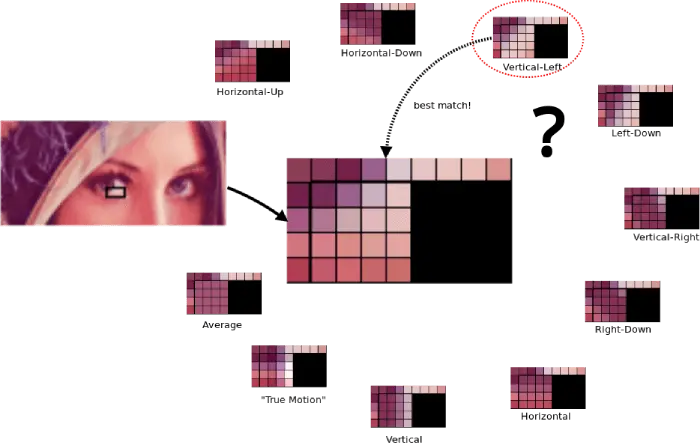
Once the filtering is done, the redundant data gets subtracted from the block, which provides us with more efficient compression. What is left is a small difference known as residual, which can be transmitted in a compressed form.
JPEGify
The final step to get our image completely compressed using the lossy compression is to JPEGify it.
A similar approach is used to encode JPEG. A DCT ( Discrete Cosine Transform that represents a measurable array of data objects in terms of a sum of cosine functions changing at various cycles) filter gets applied to the residual values for a block. The result is then quantized and entropy-coded. And finally, the quantized matrix is then re-ordered and sent to a statistical compressor.

The critical thing to notice here is that the WebP file uses block quantization and spreads bits adaptively across different image sections: fewer pieces for lowering entropy parts and higher bits for greater entropy parts. WebP lossy compression uses Arithmetic Compressor, gaining more reliable compression than the Huffman encoding used in JPEG. And finally, we receive our WebP image file that’s better in quality as well smaller in size than JPEG, PNG and GIF.
Why is WebP Image Considered as the Next-Gen Image Format?
The reason why WebP image is considered as the next-gen format is already mentioned above, but to have a clear picture, let’s discuss it a bit more in detail.
JPEG vs WebP
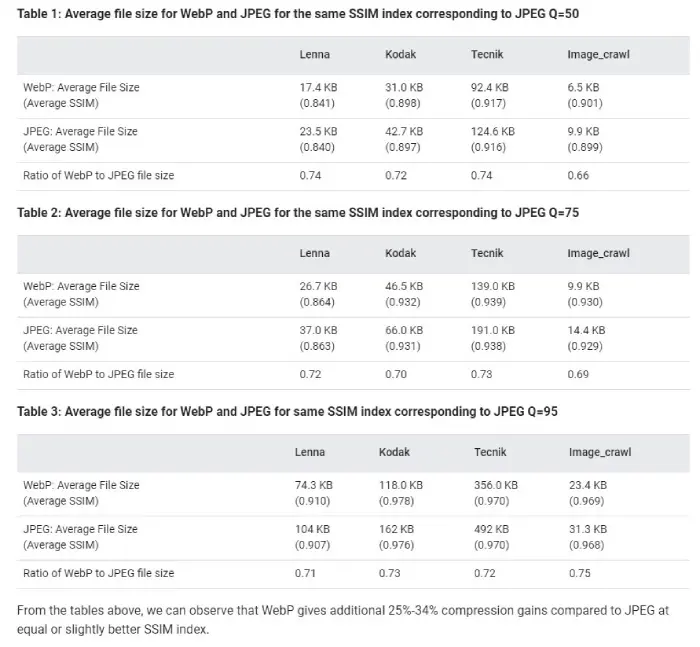
In a case study, it’s found that WebP lossy images are 25-34% smaller than JPEG images. The results came at the equivalent SSIM quality index. The study used the following list of data sets to carry out the comparison between JPEG and WebP.
- Lenna: A standard 512 x 512 pixel widely used Lena Forsén’s image that has been in use for image processing since 1973.
- Kodak: A group of 24 images from the Kodak true color image suite.
- Tecnick: 100 images from the collection are available at Tecnick.com.
- Image_crawl: To examine a considerable number of images, the experimenters assembled a random sample of PNG images from Google Image Search’s web crawl database.
Experiment 1 in the study delivered the following results,
PNG vs WebP
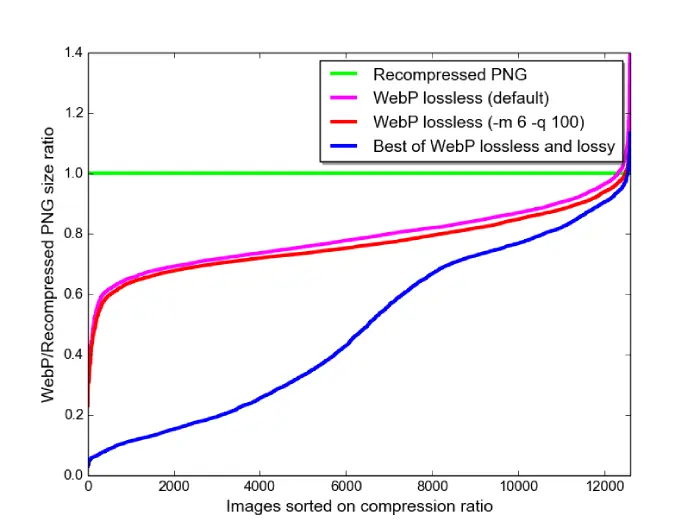
A different study on PNG and WebP found that WebP lossless images are smaller than PNG by 26%. But a file more diminutive in size is not the only thing that WebP provides. PNG images are popular because they are faster than JPEG and include transparency — a crucial segment of web designing and development.
And what makes WebP win the competition is that it also supports the transparency characteristics. Plus, it loads faster than PNG and takes less space than it. The following illustration depicts how much more effective a WebP image is than PNG.
GIF vs WebP
If you want to use animated images such as GIFs, you could also take advantage of animated WebP. A GIF supports 8-bit color and 1-bit alpha, whereas animated WebP supports 24-bit RGB color with an 8-bit alpha channel. Thus, providing a better animation quality.
GIF only supports lossless compression. But, WebP comes with both lossy and lossless compression. Moreover, a single animation can combine lossy and lossless frames. Thus making WebP’s lossy compression techniques well-suited to animated images created from real-world videos.
Another fact that makes WebP more suitable than GIFs is that it requires fewer bytes than GIFs. And when you convert GIF to lossy WebPs, it will be 64% smaller, while lossless WebPs are 19% smaller. A key thing to note when users are using mobile networks to access a particular animation.
How To Convert WebP to JPEG, GIF, and PNG?
The conversion of JPG, PNG and GIF to WebP file format is pretty simple. If you’ve got CreativeCloud’s subscription or Adobe Photoshop, you can use it to convert the JPG or PNG image into WebP. Additionally, Adobe offers powerful text-to-image tools, enabling you to generate creative visuals from textual prompts. Follow this guide from Smashing Magazine to know how you can use Adobe Photoshop to convert images to WebP.
Or, if you’re looking for a free solution, then you can use the Photopea online image editing tool to convert those images into WebP.
- First, open Photopea.com on your computer or laptop.
- Then, directly paste the image into the canvas.
- After this, go to the File menu → Export as → More → select WEBP.
For GIFs, the best solution available for free is the EZGIF.
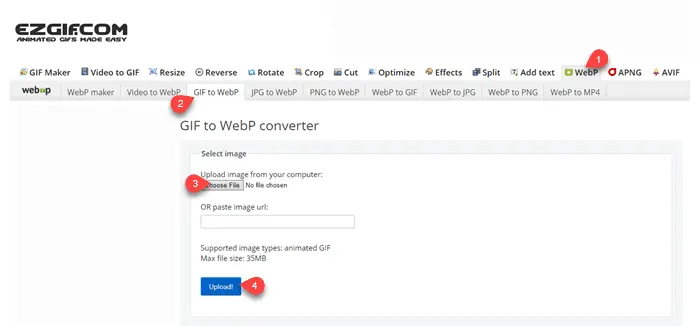
All you have to do is click the WebP menu item, then upload your GIF, and it will be converted to the WebP format.
How to Use WebP in WordPress & Divi?
In the recent 5.8 update, WordPress added support for the WebP image files. Now, as you upload other image files, you could upload the WebP image files in the media library, posts, pages and other areas. However, it’s necessary to make sure that your hosting provider provides support for WebP files. The following hosting providers offer support for WebP files,
- WP Engine’s Global Edge Security or advanced network
- SiteGround
- Hostinger
- Kinsta (On-request)
- CLOUDWAYS
- Digital Ocean
If your hosting provider isn’t from one of the above, you’ll have to use a plugin. To get the best out for your WebP images, you can follow this guide from Kinsta to use WebP in WordPress. For Divi, you could use the same guide, but if you’re looking for a tutorial specifically created for Divi, then you can follow the Elegantthemes guide on WebP. Installing your website locally on your PC for testing before going live is another option available to you with LocalbyFlywheel.
That’s it on WebP. I hope this article has helped you understand what WebP image file format is, why it’s the next-gen image format and how you can use it on WordPress. If you still have some doubts and thoughts about the WebP file or this blog post, let us know in the comments below.




Excellent article, I learned that webp supports gifs as well as jpg and png. Thank you.