To style and insert Gravity Forms in Divi isn’t a simple task. It’s a long, step-driven, and complex procedure. You have to deal with Gravity Forms functions, then Divi’s, and finally use codes to make Gravity Forms look good. For a non-techie user, it’s a nightmare. And even pro users don’t like how they use Divi Gravity Forms.
So what if you knew a way that would simplify the process to which you were used to styling Gravity Forms in Divi? And not only styling but inserting them to Divi Pages. Well, it would be amazing at the same time, liberating.
Therefore, keeping all this in mind, Divi Extended has come up with a solution. A huge leap towards styling Divi Gravity Forms. With this solution, you’d be able to change the Gravity Forms Submit button color; hide the form title, improve input fields, and a lot more. Before you know the solution, imagine what you can do with Divi and Gravity Forms together.
And after that, have yourself enjoying the designing work with Gravity Forms Styler for Divi.
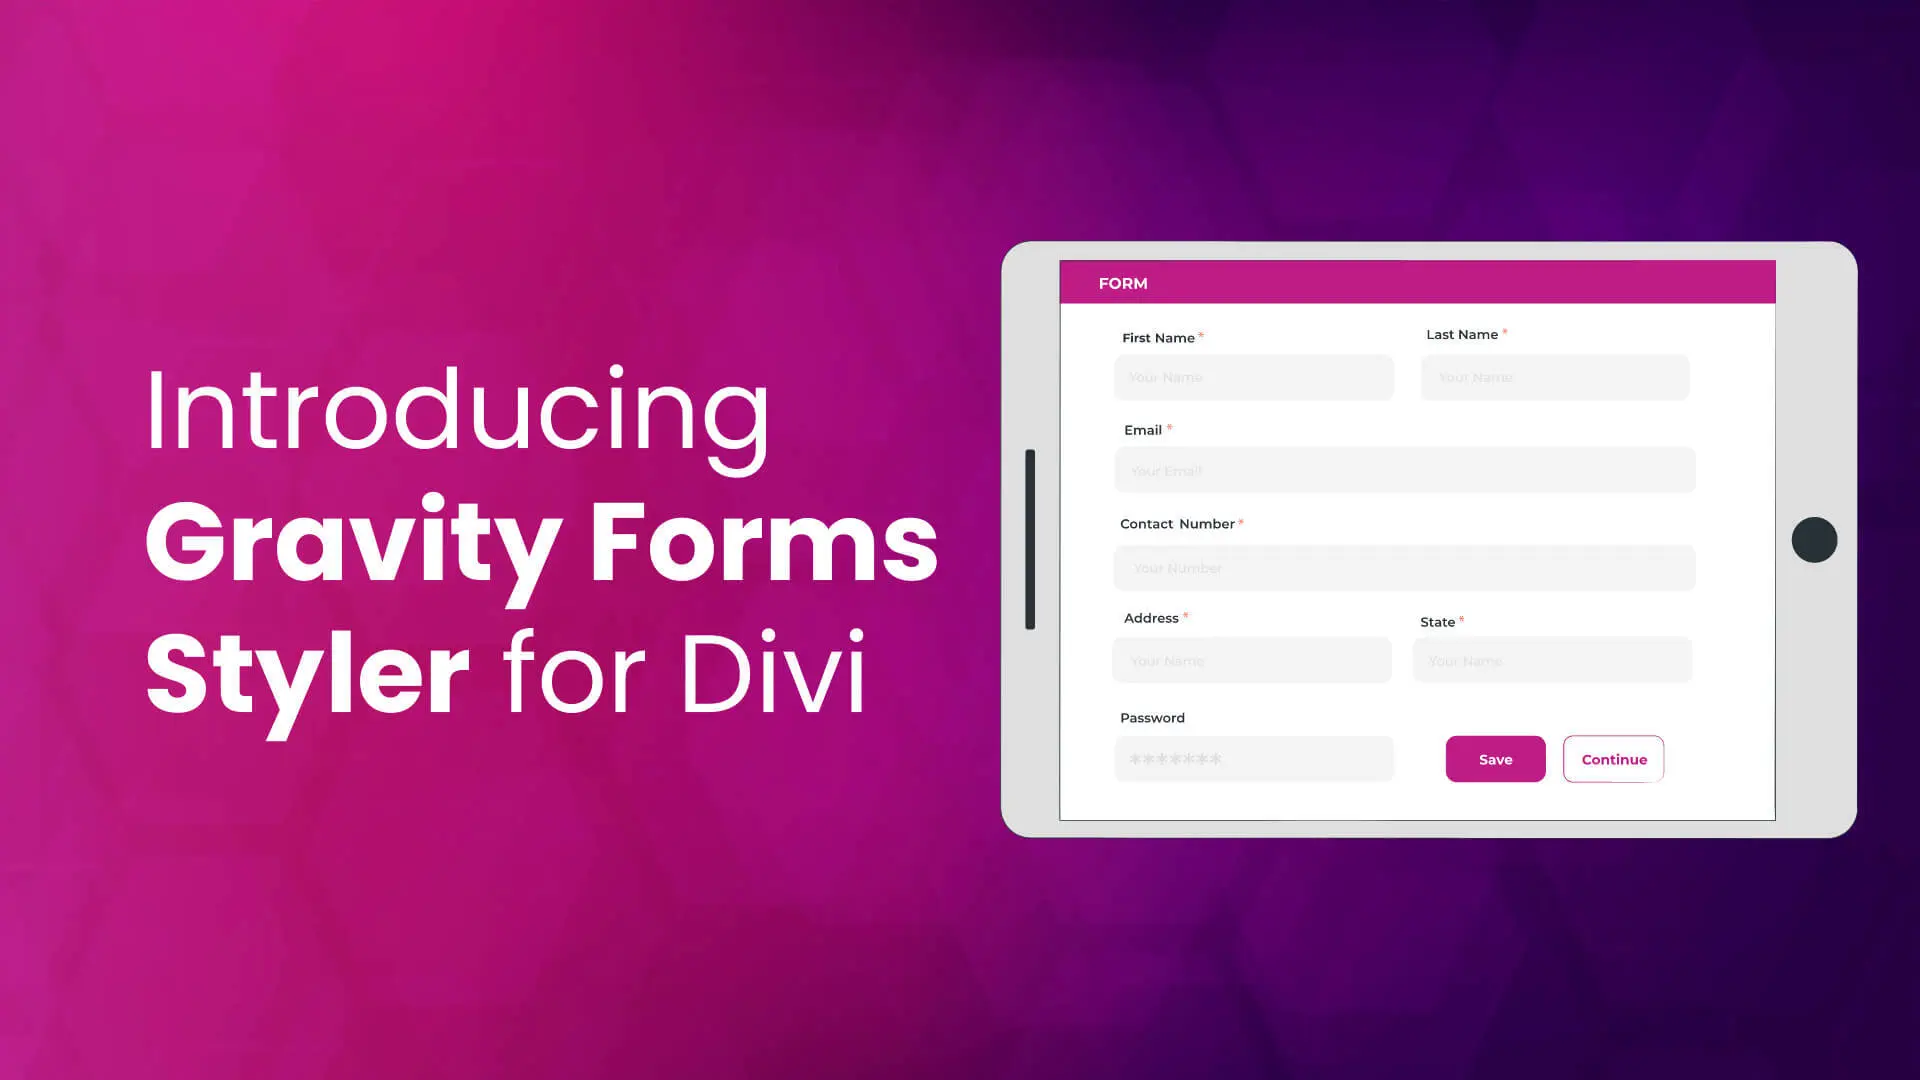
Yes, the solution is the new Gravity Forms Styler for Divi plugin, which we’ll explore in this post and see how it can help you level up your Gravity Forms in Divi — effortlessly!
What’s Inside for You?
What’s Gravity Forms Styler for Divi?
To add Gravity Forms to Divi pages, you might be using Shortcodes. And to style them, you’re probably using custom CSS. Both methods are time confusing and often don’t satisfy the users. However, Gravity Forms Styler for Divi offers intuitive controls to maximize the experience of using Gravity Forms in Divi.
It’s a premium plugin that enables you to insert Gravity Forms into Divi quickly, plus style them super easily.
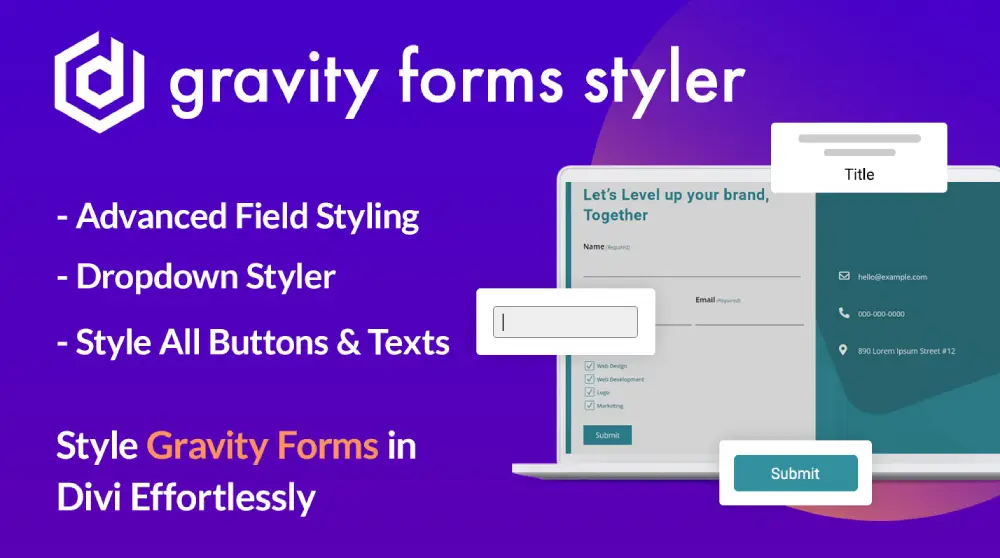
This single Gravity Forms styling plugin for Divi theme includes powerful options to style a form entirely. You don’t have to get another plugin to make your Gravity Forms look good in Divi. With this, you’ll spend less time and display beautiful forms better than before.
How Can This Gravity Forms Styling Plugin Help?
First, it’s purely made to support Divi and Gravity Forms. Its framework is wholly based on Divi. So, you won’t have trouble using it.
Second, there’s no need to find the answer to where to find gravity forms shortcode as the plugin offers an easy way to insert Gravity Forms into Divi pages.
Third, it has controls to style every part of a Gravity Form in Divi, which is easy to use and lightweight. Thus, making this plugin highly user-friendly to customize Gravity Forms without interfering with your website’s performance. And if we talk about what it can style, then this might satisfy you more than ever,
- Using this plugin, you can show the Form Title and Description. Plus, apply text customizations however needed.
- Change form elements alignment.
- Apply Ajax to make your form load faster and look visually appealing.
- You can apply Background color to the form.
- Change the text style of the form’s Placeholders, Labels, Required text, and more.
- Use Custom Styling for Fields such as Input Fields.
- Improve the look of your form’s different buttons.
In addition, you can leverage Divi Builders default options to make your Divi Gravity Forms look amazing and easy to interact with. So, users can quickly fill out all the required information. And you can generate potential leads without annoying them. Now, after looking at all of its features, you might be wondering how these features actually work.
Well, to help you process that, the following section explores how Gravity Forms Styler for Divi does everything it promises. Just follow the steps, and you’ll learn everything.
How to Use This Plugin to Style Gravity Forms in Divi?
The plugin is based on Divi and Gravity Forms. Therefore, ensure that your Divi Builder and Gravity Forms are active and ready to be used. Then follow the below steps to master Gravity Forms Styler for Divi.
Let’s get started!
Step 1 – Install and Activate Gravity Forms Styler for Divi
The installation of Gravity Forms Styler for Divi is pretty simple. All you need to do is,

- Download it from Divi Extended Store or Elegant Themes Marketplace.
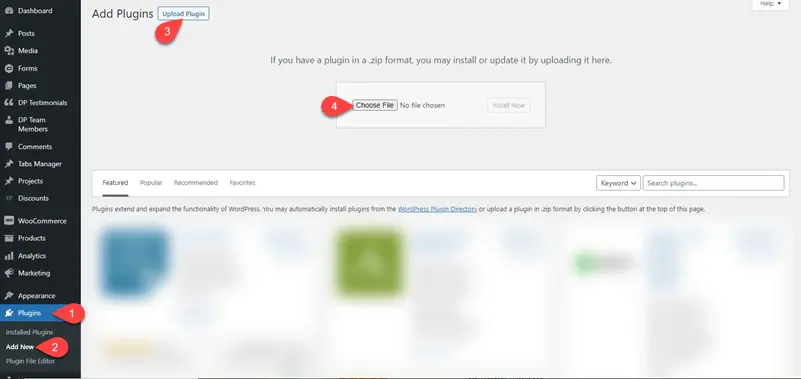
- Then, upload the Zip file to your WordPress site: Go to Plugins → Add New → Upload Plugin → click Choose File.
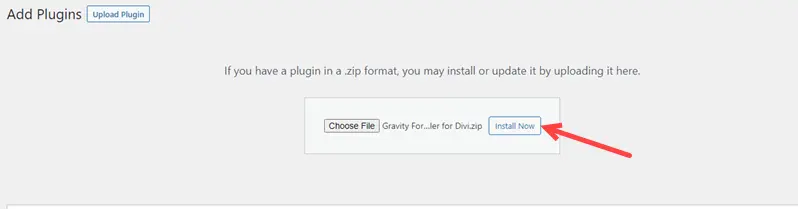
- Locate the file on your system and choose it, then click Install Now.
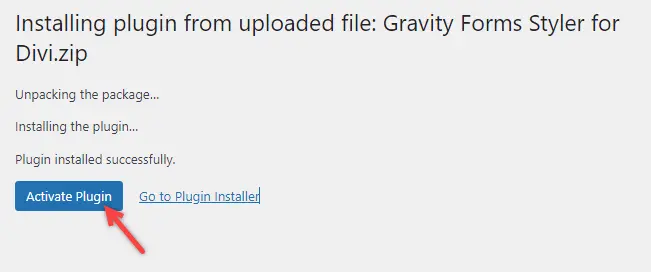
- Once the plugin is installed, click Activate Plugin.
After activating the plugin, you can move to the next step. Or refer to our docs to learn more about installing Gravity Forms Styler for Divi.
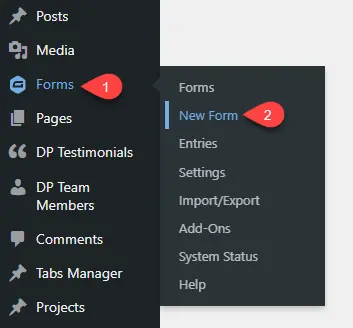
Step 2 – Create a Form Using Gravity Forms
You can skip this step if you already have a form created using Gravity Forms. Otherwise, go to Forms → click New Form.
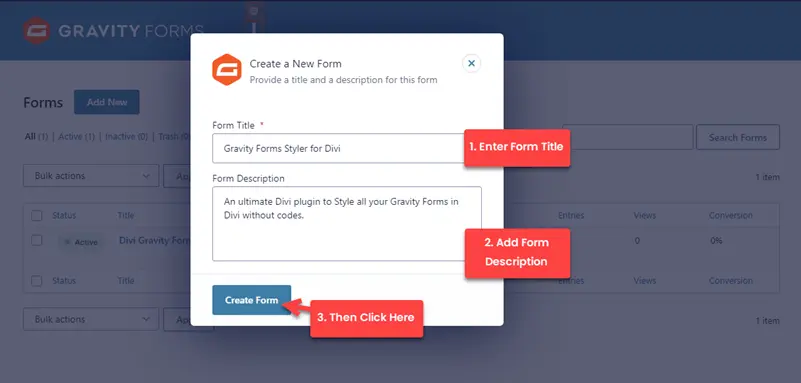
Then, add the form Title and Description. Once added, click Create Form.
This will load the form builder, where add fields by dragging and dropping them from the Add Fields panel. Then, configure fields per requirement.
After configuring the fields, you can click the Save Form button to make changes. You’ve created the form, so you can close the builder and move to the next step.
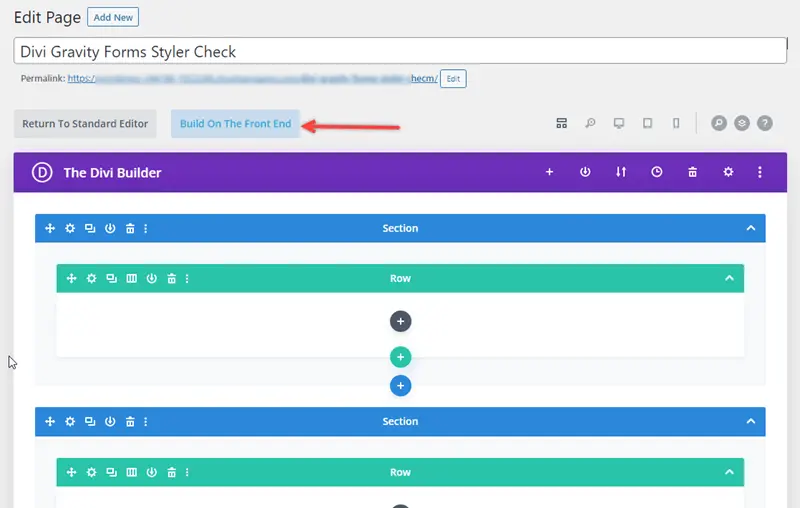
Step 3 – Add a Gravity Form to Divi Page (Without Shortcode)
To add and style Gravity Forms in Divi using the Gravity Forms Styler for Divi, you need to create a new page or edit an existing one. Ensure you do that using the Divi Builder. Then load the visual builder by clicking the Build On The Front End.
Once the visual builder has loaded, go to the section where you want to insert Gravity Forms, and search for Gravity Forms Styler. Then, insert the following module.
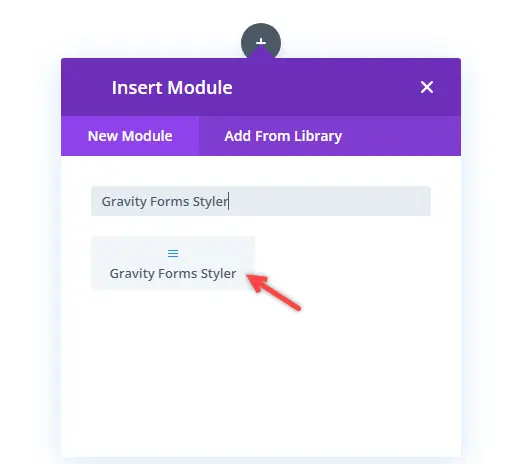
As you’ll insert the module, you get the option to insert your Gravity Forms. Simply select the one you want to display, and it will appear on the page.
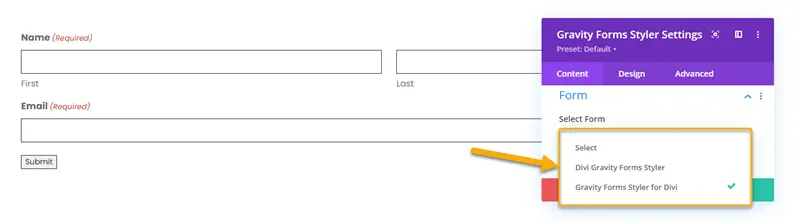
As you can see, there was no need to use a shortcode to insert Gravity Forms to the Divi page. All you have to do is, insert the module and select the form you want to display.
Step 4 – Use Divi Gravity Forms Ajax With Title and Description
After adding the form, you get the option to display the form title and description. If you need to display them, turn both Show Title and Show Description toggle to YES.
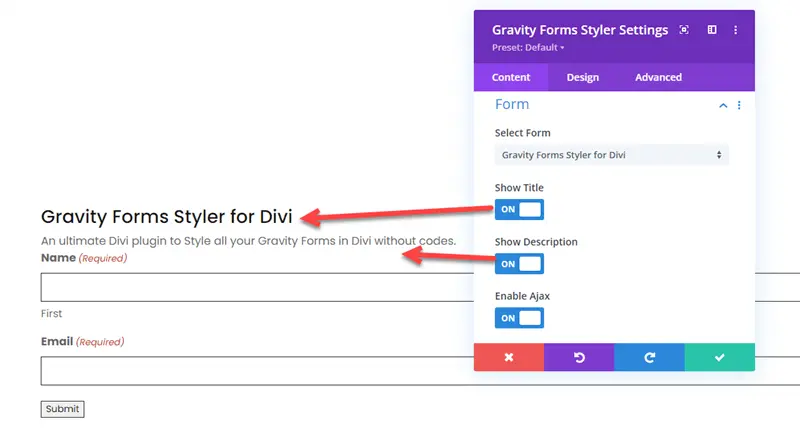
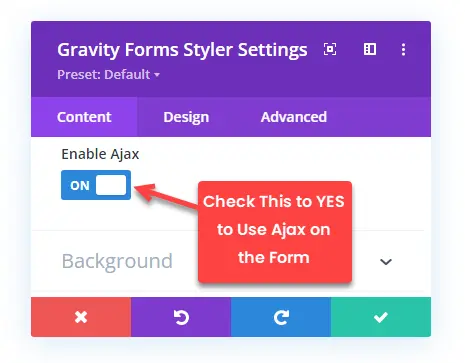
Once you do that, your form will display the Title and Description. In addition, you can apply Ajax to the form to make it work faster and better by checking Enable Ajax toggle to YES.
This will enable Ajax, and you’ll present a smooth Gravity Form for your website visitors.
Step 5 – Add Background
After Form settings in the Content tab of the module, you get the Background settings that allow you to customize the background of the form.
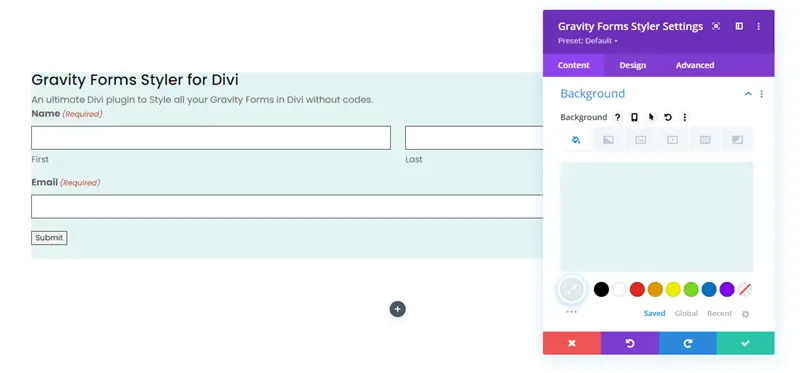
To change the form’s background, you can use Color, Gradient, Image, Video, Pattern, and Mask. According to your requirements, apply background changes, and move to the next step once made.
Step 6 – Style Gravity Forms in Divi
To style your Divi Gravity Forms, you need to open the Design tab of the module. You get the following settings to enhance your Gravity Forms look in Divi.
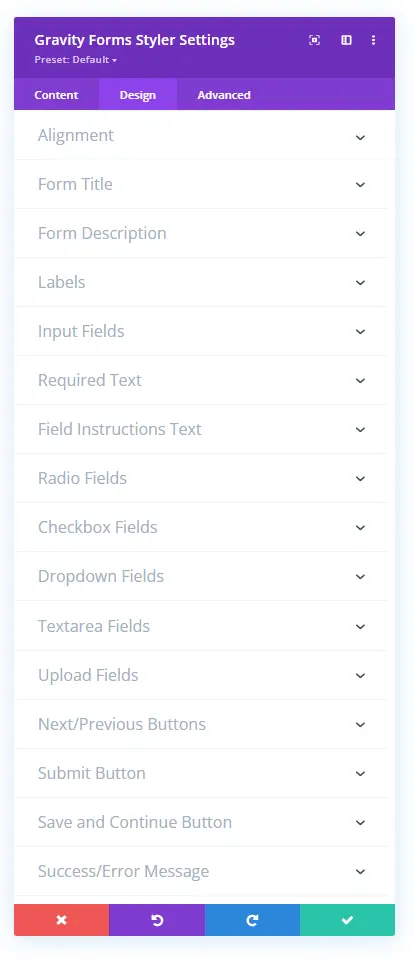
Each setting includes several options. Thus allowing you to make the most out of your Gravity Forms when it comes to styling them.
Change Text Alignment
The first setting available in the Design tab, Alignment, enables users to change Text alignment. Whether form Title, Description, Labels, Placeholders, or any other text, you can align them at a different location.
The alignment options are Left, Right, Center, and Justified. Furthermore, you can apply Text Shadow as well if needed. Using this option, you’ll apply shadow to all text. However, you can utilize the individual settings if you need to apply that to a specific text.
Text Customizations: Title, Description, and Labels
After Alignment, you get settings to apply text customizations to the Form’s Title and Description as well as fields label.
You can perform Font tweaks such as Font Family, Weight, and Style.
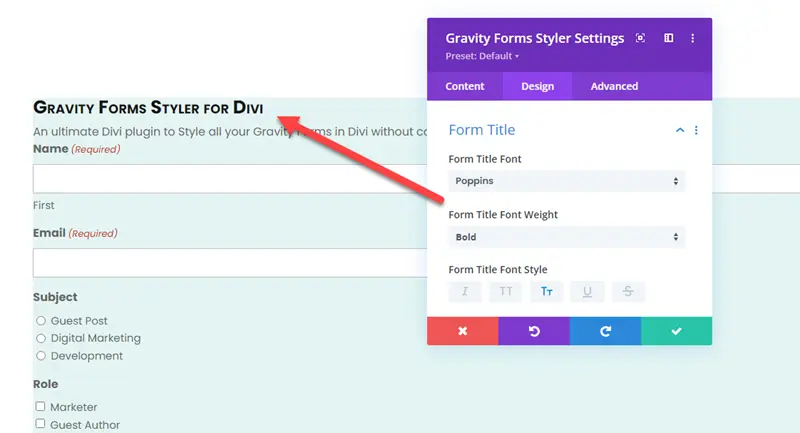
Then, you have the control to change the text’s size, color, letter spacing, line height, and shadow. Plus, add custom padding for the form’s description.
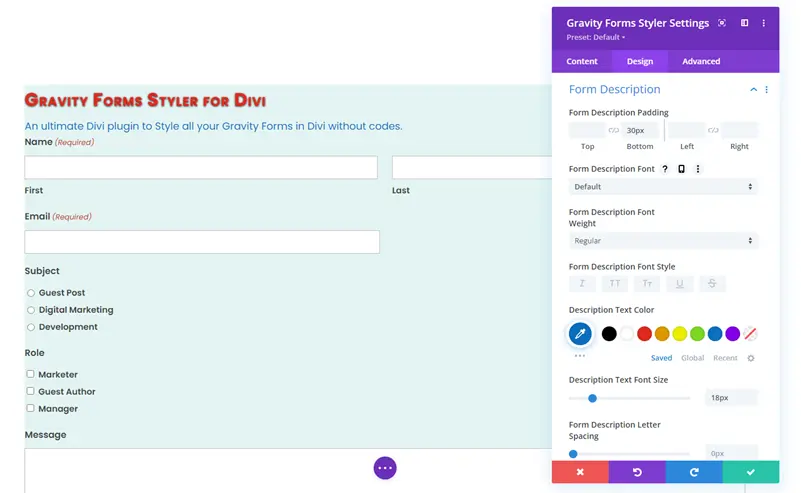
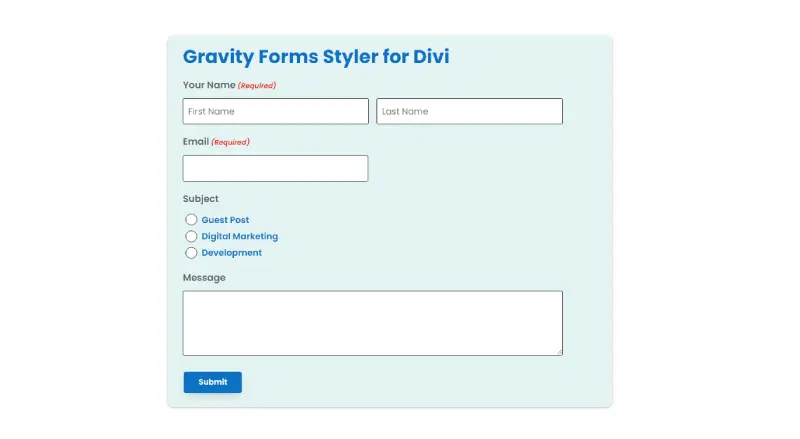
Once you apply those changes, you can have your form’s title like the above screenshot.
Styling for Input Fields
The next setting available in the Design tab to style Gravity Forms is Input Fields.
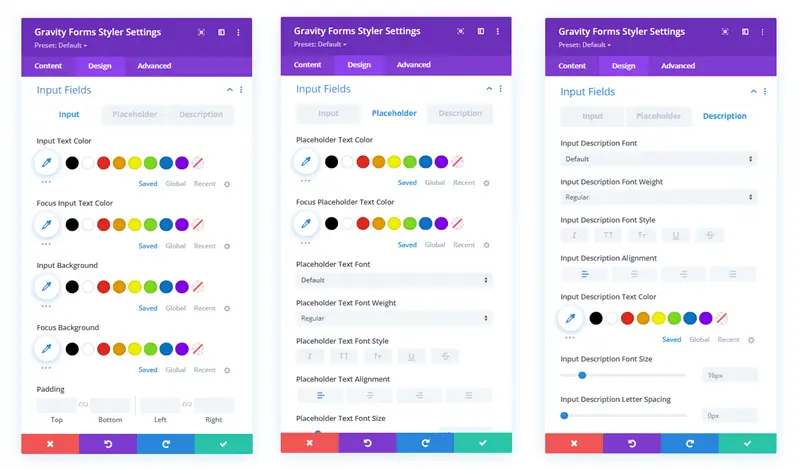
Using this, you can apply Color and Text customizations to the Input field’s Text, Placeholder, and Description. For input fields, you can also apply Padding; thus, giving you the control to make your form spacious.
After applying these customizations, the text in the input field, placeholder, and fields description would look like the above per your tweaks.
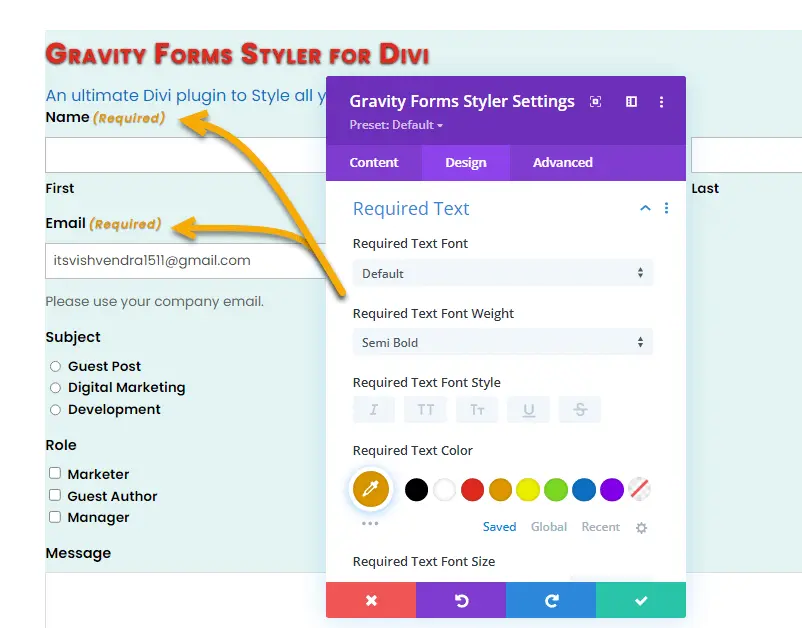
Text Customizations: Required Text and Field Instructions Text
In addition to the Form Title, Description, and Labels, you can apply text customizations to the Required and Field Instructions Text as well. The settings Required Text and Field Instructions Text provides you with the essential options to make them look good.
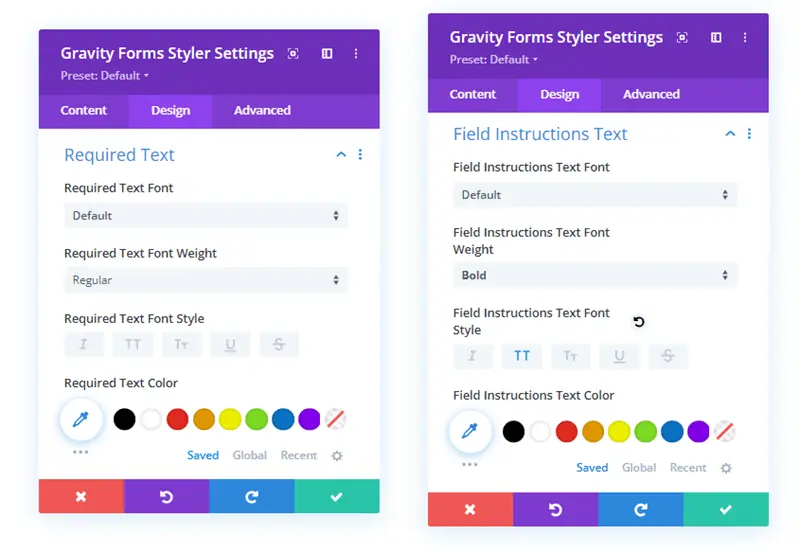
By default, the Required Text has theme styling such as Red text color. The options available in the setting let you change font family, size, color, styling, and more just as you can do with other elements.
Likewise, you can apply text customizations to the Field Instructions Text.
Custom Styling for Radio and Checkbox Fields
Radio Buttons and Checkboxes allow web owners to quickly obtain users’ information. Therefore, they need to be highly visible as well as user-friendly. Using the setting, Radio Fields, and Checkbox Fields settings, you can easily achieve that.
To access the controls, first, you need to check the Use Custom Styling as YES for both settings.
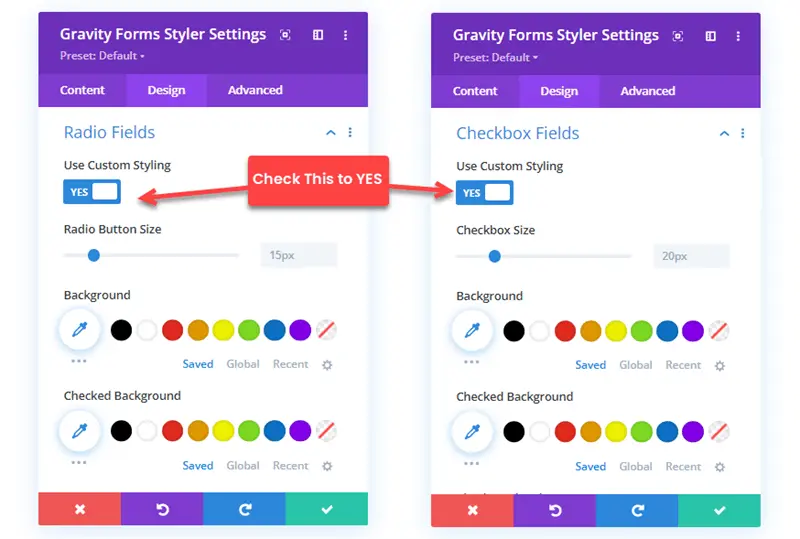
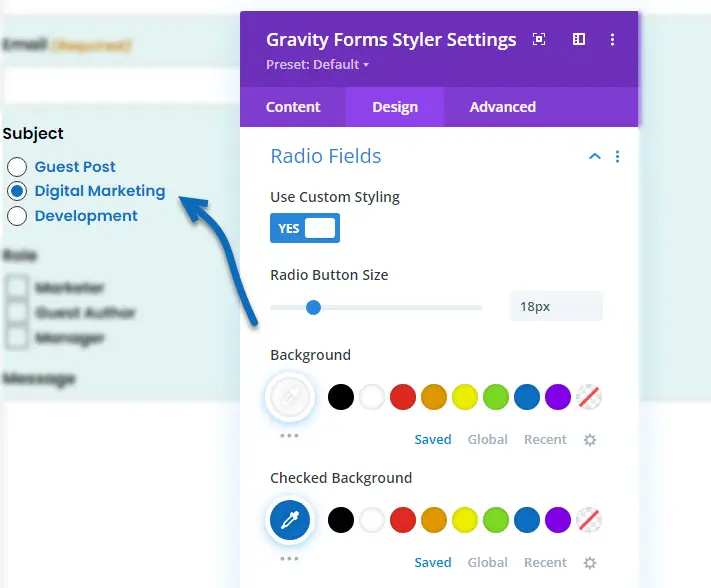
Using the Radio Fields settings, you can change Radio buttons size, the color of checked or unchecked buttons; apply text customizations, border radius, and more.
Similarly, the Checkbox Fields setting lets you customize the checkbox’s size, color for checked and unchecked boxes, and check mark. You can also apply text customizations to the options with text shadow, and border radius styling for the checkboxes.

Style Dropdown Menu
Just like Radio Buttons and Checkboxes, the Dropdown menu provides users with multiple choices to quickly submit their information. Using the Dropdown Fields settings, you can style your Divi Gravity Forms dropdown menus immensely.
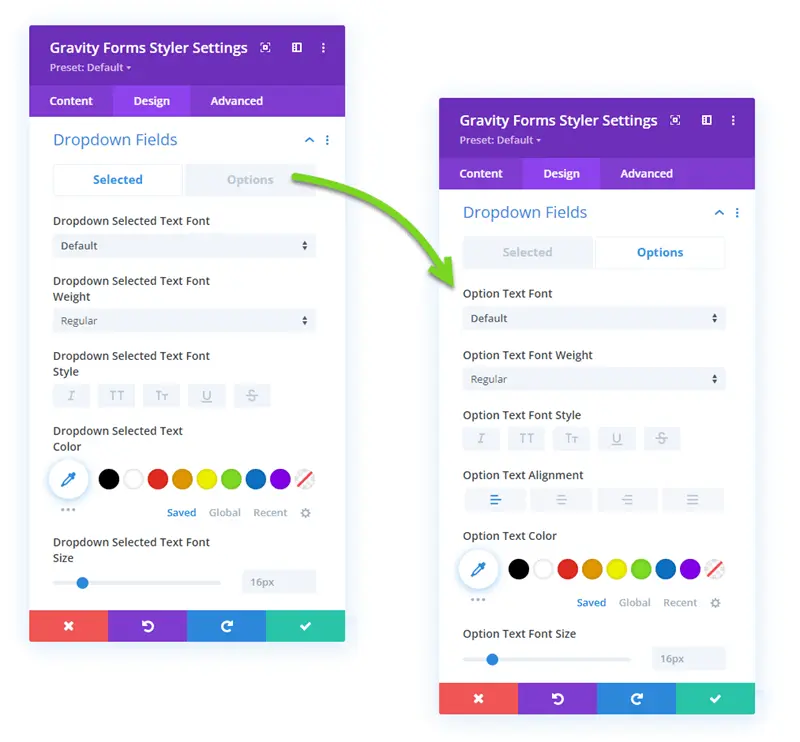
It provides you with separate customization options to enhance the dropdown menu’s Selected and Non-selected choices. To access the options, all you have to do is switch between the Selected and Options tabs. By utilizing the options, you can change dropdown menu options’ font family, size, color, and more.
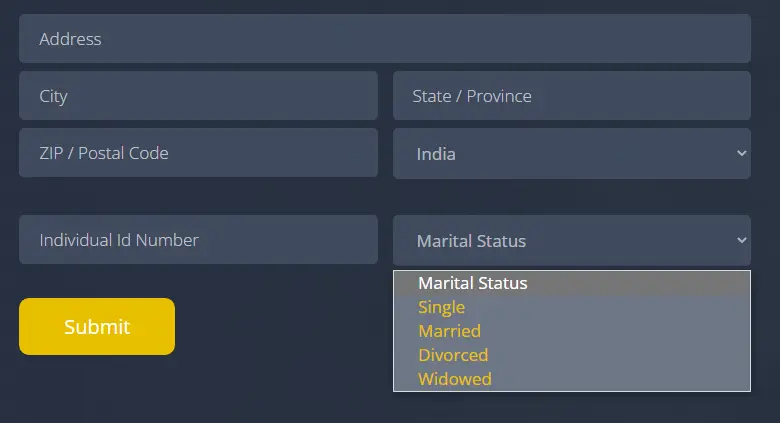
Once you’re done with the customization, you can have your dropdown menu like the above.
Change Textarea Height
If you’re using Textarea/Paragraph Text in your form, which is often the case, you can increase or decrease its height using the Textarea Fields setting.
And to achieve that, all you have to do is move the Textarea Fields Height slider from left to right. You can also directly define the value in the setting’s input field.
Style Upload Fields
Other than Radio Buttons, Checkboxes, and Dropdown Menus, what’s even faster to obtain user information are Upload Fields. Whether a job application or support form, you can ask users to upload Resume PDFs, Support Images, Receipts, and more to look into user issues easily. If you’re using the File Upload field in your Divi Gravity form, you can utilize the Upload Fields settings.
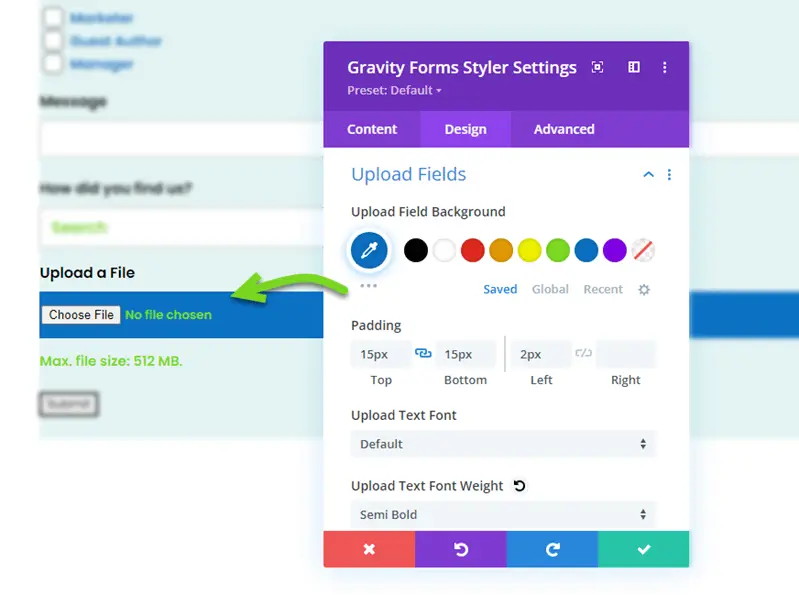
Using the options available in the settings, you can change fields’ background color and padding as well as apply text customizations.
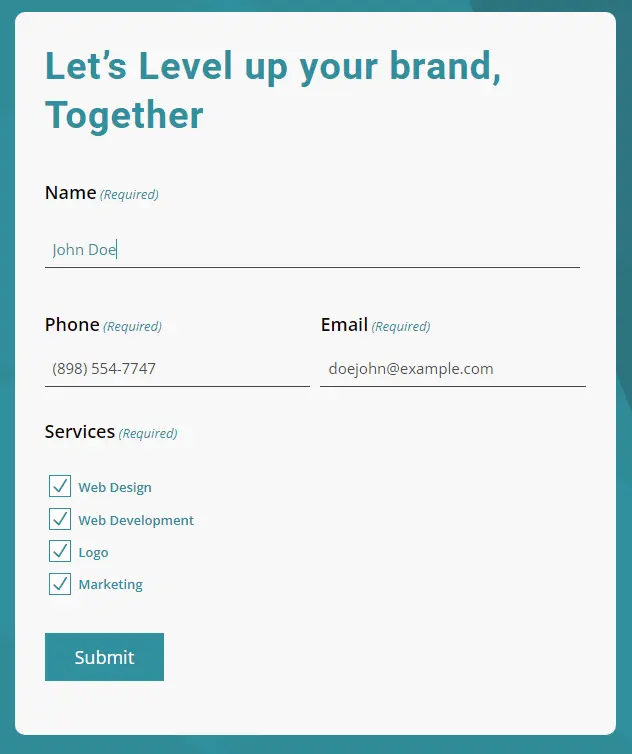
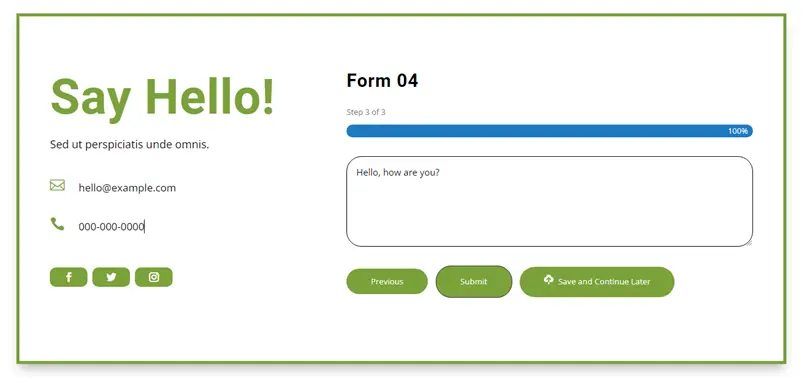
Improve Form Buttons: Submit, Next/Previous, Save and Continue
After Upload Fields, the next settings available in the Design tab are to enhance the look of your form’s different buttons. Whether Submit, Previous/Next, or Save and Continue button, you can style each button of the Gravity Forms in Divi.
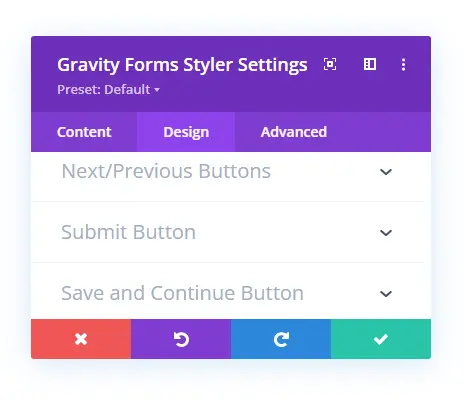
The settings are Next/Previous Buttons, Submit Button, and Save and Continue Button. Using these, you can customize form buttons’ Margin, Padding, Background, Text, Border Radius, and more.
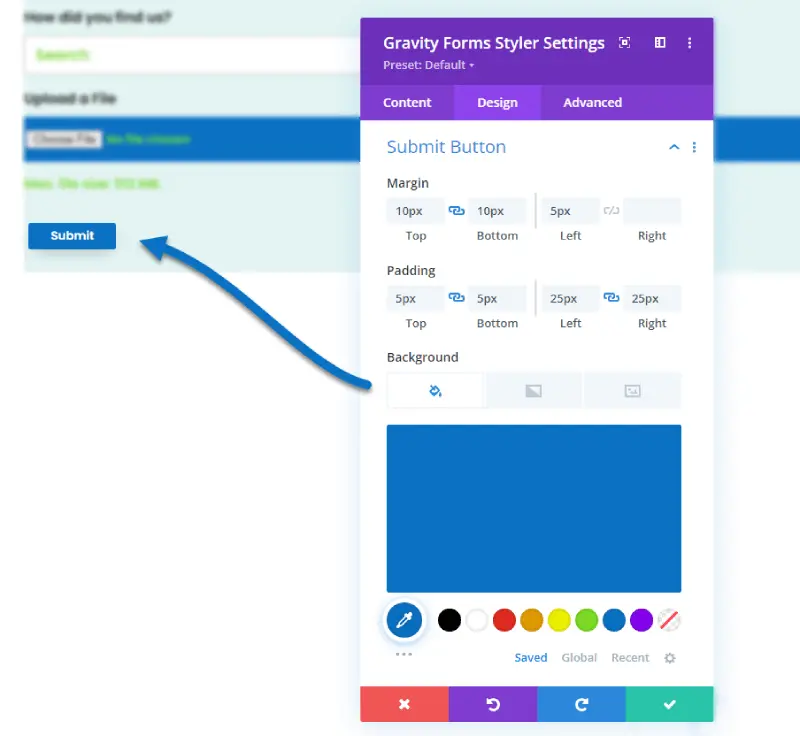
The options are easy to use; all you have to do is just define values for the Padding and Margin; choose color, image, or video for the Background. Try different text font families, style, color, size, etc. Once you’ve utilized all the options to style Gravity Forms buttons in Divi, you can have them like the following.
Beautify Message: Success and Error
Apart from filling out the form, what’s essential for the user is to know the status of their submission. What they submitted was either successful or not. If you’ve styled every element of the Gravity Forms in Divi and didn’t touch the message, you’re going to put a wrong impression. With a dull and non-styled message, you’d sadden the user’s mood instead of cheering up.
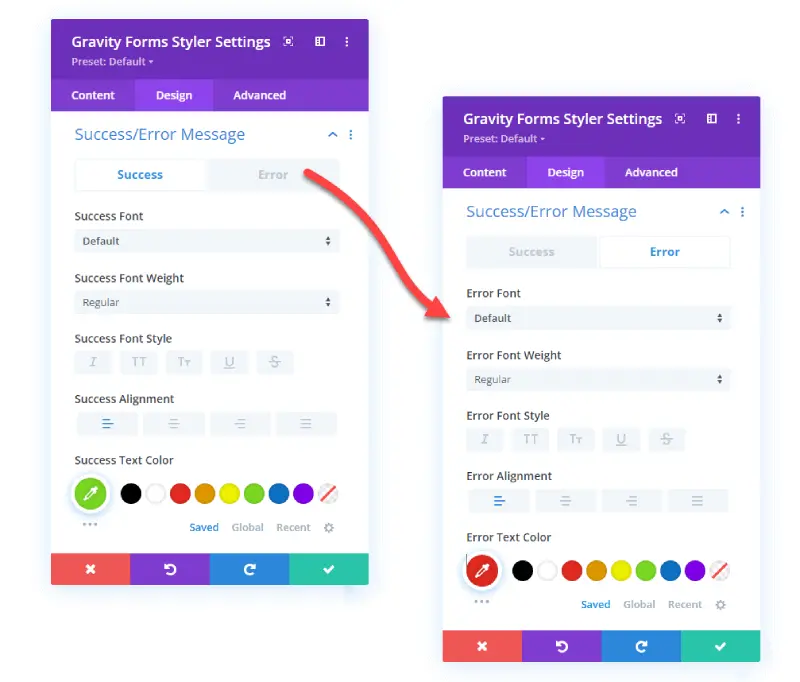
Therefore, to help you with this part of styling Gravity Forms in Divi, the styler plugin offers the Success/Error Message settings. Using the available options in the settings, you can optimize the message’s text immensely.
For example, try a different font family, color, shadow, and more. Plus, you can change the alignment to Left, Right, Center, and Justified.
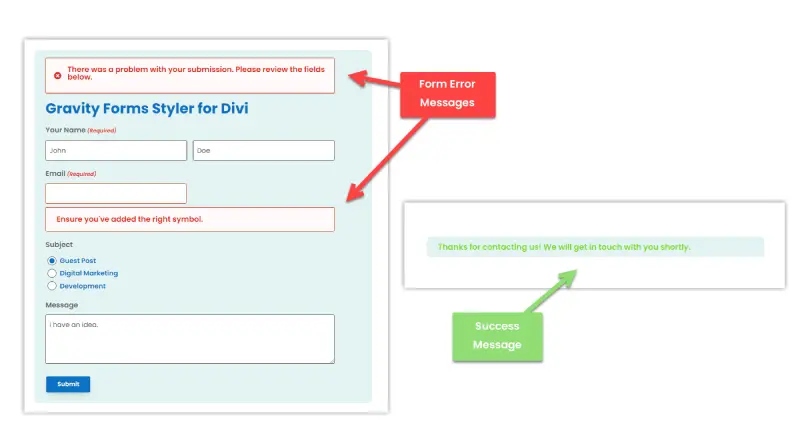
Once you’ve utilized all the options; you can have your Success or Error messages like the above to match your website’s design scheme.
That’s it; we’ve explored all the styling options in the Design tab. Nonetheless, there’s one more additional styling option available in the Spacing settings, which is Fieldset Padding.
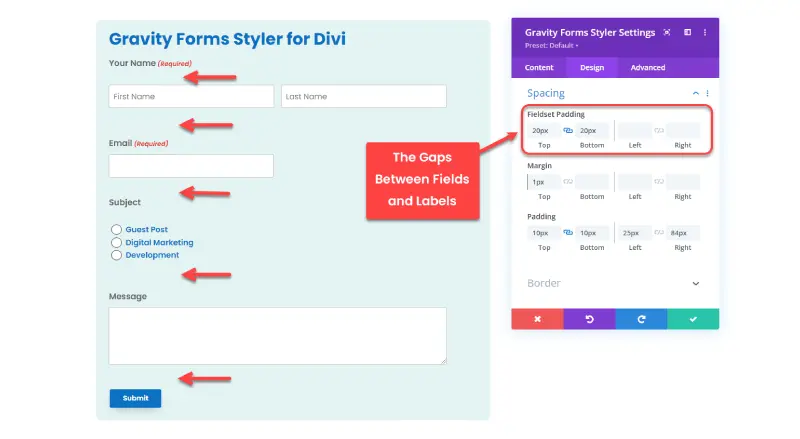
It allows you to add padding space between Label and Field. If you want to make your form spacious, where fields and labels aren’t closely attached, you can utilize this option. Moreover, you can leverage Divi Builder’s default options to make the form more stylish and engaging like the following.
Where to Get Gravity Forms Styler for Divi?
To help our customers make the most of the plugin at their convenience, we have launched Gravity Styler for Divi on both Divi Extended and Elegant Themes Marketplace.
You’ll get the same plugin with all its features on both platforms. Plus, additional benefits such as,
- Frequent Updates: To improve the plugin’s existing features, add new options, and fix bugs and errors, if any.
- Dedicated Support: You can reach out to us 24×7 no matter what issue you’re facing. Our support team will be more than happy to assist you.
- Free Layouts: To help you get started quickly on styling Gravity Forms in Divi, we’ve built styled Divi Gravity Forms layouts.
Summing Up
To style Gravity Forms in Divi, there’s no better option than Gravity Forms Styler for Divi. It’s easy to use, fast, provides loads of styling options, plus you get pre-built layouts, updates and dedicated support. Using this plugin, you’ll save time and boost your styling skills for Divi Gravity Forms. Furthermore, you can quickly add your form anywhere on the page without using Shortcodes.
It’s an amazing and liberating solution you shouldn’t miss. Get it today, and let’s how was your experience using it.


0 Comments