
In this blog post, we’re going to discuss about Advanced Flip Box module’s layout 1 and its features. Plus, we will also create some awesome Divi flip boxes using the same Divi blurb layout of this new module of Divi Blurb Extended plugin.
Advanced Flip Box: Layout 1 and its all features
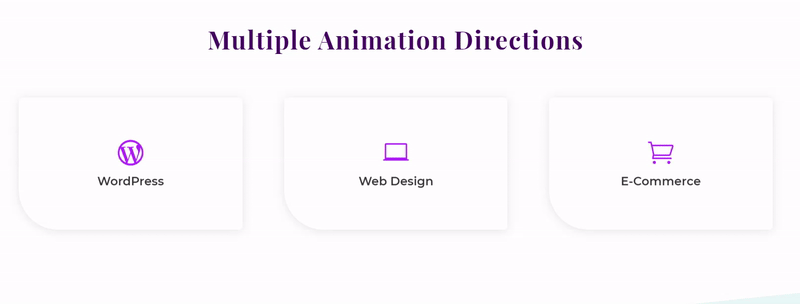
In the last post, we discussed that layout 1 of Advanced Flip Box module allows user to create stylish Divi flip boxes that can animate in four directions: Top, Bottom, Left, and Right. In addition to the flip directions, user can also customize the background with color, image or gradient. Just like the below Divi blurb examples.
Similarly, we will create awesome blurb boxes in this blog post using every option. So, you can use new Advanced Flip Box module effectively while creating your own blurb boxes.
Step 1: Some requirements
Before you start making blurb boxes, make sure you’ve updated the Divi Blurb Extended plugin and Divi theme. In most cases, this new module will work in earlier version of Divi theme. But for best practices, try to update your Divi theme to Divi 4.0.
Step 2:
Select your page where you want to create blurb boxes. And go to the Front End builder for engaging user experience while creating blurb boxes using Advanced Flip Box module.
Step 3:
First, insert a regular section, then choose row with 3 columns. After adding the row section, you’ll get insert module pop up. And from this setting, add Advanced Flip Box module, you’ll get it in 2nd column of 1st row of Divi module settings.
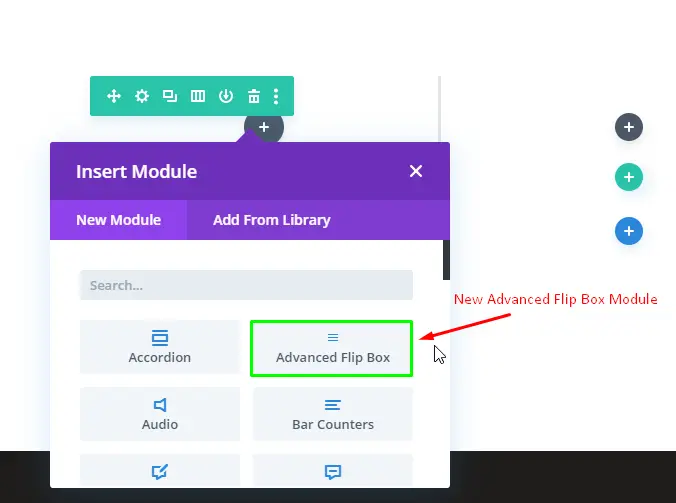
After adding the new Advanced Flip Box module, we will get Advanced Flip Box settings.
Step 4: More on Advanced Flip Box settings
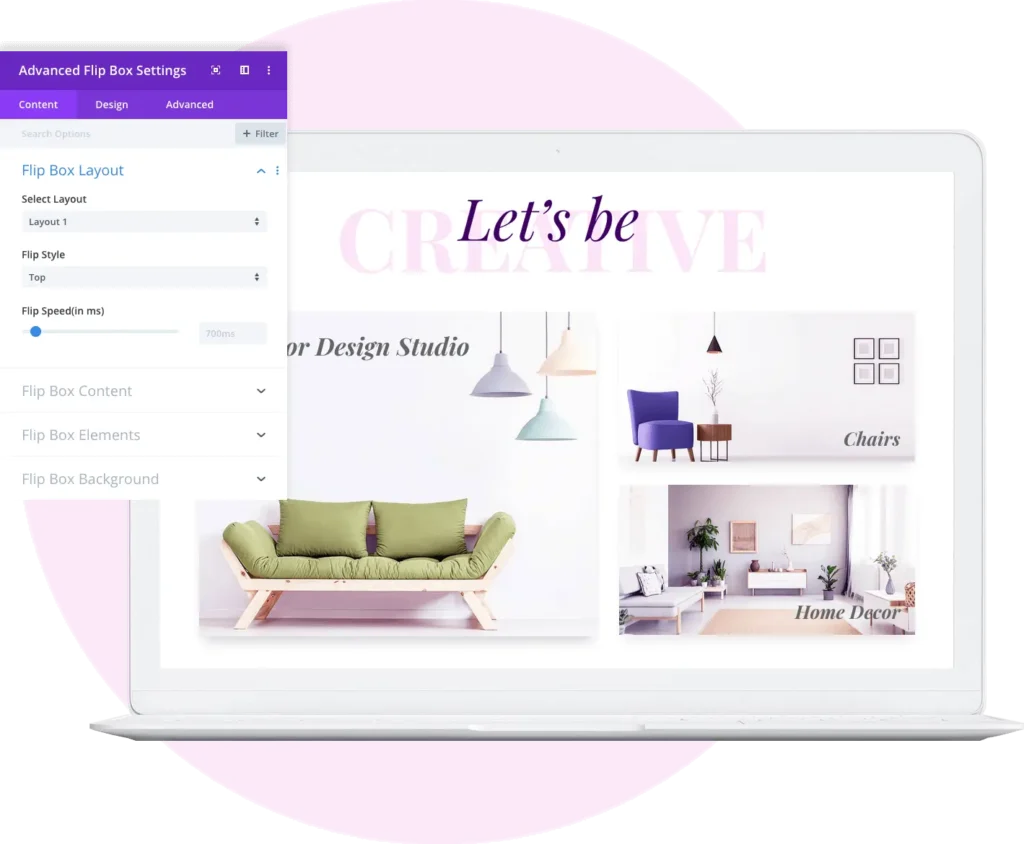
Select Layout: layout 1
Flip Direction: Top
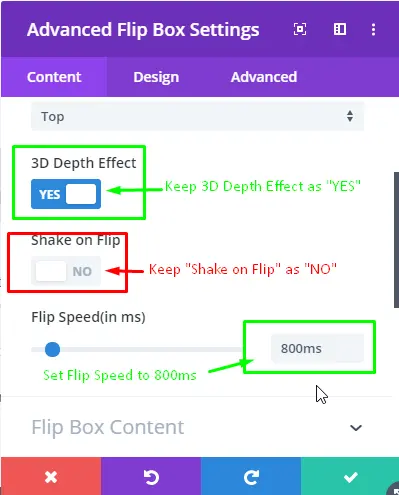
Keep 3D Depth Effect as “Yes” for 3D visual representation of the Divi flip box. And for Brandishing our blurb box we can check “Shake on flip” to Yes but in this case leave it untouched. This option helps Flip Box swing back and forth after the flip.
Flip Speed: The speed limit for flipping a blurb box is unto 10000 ms. In our case, we will set it 800 ms. And make sure you’ve not checked the “Shake on Flip” option.
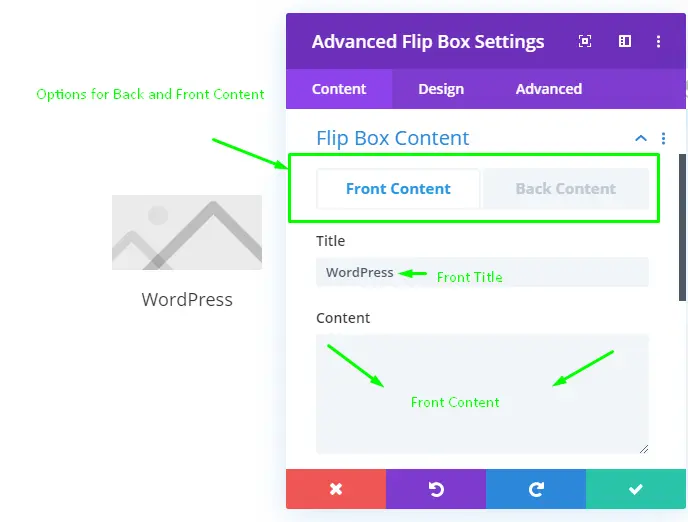
Flip Box Content
Here, we have two options. One for Front content and one for Back Content. Give your Flip Box Front title and Content (if needed).
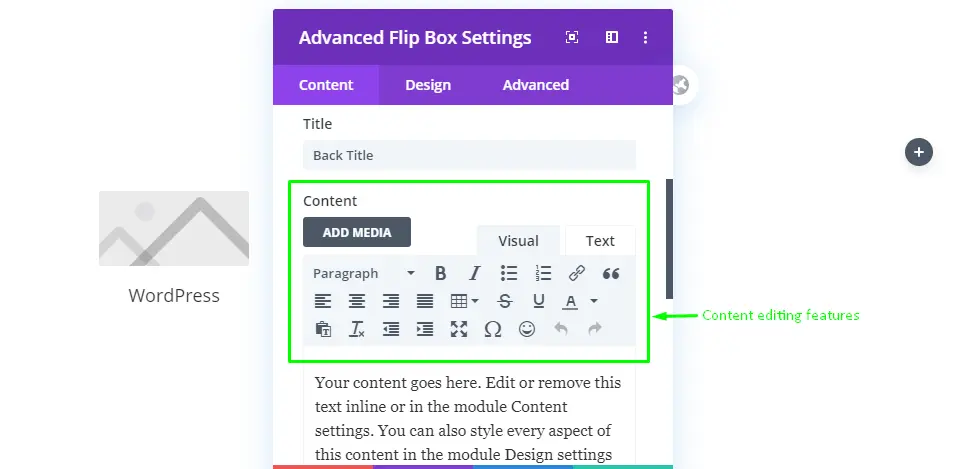
In Back content settings, we get extra customization. Just like the blog editor.
Flip Box Element Settings
Again we get two options. For both Front and Back side of the Flip Box.
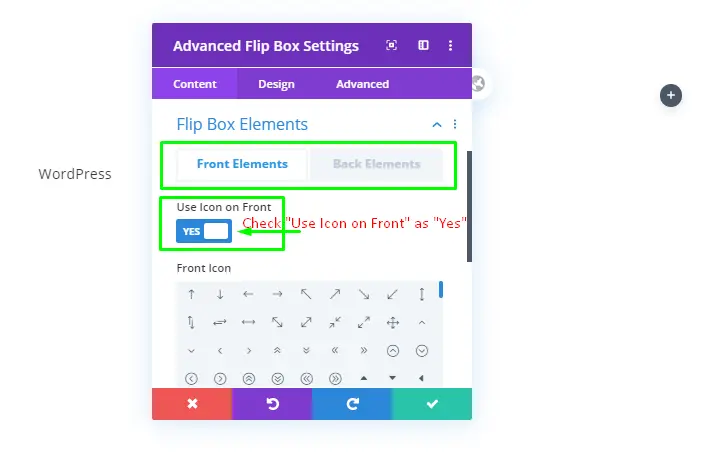
Here we can choose either Icon or Image. Check “Use Icon on Front” option. Same for the Back Elements settings.
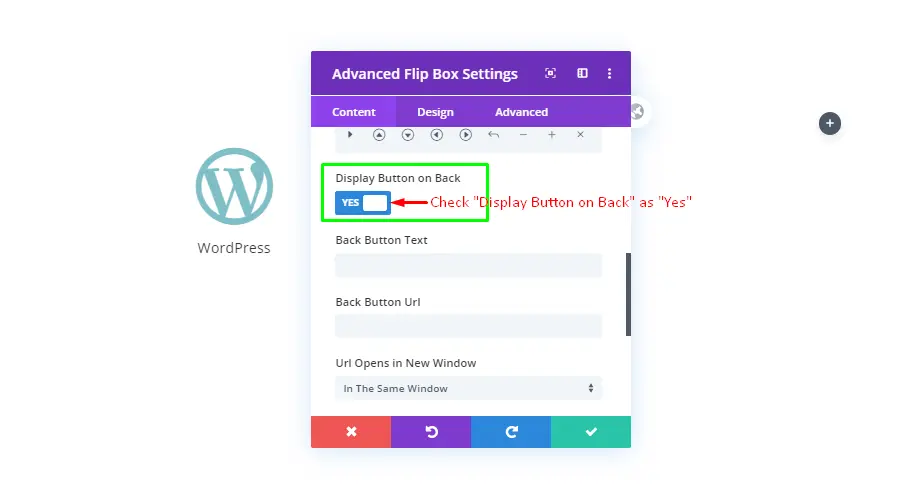
In Back Elements settings, check on Display Button on Back and fill up the required details.
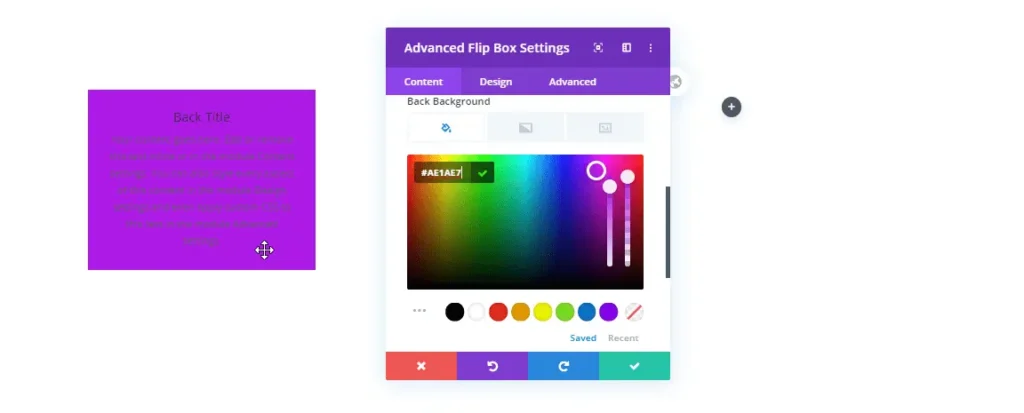
Divi Flip Box Background
Leave front background empty. And for back side choose color code: #AE1AE7
Leave link, Background and Admin label settings untouched and move to the Design sub settings.
Step 5: Design setting of Advanced Flip Box module
Front Image/Icon Style
Set Icon color to #AE1AF7. And Top as the Image/Icon placement.
Check Icon Font size and set it to 52px. Leave Style Icon untouched. Because it will place the icon in three styles: Square, Circle and Hexagon.
Back Image or Icon Style
Keep placement Top and choose color code #FFFFFF. Check “Use Icon Font Size” and set it to 40px.
Leave Style Icon untouched.
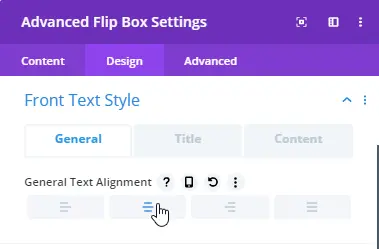
Front Text Style
General = Center
Title Front Text Style
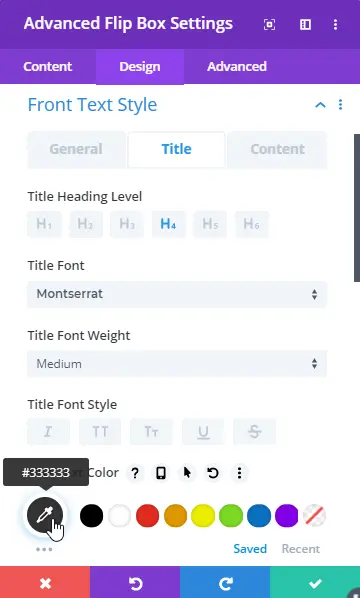
Set Title Heading level = H4
Title Font= Montserrat
Leave Title Font Style untouched
Text Color = #333333
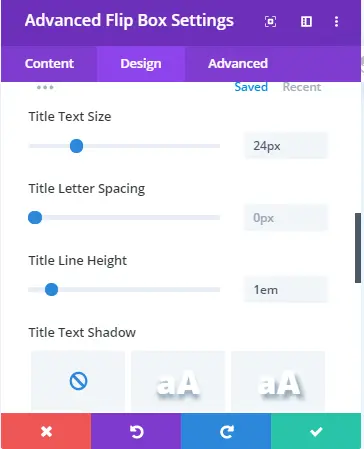
Set Title Text Size= 24px
Title Letter Spacing = 0px
And Title Line Height = 1em. Leave Title text shadow untouched.
Title Content Style = None
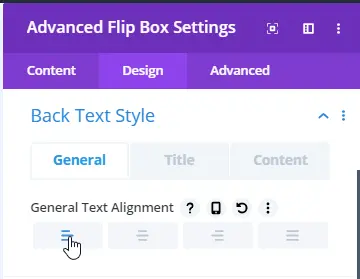
Back Text Style
General Text Alignment = Left
Title
Heading Level = H4
Title Font and Weight = Montserrat, Medium
Title Text Color = #FFFFFF
Text Size = 16px
Title letter Spacing = 0px
Title Line Height = 1em
Content Back Text Style
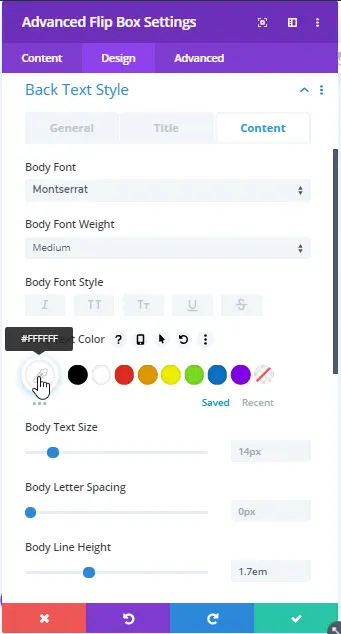
Body Font and Weight = Montserrat, Medium
Body Text Color = #FFFFFF
Text Size = 14px
Letter Spacing = 0px
Body Line Height = 1.7em
Step 6: Back Button Style
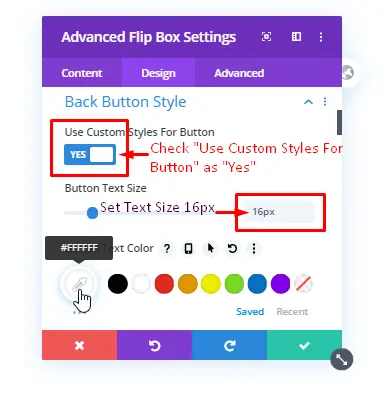
Check “Use Custom Styles For Button” as “Yes”.
Button Text Size and Color = 16px and #FFFFFF
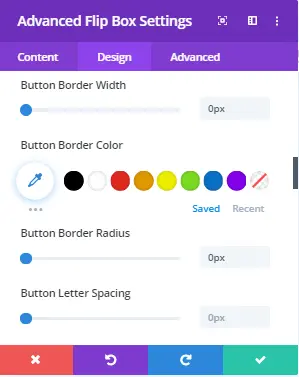
Set Border Width and Radius as 0px.
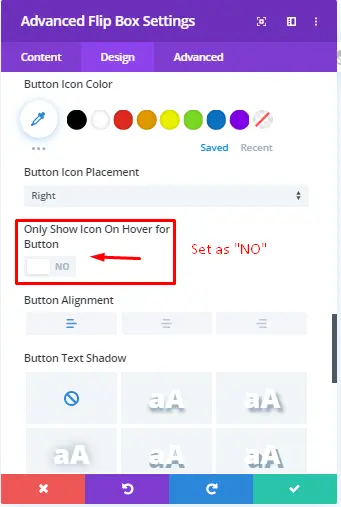
Use button font as Montserrat and Font weight as medium. Don’t forget to check “Show Button Icon” as Yes, and unchecked the “Only Show Icon on Hover For Button”.
Set Button Icon Placement “Right” and Alignment “Left.”
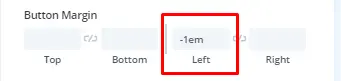
Button Margin Left = -1em
Step 7: Front Box Style
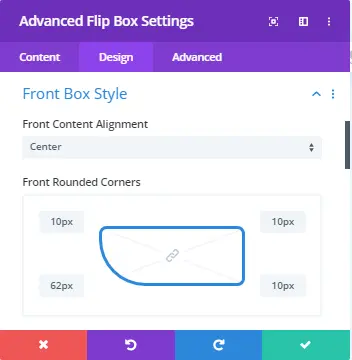
Front Content Alignment = Center
Front Rounded Corners = 10px for Top Left, Right and Bottom Right Corners. And 62px for Bottom left corner.
Front Border Styles = Front Border Width with 26px
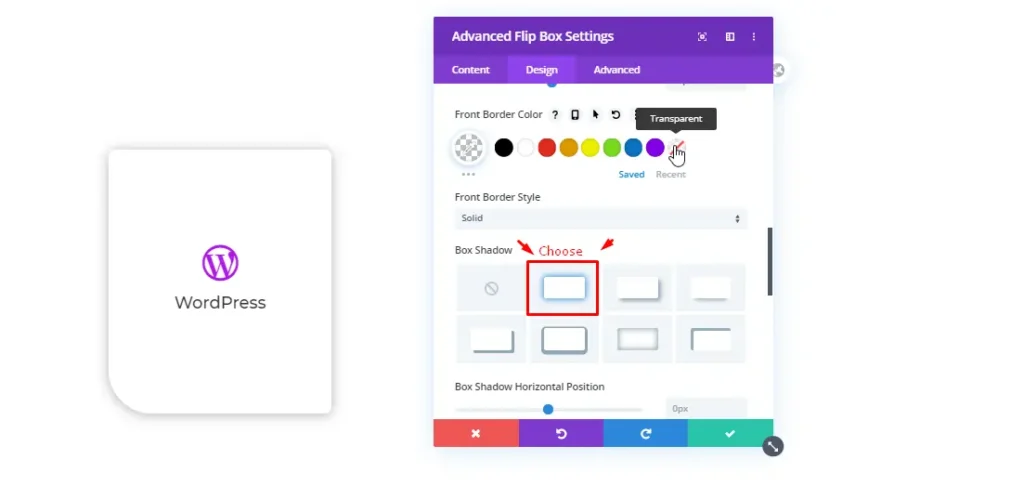
Border Color = Transparent
Border Style = Solid
Box Shadow = Choose 2nd option
Step 8: Front Box Style
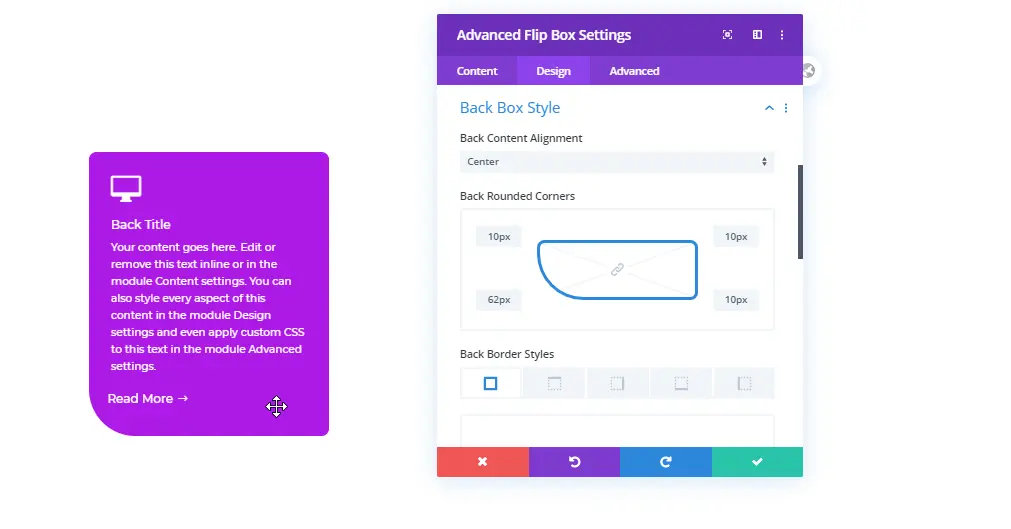
Back Content Alignment = Center
Back Rounded Corners = 10px for Top Left, Right and Bottom Right Corners. And 62px for Bottom left corner.
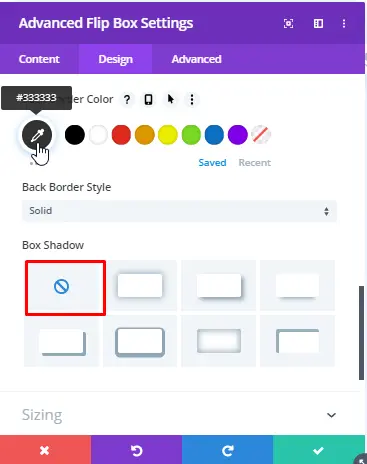
Border Color = #333333
Back Border Style = Solid
Box Shadow = None
Step 9: Sizing and final touch
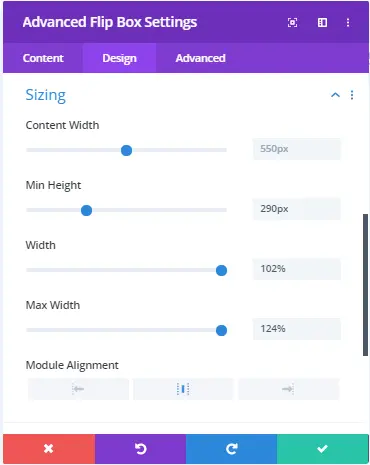
Content width = 550px
Min Height = 290px
Width = 102%
Max Width = 124%
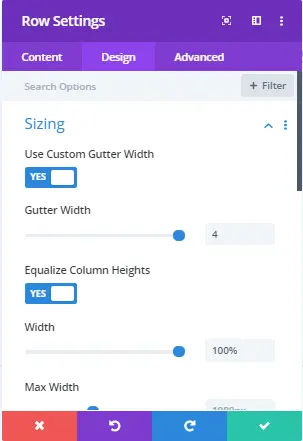
Now, after following all these steps. Go to Row section settings. And in Design menu, select sizing. Check ” Use Custom Gutter Width” as “Yes”. In addition to this step, check “Equalize Column Heights” as “Yes”, too.
Save settings, and congratulate yourself because you’ve successfully created a new and beautiful blurb box using all new Advanced Flip Box module.
If you haven’t purchased the Divi Blurb Extended plugin, then do it now because it’s so easy to create Divi blurbs with this plugin.


0 Comments