
If you have a WordPress website built using the Divi theme, and now you’re planning to use WooCommerce to handle all eCommerce processes, you’ve made the perfect choice. WordPress, Divi, and Woo together provide you with extensive features that make all the digital shop-related actions and designing web elements possible.
One of those elements is the WooCommerce Add to Cart button.
When you create an eCommerce store using WooCommerce, by default, it adds the Add to Cart button. However, while designing the product pages and archive pages using Divi, you need to do that manually.
But what is Add to Cart, and how can it help you maximize your profits and the performance of your store? Let’s see that in the following section, and after that, we’ll look at how we can add it in Divi-powered product pages.
What is the Add to Cart Button?
If you are displaying products on your eCommerce store and want the visitors to purchase them, how are you going to do that?
How are you going to point out to them that this particular product is buyable?
Well, you’ll add a copy reflecting this idea and an element that allows it, and that element is Add to Cart. Just like a CTA, an Add to Cart button allows your customers to put their products in the cart and later purchase them.
The journey flows through awareness → adding product to the cart → reviewing the cart → checkout = purchase done.
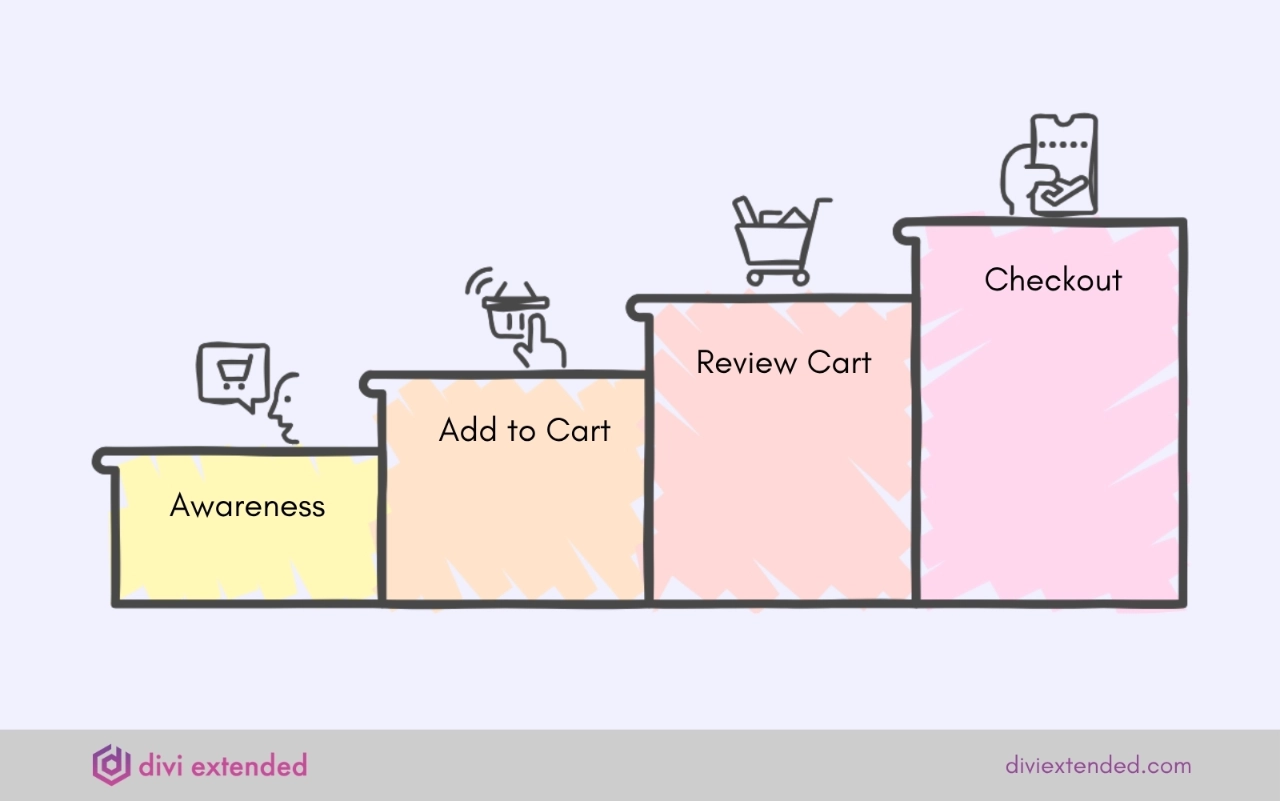
Unlike the traditional Buy Now button, the Add to Cart button gives users the opportunity to buy multiple items together.
It’s just like going to a supermarket, exploring different products, adding them to the cart, and finally paying the amount through a single billing at the checkout desk.
On a Divi Woocommerce store, you can use an Add to Cart button in the same way, and for different locations. We’ll discuss that later in this article.
Benefits of Adding the WooCommerce Add to Cart Button
In addition to giving customers an easy way to purchase a product, an Add to Cart button offers the following benefits:
- Higher conversion
- Creates ownership
- Invokes urgency
- Improved upselling and cross-selling opportunities
- Higher order value due to multiple items in the cart
| Benefit Type | Customer Impact | Business Impact |
| User Experience | Easier, more flexible shopping | Higher satisfaction, repeat business |
| Conversion | Easier to proceed to purchase | Increased sales, higher AOV |
| Data Insights | — | Better inventory, pricing, and marketing |
| Upselling/Cross-selling | — | More revenue opportunities |
| Cart Recovery | — | Recover abandoned sales |
| Operational Efficiency | Faster checkout | Reduced manual work, cost savings |
With all these benefits, it’s a sure sign that if you’re managing an eCommerce store, you should utilize the Add to Cart button alone or alongside the Buy Now button.
How to Use the Divi Add to Cart Button on Product Pages
If you’re creating your WooCommerce product pages using the Divi theme, then to add a WooCommerce add to cart button, you can use the Divi WooCommerce Product Add to Cart module.
What is the Divi WooCommerce Product Add to Cart Module?
It’s a native Divi WooCommerce module that provides you with the possibility to add an Add to Cart button easily. Previously, the Divi Shop module had this functionality to add an Add to Cart button.
But now, you get a dedicated module: Divi WooCommerce Product Add to Cart, which you simply have to search for and insert on the page to display an Add to Cart button.

When you insert this Woo Product Add to Cart module, you get:
- Quantity selector
- Product stock info
- Color and size selector
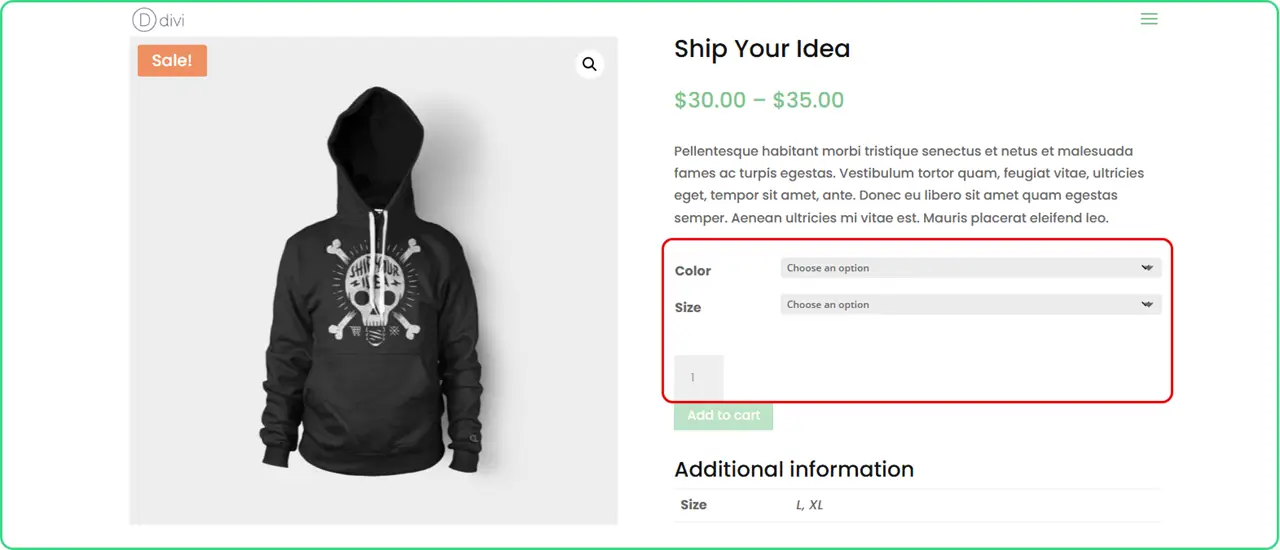
This makes the Divi WooCommerce Add to Cart button more than just a button. It’s a complete, highly interactive element that improves user interaction. Furthermore, if you’re creating a global product page template, then it allows you to use it for current products, Latest products, and for a single product.
Follow the steps below to see how it works and how you can utilize it effectively.
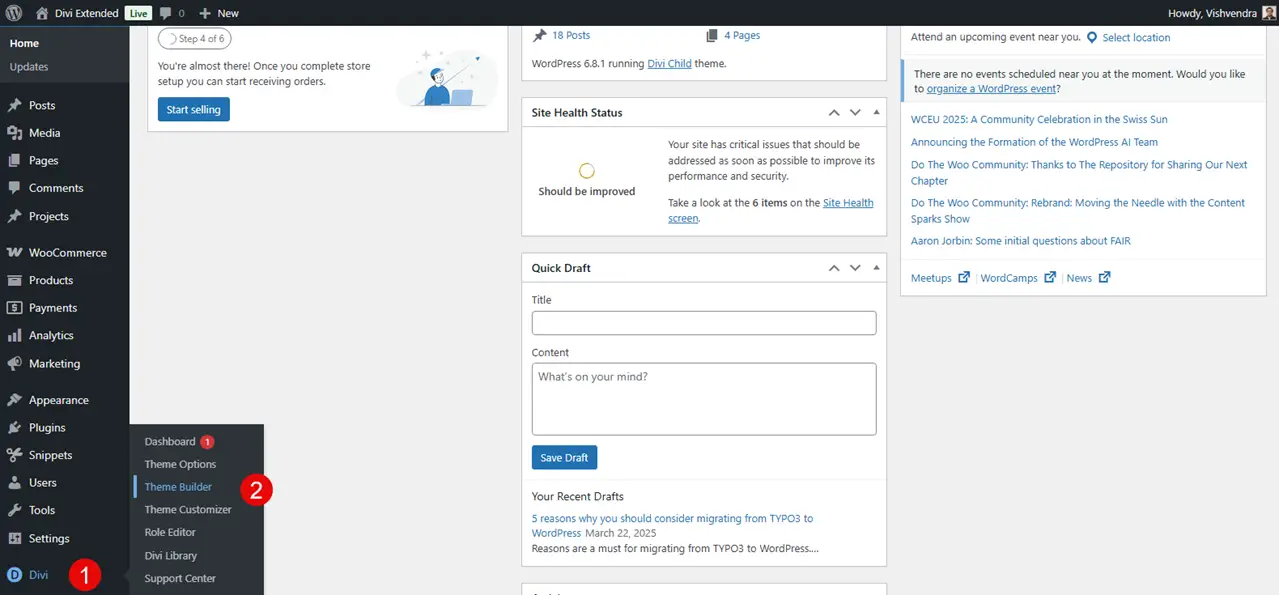
Step 1: Open Divi Theme Builder and Create a Product Page Template
In order to create a product page template, you need to access the Divi Theme Builder. For that, go to Divi → Theme Builder.
Once inside the Theme Builder, click on Add New Template → Build New Template → go to Products → select All Products.
After creating the template, click on the Add Custom Body → Build Custom Body
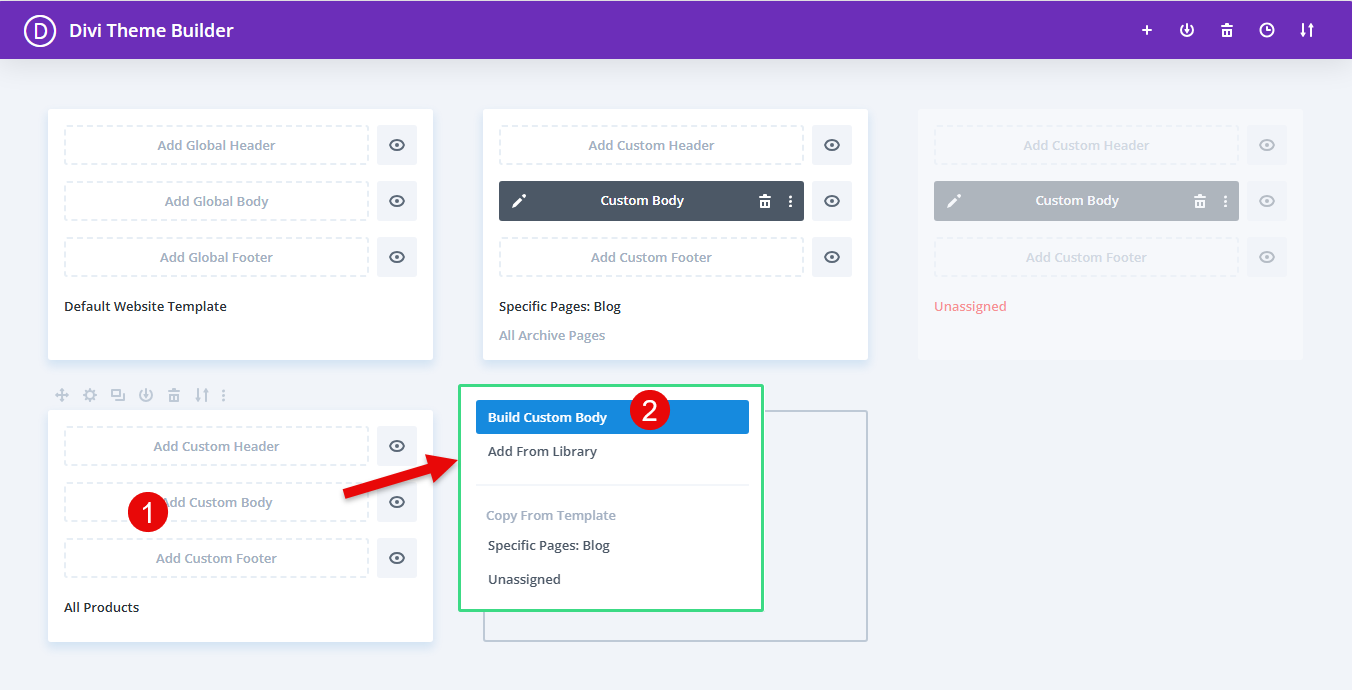
This will launch the visual builder, where we will add the module.
Step 2: Insert the Divi Woo Product Add to Cart Module
In this step, we will design a complete product page template. So, for that, insert a two-column Row, then insert the modules like the following:
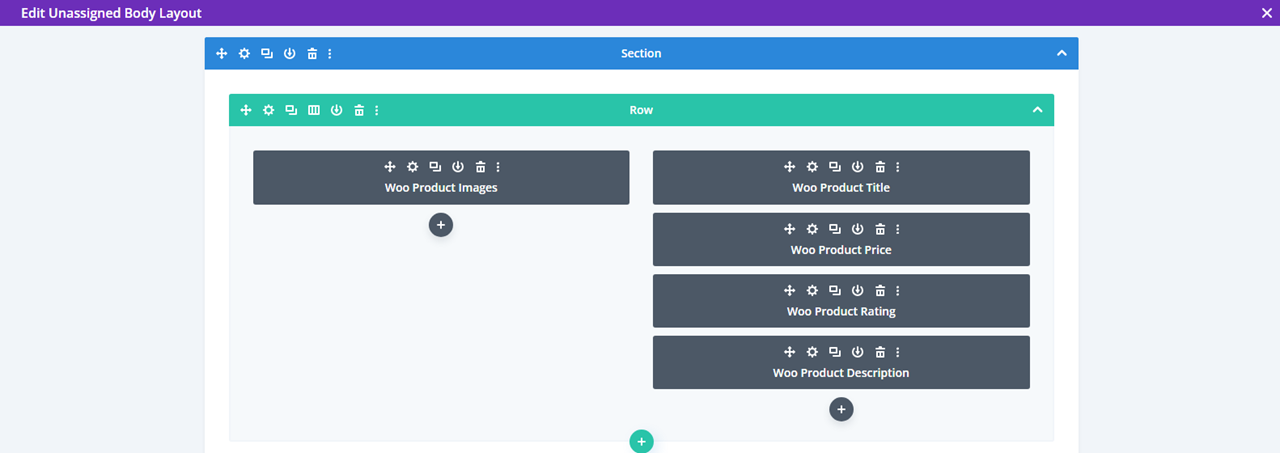
| Left Column | Right Column |
| Woo Product Images | Woo Product Title |
| Woo Product Price | |
| Woo Product Rating | |
| Woo Product Description |
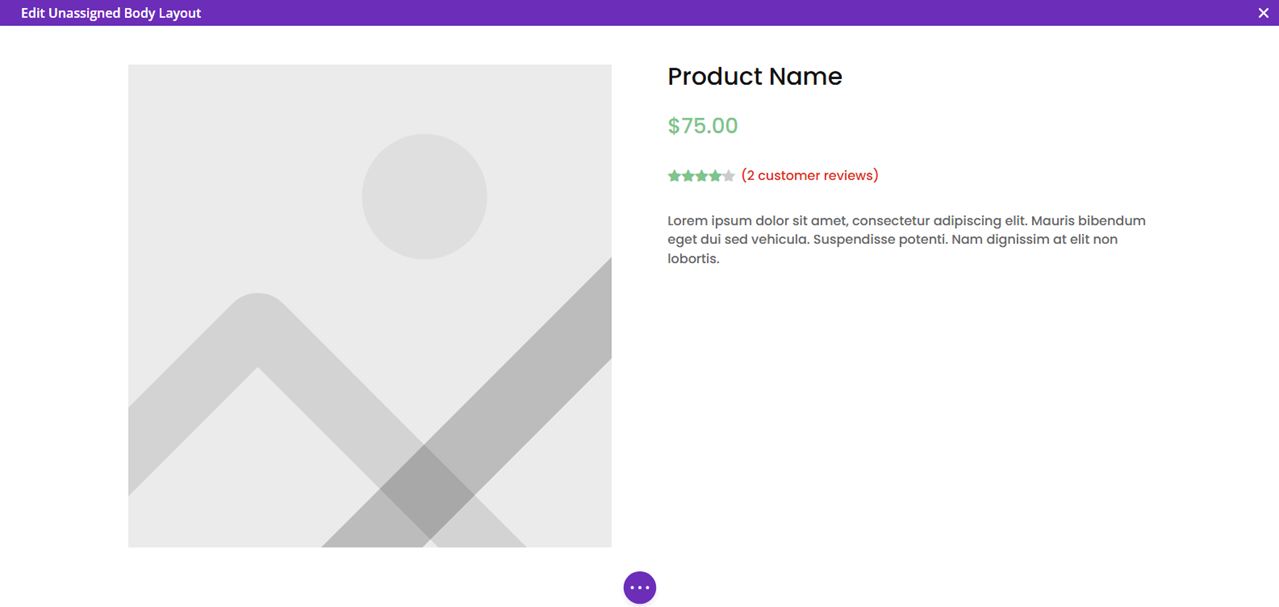
After inserting the above Divi WooCommerce modules, the product page template looks like the following:
Now, to add our Divi Add to Cart button, we need to insert the Woo Product Add to Cart module. To do that, simply click on the insert module button, then search for Add to Cart, and insert the following module:
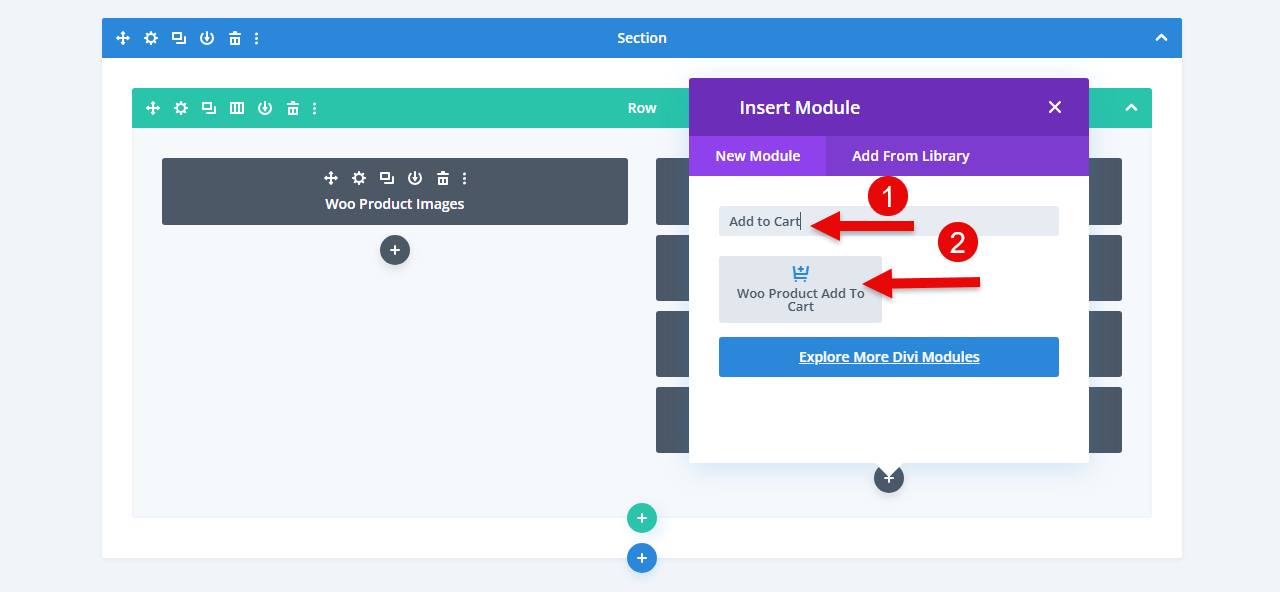
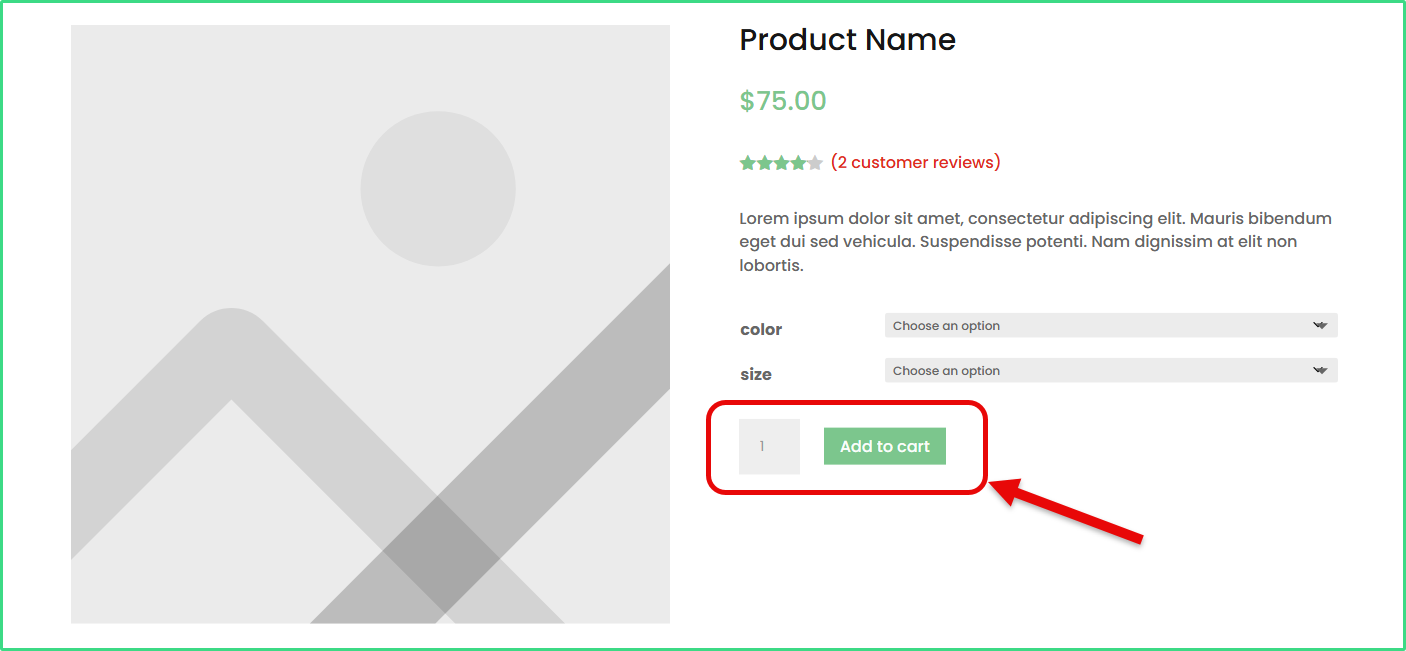
As you do that, you can see the Divi WooCommerce Add to Cart button, just like the screenshot below.
Step 3: Customize and Publish It
We have successfully inserted the Divi WooCommerce Product Add to Cart module, and it’s functional. But, there’s a possibility you might not want to use it exactly the same. Therefore, Divi provides additional options to enhance the Add to Cart button’s look.
The first tab we have is the Content, and it includes the following options:
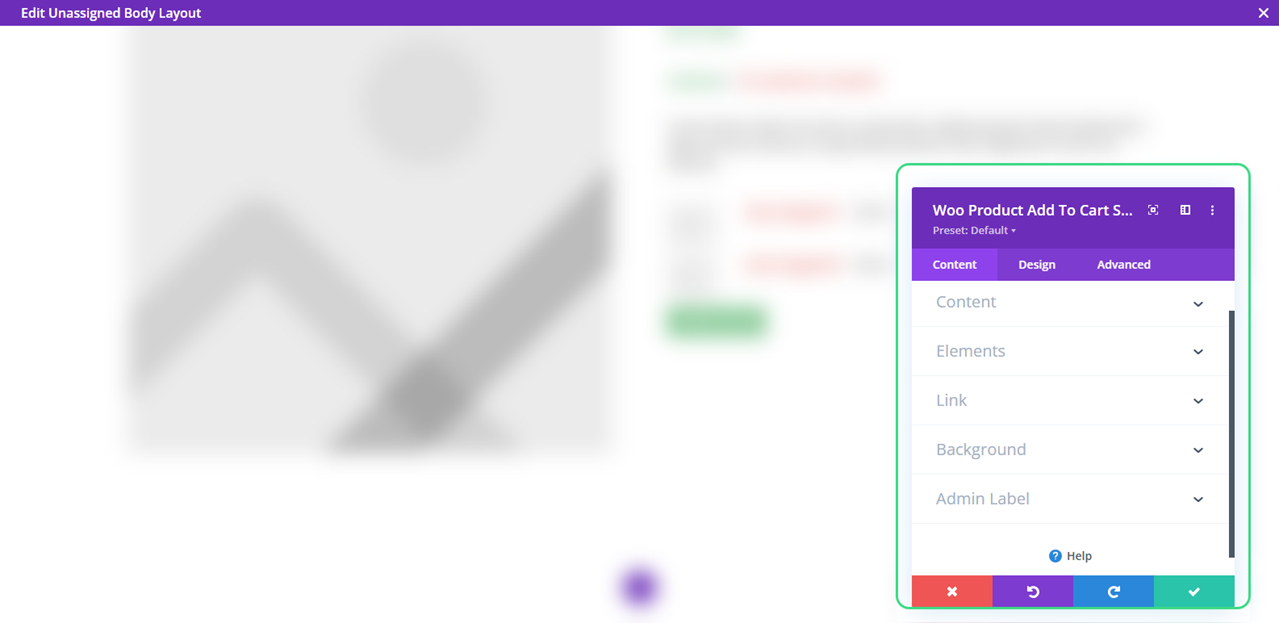
Content
In this tab of the Divi Woo Product Add to Cart module, you can choose which product you want to display the button for. It provides you with options like:
- This Product
- Latest Product
- Separate Products as Titled
Elements
In the Elements tab, you get the options to enable or disable the Quantity Field and Product Stock info.
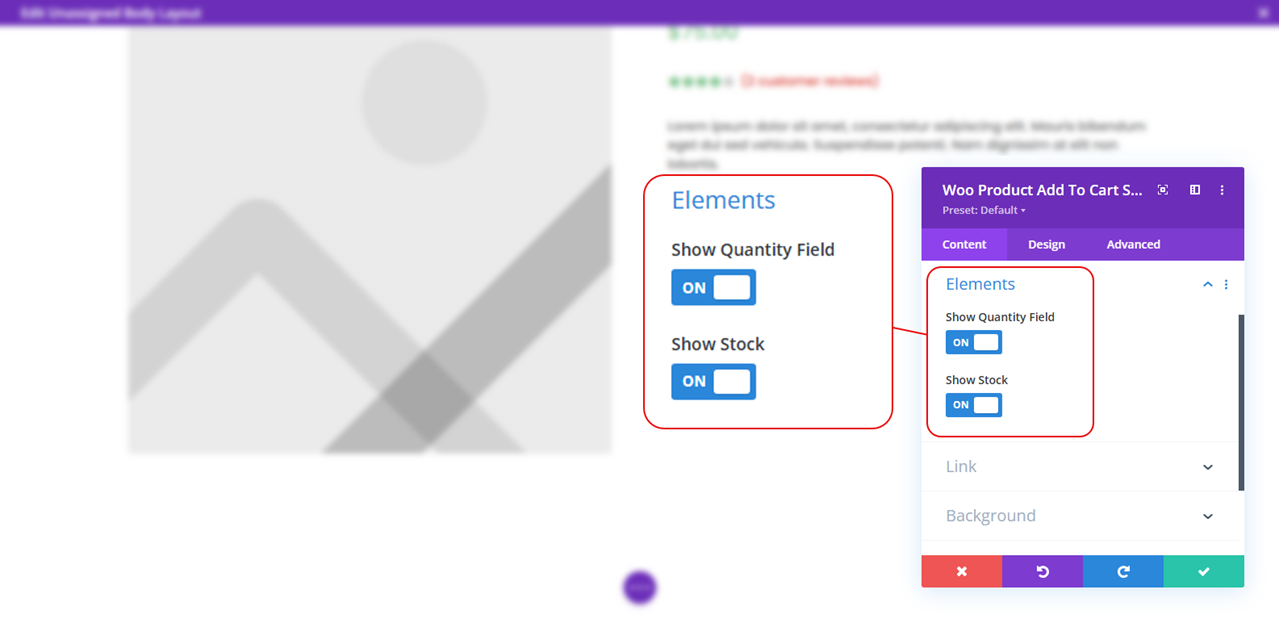
If you enable the “Show Quantity Field,” the Add to Cart button will have a quantity selector allowing customers to select how many units they want of the same product. When you enable the “Show Stock,” it will display whether the product is in stock or not. If the product isn’t available, the customers can see the notice.
Design
The design of the Woo Product Add to Cart module provides you with the following options:
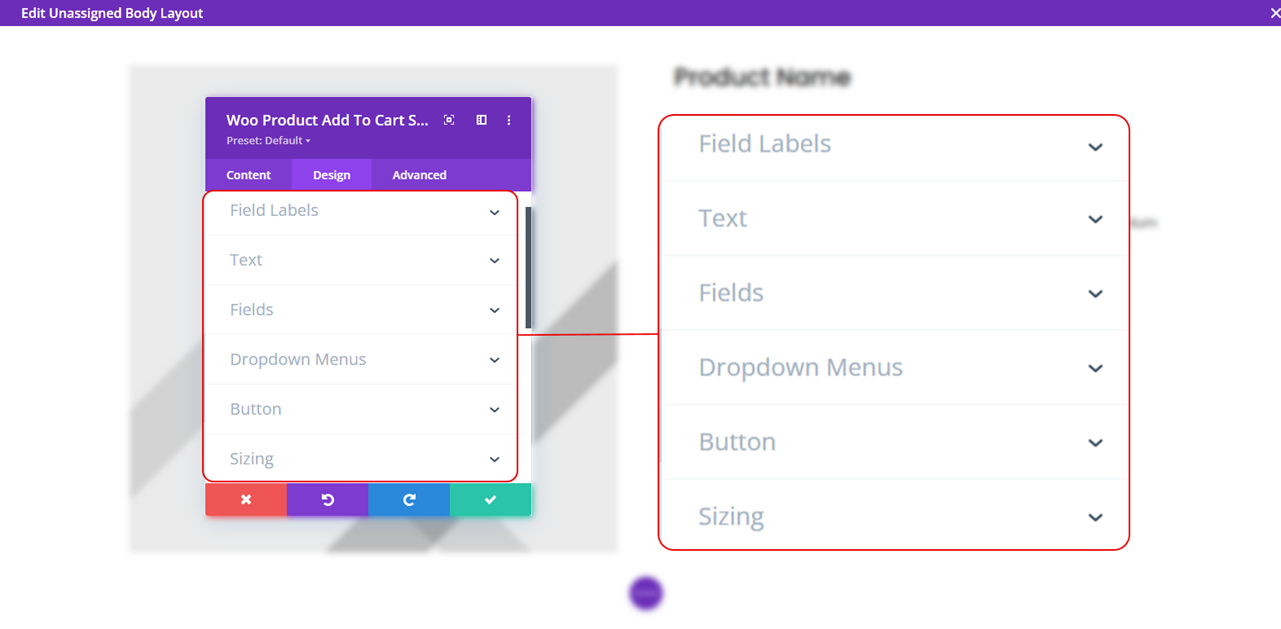
These customization options allow you to place the Add to Cart button Inline or Stacked under the quantity selector. You also get to choose the alignment of the button text, add background color to the fields and dropdown menus, and apply custom styles for the button.
With all these, you can optimize the Add to Cart effectively and make it highly interactive.
How to Change the Name of the Add to Cart Button Text
If you’re using the native Divi WooCommerce Product Add to Cart module, then you need to use custom code to change the text of the Add to Cart button in WooCommerce.
Below, we will add a few lines of code in the functions.php file, and it will change the button text.
You can add the code in the functions.php file of your child theme, which is recommended. However, if you don’t want to touch the functions.php file, then the alternative method is to use a plugin.
So, for that, install the Code Snippets plugin.
Once it’s installed and activated, go to the Snippets menu → click Add New.
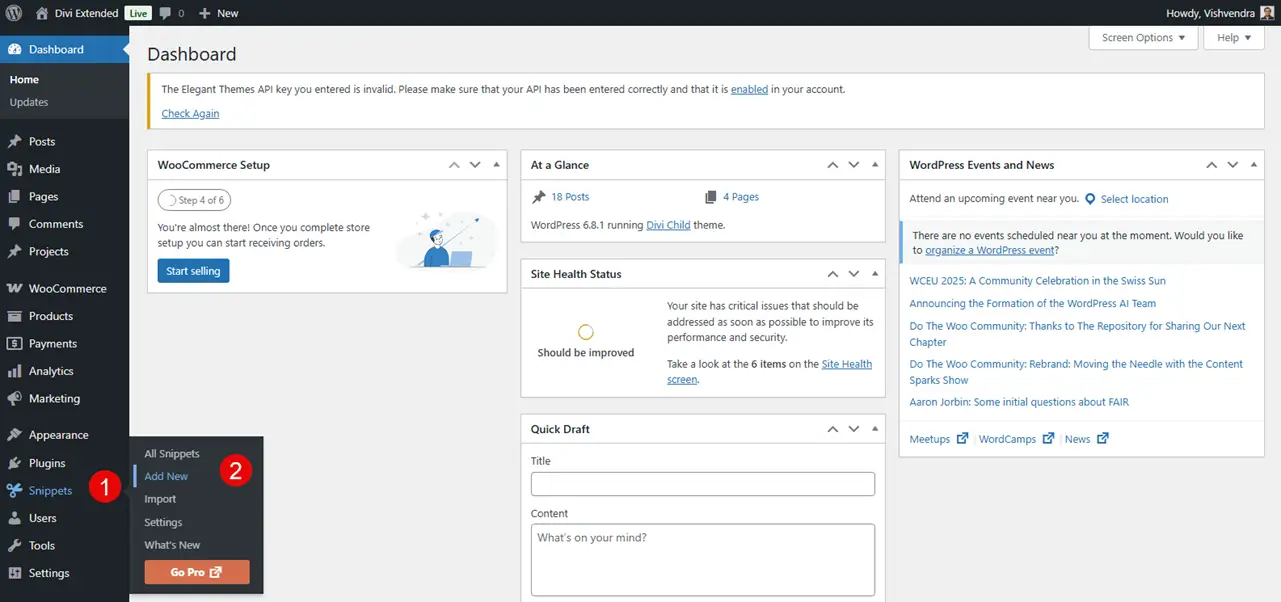
First, enter the code title, then paste the following lines of code.
// Change add to cart text on single product page
add_filter( 'woocommerce_product_single_add_to_cart_text', 'woocommerce_add_to_cart_button_text_single' );
function woocommerce_add_to_cart_button_text_single() {
    return __( 'Add to Cart Text', 'woocommerce' );
}
Replace, Add to Cart Text, with your custom text you want to give to the Add to Cart button.
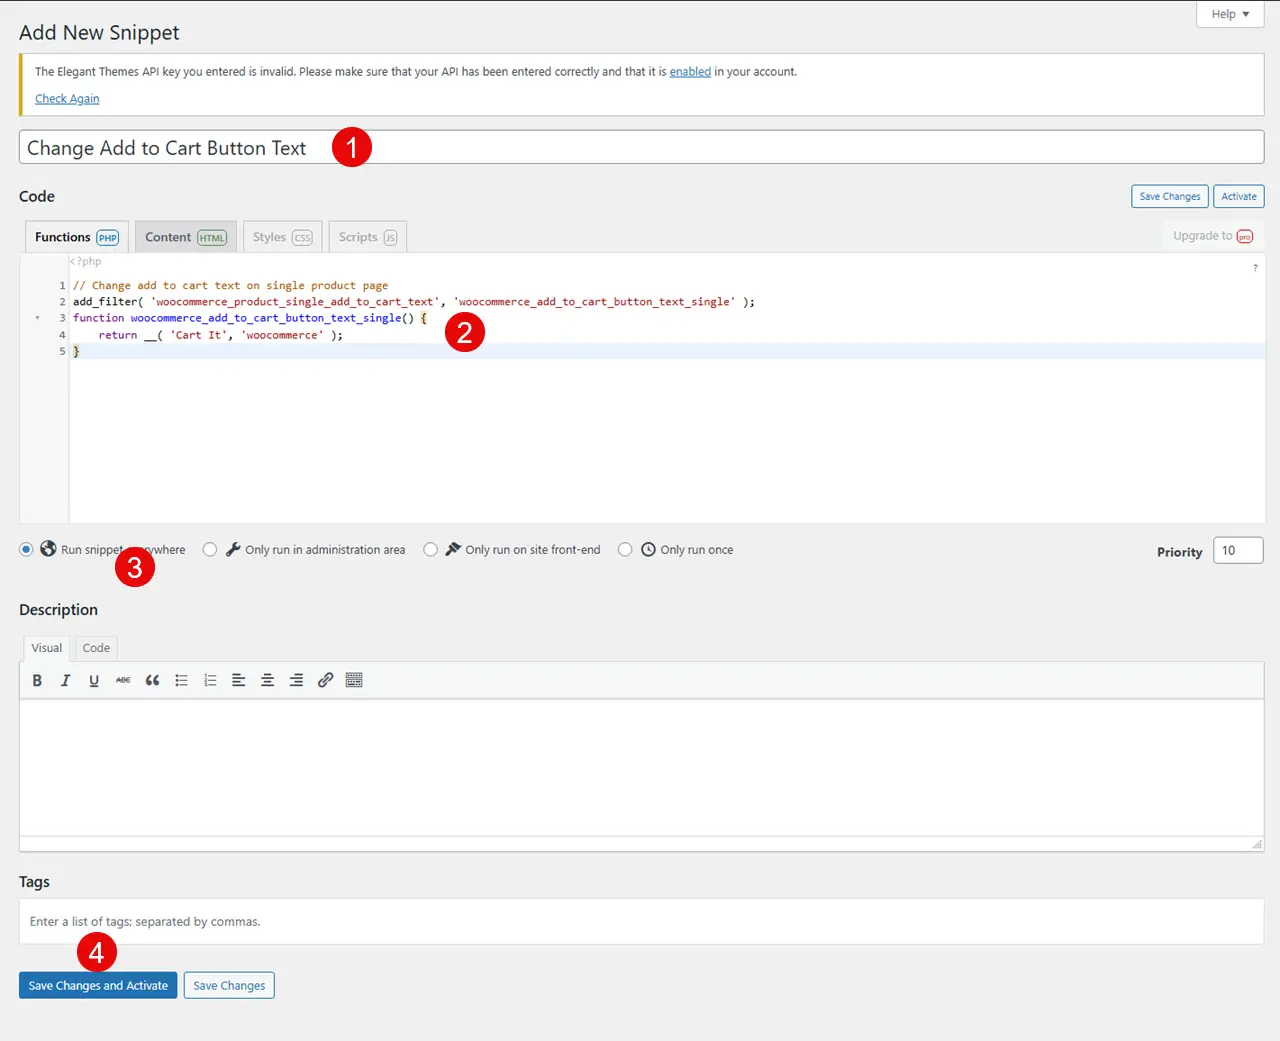
Then, choose Run snippet everywhere, and click Save Changes and Activate. Now, check your product page, and the text of the Add to Cart button will be changed.
How to Use an Icon on the Add to Cart Button
To use an icon with the Add to Cart button text, you need to enable the Custom Styles. For that, simply open the settings of the Woo Product Add to Cart module → Design → Button → enable the Use Custom Styles for Button.
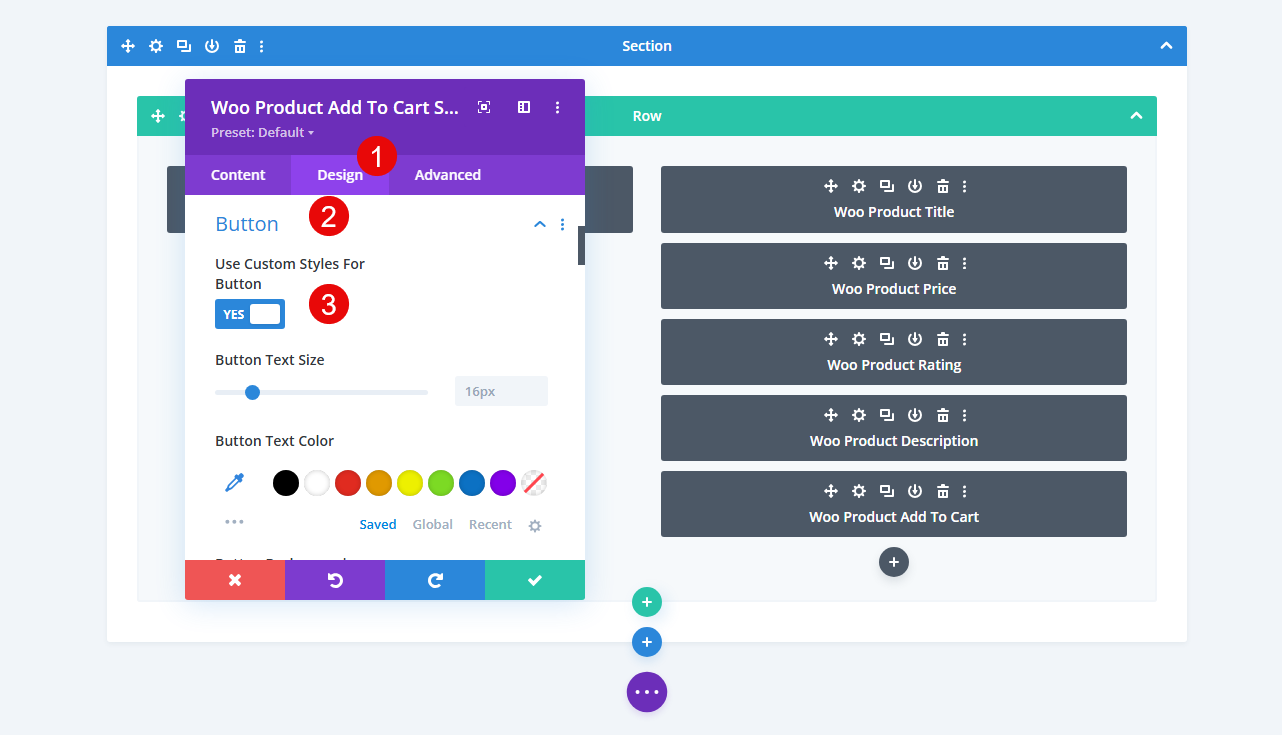
Then scroll down to Show Button Icon. By default, it’s already enabled, so you only need to select the icon you want to use.
Once the icon is selected, save the changes. Now, when the user interacts with the Add to Cart button, they can see the icon
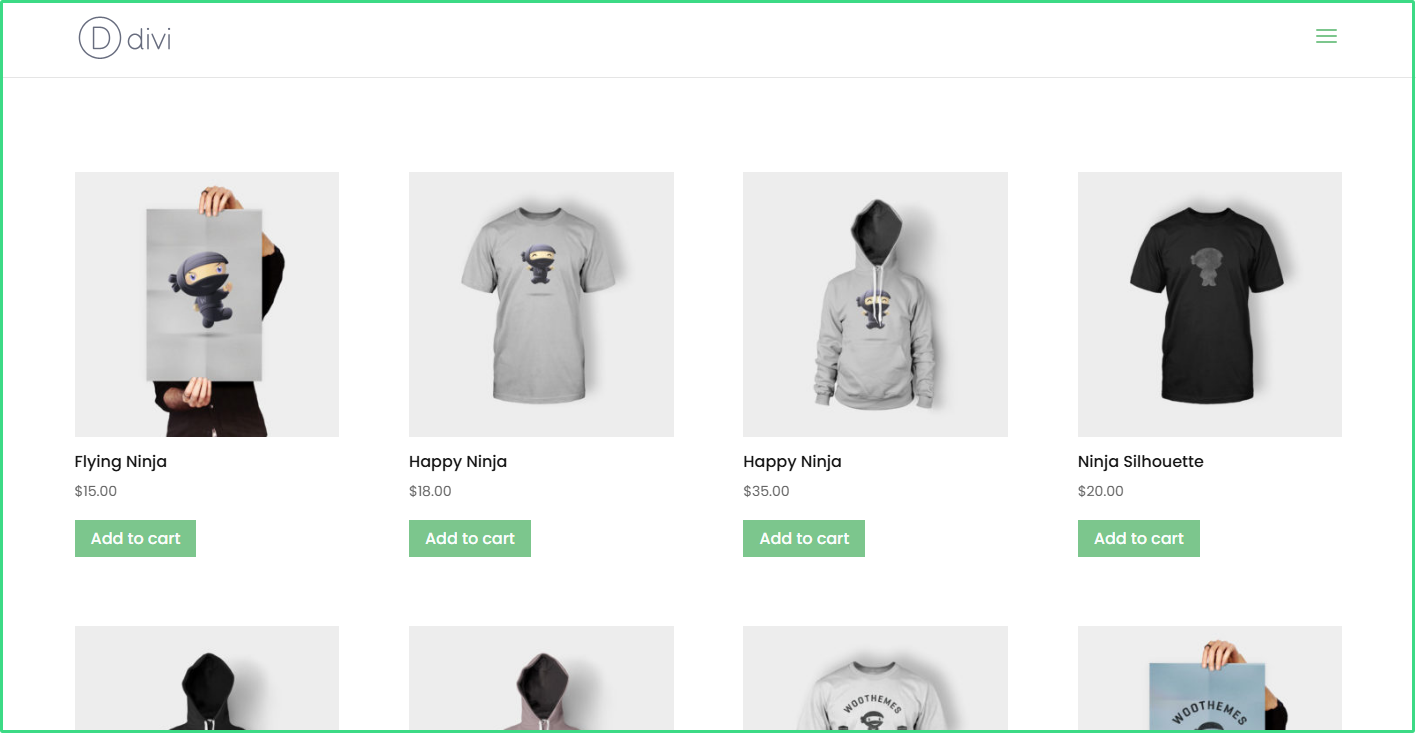
How to Display Add to Cart in Product Archive Pages
The Woo Products module of the Divi theme allows you to showcase multiple products on the page. Using the Theme Builder option, you can create product categories and tags pages with the Woo Products module.
The module is easy to use and offers extensive options. For example, it allows you to:
- Showcase products of different types.
- Define a custom column number up to 6.
- Showcase elements like Name, Image, Price, and Rating.
- Use numbered pagination.
In addition, you can utilize the design options to style the products even further, making it an effective Divi WooCommerce module. However, the only limitation of this module is that it lacks the Add to Cart button.
Hence, you need to use either a custom Code or a third-party plugin like Divi WooCommerce Extended.
If you want to add the Divi add to cart button on product archive pages using custom code, then follow the subsequent steps. First, copy the following code:
// Add "Add to Cart" button to Divi Woo Products module items
add_action('woocommerce_after_shop_loop_item_title', 'custom_add_to_cart_in_woo_products', 15);

function custom_add_to_cart_in_woo_products() {
    if (is_shop() || is_product_category() || is_product_tag()) {
        global $product;
        echo '<div class="custom-add-to-cart">';
        woocommerce_template_loop_add_to_cart();
        echo '</div>';
    }
}
Then, go to the Snippets menu → Add New
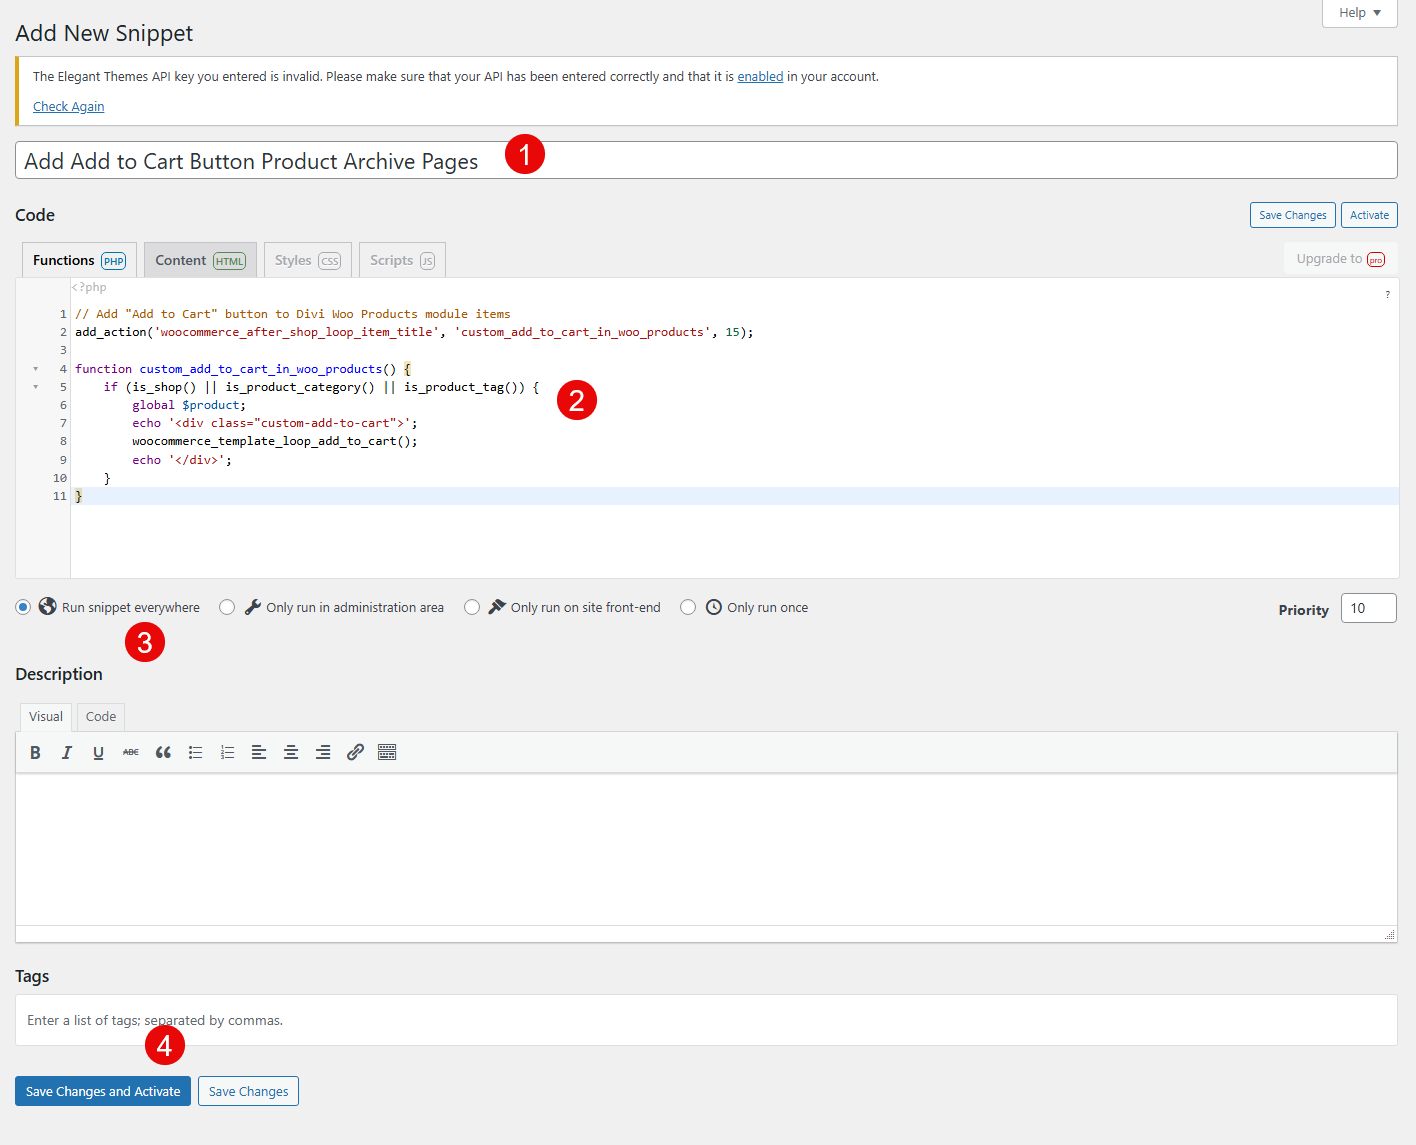
First, enter the title, and then paste the code copied above. Once the code is added, choose Run snippet everywhere, and then click Save Changes and Activate.
As you do that, the archive page will start to display the Add to Cart button in archive pages like the following:
By default, it will inherit the website styles. But if you need to make certain changes, use the following CSS.
.custom-add-to-cart .button {
    margin-top: 10px;
    display: inline-block;
    background-color: #2cba6c; /* Change as needed */
    color: #fff;
}
Adjust the CSS per your requirements.
Best Practices of Using an Add to Cart Button
Adding the button on product pages isn’t enough. In order to have it work for you, you need to ensure you’re following the best practices. Below are some of the essential practices you can apply to your product page button.
i. Personalized Button Text
Having generic terms like Buy Now doesn’t give much appeal to the customers. The button should evoke emotions and a personal touch. Therefore, when you use custom text, ensure you connect with the user and create urgency to interact with it.
For example, you can use button text like Add with Confidence, Shop with Heart, Try It Today, and Claim This Deal.
ii. Color scheme
Creativity is good, but in the name of creativity, don’t go too far.
When you choose the color scheme of your WooCommerce product button, ensure it matches the default color scheme of the store. Don’t make it unique and don’t make it fancy. People like to interact with elements that are minimalist and don’t strain their eyes too much.
So, keep this thing in mind when you add color to your button.
iii. Easy to access
In most cases, the button is placed right after the product description. You can follow the same approach, but if you’re looking for uniqueness, then try to do it in a way that doesn’t compromise accessibility.
Users, whether normal or physically impaired, should be able to access and interact with it easily.
iv. Responsive
More and more users nowadays access the internet on their mobile phones. Therefore, if you are creating a product page with an add to cart button, it’s essential that it should be responsive. The button should behave normally and allow users to easily perform their actions regardless of the device they are using.
To ensure that in Divi, you can use the dedicated responsive option and then apply font sizes, colors, and dimensions, keeping each device view in mind.
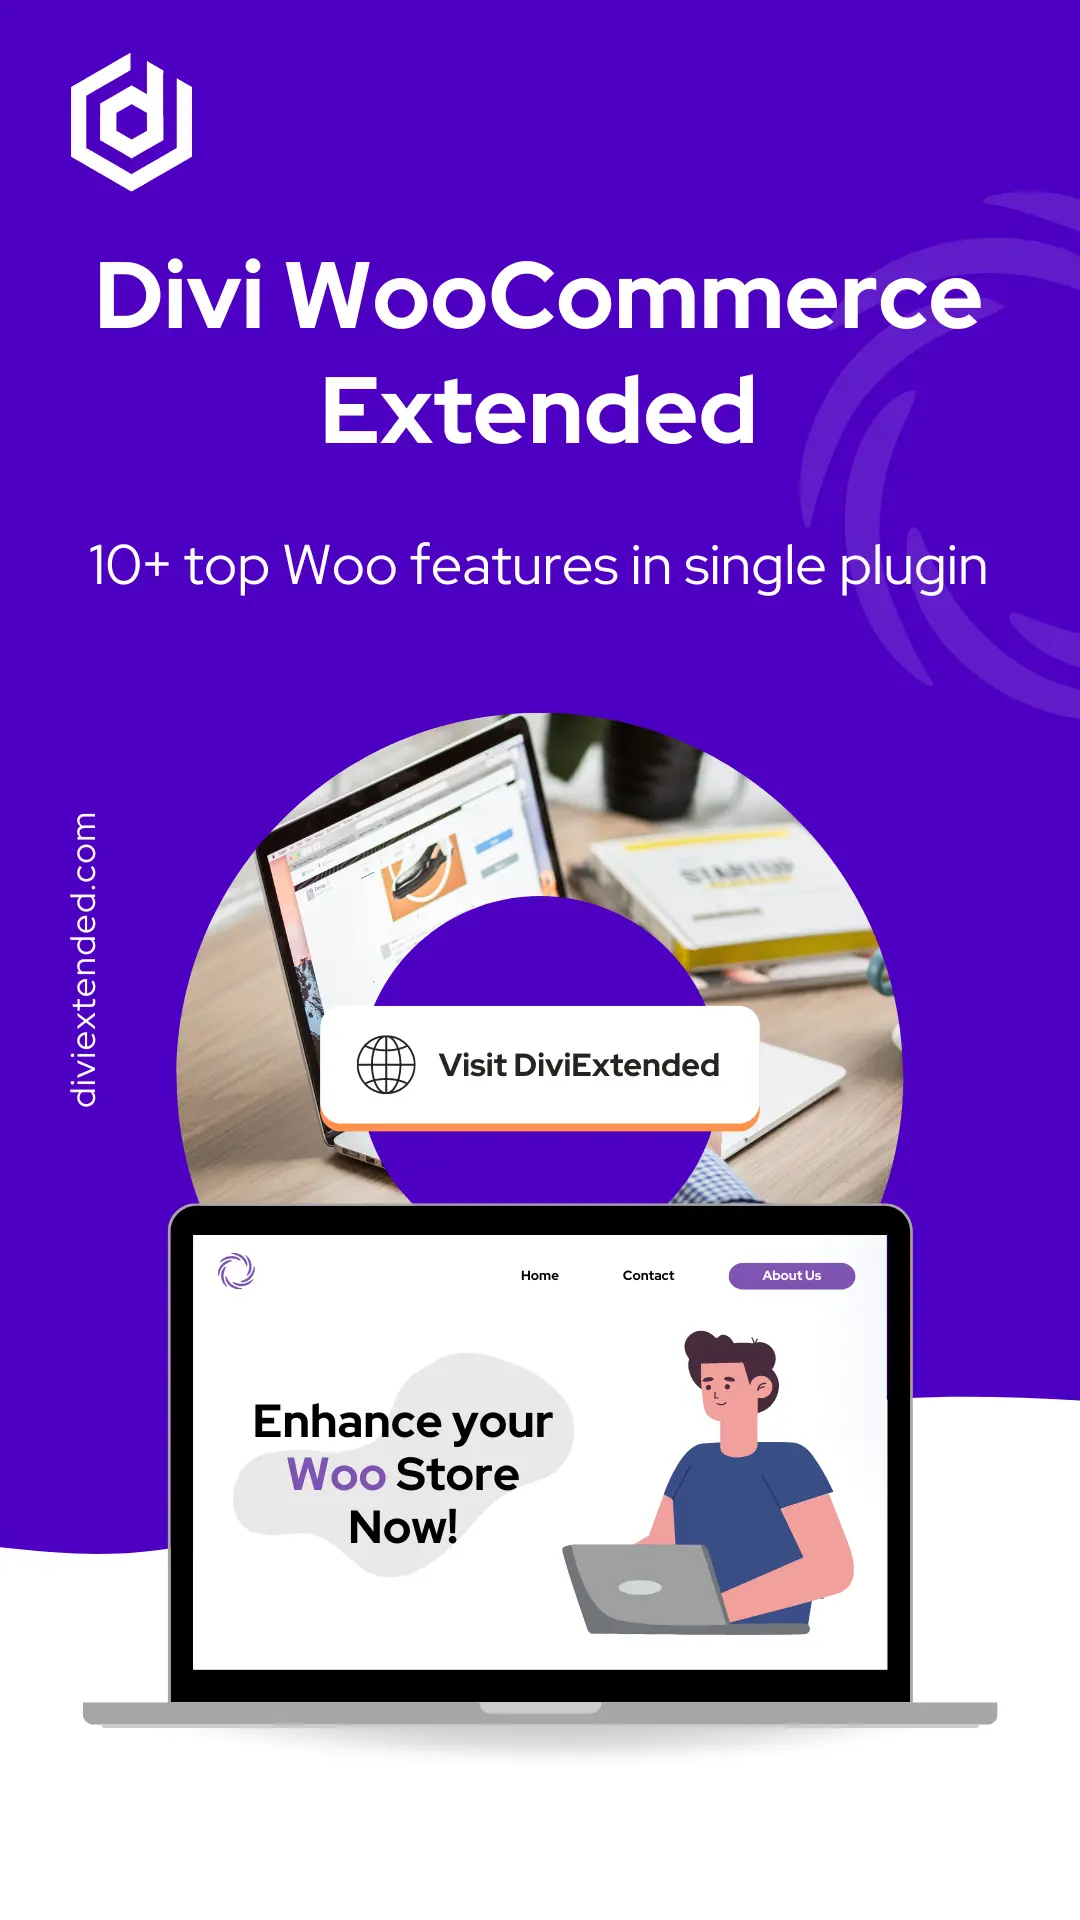
Enhance Your Divi WooCommerce Even Further With Divi WooCommerce Extended Modules
The native Divi Woo product modules are enough to design a functional eCommerce store. However, if you want to take your Divi WooCommerce store to a new level, you need to utilize additional plugins.
And one such plugin is Divi WooCommerce Extended.
It’s a premium Divi WooCommerce plugin that provides you with multiple modules and extensions to improve the design and functionality of your WooCommerce store created using the Divi theme.

This single WooCommerce Divi plugin provides you with 7 modules and 4 extensions. In addition, you get several prebuilt layouts to speed up your design process.
The modules and extensions included with this plugin are:
- Mini Cart: This module allows you to add a Divi cart icon in the menu. As well as add a floating cart on the page for quick cart view without visiting the WooCommerce page.
- Products Carousel: Using this module, you can create product sliders in Divi with different styles.
- Products Grid: Add product grids with improved design functionality like Quickview and an Add to Cart button without using any code.
- Products Categories: Design beautiful product categories sections.
- Ajax Search: Provide your customers with a quick and live search for products they’re looking for.
- Products Accordion: Showcase products with information using interactive tabs (accordions).
- Product Gallery: Create beautiful product galleries with a masonry layout and filter option.
- WooCommerce Checkout Manager: Manage the fields on your checkout page.
- Wishlist Manager: This Divi WooCommerce extension allows you to enable the wishlist functionality on your WooCommerce store.
- Product Tab Manager: Using this extension, you can add more tabs to the product pages.
- Divi Library Shortcodes: Turn layouts into shortcodes and use them effectively on the website.
By utilizing all these, you build a Divi WooCommerce store that is ready to expand and serve your customers in the best way possible. Not only these, but you get dedicated support and updates, so you never find yourself left out when using this.
Learn more about the Divi WooCommerce Extended plugin.
FAQs – Frequently Asked Questions
How to add an add to cart button in the Divi shop page?
As discussed above, you can use the Woo Products module in the Divi Template for Shop. Then, utilize the code provided to add the button to the archive pages.
Does WooCommerce work with Divi?
Yes, Divi is fully compatible with WooCommerce, and the modules it offers allow you to maximize the use of WooCommerce immensely.
How to customize the WooCommerce shop page with Divi?
To customize the WooCommerce shop page, you can create a Divi Template for Shop in the Theme Builder. Then, use the available Divi WooCommerce modules to customize the page according to your project’s requirements.
Ending Thoughts
If you’re building your product pages using the Divi Theme builder, then what we have discussed above will assist you extensively. Not only will you be able to add the button, but you can also change its name, use an icon, and display it in the archive pages as well.
By following the best practices, you’ll create eCommerce buttons that engage users rather than overwhelm them.
Lastly, with Divi WooCommerce Extended modules and extensions, you will be able to build a Divi WooCommerce website that serves its purpose, keeping user-friendliness in mind. For an eCommerce store, optimized CTAs, proper elements, and improved user experience are the core.
And with the information available in this post, you’ll cover all those areas without any extra effort.
Now, go to your Divi WooCommerce website and create the element you started reading this.


0 Comments