Rich snippets or rich results are those snippets that highlight your website’s text or content in the most attentive way in search results. They could be an image, text, video, or more that classifies itself as a part of the Schema Markup. A website optimized for schema markup receives good search results ranking, which further improves its traffic for both user interaction as well as conversion.
The same can be applied to a Divi website. You can turn your straightforward content into Divi rich snippets. However, despite Divi’s optimized SEO configuration, it’s rare that without any other 3rd-party plugins and modules, your website’s content will appear in search results as rich snippets.
Therefore, to help you make your Divi website a complete rich snippet ready — that showcases not merely text but different content elements in the search result, we will overview different free and premium plugins and follow some steps to make a Divi website rich results enabled.
If you’re new to Divi Extended blog, please subscribe to its free newsletter that will keep you updated with new tutorials, guides, and much more to help you create a fantastic website.
Now, let’s see how we can create rich snippets in Divi.
Using SEO Plugins
SEO plugins on WordPress are one of the most used plugins. Not only do they improve the website’s content quality, but they also guide you in the direction to make some crucial changes to the website to make it SEO-enabled. For instance, Set SEO titles/meta descriptions, XML Sitemap, Image SEO, Redirections, and much more. But with that, what you also get is that they support schema markup.
There are different WordPress SEO plugins available, but in this blog post, we’re only going to discuss the following,
As these are the widely used plugins to improve a website’s SEO. Let’s see how you can use these SEO plugins to make a Divi website rich snippets ready.
Making Divi Website Rich Snippets Ready With Rank Math SEO
Once you install the Rank Math plugin, it begins to set up different options to make your website SEO-ready. The first step involves setting up the basic configuration, such as on what level you want to use the Rank Math plugin that is Easy and Advanced.

Then after the Getting Started step, it asks you to provide basic details of your website in Your Site step. It includes fields to define your website’s niche, a logo for Google search results, and an image for social networks.
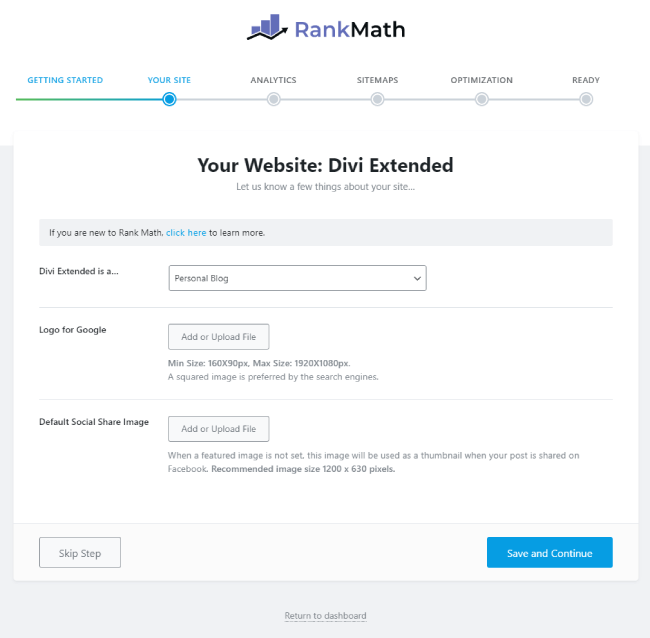
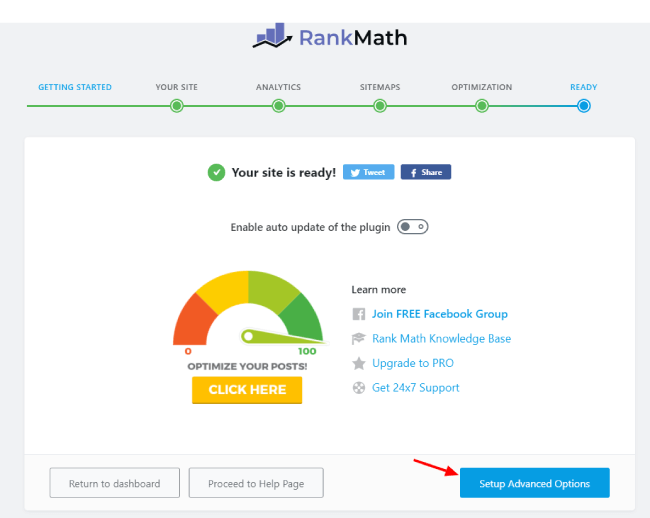
On completing that step and moving forward, it provides you with the option to connect it with Google Analytics in the Analytics step. Likewise with the other previous step, once you complete this, it opens another step. So, one by one, you have to configure settings according to your requirement and business. Once you reach the Ready stage, don’t hit the Return to dashboard; else, choose Setup Advanced Options.
Now, you have to open the Schema Markup step and in that choose Article schema markup for Schema Type for Posts, then further you have to choose Blog Post in Article Type. If your posts are published by an organization and the organization’s name will be displayed in the posts, you can select Article as Article Type. Otherwise, stick with Blog Post or News Article if your website is of news domain.
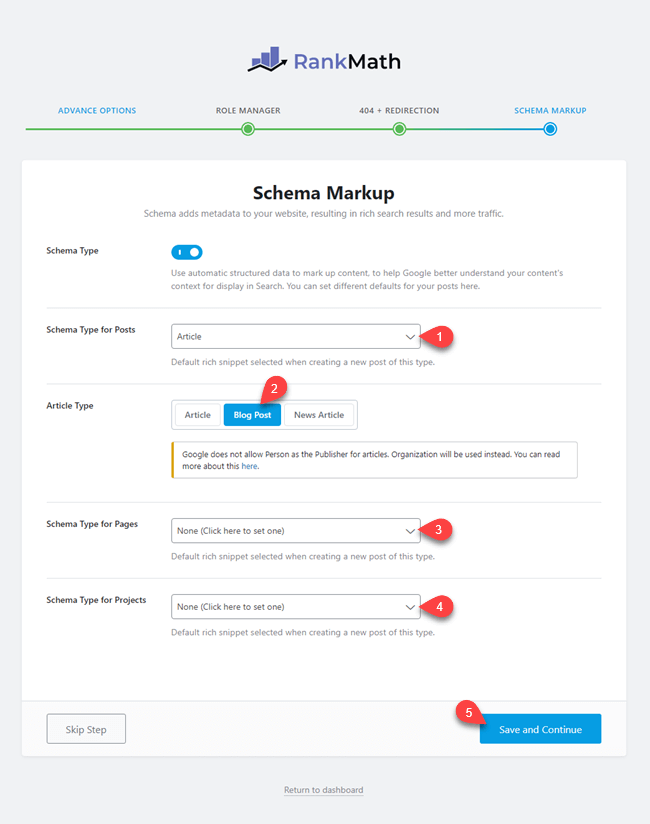
Then move to Schema Type for Pages and select their schema type per the very nature of your site’s pages. If most of your website’s pages are of Products, then choose Product. If pages are for services, then select Services. Or, for the best, keep it None because you can apply schema type for pages when you create them.
Do the same for Schema Type for Pages, and once you’re done with that, click Save and Continue. In this way, using the Rank Math plugin, you can apply schema markup on your website’s posts, pages, and project right when you’ll install it. However, if you don’t want to set up a schema markup during basic configuration, you can try the alternative method.
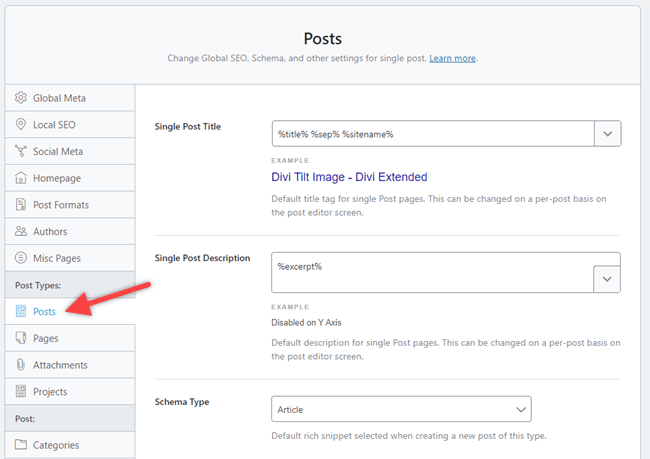
After installing the plugin, go to Rank Math → Titles & Meta
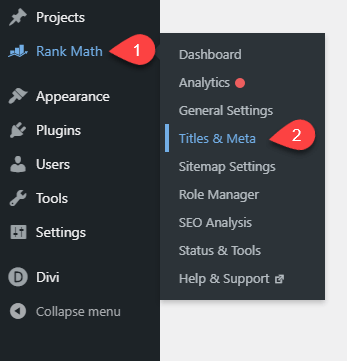
Then go to Post Types: → Posts, and explore the settings and apply schema markup as we discussed before.
We haven’t assigned the Schema Markup for pages. If all the pages follow the same schema, then you can assign it right in the Setup Wizard. Otherwise, edit an existing page or create a new one, then head over to the Rank Math icon at the bottom.
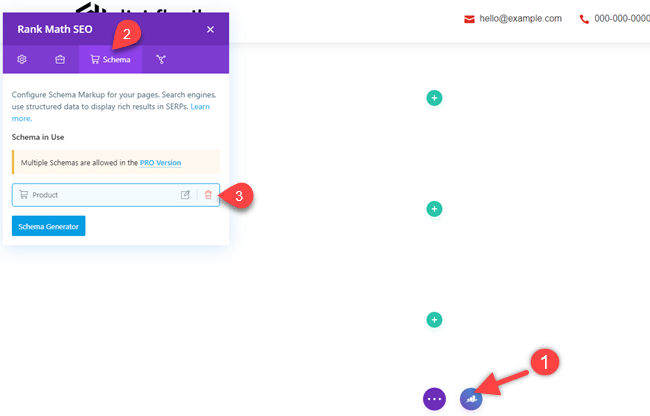
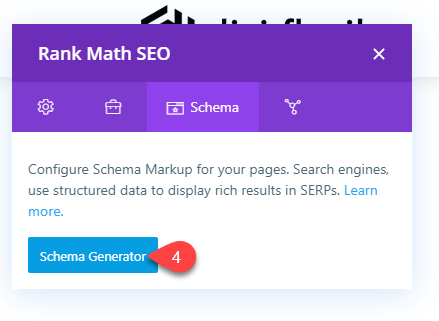
Then, open the Schema option, delete the predefined value and click Schema Generator.
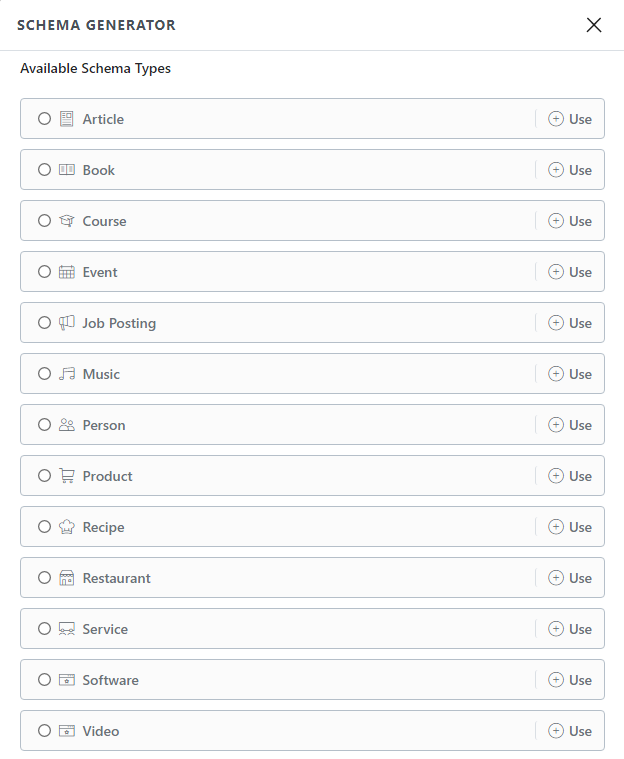
It will open a schema generator popup, where you can select the required Schema Markup for the page.
Once selected the schema markup, input the appropriate details, and then click Save for this post. The key thing to notice here is that you have to use the schema shortcode to get Rank Math working.
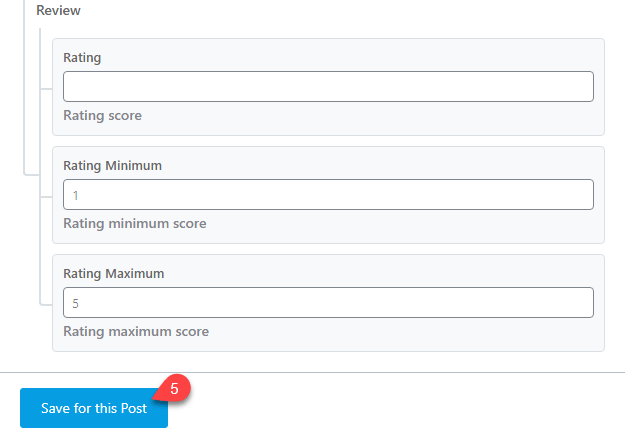
In this way, you’ll make your Divi website rich snippets ready using the Rank Math plugin. However, the downside of using this plugin is that for pages, you have to follow the same process repeatedly, which might be tiring and even not satisfy you.
Making Website Divi Rich Snippets Ready With Yoast SEO
The way it’s complicated with the Rank Math plugin to make your website rich results ready, in Yoast SEO, you don’t have to. As soon as you install Yoast SEO, it by default applies the appropriate schema to your website. However, if you want to configure schema markup in Yoast SEO manually, follow the below steps.
On your WordPress Dashboard, go to SEO → Search Appearance
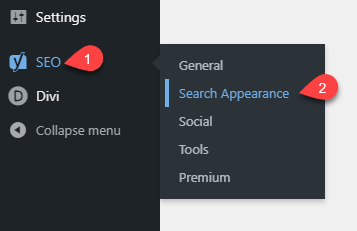
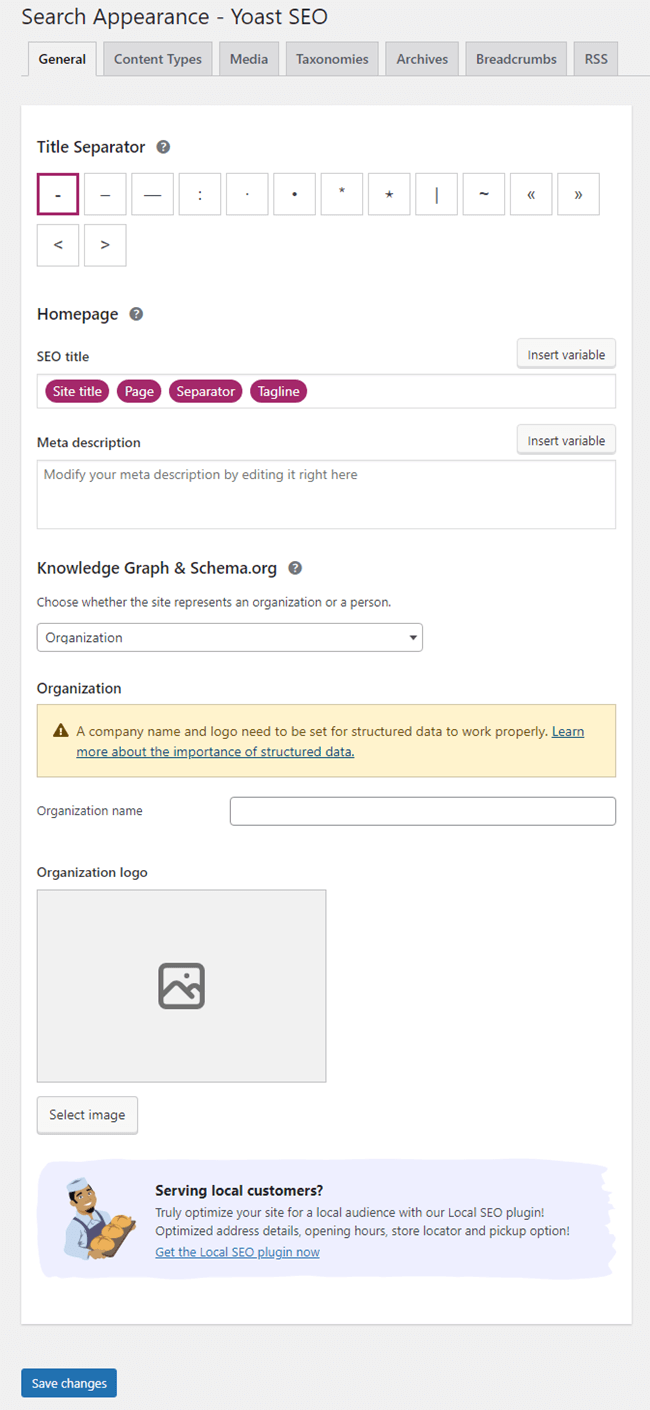
Here, you get the fields and option to define your website’s type for Knowledge Graph & Schema.org (organization or person), how your website’s page should appear with the title, and meta description (the meta description you’d use on this page will reflect for the homepage).
Once added the required information, move to the Content Types tab. Here, you get the option to select Schema Type for Posts, Pages, and Projects. You need to head over to the Schema Settings in each of the settings, then select Web Page as Default Page Type. However, if your website’s pages reflect some other functionality, then you can choose a different Default Page Type. Remember, for posts, you need to keep the Web Page as Default. Plus, if some pages will be different from the type you’ve selected, you need to change their type while creating them.
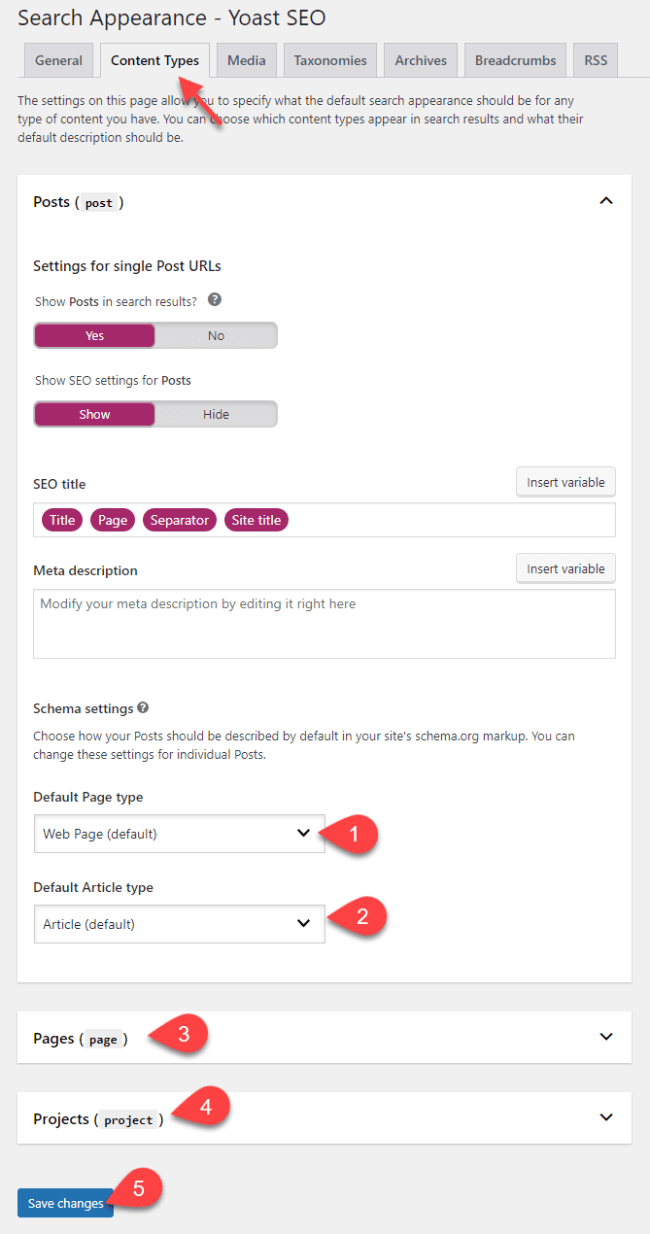
Once selected appropriate types, click Save changes, and your website posts, pages, and projects are optimized for rich snippets.
Divi Rich Snippets Limitation With SEO Plugins
Well, the first limitation with SEO plugins to make Divi website schema ready is that they’re designed to be more compatible with Gutenberg Editor than Divi Builder. You cannot use Yoast’s and Rank Math’s blocks like Yoast Breadcrumbs, Rank Math FAQ, How to, and more in Divi visual builder.
Yes, Rank Math works in Divi Builder, but it only changes page type, not individual elements on the page. So, you won’t have FAQs and Review schema markup on the same page. With Yoast, you don’t get any Divi builder support; however, you can change an individual page’s schema type by switching it to the Gutenberg editor.
So, it means you cannot make Divi website rich results ready? No, you can and that too in an intuitive way by using the schema modules of the Divi Plus plugin.
Using Divi Plus’ Schema Module
Divi Plus is a multipurpose premium plugin with over 50+ Divi modules, 04 extensions, 50 templates, 200 section blocks, and multiple free Divi child themes. Its 50+ Divi modules also include the schema modules that we’re going to discuss now and see how we can use them to optimize our Divi website’s different segments for schema markup.
Divi Breadcrumbs Module
Breadcrumbs are a nice way to guide search engine crawlers to index a website’s page easily and systematically without any clatter on the server. If you look at Google Webmaster’s word, this is how they explain breadcrumbs’ importance on the web page.

Plus, they also make it easy for users to navigate through different pages and areas of the site and extract their required information. Moreover, it also increases the session duration as well as lowers bounce rate, which is good for SEO.
And with Divi Plus’ Breadcrumbs, you can do it easily. To add Divi breadcrumbs on your site, simply go to the Settings → Divi Plus, and enable the Breadcrumbs modules.
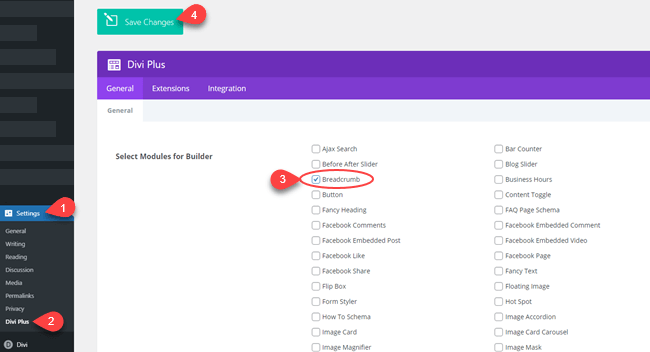
Then, create a new page or edit an existing one. Insert DP Breadcrumbs module, and you’re good to create engaging, Schema ready, and beautiful breadcrumbs on the site.
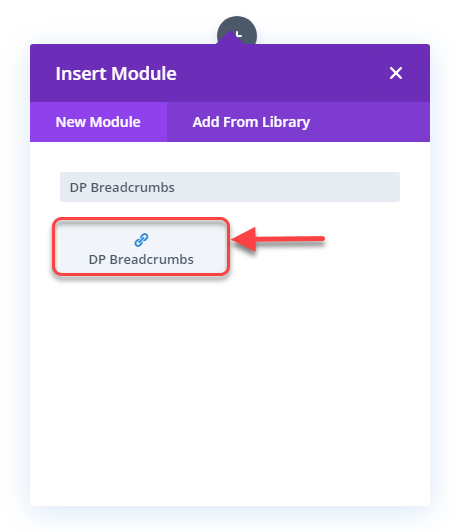
To know how to use the Divi Plus Breadcrumbs module efficiently, follow this Divi Extended Divi Plus Breadcrumbs tutorial.
What Can You Do With the Divi Plus Breadcrumbs Module?
- Multiple breadcrumbs layout.
- Create icon based or text based breadcrumbs.
- Apply color and other design customizations.
- No dependency on other SEO breadcrumbs plugins such as Yoast.
Divi How-To Schema Module
Running a food blog or a website that shares how-to tutorials and wants them to appear in the search result as rich snippets like the below screenshot? Then the Divi Plus How To Schema module is your go-to module.

To use the How To Schema module, you need to enable it in the Divi Plus modules panel. Follow the same step mentioned in Divi Plus Breadcrumbs to enable this module. Then, create a new page or edit an existing one, insert module DP How To Schema, and you’re good to create schema optimized, engaging and beautiful How to tutorial content.
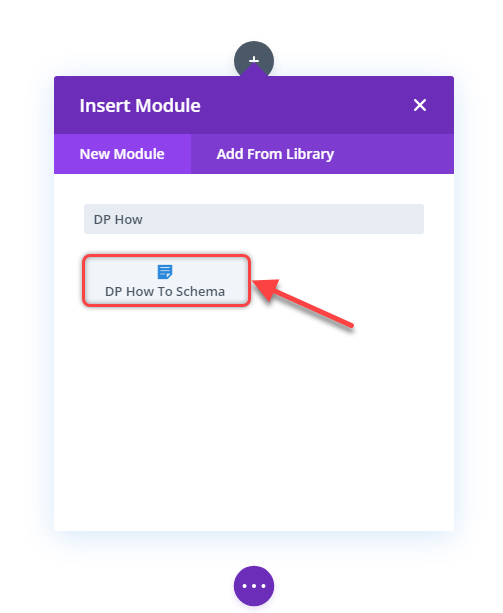
Follow this guide on Divi Plus How to Schema module to use it efficiently and create schema-enabled Divi how-to content for rich snippets.
What Can You Do With How to Schema Module?
- Create How-to tutorials with images, customized text, and more.
- Separate customization for steps.
- Add details about tools & supplies.
- Add information about time & cost.
- Individual customization for How to Heading and Description.
Divi FAQPage Schema Module
More often than not, users need support to either use your products/services or clear their doubts. So, users might probably end up sending you emails or submitting queries through the contact us page.
This could increase your workload and even frustrate you because different users often ask the same question. Therefore, to deal with this situation, it’s better to add FAQs on the page.
And using the Divi Plus FAQPage Schema module, you can do that easily. It allows you to create schema optimized FAQs on the site that appears in the search results as rich snippets, just like the below screenshot. Plus, it also enables you to enhance those FAQs designs using the available customization options.

By following this guide on FAQPage Schema, you’d be able to create amazing FAQs on your website.
What Can You Do With the FAQPage Schema Module?
- Add multiple questions and answers.
- Multiple FAQ Layouts – Accordion and Grid.
- Show FAQs up to 4 columns and in masonry formation with Grid layout.
- Add Accordion Icons for both the Closed and Open State.
- And much more.
Divi Testimonial Grid and Slider Module
Testimonials are a great way to infuse trust in website visitors’ minds and motivate them to try or buy your services and products. If you add reviews on the site and are schema optimized, they can even improve its SEO traffic. How? Testimonials with star rating and review schema appear on the search result, similar to the screenshot below. When users see good reviews and star ratings in the results on your products and services link, they prefer you over others.

The Divi Plus Testimonial Grid and Slider module allow you to create beautiful, engaging, and interactive testimonials optimized for review and star rating schema. Moreover, the testimonials you’ll create using these modules can fetch the reviewer’s image using the Gravatar email. So, you don’t have to upload images and add them to their respective location manually.

How to use Divi Plus Testimonial Modules Effectively? Follow this guide on Testimonial Slider, and you’ll be able to show excellent reviews in an amazing way.
What Can You Do With the Testimonial Module?
- Multiple Slider and Grid Testimonial Layouts.
- Column Control.
- Masonry Grid Formation Support for Testimonials.
- Slider effects like Cube, Slide, Flip, and Coverflow.
Divi Star Rating Module
If you don’t want to include reviews on your site and only want to display star ratings that comply with the Star rating schema, you can use the Divi Plus Star Rating module. It will allow you to add different elements such as Products, Testimonials, and more optimized with star rating schema.
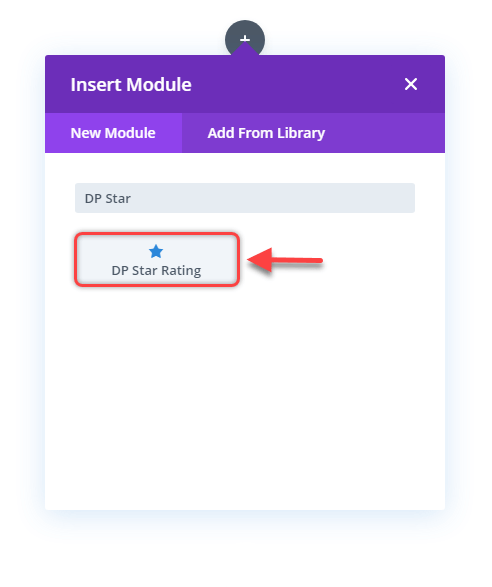
To do that, all you have to do is insert the DP Star Rating module on the page.
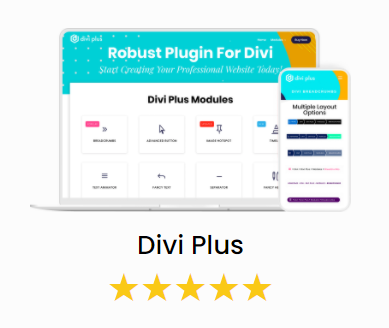
Then add appropriate information and resources to the module. Explore its customization options to enhance the look and feel of your Divi elements. And you’ll get your star rating optimized design section the same as the following screenshot.
To use Divi Plus Star Rating Module at its best and optimize webpage elements for schema markup, follow the step-by-step guide here.
Test Your Webpages for Schema Markup / Rich Results
Once you’ve created your Web Pages with Divi Plus Schema module and SEO plugins for schema markup, it’s time you run a test to make sure that all the pages with schema markup are eligible for Rich Results.
To do that, go to Rich Results Test,
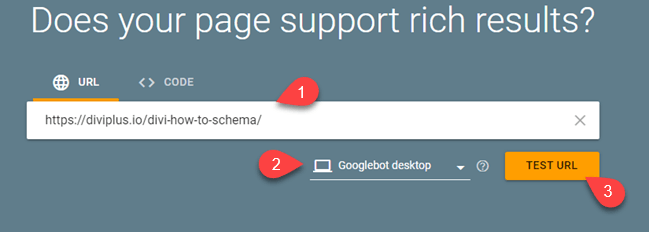
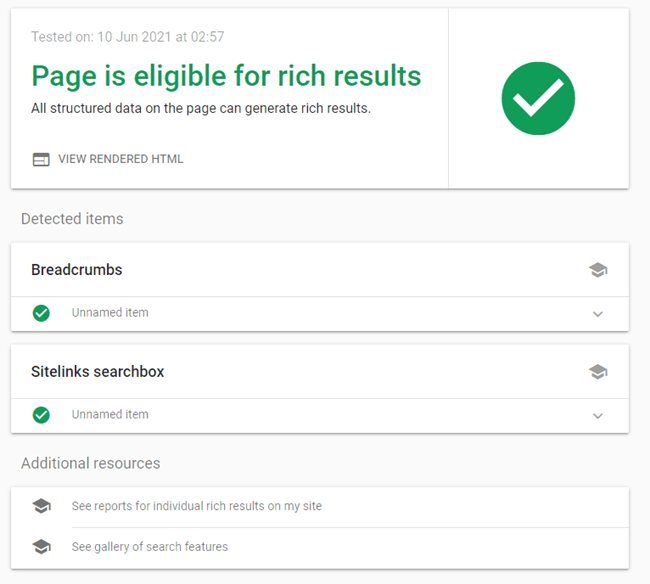
Then, enter your webpage’s URL having Schema Markup on it. First check for Googlebot desktop. It will take some time to analyze your webpage. And if your web page passes the test for rich results, you’ll get the same result as the following.
Conclusion
Above, we have discussed the SEO plugins and Divi Plus Schema module to create rich snippets in Divi. With SEO, you have the option to apply schema markup on Blogs, Pages, and projects. And with the Divi Plus module, you could apply multiple schema markup on a single page on different segments or elements of the page. Making it completely schema markup ready.
Therefore, if you want to add useful, engaging, and interactive Divi elements optimized for schema markup, going with Divi Plus is a perfect choice. Because with the schema module, you also get other valuable modules, extensions, templates, child themes, and more to build a modern website in no time. And that too for websites of various niches. So, don’t wait and get it now.




0 Comments