
WordPress Custom Fields is a powerful tool that lets you add additional metadata to posts, pages, and custom post types. You can easily add and display extra information using custom fields which is not possible with WordPress’s default content fields. Custom fields can integrate with Divi to provide you with outstanding flexible solutions for extending your website’s functionality. Advanced Custom Fields plugin is the ultimate solution to present dynamic content with the help of custom fields in Divi. We can add custom fields in Divi using the ACF plugin, shortcodes, and dynamic content features.
In this post, we will discuss the applications of custom fields in Divi and how to add custom fields to various Divi modules using the ACF plugin.
After taking an overview of custom fields in Divi, let’s explore which Divi modules have the power to display additional dynamic content.
Which Divi Modules Can Display Custom Fields Using ACF Plugin Shortcodes?
Many Divi modules offer you the functionality to display custom fields in Divi using shortcodes. Shortcodes enable you to show dynamic content in the Divi modules by referencing values of custom fields. Let’s explore some Divi modules that can work with the ACF plugin shortcodes.
1. Divi Text Module: This module can use custom fields to display personalized messages, product specs, and similar information.
[acf field="your_custom_field_name"]2. Divi Code Module: You can easily display dynamic values of custom fields in the Divi Code module using shortcodes.
<div>
  <?php echo do_shortcode('[acf field="your_custom_field_name"]'); ?>
</div>
3. Divi Slider Module: This module can pull text and images from custom fields to showcase product highlights, client testimonials, and project features in dynamic sliders.
[acf field="slide_content"]4. Divi Blurb Module: This Divi module can create dynamic feature boxes with titles, content, and images using custom field data.
[acf field="your_custom_field_name"]Many other Divi modules such as Testimonial, Contact Form, Pricing Table, etc. utilize custom fields with shortcodes to reflect dynamic content on your Divi website.
You can also ACF shortcodes in some of the modules of the Divi Plus plugin to display custom field values. It seems interesting to display dynamic custom field values in various Divi Plus modules such as Fancy Text, Fancy Heading, etc.
After getting a detailed understanding of custom fields and their uses in Divi, let’s learn how to add custom fields in Divi.
How to Add Custom Fields in Divi using ACF Plugin?
Adding custom fields in Divi is not a big thing but for beginners, it may be a complicated task. There are two ways to add custom fields: either install a plugin or use the more difficult method of modifying the PHP file. We recommend the Advanced Custom Fields plugin to create custom fields as it would be a simplified approach for beginners who don’t have the necessary coding skills.
Now without any further delay let’s start the tutorial.
1. Install Advanced Custom Fields Plugin
Go to the dashboard of your WordPress website. Select Plugins >> Add New Plugin.
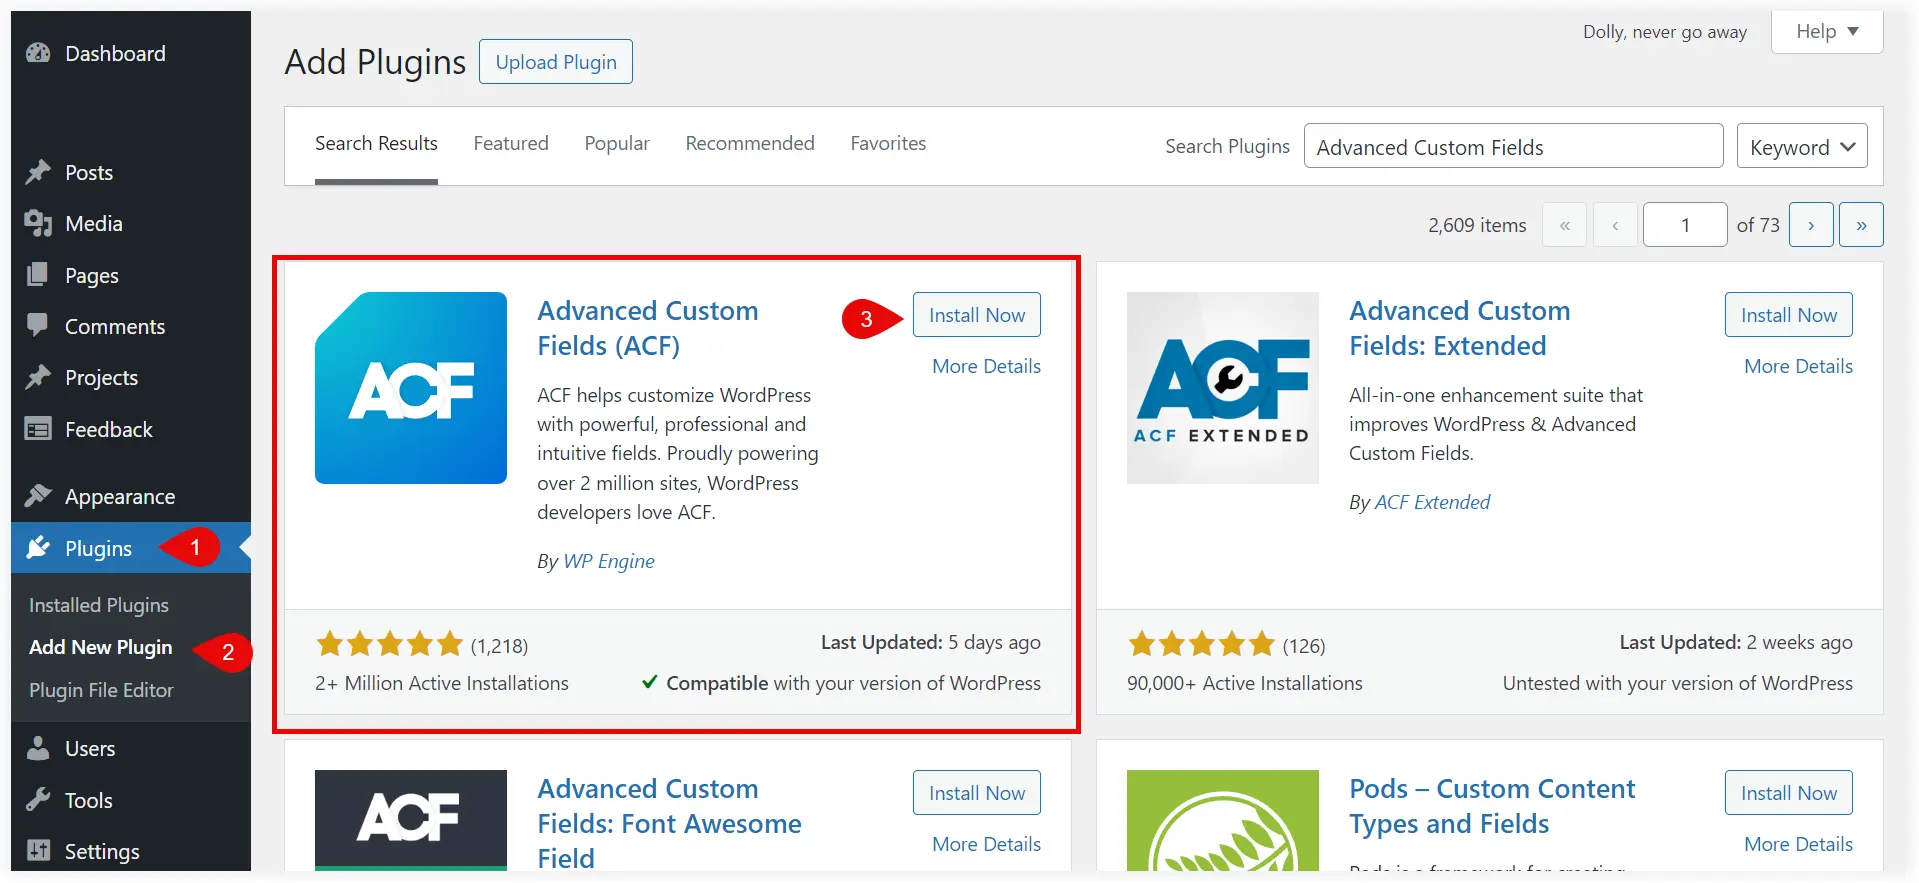
After installing the ACF plugin activate it.
2. Create New Custom Fields
After equipping your Divi website with ACF, you need to create custom fields that will be added to your website later. In this tutorial, we will keep things simple to help you understand everything clearly. That’s why we will use the custom fields to display a Date Picker field based on the selected value of the radio button.
Go to your WordPress dashboard Select ACF >> Field Groups.
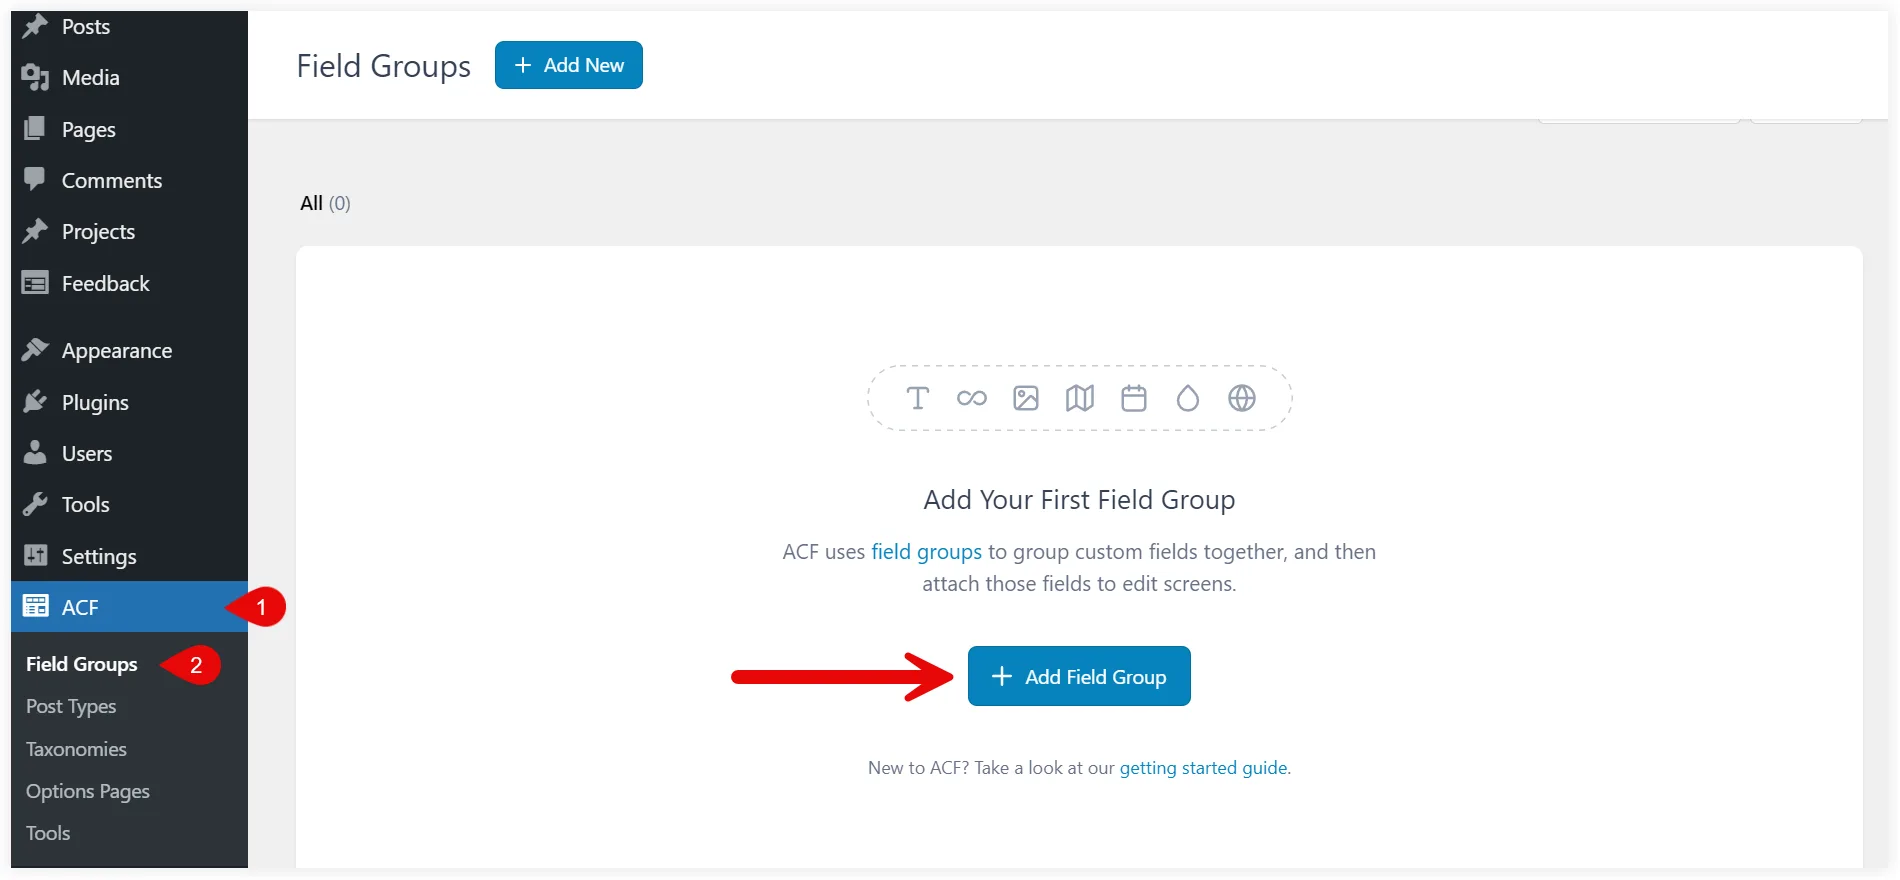
Field Groups are collections of custom fields going to be displayed together on the front end. For example, custom fields for a blog can be reading time, author description, etc, which can stored collectively to form a group.
3. Configure ACF Custom Fields
Add a Field Group Title.
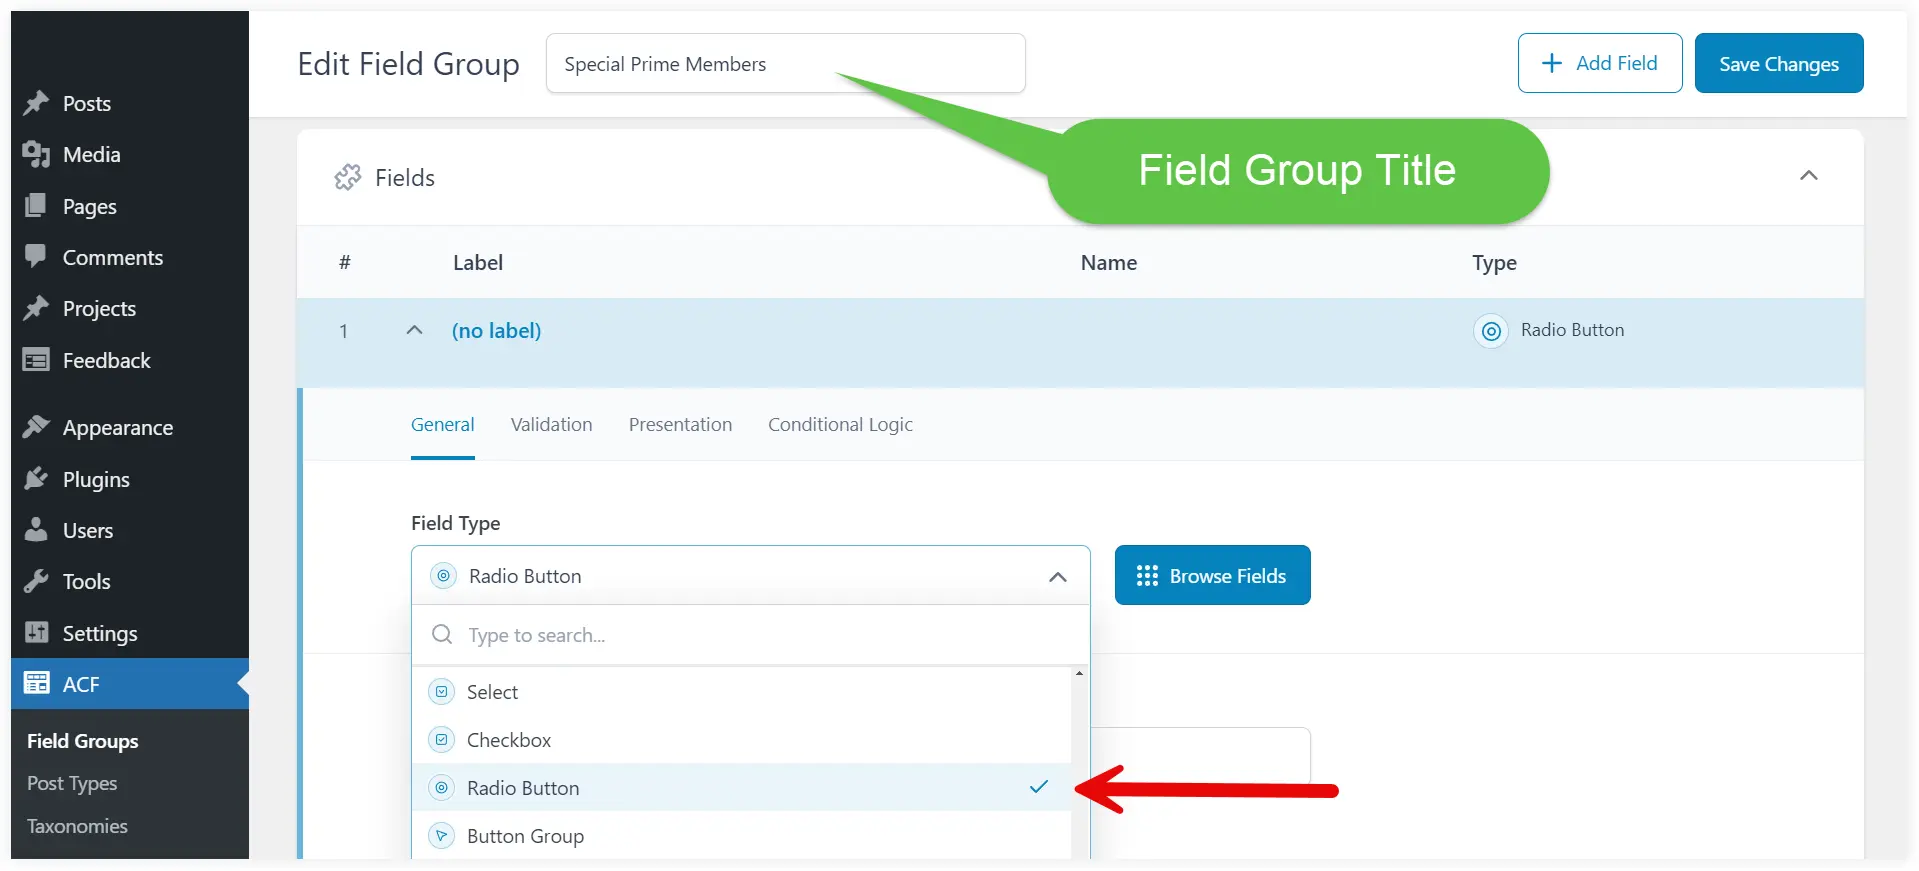
Enter the Field Label, Field Name, Choices(Yes and No), and Default Value(Yes/No) of the radio button.
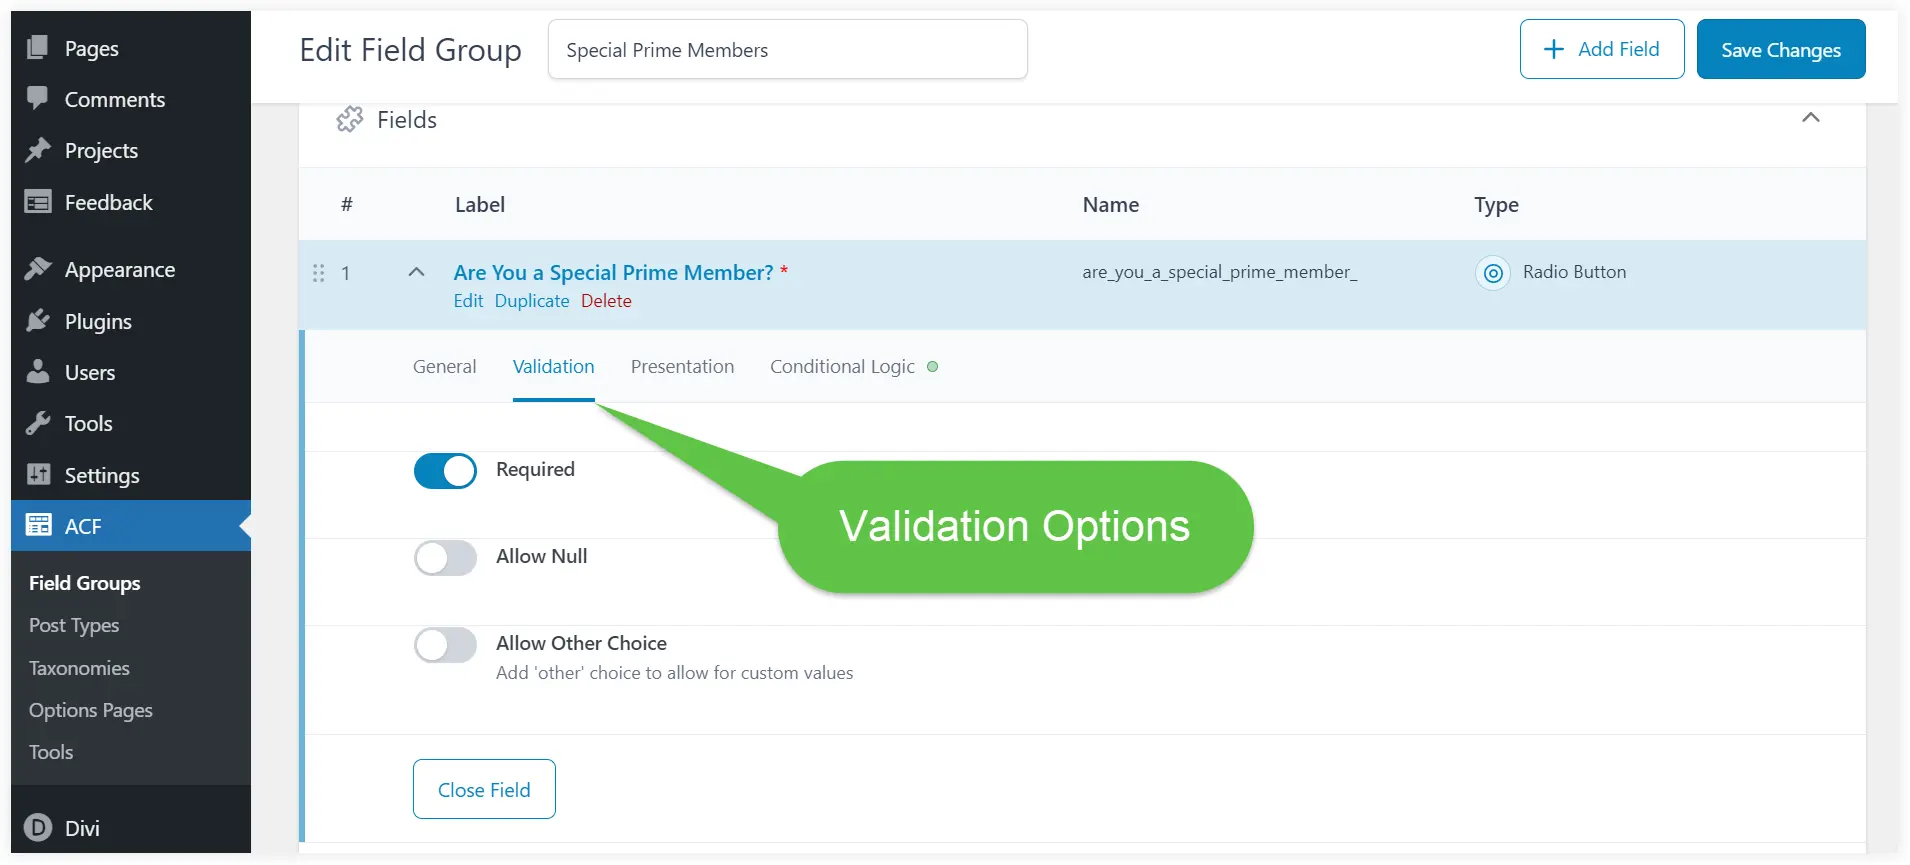
Select Validation options for custom fields.
Keep the Required switch enabled. As a result, user selection will become mandatory and the field can’t be skipped.
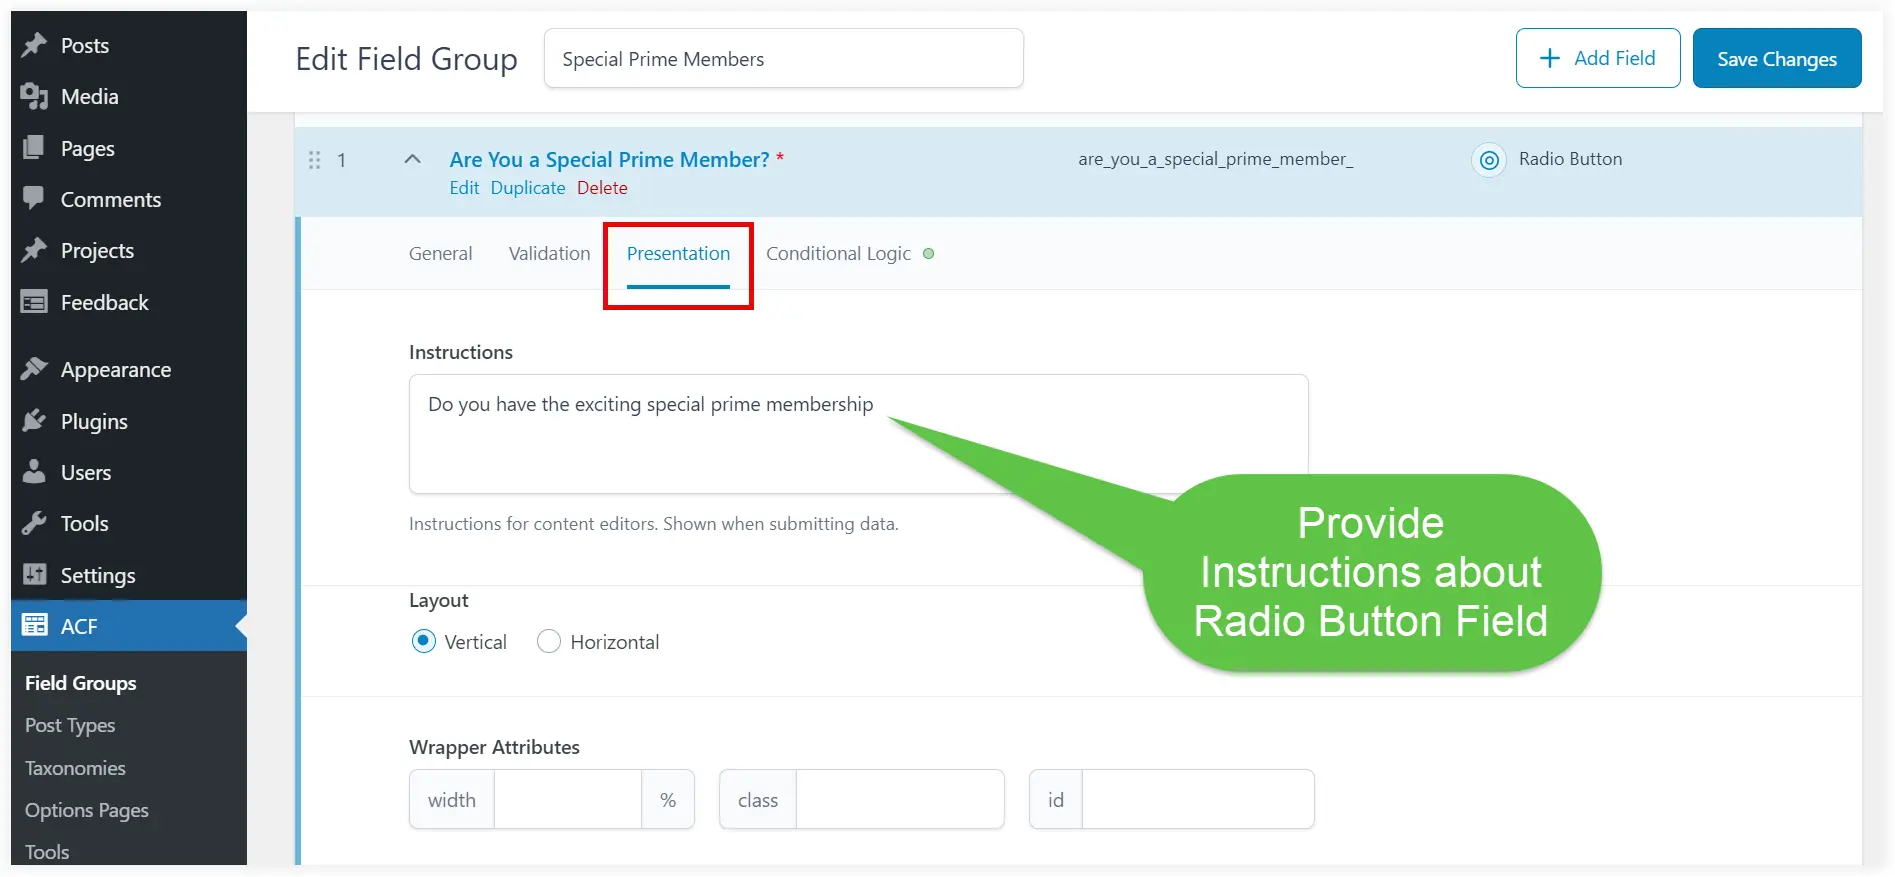
In the Presentation tab, enter the instructions displayed with the custom field label to give a quick idea of what the radio button field is asking.
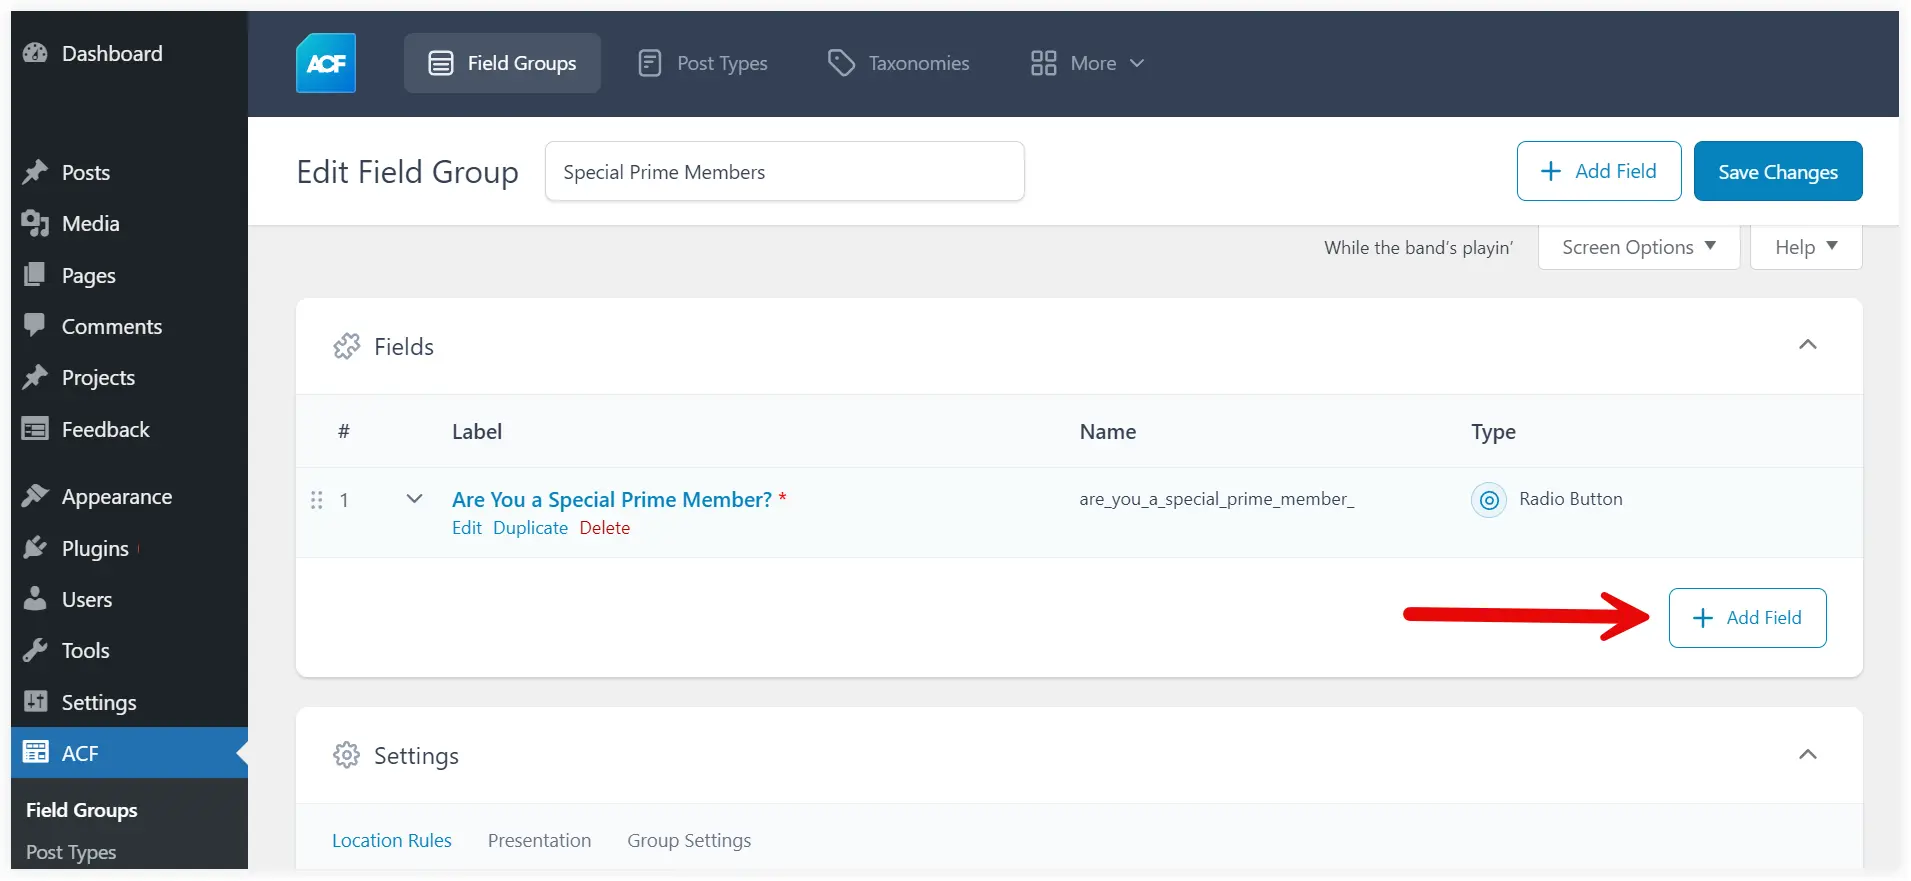
Now we want the Radio button custom field to display the Date Picker field based on the user input.
For that first, we have to add a new Date Picker field. Click Add Field.
Select Field Type as Date Picker.

Fill in the values like Field Label, Field Name, Date Format, Display Format, and Return Format. You can keep all the fields default except for the Field Name and Field Label.
Also, configure the Validation and Presentation settings as we did for the first radio button custom field.
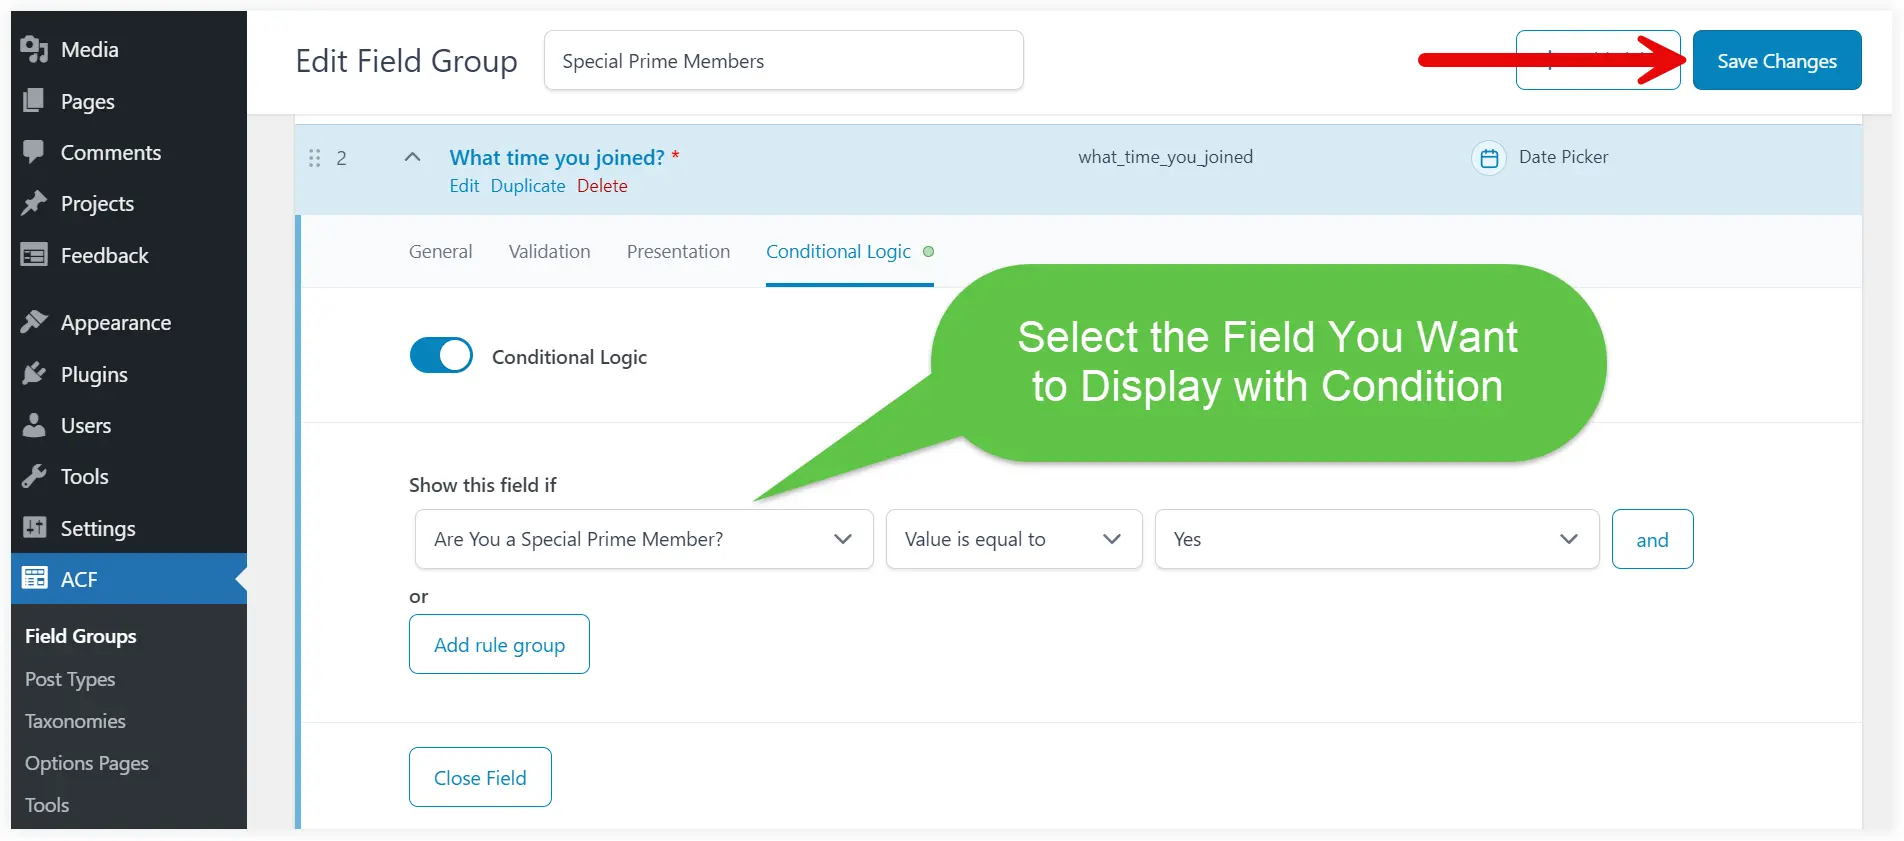
Next comes the crucial ‘Conditional’ setting for this Date Picker field. Enable it. Now we want to show this Date Picker field when anyone selects ‘Yes’ in the previous radio button field. Select that radio button field in Show this field if. Select condition as Value is equal to and Value ‘Yes’.
Now we need to decide where these custom fields will be displayed. The Settings will let you configure that. Go to Location Rules. Set a Rule to show the custom fields on the Post Type – equal to – Post. You can also select options for Page, User, and Forms.
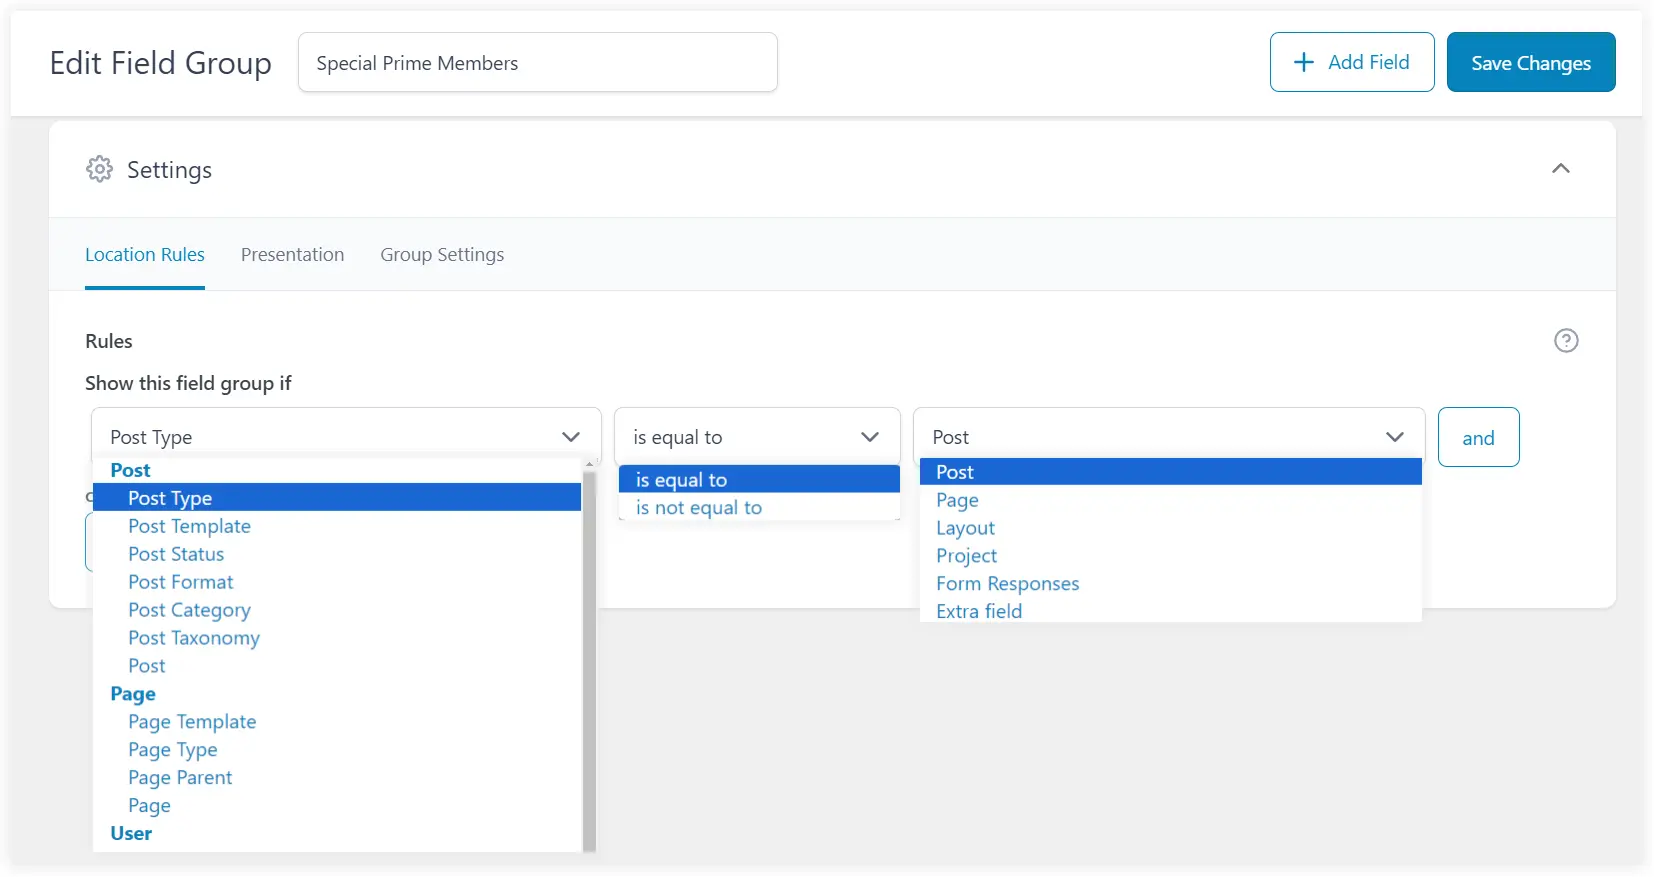
Click on Save Changes. You have successfully created a custom field group.
Create Post to Test Working of Custom Fields
After doing all that configuration and settings in the ACF plugin let’s see if the custom fields we created are visible in the posts and if they are working as we planned.
Go to the dashboard of your WordPress website. Add a new post and edit it with the default block editor. Scroll the Settings sidebar and find the custom fields created under the Post tab.
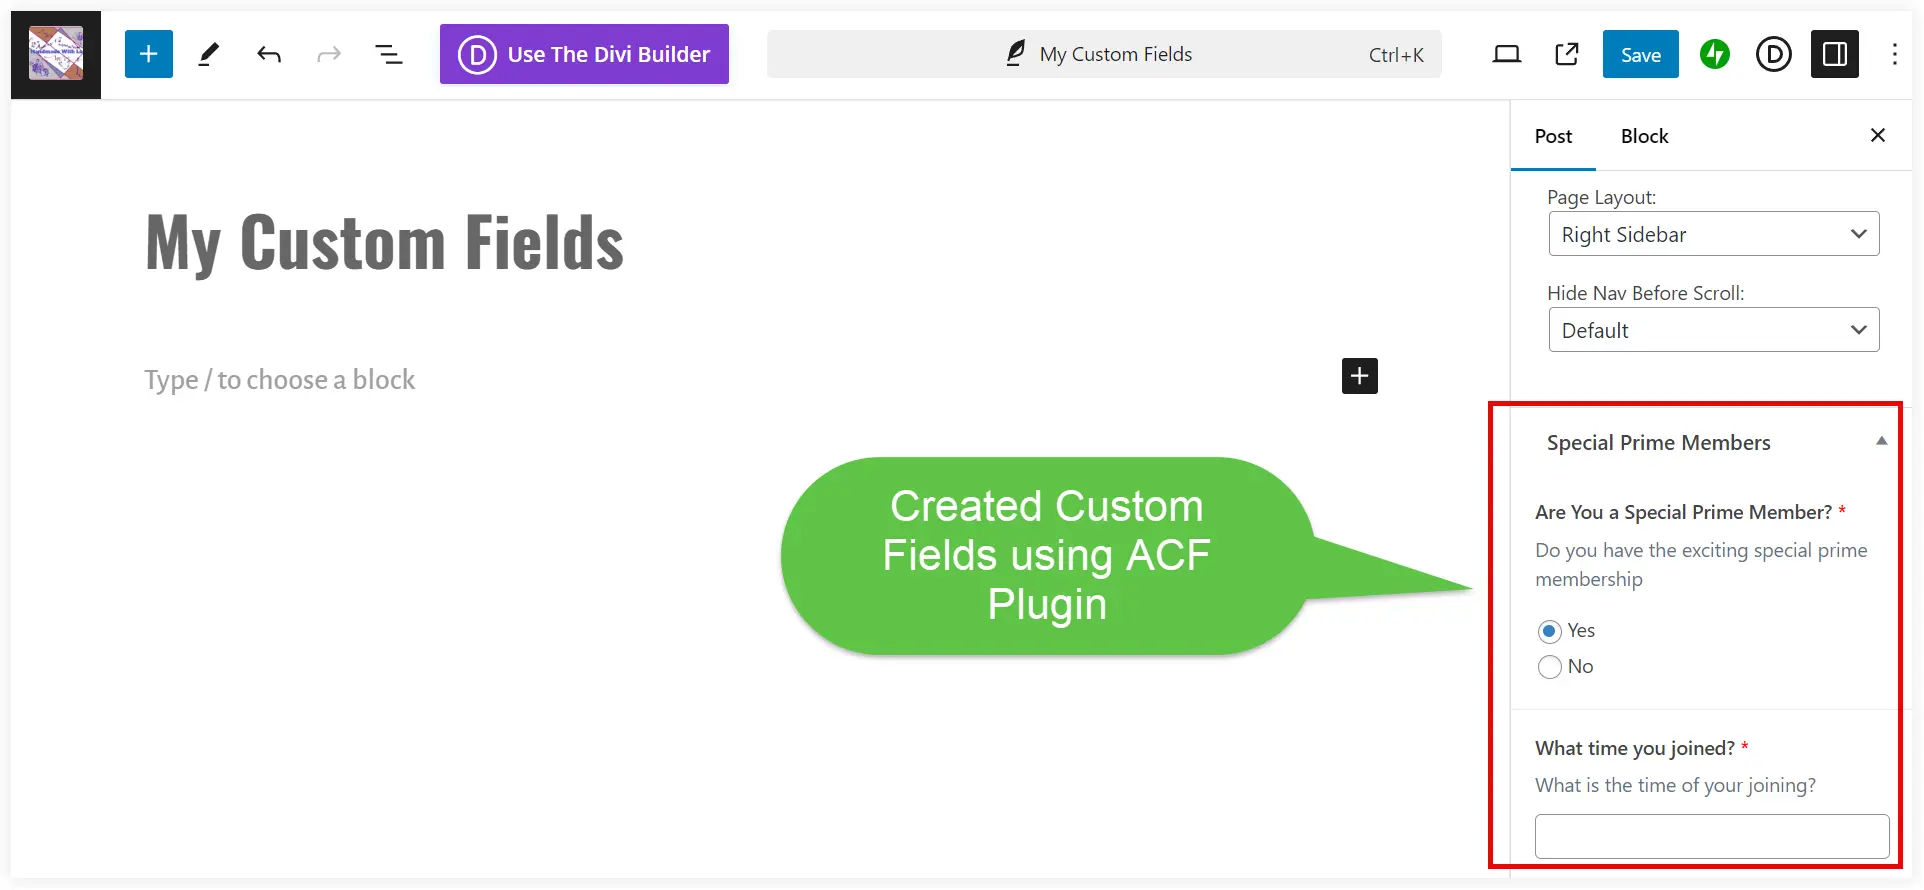
We also need to check the conditional functionality of the custom fields. By default, the selected value of the radio button is ‘Yes’. Select ‘No’ and you will observe that the second custom field will disappear. The condition setting is working perfectly.
How to Display ACF Custom Fields in Divi Using Shortcodes?
After finishing the custom fields, we must show them on the front end. The purpose of creating custom fields is meaningful when their values are displayed. On a WordPress website, there are two ways to do it:
1. Use the built-in ACF shortcodes
You can easily utilize built-in shortcodes to display the values of custom fields on the front end but it is limited to text fields of Gutenberg only. That’s a drawback of using the ACF plugin. ACF sensed these things and provided prebuilt custom ACF blocks that can seamlessly work on Gutenberg to display the values of your custom fields on the front end.
2. Use ACF Code
This is the second way to reflect the values of custom fields on the front end. We can do it uniquely using shortcodes and easy coding tricks.
Let’s see how we can use shortcodes to make the best use of ACF custom fields to display dynamic data throughout your Divi website.
Add the below code to your functions.php file. Before doing this backup your functions.php file.
// Register the shortcode
function diviextended_acf_value_shortcode($atts) {
    // Extract shortcode attributes
    $atts = shortcode_atts(
        array(
            'selector' => '', // Default empty
            'id' => '' // Default empty
        ),
        $atts,
        'acf_value'
    );

    // Get the post ID and selector from attributes
    $post_id = intval($atts['id']);
    $selector = sanitize_text_field($atts['selector']);

    // Check if both post ID and selector are provided
    if (empty($post_id) || empty($selector)) {
        return 'Post ID and selector are required.';
    }

    // Get the ACF value
    $acf_value = get_field($selector, $post_id);

    // Return the value or a message if not found
    if ($acf_value === false) {
        return 'ACF value not found.';
    } else {
        return esc_html($acf_value);
    }
}
add_shortcode('diviextended_acf_value', 'diviextended_acf_value_shortcode');
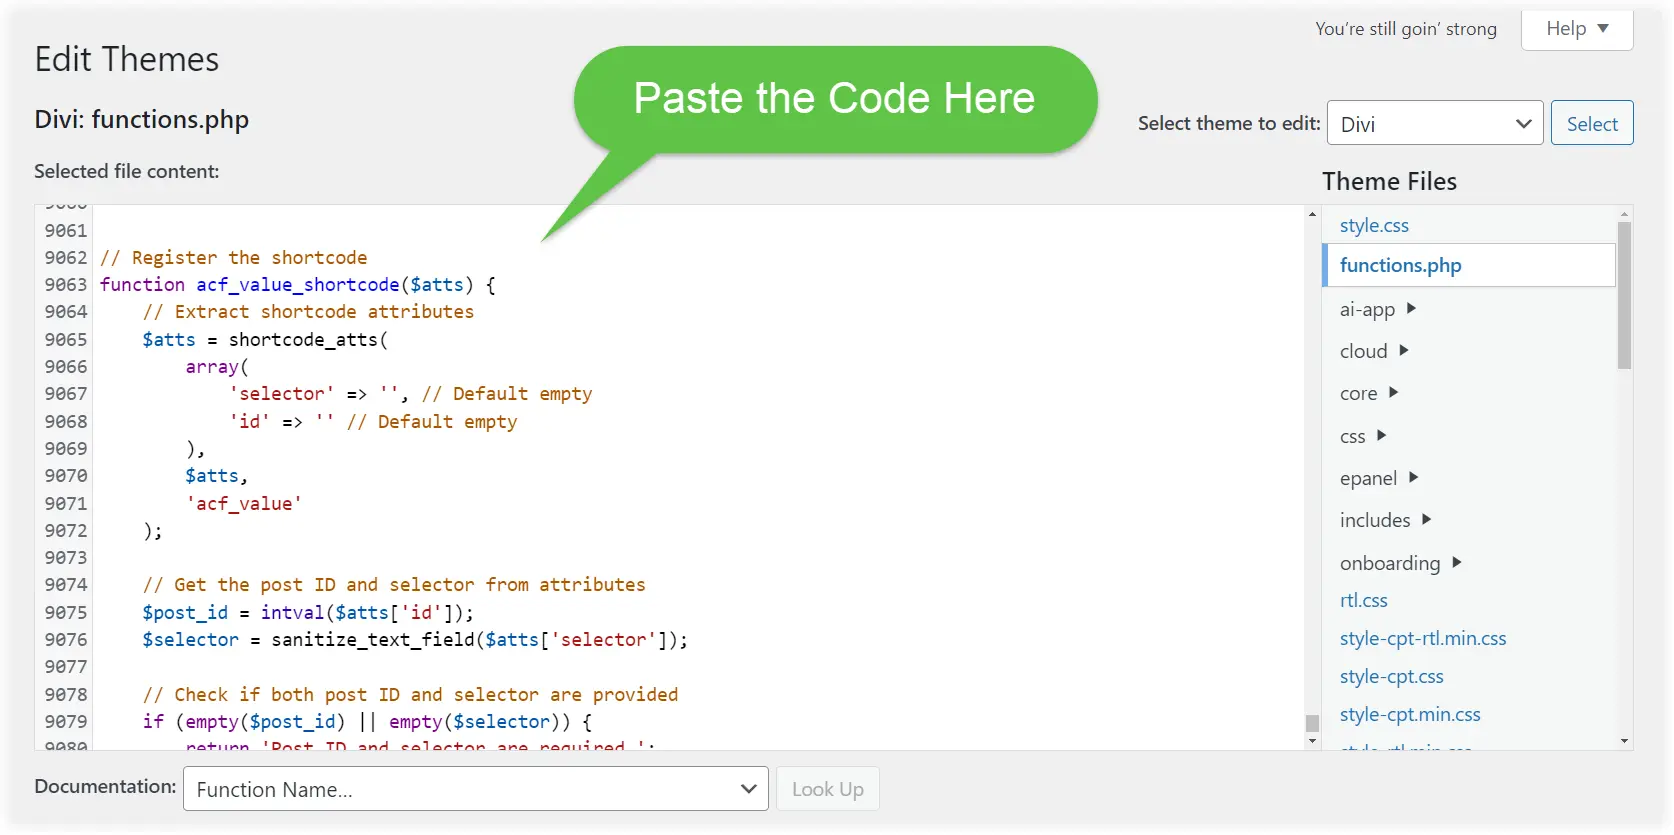
Save the file.
Note: We are configuring it for a post but you can also do it for pages. For that, you have to configure settings for a page in Location Rules while creating the custom fields in the ACF plugin.
Select this combination in ACF Location Rules to apply it to the pages.
Post Type – is equal to – Page
Also, replace this section of the code to work for the pages.
Replace it
    // Get the post ID and selector from attributes
    $post_id = intval($atts['id']);
    $selector = sanitize_text_field($atts['selector']);

    // Check if both post ID and selector are provided
    if (empty($post_id) || empty($selector)) {
        return 'Post ID and selector are required.';
    }
With this
// Get the page ID and selector from attributes
$page_id = intval($atts['id']);
$selector = sanitize_text_field($atts['selector']);
// Check if both page ID and selector are provided
if (empty($page_id) || empty($selector)) {
return 'Page ID and selector are required.';
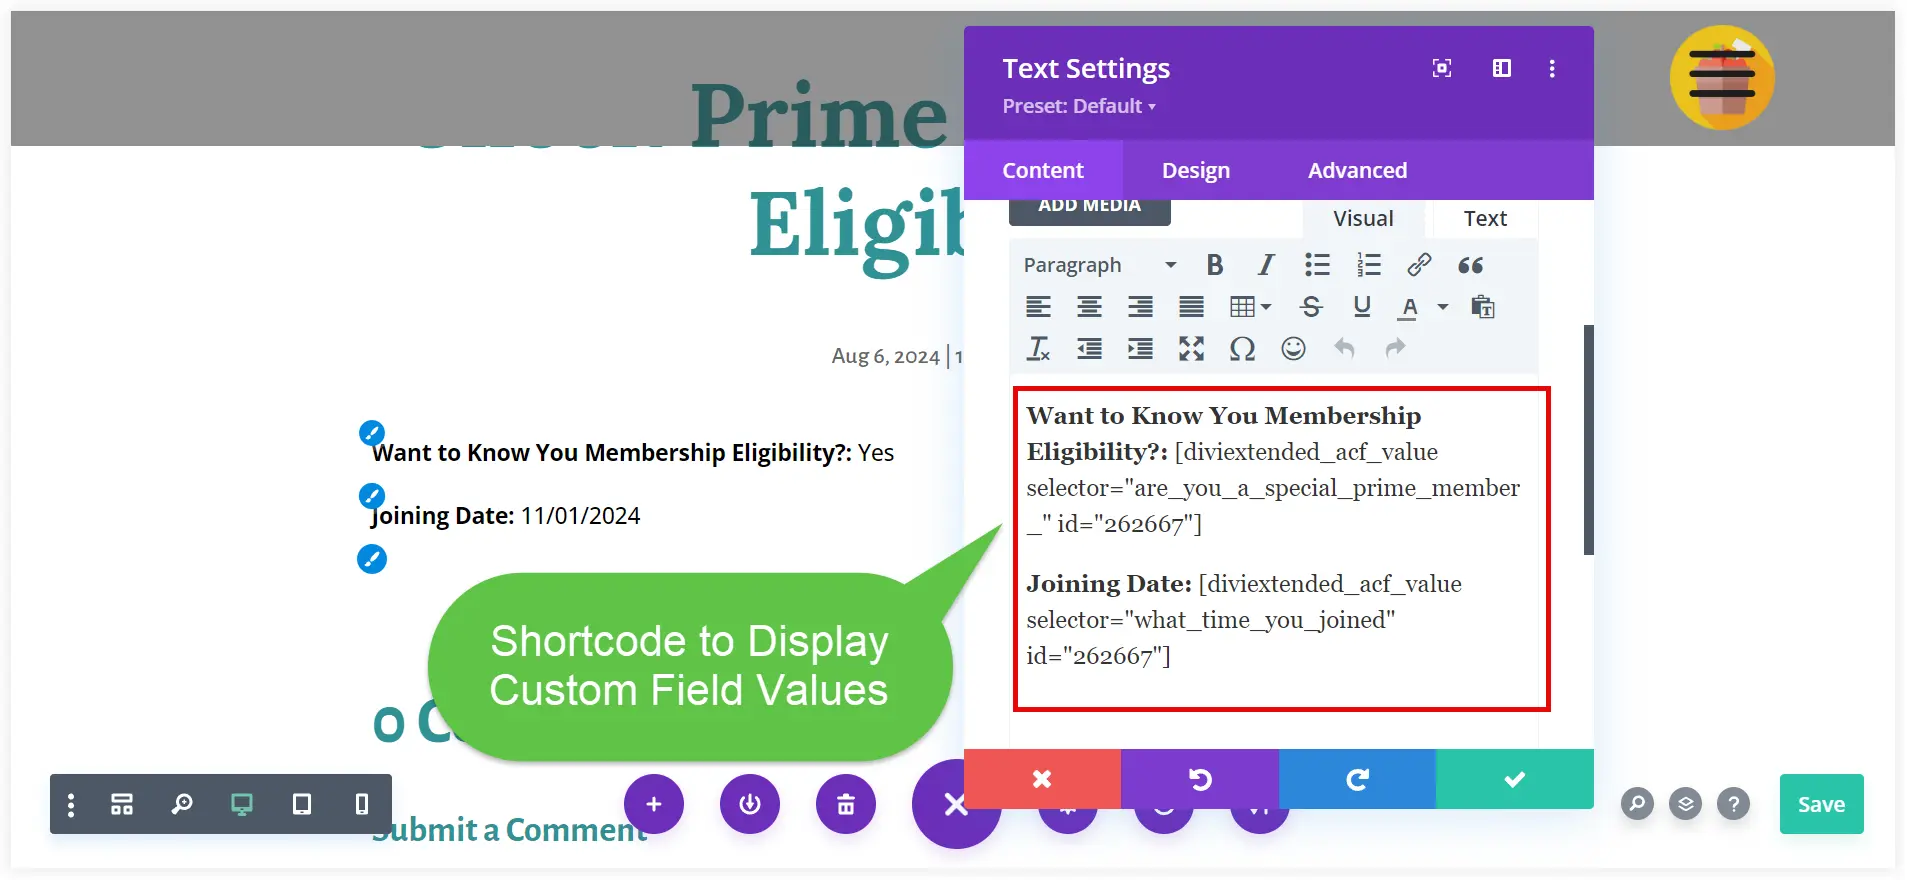
}Edit the post using Divi Builder. Select the Divi Text module and paste the following shortcodes in it. Two Divi Text modules are required to display the values of both these shortcodes.
Want to Know Your Membership Eligibility?:
[diviextended_acf_value selector="are_you_a_special_prime_member_" id="262667"]

Joining Date: [diviextended_acf_value selector="what_time_you_joined" id="262667"]
Replace the post ID in shortcode with the post’s ID where you selected and saved the values of custom fields. Also, replace the “are_you_a_special_prime_member_” with the relevant custom field name that you want to display.
Now you can use the values of those custom fields and display them anywhere on your website using the Divi Text module with shortcodes.
It is an outstanding supersmart solution but we recommend you go for the ACF Pro plugin that offers you easy-to-use prebuilt Gutenberg blocks. You can personalize these blocks as per your requirements.
How to Display ACF Custom Fields in Divi with Dynamic Content Feature?
Divi makes displaying ACF custom fields too easy, even though it is a little tricky without utilizing ACF blocks in Gutenberg. Divi provides the Dynamic Content feature in its modules to do it seamlessly. This is one of Divi’s primary features that sets it apart from its competitors.
Let’s see how we can utilize Divi’s Dynamic Content feature to do that.
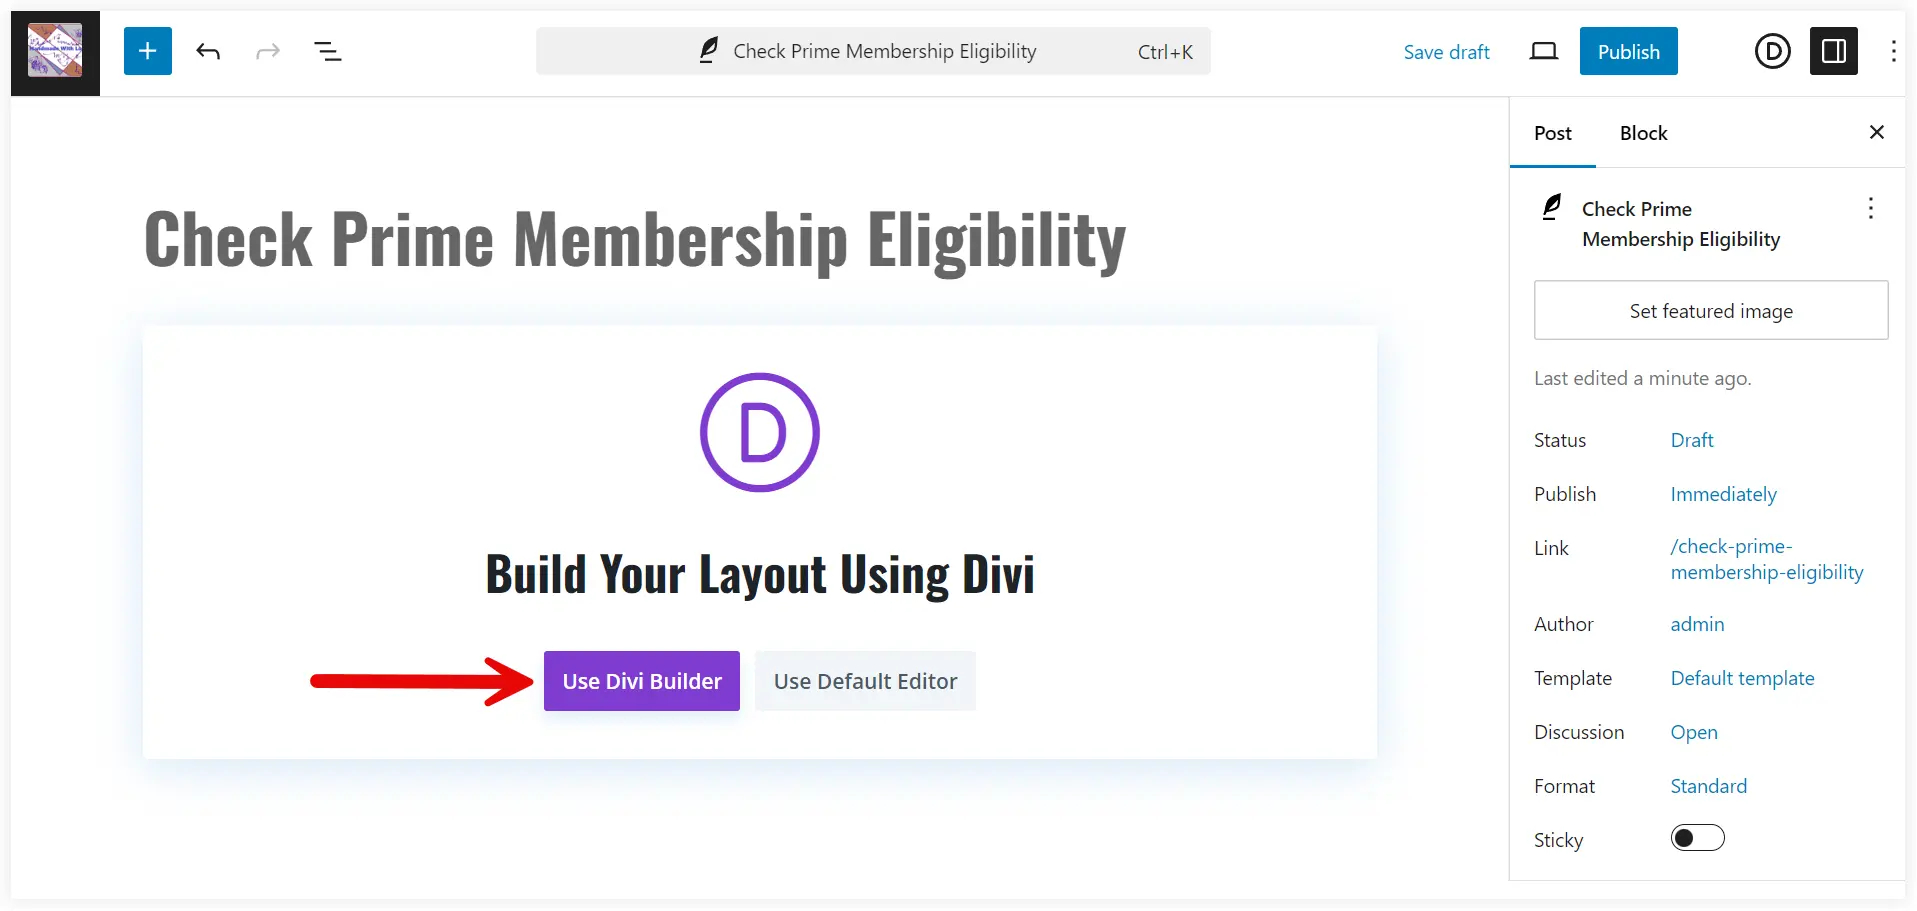
1. You already have created the custom fields to display dynamic values on your website in the earlier section. Open the same post and edit it using Divi Builder.
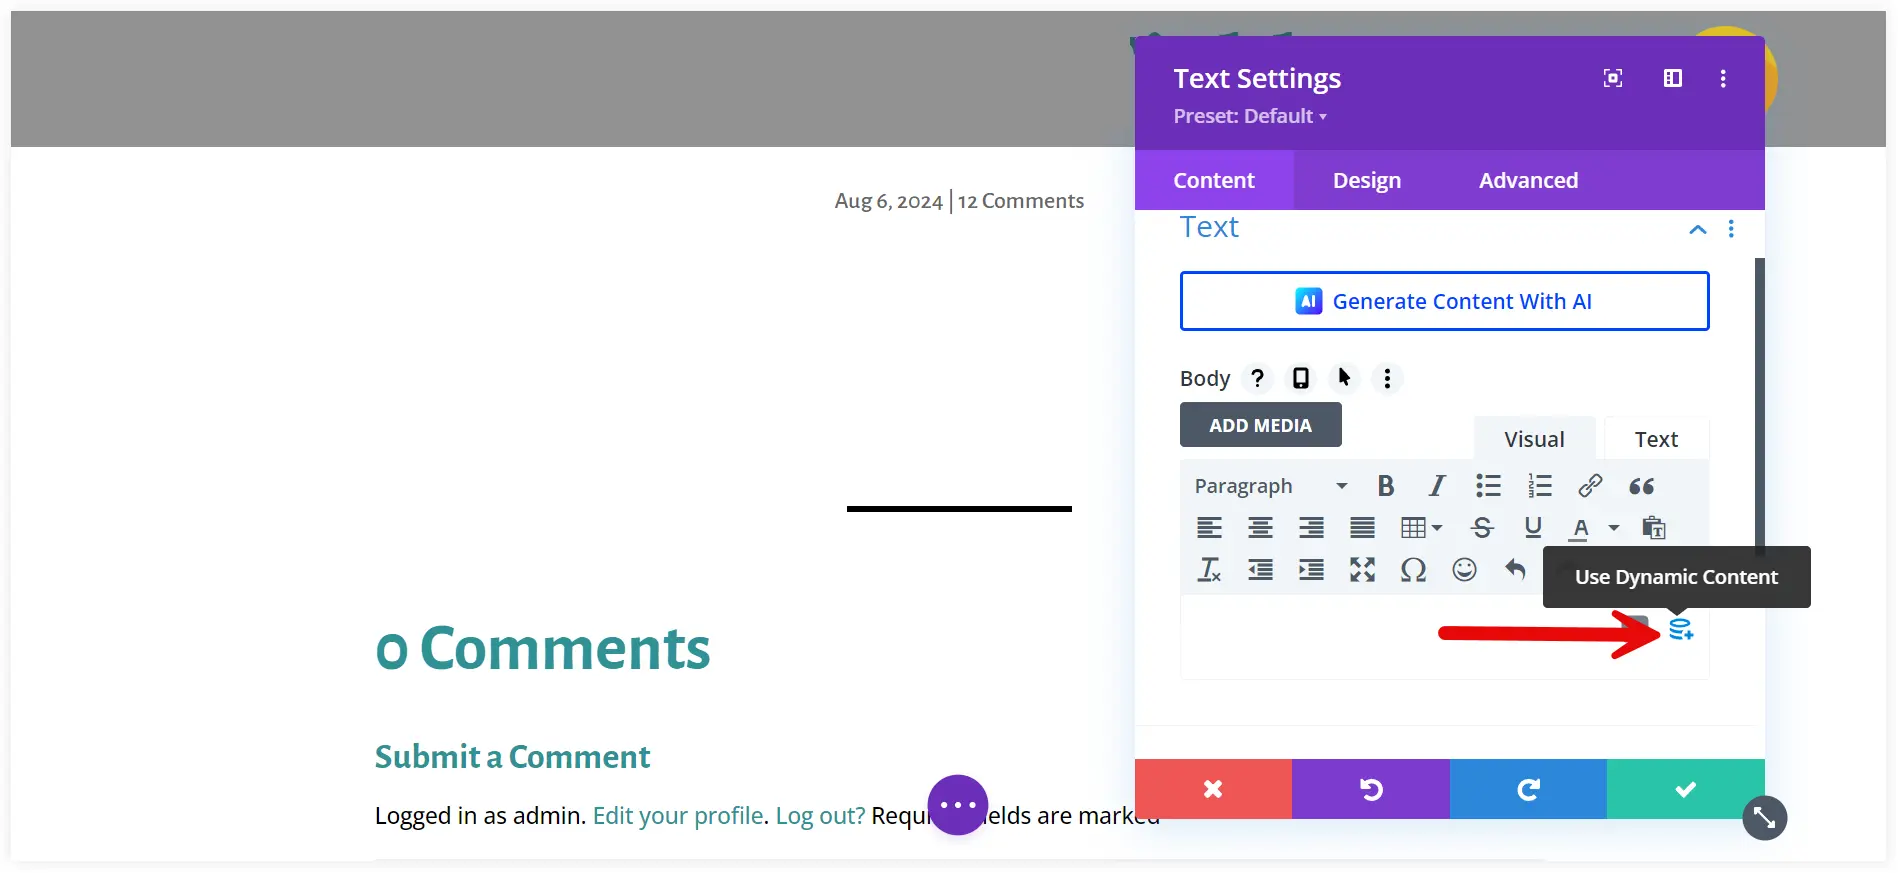
2. Select the Divi Text module and click the Dynamic Content icon.
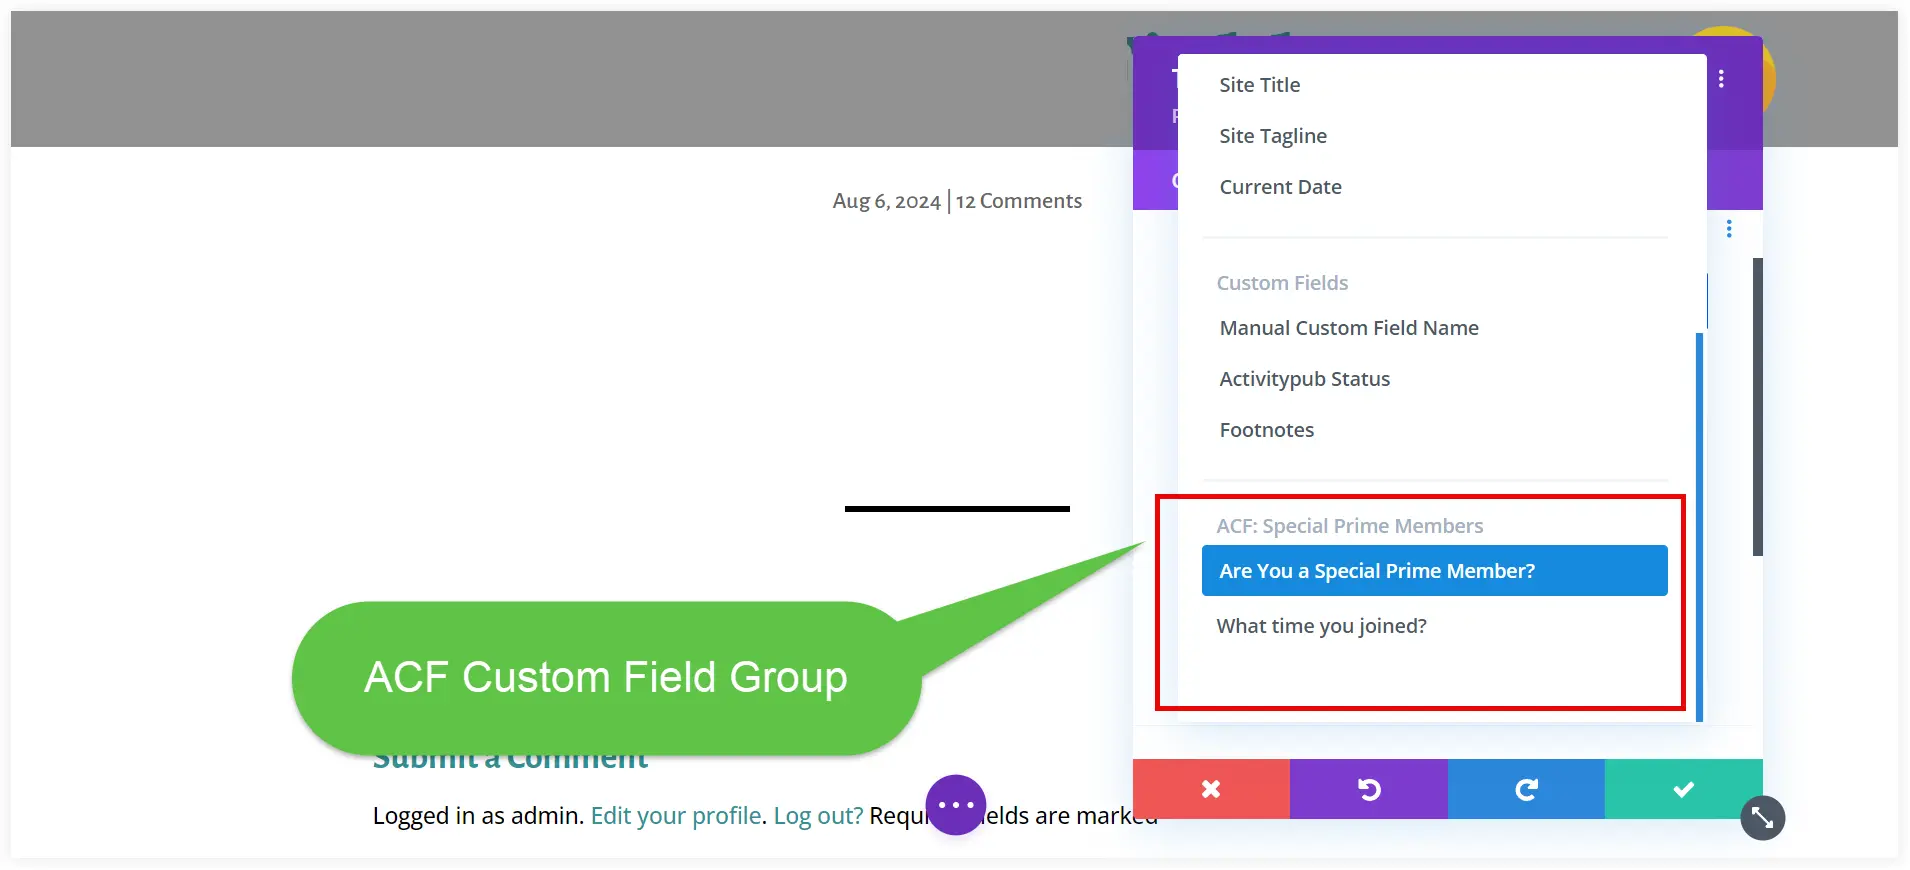
3. Scroll the list and you will notice that custom fields created by us are there under the same ACF field group we created. Select the first custom field.
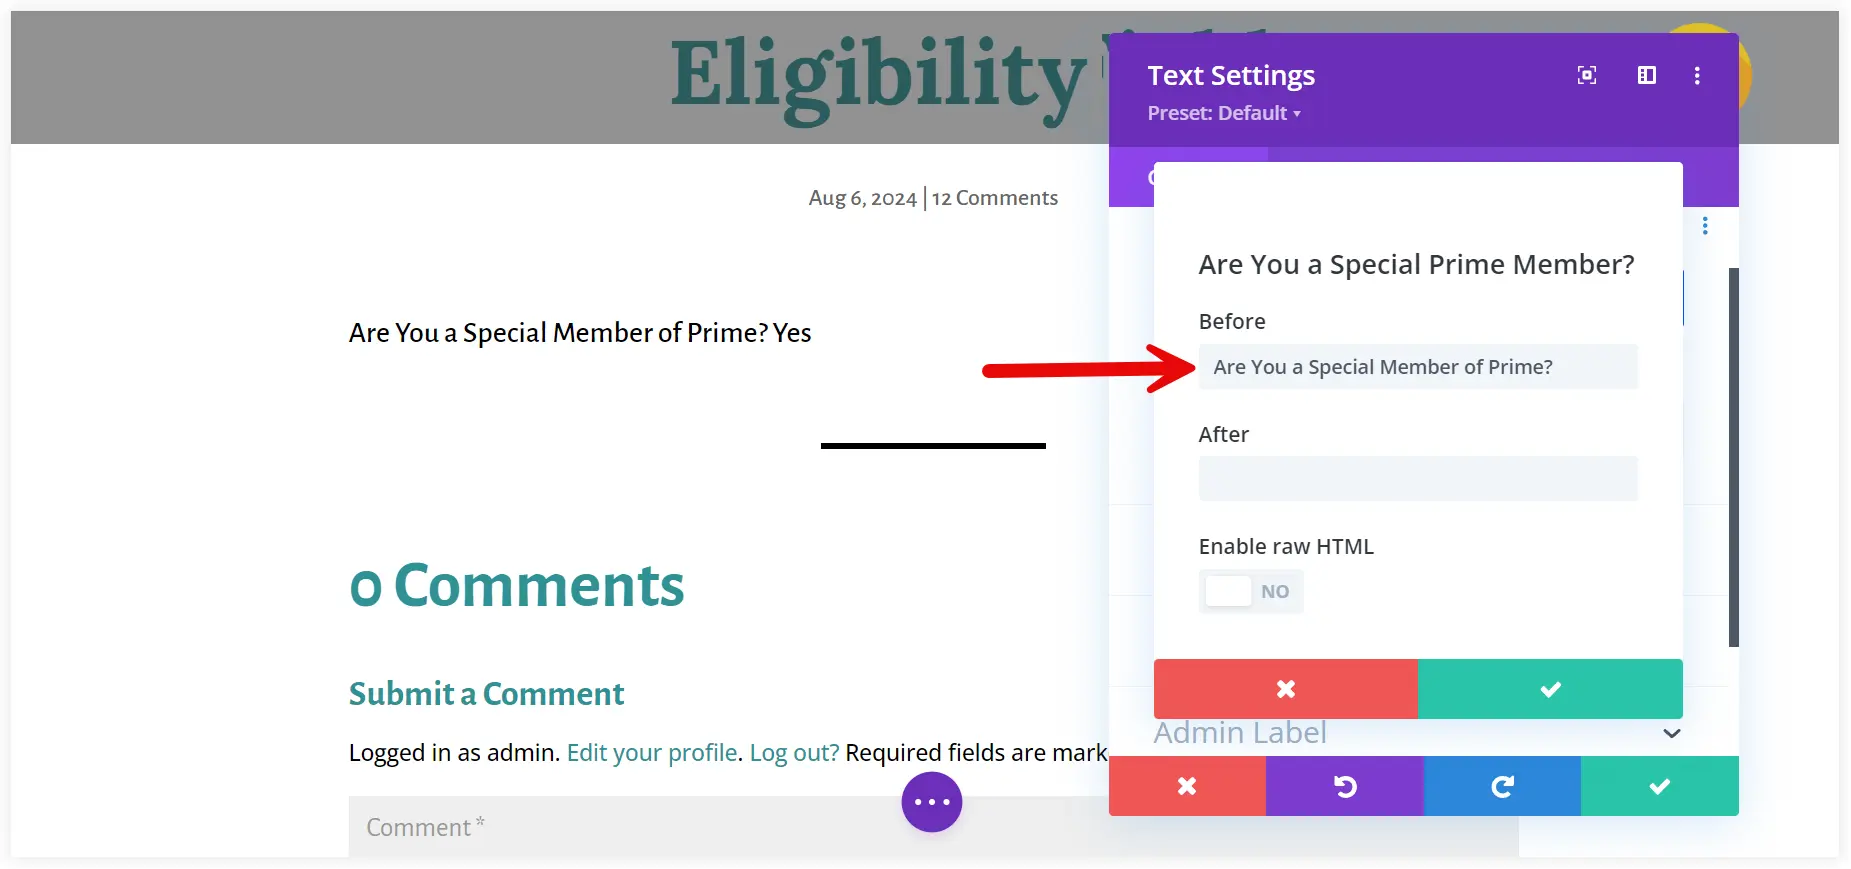
4. Enter the Before Label that will come with the value of that custom field. Click on the green ticks, save the changes in Divi Builder, and publish this post.
5. Similarly, add a new text module and use the Dynamic Content feature to display the value of the second custom field(Date Picker).
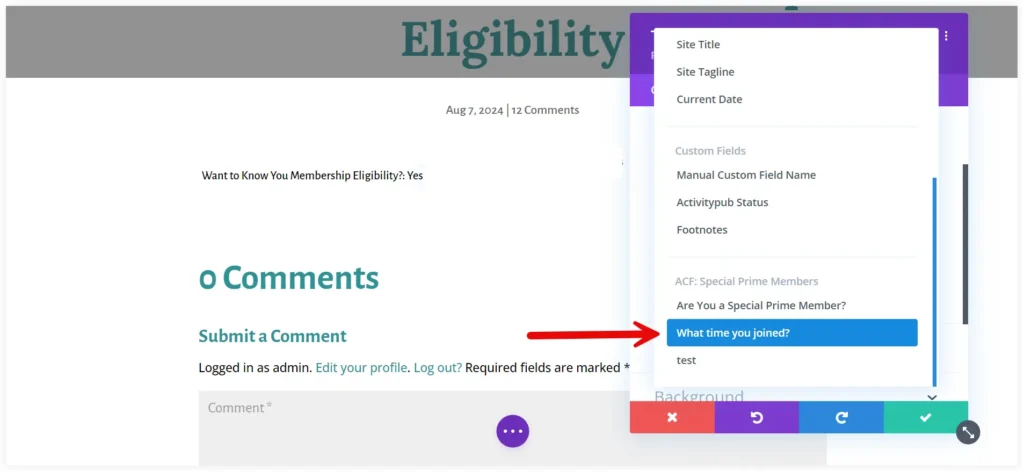
You can add multiple Divi modules to show the dynamic values of custom fields in several sections of a post or page.
6. Publish this post or page on Divi Builder. View it in the front end to see the custom field values displayed.

7. If you want to check the dynamic nature of these custom fields just edit the post and change the date of the second custom field.
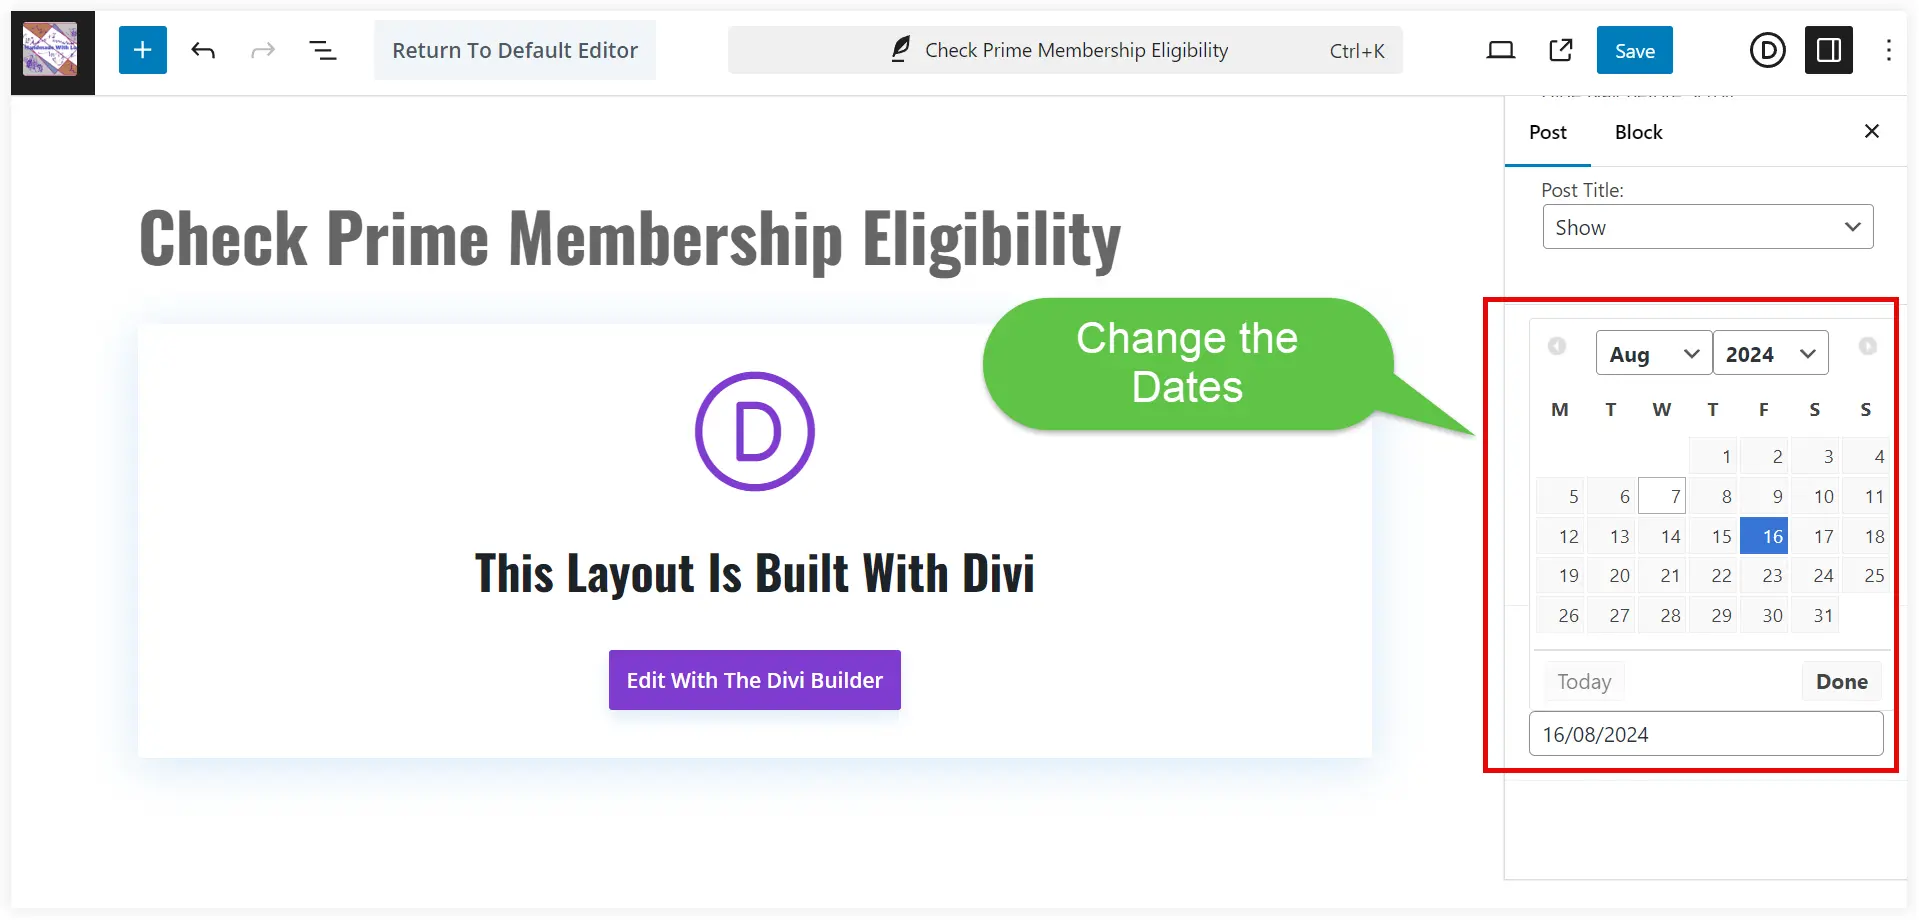
Now verify it on the front end. The date has been changed now. This is the beauty of the Dynamic Content feature in Divi.
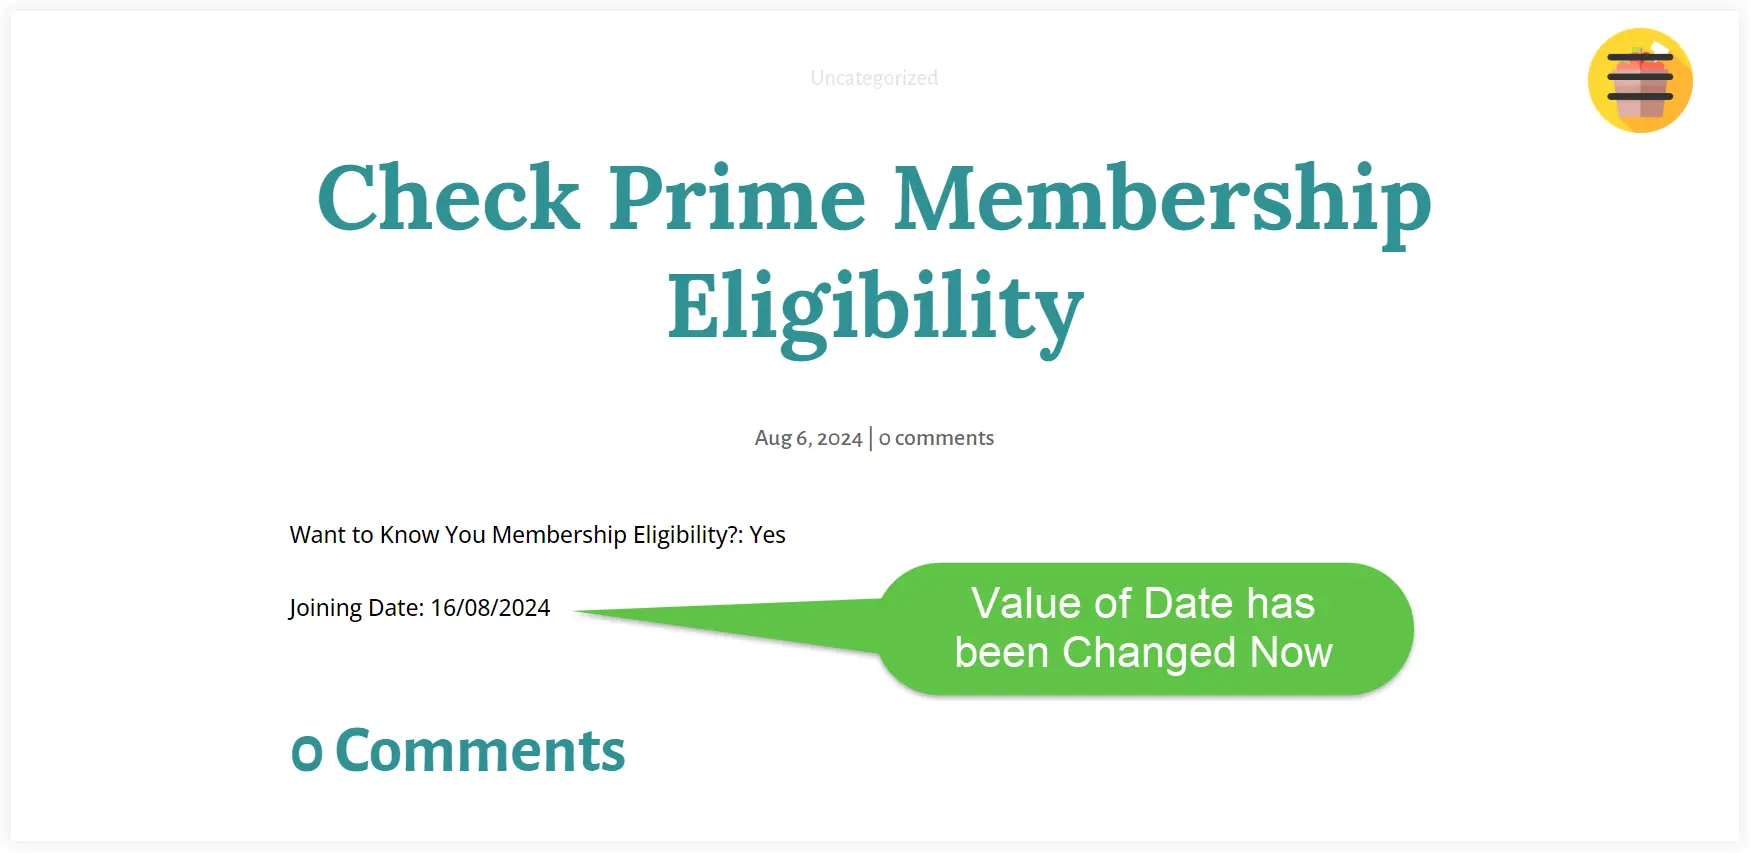
Did you observe that? The values have now changed in the front end. In this way, you can harness the capabilities of Divi’s Dynamic Content feature to pull the real-time values of custom fields across the website.
Final Takeaway
ACF custom fields open a world of possibilities to create dynamic personalized websites. The flexibility of Advanced Custom Fields combines with Divi’s intuitive design power to serve dynamic content for a better user experience. The common approach discussed in this post also helps you to make your Divi layouts dynamic using custom fields. You can follow the steps discussed in this post to learn the skill of integrating Divi with ACF and develop an outstanding dynamic website.


0 Comments