
Search Divi Blog Extras Documentation
Search for answers or browse our knowledge base.
-
Getting Started
- Installation
- Blog page setup
- Category archive setup
- Category background-color
- Layout selection
- Post order type
- Include or exclude posts by ID
- Category filter
- Enable custom post type support
- Enable tags
- Taxonomies relation
- Content settings
- How to set excerpt length in Divi Blog Extras?
- Pagination
- Read time settings
- Blog Extras' widget configuration
- Button formatting settings not being applied or working on front-end?
- How to use the free Divi Blog Extras layouts
- How to display related posts based on the post category using Divi Blog Extras?
- Show all articles ( 4 ) Collapse Articles
-
Videos
- How to create a Divi search result page
- Divi Blog Extras intro and basic setup (Beginners Guide 1)
- Divi Blog Extras pagination formatting and displaying meta info (Beginners Guide 2)
- Divi Blog Extras creating category archives (Beginners Guide 3)
- Divi Blog Extras search result page (Beginners Guide 4)
- Divi Blog Extras related posts (Beginners Guide 5)
- How to translate Divi Blog Extras with Loco Translate plugin
- How to use Divi Blog Extras with Divi projects post type.
-
FAQs
- How to change masonry layout to 6 columns in Divi Blog Extras
- Blurry Images in Divi Blog Extras?
- How to add ACF or custom fields in Divi Blog Extras
- How to move meta after excerpt in Grid Extended layout of Divi Blog Extras
- How to update Divi Blog Extras?
- Is Divi Blog Extras compatible with the extra theme and Divi Builder plugin?
- I purchased the plugin and want to know how can I download it again in future?
- Does It work on both posts and pages?
- Make Block Extended corners square
- How to change overlay opacity in Block Extended layout?
- How to change position of the category in Block Extended layout?
- How to adjust the width of the post content and post media container in Full Width layout?
- Disable animation on hover in Block Extended Layout
- Divi Toolbox conflict
- WPML show more button issue
- How to display featured images in high quality in Divi Blog Extras?
- How to Change or Remove Overlay Opacity in Divi Blog Extras
- Align read more button to the bottom in block extended layout
- Remove border radius from category in Block Extended layout
- Adjust the width of media and content in Full-Width layout using CSS
- Change pagination URL to numbers
- Display title only on hover in Masonry layout (Block Extended Variant)
- Add space between Masonry Layout
- Remove border from numbered pagination
- How to create a search result page in Divi using Divi Blog Extras plugin
- Remove link from categories in Grid Extended Layout
- How to hide all categories except first in Block Extended Layout
- Display post tags along with categories on the front-end
- How to change text of read more link?
- Images not appearing in Divi Blog Extras on mobile
- What is the difference between various image sizes
- Remove links from Box Extended title and image
- Remove links from fullwidth layout title and image
- Hide Separator Between Fullwidth Layout Articles
- Disable linking from post title and featured image
- How to format Load More button?
- How to enable “All Posts” link in Category Filter”
- How to remove meta field icons in Block Extended Layout?
- Post Offset
- Category Filter not working?
- How to put a border around the image only in Grid Extended layout.
- How to align read more button at the bottom in Vertical Grid slider
- Pagination not working?
- How to add an overlay color to the featured image on hover?
- How to display posts in random order
- How to use Divi Blog Extras without featured images?
- How to turn Block Extended layout in 2 columns full width
- How to turn Block Extended layout in 2 columns
- How to turn Block Extended layout in 4 Columns
- How to turn Block Extended layout in single centered column
- Hide/Show author, date, and comment meta
- How to remove round corners of Block Extended layout and make them square
- Slider navigation showing as PREV and NEXT instead of arrows?
- How to move all images on right in Grid Extended layout
- How to move all images on left in Grid Extended layout
- How to move all images on right in Box Extended layout
- How to display full width text in Full Width Background layout
- How to change "No Results Found" text
- Category filter not appearing?
- How to change the font size of post title and meta in widgets
- Remove link from the featured image, post title, and categories
- Page with Divi Blog Extras resulting in fatal error or shows disrupted layout?
- Info about Divi 4.10+ compatibility update
- How to add a border radius to filterable categories
- How to add border radius on image and content box in box-extended layout
- Ordering issue in masonry layout?
- Change style of "No results Text" message
- Change the order of categories in the category filter
- Full width layout with smaller image
- Alt Tag on Images
- How to move arrow icon outside the slider container in Divi Blog Extras?
- First image on left in grid extended layout
- Blogs not visible on pages
- How to display block extended image without cropping
- Change the order of meta data in slider layout
- Remove the box shadow in Block Extended layout
- How to disable category/terms link in blog layouts?
- How to remove on hover effect in Grid Extended layout?
- Display custom posts by ID
- Change the order of meta data in masonry layout
- Change arrow in blog slider
- Move category below the meta fields in block extended layout
- How to remove separator in between title and text in Masonry variant-vertical grid
- How to display category along with meta in Block Extended?
- Sticky posts not working?
- How to remove hover effect from image in Block extended masonry layout?
- How to remove round corners of Slider Block Extended layout and make them square
- Change the full width layout elements into stack for mobile view
- Break point change for tablet view in Slider grid extended variant
- Blog Extras Slider layout is not responsive
- Place the filter category list on the right in Divi Blog Extras
- No categories or tags to choose from in blog extras plugin
- How to show category tag on Image in Grid Extended layout?
- Move category below the image in block extended layout
- How to turn Grid Extended layout in 2 columns?
- How do I move the title below the image in Divi Blog Extras' classic layout?
- How can hide the vertical pipe in the post meta of the Divi Blog Extras full-width layout?
- How can the calendar icon be removed from the Divi blog extras' masonry layout?
- Why is the "Random" order type not recommended for pagination?
- How to turn Block Extended layout in 5 columns?
- What are the price differences between purchasing Divi Blog Extras through diviextended.com and elegantthemes.com?
- Remove link from categories in Block Extended Layout
- How to change Grid Extended layout to 3 columns in Divi Blog Extras
- How to change Grid Extended layout to 3 columns with image on top in Divi Blog Extras
- Move meta content below the feature image in the Block Extended layout
- How to show full feature image in divi blog extras-grid extended
- How to display button in post excerpt?
- Menu items and category ordering/sorting
- How to change the category font and size in Block Extended?
- How to reduce the post content padding in the Masonry: Vertical Grid layout?
- How to capitalize the category text?
- How can I display the category filter similarly across all devices without using the hamburger menu icon?.
- How to disable the display of featured image on mobile in Divi Blog Extras?
- Align elements in vertical grid layout
- How to change position of "Load More" pagination button in the Divi Blog Extras?
- Why are posts not appearing in the correct chronological order in the Masonry Vertical Grid layout?
- How to display equal images in Divi Blog Extras?
- How to add a border to the filterable category in Divi Blog Extras?
- How to set different column numbers for desktop, tablet, and mobile in the Divi Blog Extra module?
- How to display images in a 1:1 ratio in Block Extended layout
- Show all articles ( 105 ) Collapse Articles
-
Developer Documentation
-
Blog Extras Child Themes
Installation
File Structure
The name of the plugin file is divi-blog-extras.zip. It can be downloaded from the link in the order confirmation email. The plugin is also available for download from the My Account area. If the plugin was purchased from any vendor, the download link will be available on their website.
Recommended Requirements
- Divi Builder
Installation
Divi Blog Extras can be installed using 2 methods:
From WordPress Dashboard
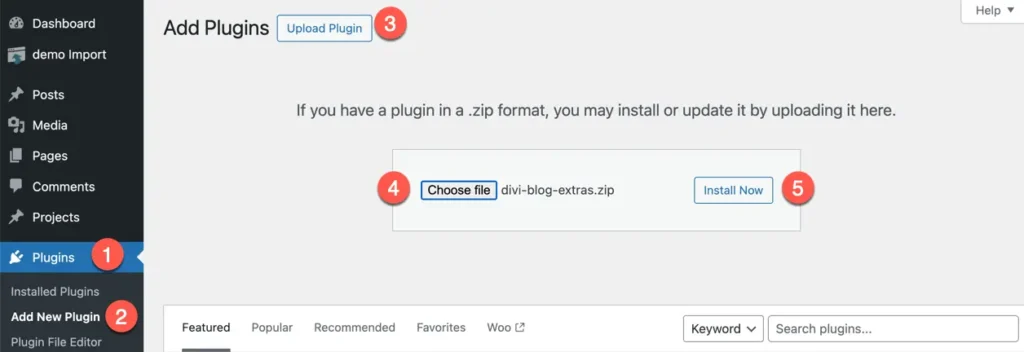
Go to WordPress Dashboard >> Plugins >> Add New >> Upload Plugin >> Choose File >> Browse divi-blog-extras.zip and click Install Now >> Activate Plugin.
Manually Uploading via FTP
- Extract divi-blog-extars.zip.
- Connect to your server using FTP application.
- Navigate to wp-content/plugins/.
- Upload the divi-blog-extras directory in the plugins directory of your server.
- Go to WordPress Dashboard >> All Plugins > >Activate Divi Blog Extras.
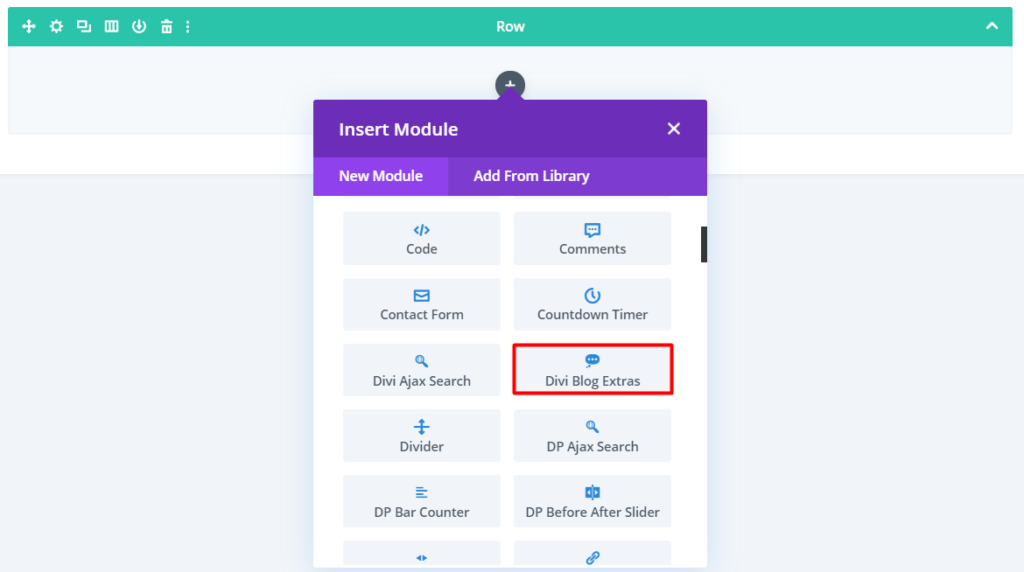
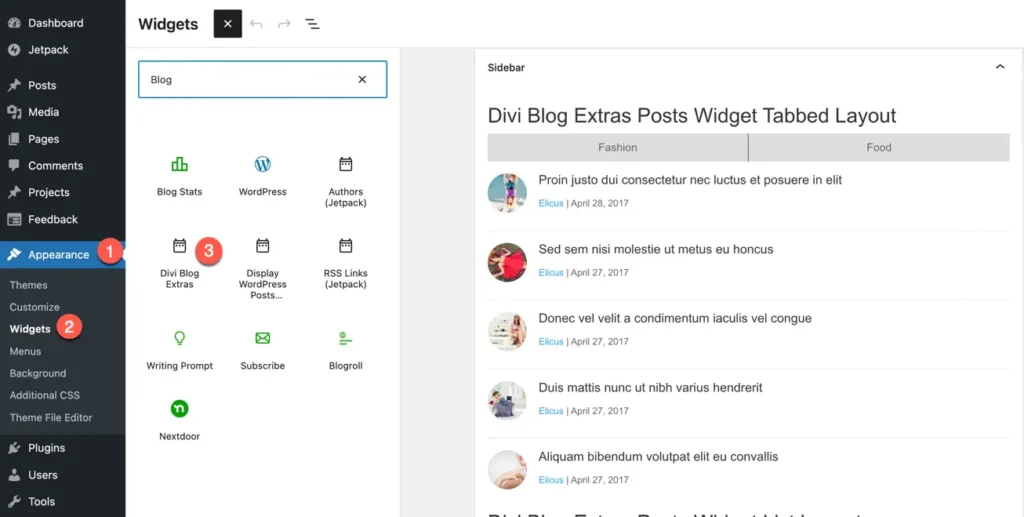
Once the plugin is activated, it will add the following two items to your site:
A new blog module to Divi Module Library named Divi Blog Extras.
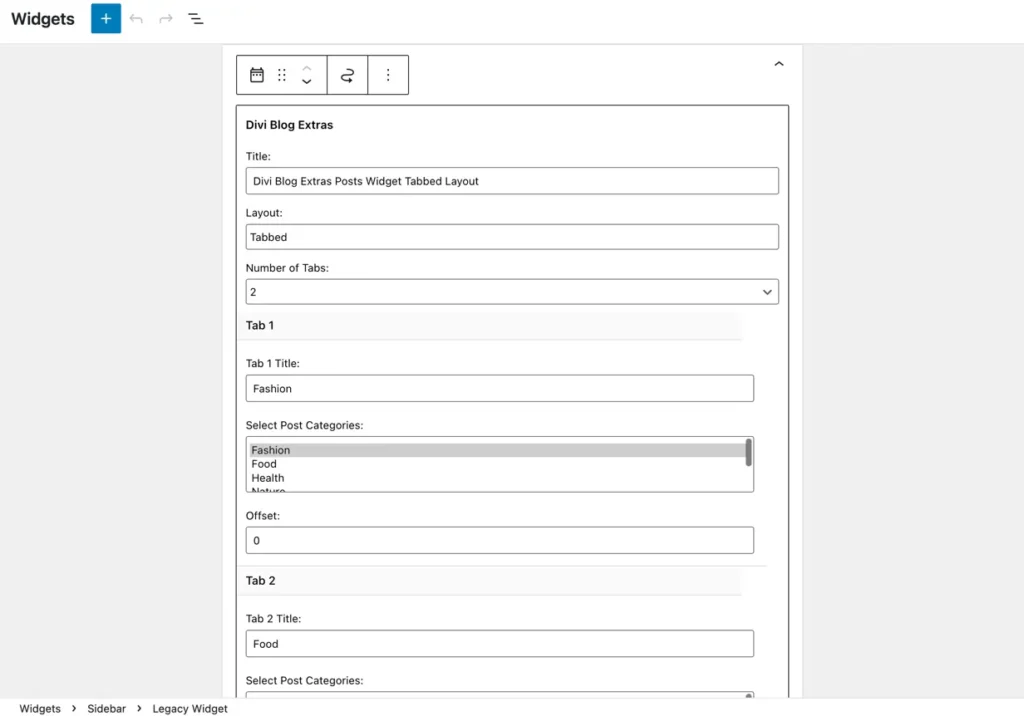
A Widget with the following settings.
At this stage, you are good to go to the next step and create your stunning blog and pages using Divi Blog Extras.