
Have you changed your host more than once and still feel unsatisfied with the performance? Then going through this blog post till the end, would help you to decide and choose a better platform to host your WordPress website.
Without taking much time, let’s get right into it.
Primary advantages over shared hosting
Speed: Speed is one of the most critical factors for a website. A slow website may turn down a visitor and thus cause potential business loss. There are many techniques available for improving website speed, but a sluggish web server fails them all. Hosting a WordPress website with the smallest available plan at the Digital Ocean is far beyond sufficient compared to standard shared hosting.
Cost: Starts from $5 per month, which comes with 1 GB RAM / 1 CPU, 25 GB SSD disk, and 1000 GB transfer that is sufficient to host half a dozen moderate traffic based sites without any issue. In this post, we only cover setting up 1 WordPress website on Digital Ocean.
Scalability: The highest available plan to opt-in for is 192 GB RAM / 32 CPU, 3.75 TB SSD disk, and 12 TB data transfer. It cost $960/month. There is complete control over switching a plan from lower to higher.
Option to choose the Data-center region: With Digital Ocean’s hosting plan, you get an option to select your droplet data center region. Such as USA, EU, Asia, or a few others as your server location based on the location of your most prominent visitor segments.
What to expect?
This tutorial covers the standard steps required for setting up one’s server powered on Digital Ocean with Plesk hosting control panel. In general, there is no limit on the number of websites you can host on a droplet provided in Digital Ocean’s hosting plan— even with the $5 plan. However, the Plesk hosting control panel that comes for free allows only 3 Domains to host on the server.
Requirements and experience
- An account on Digital Ocean for creating a Droplet,
- Ability to log in to SSH. One time login is required to initiate the WordPress installation process. We will cover the steps below.
- Familiarity with SSH and Putty.
- Knowledge about the WordPress installation process.
- Familiarity with the DNS update process to point a domain to Digital Ocean. Not familiar? Don’t worry, the Digital Ocean documentation has some useful documents on this.
Getting Started
Generating SSH key pair
Until recently, there was no username and password emailed to users after creating a droplet to connect the Digital Ocean droplet by default with Plesk installed using the available tools. Plesk requires SSH key for installation, and when Plesk gets installed on a Digital Ocean droplet, no root username and password is emailed like a standard droplet. The SSH keys passcode is required to log in to the server via SSH and access initial Plesk commands to complete the installation.
Installing Plesk
Go to Create droplet option
Select Marketplace section under Choose an image
Select Plesk with Ubuntu
In the choose a plan section, select Standard, General Purpose, CPU-Optimized, or Memory-Optimized. Under each plan, there are different sets of droplet configurations. For a regular WordPress website, the basic plan will work just fine and can easily handle a few thousand visitors per month. One of the best things about Digital Ocean hosting is the ability to upgrade a plan, which you can do later if required.
We could skip the block storage settings as 25GB is more than sufficient for standard websites.
In the data-center section, you can select the closest data center to the primary site user traffic.
In the select additional options section, enable monitoring, and leave everything else unchecked.
Preparing Plesk for the first run
What is the login URL for Plesk Control Panel?
http://x.x.x.x:8443
http://example.com:8443
Once the installation is complete, the Plesk Control Panel can be accessed using the above two URL patterns using a web browser. x.x.x.x is the IP address of the Droplet. You can get the IP by going to the Droplets page on your Digital Ocean account. The same was emailed to you after creating the Droplet if you decided to choose the one-time password option while installing Plesk.
example.com refers to the domain that points to this Droplet.
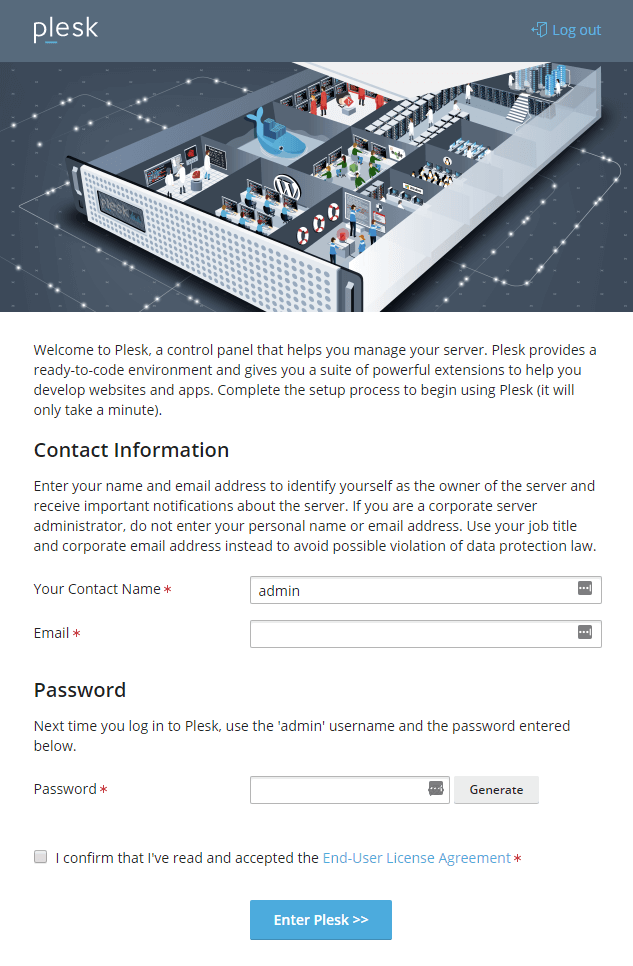
The first run of Plesk installed using the Digital Ocean marketplace tool requires some basic setups, which include setting up the admin password.
Log in using the password received in your email account and the configuration process for Plesk to start.
On this screen, set up your name and email address. Your default username is admin, as the screen suggests. Then finally enter your password for the Plesk Control Panel and click on Enter Plesk.
When you’re through the above step, you will be taken to the Plesk Control Panel. Plesk is a very powerful tool, and the free version available for Digital Ocean users can host up to 3 domains. If you are looking for a server to host multiple websites, you could go for a pro plan which will let you host more than 3 domains.
Pointing a Domain to Digital Ocean Droplet
If you don’t want to move your entire domain services to Digital Ocean like emails, DNS configuration, you don’t need to point your entire domain to Digital Ocean Nameservers. Instead, you can only create A records for your domain that points to the IP address of the Droplet. Here is a typical entry that you need to make on your domain registrar website for your domain.
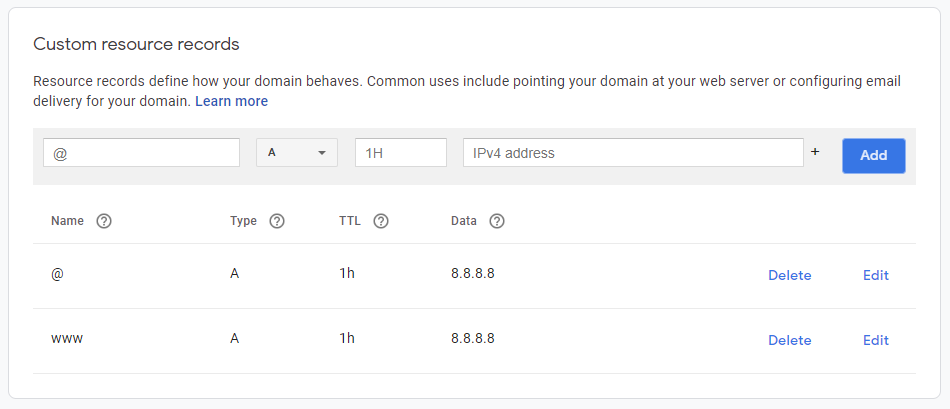
In this example, if your domain is registered with Google Domains, the above A records will start pointing your domain to Digital Ocean Droplet. In the screenshot, 8.8.8.8 is not the value you need to put but the actual IP address of your Droplet.
Adding the Domain to Plesk
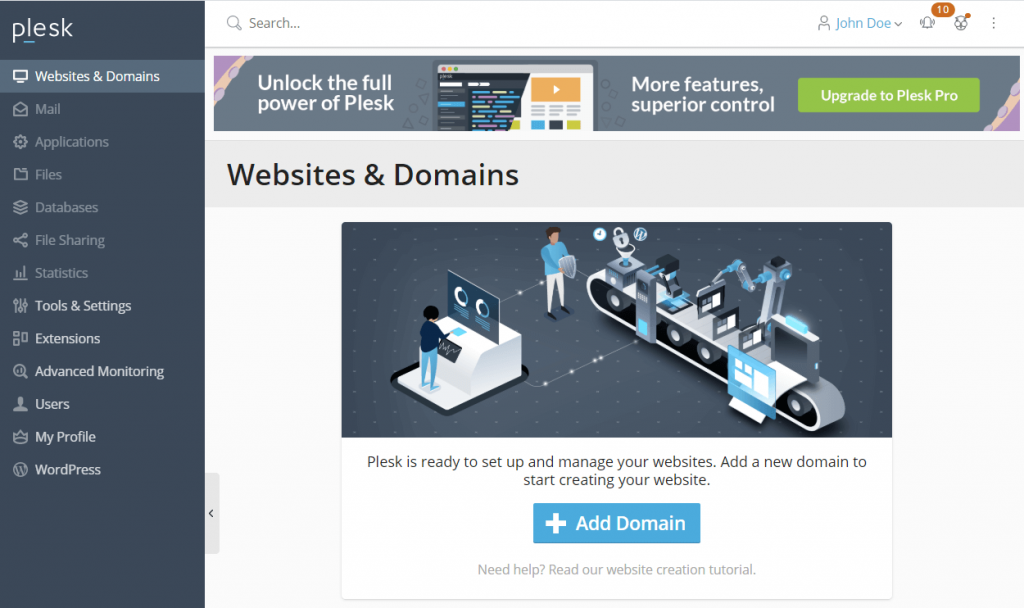
Now, when you’re ready with your Domain pointing to the Digital Ocean Droplet, you can log in to the Plesk Control Panel again. Click on Add Domain button on the Websites & Domains page to allocate webspace.
When we purchase hosting from a managed hosting provider, everything is ready to use, and we don’t need to add the primary domain ourselves. An automated system does it, and our primary domain is ready to use after placing the order. In that case, if we have to add the second domain, we go to the Addon Domains page and add webspace for that domain.
Working with this edition of Plesk is similar. However, unlike the above approach, we add the primary domain manually (keeping the goal of this article).
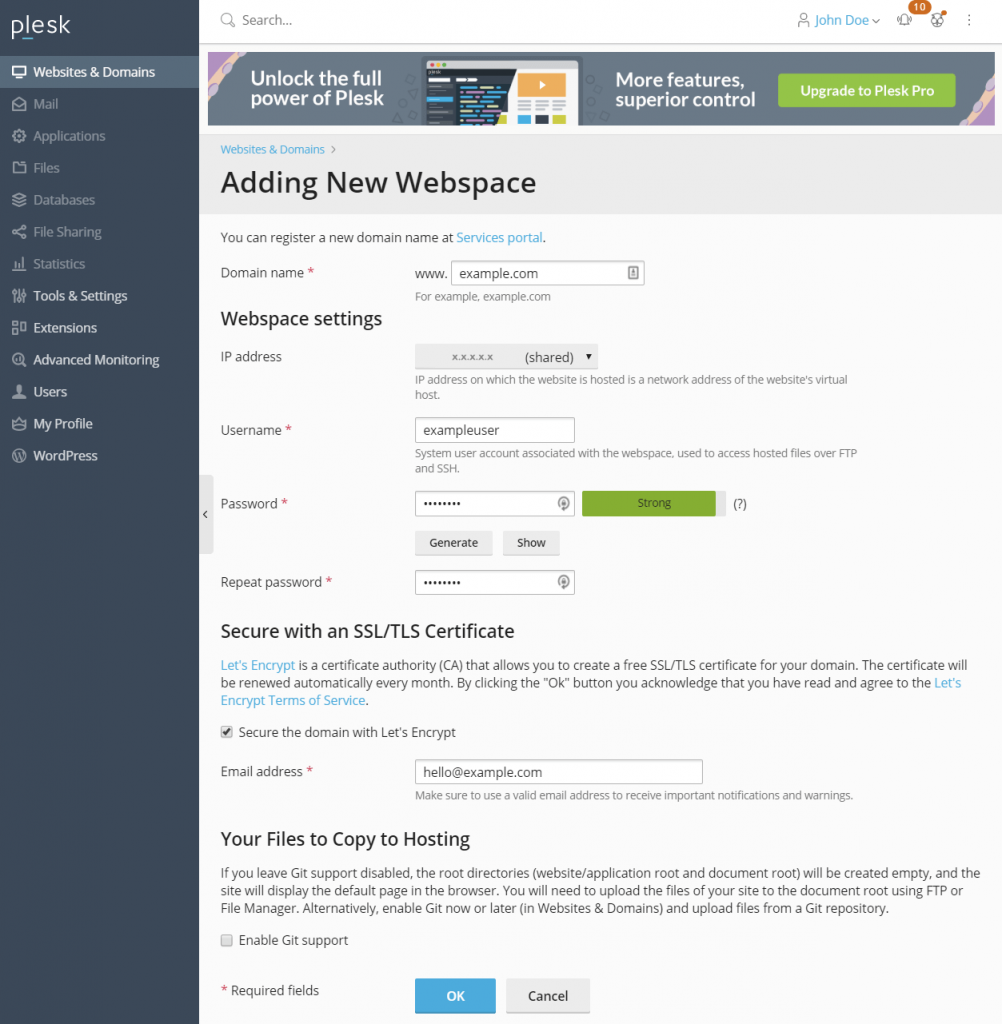
With this step, a webspace for the domain will be created on this new Digital Ocean Droplet running Plesk as Hosting Control Panel.
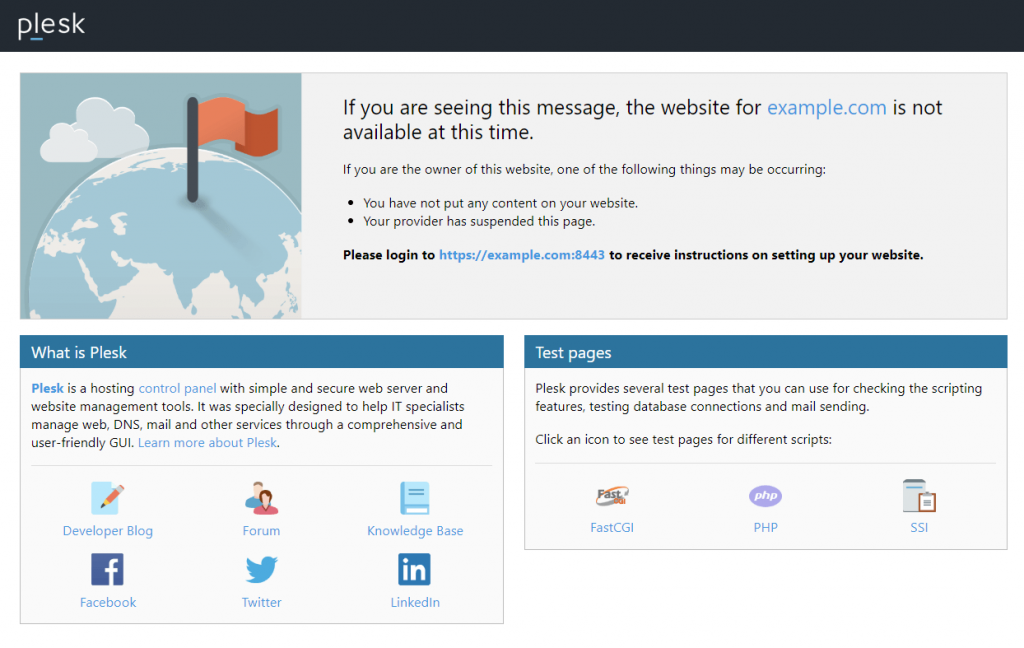
If you try to access the domain now, you will be able to see the default landing page. Once you see the page below, it means that your domain is pointing right to the server, and it is ready to be used. You can remove the default page using the FTP or Web-based editor from the domain root directory, and you could deploy your files there.
Managing features and settings for hosted Domains
After the successful addition of a domain to Plesk, you will be able to see the settings associated with it. Here is a screenshot of the control panel that shows the available options and controls for the domain.
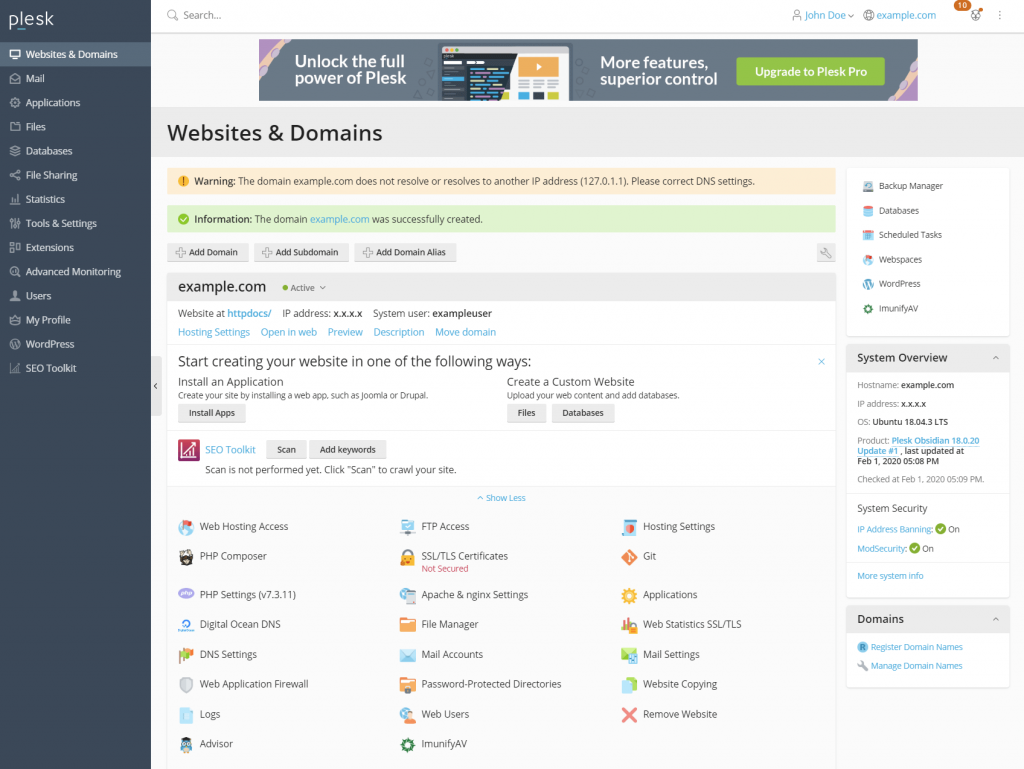
The commonly used features and settings as per the above screenshots includes
- File Manager.
- Database.
- Applications installer – WordPress, Joomla, etc.
- PHP Settings (Should be used to increase the upload size from default 2 MB to higher).
- Add Domain (for adding more domains).
- ImunifyAV tool- To keep track of Malware and security issues on the server. This feature is limited in the free version but will trigger a flag if there are issues.
- Logs- The real-time log gives you an instant update of every request. It’s an excellent tool for developers, which is not usually available in real-time if you’re using other hosting control panels.
- SSL/TLS Certificates- This area will let you install Free Let’s Encrypt SSL on the hosted domain. To make it work, you should be two A names created which point to the server IP (with and without www).
- Hosting Settings- Change the domain root folder, change the PHP version, suspend the domain, set forwarders, and more.
- DNS settings- This setting is not usually required when hosting your domains only by pointing the A name. But if you decide to point your nameserver to the Digital Ocean, then you can control your DNS settings from here.
Tools and Settings – Manage the Server and Plesk
When running a self-managed server, it is essential that we keep it up to date and secure. There are also other features and operations that are required regularly. Plesk has plenty of tools available for managing a web server.
Check out the Tools & Settings page for more information on Update, Security status, and the whole range of settings available. You can find detailed documentation about using Plesk here.
Installing WordPress on Plesk
Plesk comes with a powerful and super-rich WordPress toolkit. Probably the best in the industry if you have a pro version. In order to install WordPress on Plesk, click on WordPress on the left sidebar.
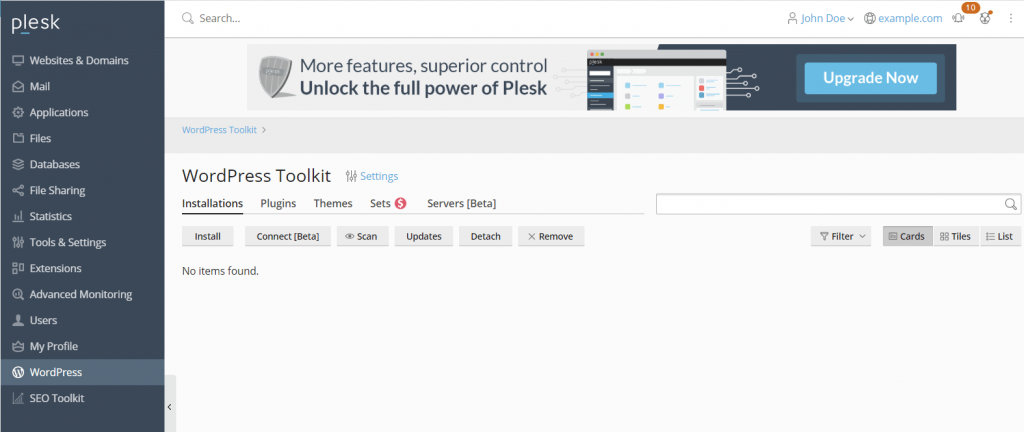
Then click on Install and fill the details on the next screen to complete the installation.
Resizing your Digital Ocean Droplet
We selected the basic Droplet while creating this Server. In order to scale it to a higher configuration, you need to go to your account area on the Digital Ocean.
- Click on Droplets on the left sidebar in the Manage section.
- Then click on the droplet you want to resize.
- Click on Power and then Press Turn Off and confirm the action.
- Go to Resize and select what you want for your server and Press the Resize button. Feel free to get in touch with us if you would like a recommendation on the droplet size for your website.
- Go back to the Power tab and Turn On the Droplet again after the resizing process is complete.
Summary
In this blog post, we’ve shown you how you can easily host your WordPress website on Digital Ocean with its fast and scalable hosting plan. With Digital Ocean’s hosting plan, you’ll be able run website that showcase powerful performance 99% of the time. However, if you still facing some issue and having difficulty to host your website, then you can reach us. Our professional web developer team at Elicus, would be happy to help you to set up your website, and establish online presence for your business.


Hello, Can you also write up an article on how to speed up the Divi websites because it will help the community?